Fly a Kite Gatefold Card
Spellbinders – Up and Away
Hello, crafty friends! Today, I’m excited to share a super fun project with you — the Fly a Kite Gatefold Card! This cheerful birthday card is packed with bold color, and a little bit of magic, thanks to the adorable Up & Away etched dies by Simon Hurley for Spellbinders. I love how the gatefold design adds an extra surprise when the card is opened, making it perfect for birthdays or any happy occasion.

The Up and Away die set from Simon Hurley’s Sky’s the Limit Collection by Spellbinders are a delightful addition to any papercrafter’s toolkit. This 19-piece die set allows you to create charming scenes featuring children flying kites, complete with customizable hairstyles, outfits, and accessories like a propeller cap. This collection also includes coordinating sentiment press plates, an additional kite die set, and an embossing folder with a matching layering stencil.
You can shop the entire Sky’s the Limit Collection here.
Whether you’re creating for birthdays, springtime celebrations, or simply to brighten someone’s day, these versatile dies offer endless creative possibilities. They’re compatible with most leading die-cutting machines, making them perfect for cardmaking, scrapbooking, and beyond.
Now, let’s jump into the details of how this fun card came together!
Link Abbreviations
- SB – Spellbinders*
- Sb.com – Scrapbook.com*
- SSS – Simon Says Stamp
- AMZ – Amazon*
- BA – Blick Art Materials*
Disclosure: I received this product for free to try out and share my honest thoughts with you. This post also includes affiliate links*—if you decide to shop through them, I may earn a small commission (at no extra cost to you). Money earned via affiliate links helps pay the fees to keep this blog up and running. Thanks so much for supporting GroveCrafted and helping me keep the crafty inspiration coming!
Supplies Used
- Spellbinders Cutting Dies – Up and Away #S4-1433 | SB | Sb.com | AMZ |
- Spellbinders Cutting Dies – Essential Hexi-Gems #S5-588 | SB | Sb.com | AMZ |
- Spellbinders Cutting Dies – Tunnel Clouds #S6-233 | SB | Sb.com |
- Spellbinders Cutting Dies – Percision Layering A2 B #S5-494 | SB | Sb.com |
- Spellbinders BetterPress Plate – Let’s Celebrate Sentiments #BP-123 | SB | Sb.com | AMZ |
- Altenew 3D Embossing Folder – Cloudy Day # | Sb.com |
- Spellbinder Essentials Cardstock – Sunkissed #CS-057 | AMZ |
- Spellbinder Essentials Cardstock – Raindrop #CS-019 | AMZ |
- Spellbinders ColorWheel Cardstock
- BetterPress Ink – Cosmic Sky #BPI-003 | SB | Sb.com |
- Sakura Micron Pen 05 – Blue | BA |
- Sakura Micron Pen 03 – Black | BA |
- Alcohol Marker – Skin Tone
Tools Used
- Spellbinders Platinum Six | SB | Sb.com |
- Spellbinders BetterPress Letterpress System | SB | Sb.com | AMZ |
- Tim Holtz Paper Trimmer | Sb.com | AMZ |
- EK Scoring Board | AMZ | SSS |
- Bearly Art Glue | SB | Sb.com | AMZ |
- Spray Bottle with water | SB | Sb.com |
- Die Pick
- Bone Folder | SSS |
- Archival Ink Cleaner | SB | Sb.com |
- Microfiber Cloth | SSS |
- Foam Squares – White | SSS |
- Best Ever Craft Tape – ¼ in | SB | Sb.com |
- Magic Black Eraser | BA | AMZ |
- Pencil & Ruler
Making the Gatefold Card
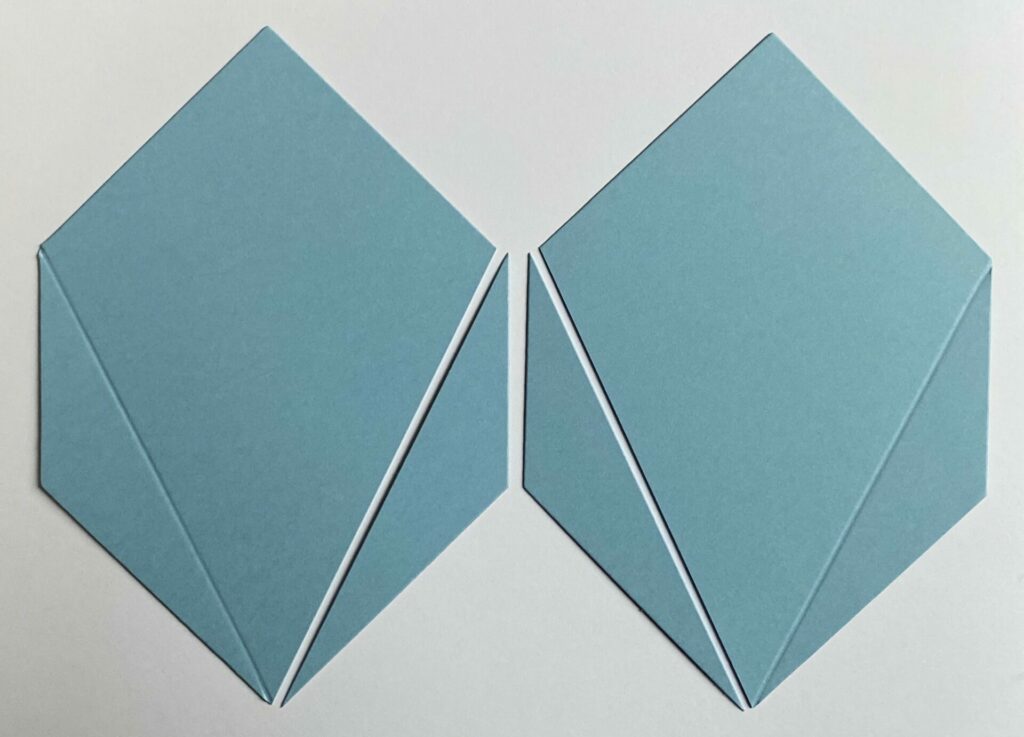
I started by making an A2 top-folding card base using raindrop essentials cardstock from Spellbinders. For the gatefold panels, I die-cut two shapes with the largest hexi-gem die, also from raindrop cardstock. To create the kite shapes, I scored one side of each hexi-gem and trimmed the opposite side. (You can see exactly how I shaped them in the photo below!)
Next, I glued the scored kite flaps to the inside of the card base, carefully aligning one along the top left edge and the other along the bottom right edge. Making sure the folds lined up neatly with the card base helped everything open and close smoothly. (You can see the exact placement in the photo below!)
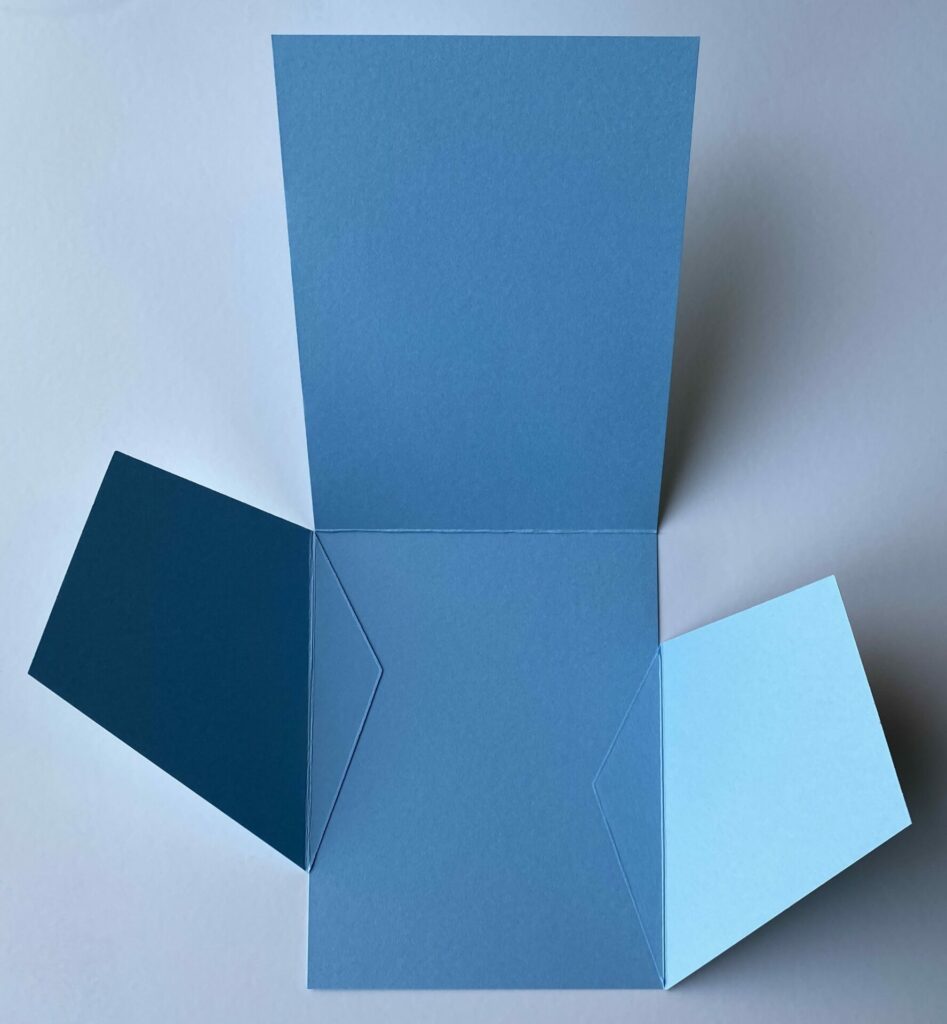
With the gatefold card base ready, it was time to start building the large kites for the card front.

Creating the Kite Flying Scene
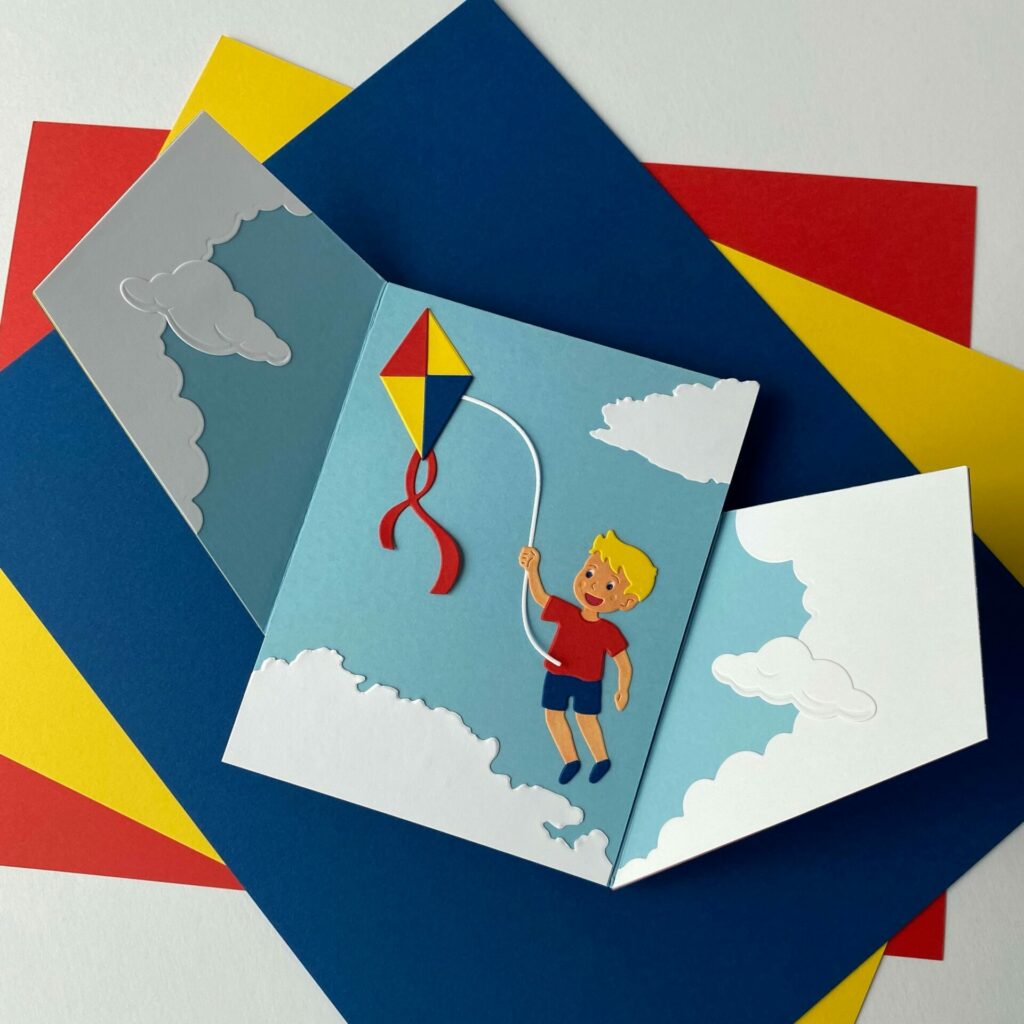
To bring the kite flying scene to life, I used the Up & Away die set by Simon Hurley for Spellbinders. I started by die-cutting all the pieces from different colors of cardstock:
- Poppy Red – shirt, top right kite piece, and kite tail
- Sunkissed Yellow – hair and the full kite shape
- Cosmic Sky Blue – shoes, shorts, and bottom right quarter of the kite
- White – body, head, kite string, plus the backer pieces for the mouth and eyes
Next, I colored the head and body pieces with a skin tone alcohol marker to give them a bit more life. For the tiny mouth and eye backers, I used a red marker for the mouth and blue and black Micron pens to detail the eyes.
Once everything was colored, I assembled all the die-cuts with glue and arranged the pieces on the card to create the playful flying scene.
Adding the Clouds
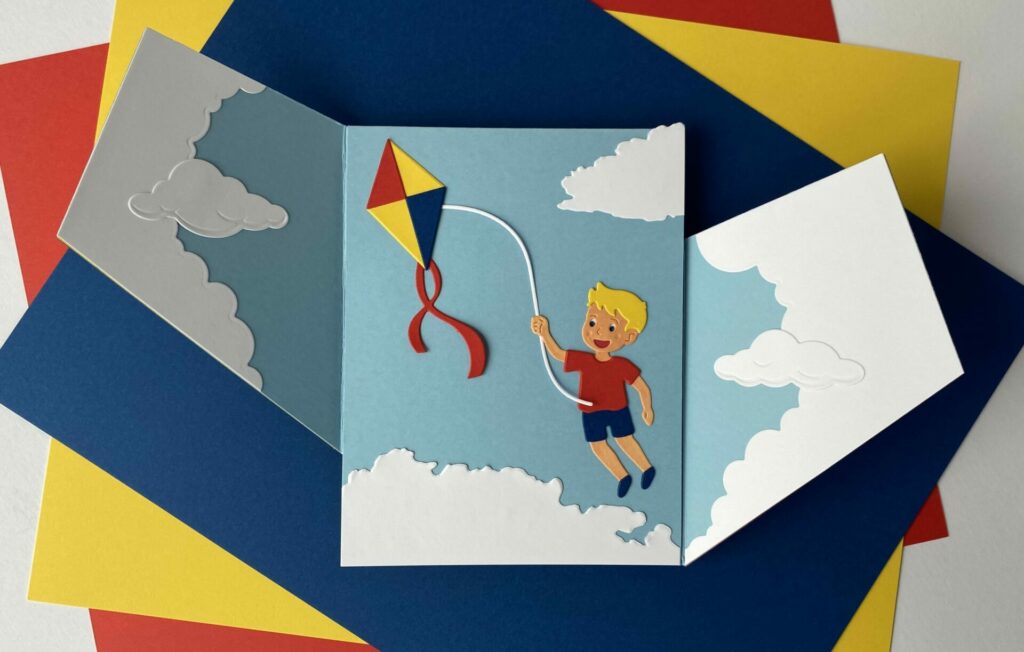
At this point, the scene looked cute, but it felt a little empty — it needed something extra! Since I didn’t have any cloud dies on hand, I got creative: I used the Cloudy Day 3D embossing folder from Altenew, embossed some white cardstock, and then fussy cut out a few fluffy clouds. (It definitely could use even more clouds — I’ve already ordered some cloud dies and plan to add them once they arrive!)
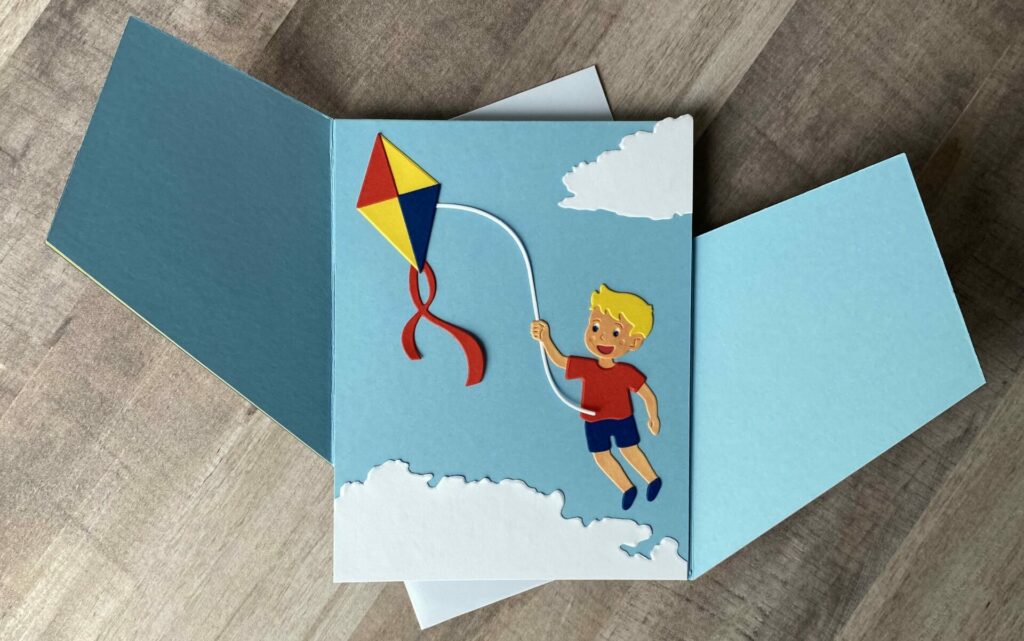
The cloud dies have arrived — and I couldn’t wait to use them! I started by die-cutting two shapes from white cardstock using the largest Hexi-Gem die and trimmed them into kite shapes. Then, I used the medium Tunnel Cloud die to cut into those kite shapes, creating a dreamy layered look. I adhered them to the inside flaps of the card. For added dimension, I also die-cut the smaller clouds from white cardstock and glued the two larger ones onto each flap — one on the left and one on the right.
I also think adding a Soaring Sentiment from the same collection would be a perfect finishing touch — maybe on one of the inside flaps, floating over the clouds for a little extra whimsy.
Constructing the Kites
For this part, I’ll refer to the kite on the front right as “Kite A” and the one behind it to the left as “Kite B”.
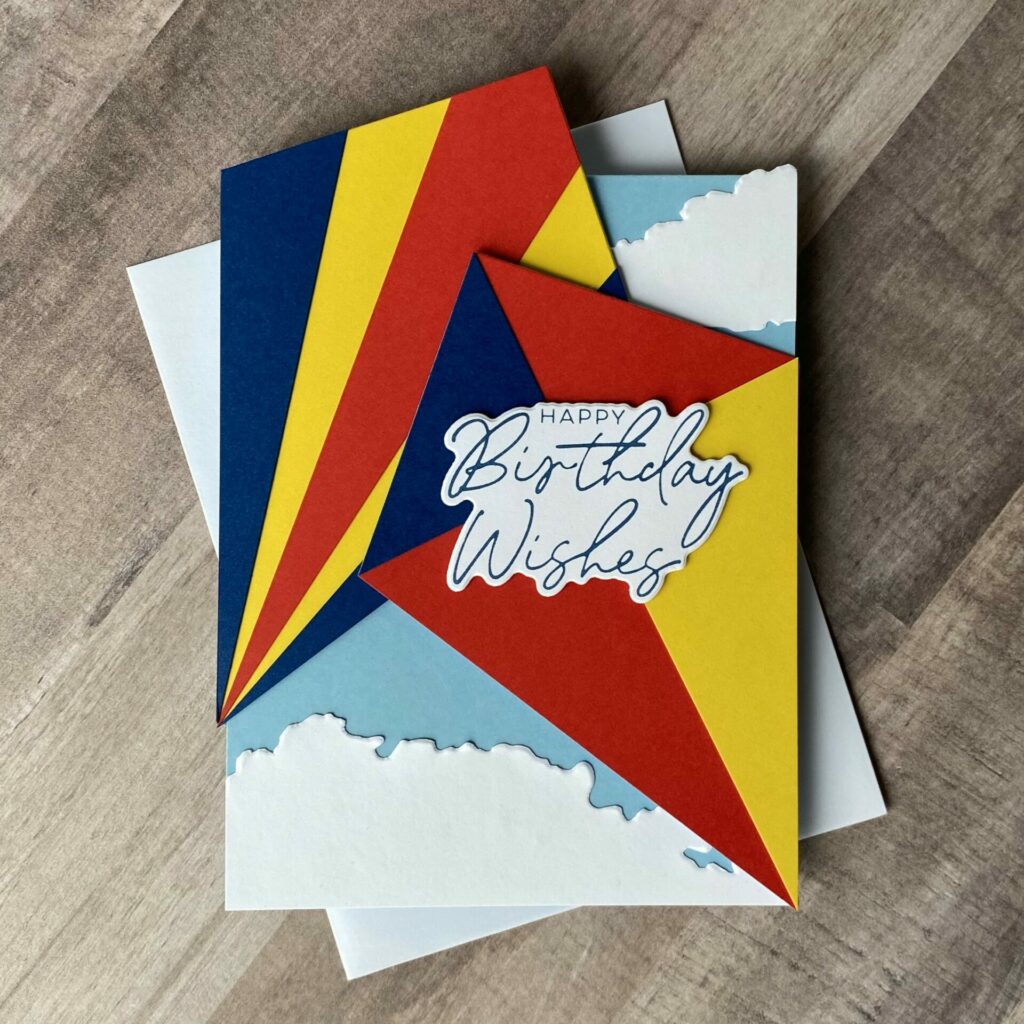
Kite A
To create Kite A, I die-cut three shapes using the largest Hexi-Gem die — one each from Poppy Red, Sunkissed Yellow, and Cosmic Sky Blue cardstock.
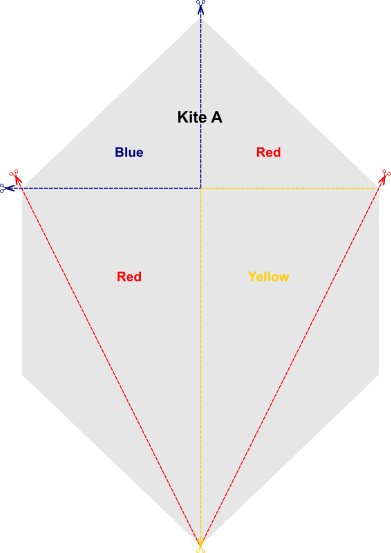
I trimmed each die-cut down into a kite shape, keeping the red kite whole to serve as the base layer. Then, I cut the blue and yellow kites into quarters, like a traditional four-section kite. I glued the blue top left quarter and the yellow bottom right quarter onto the red base, creating a colorful and playful kite design.
Kite B
For Kite B, I also die-cut three shapes with the largest Hexi-Gem die from the same three cardstock colors. This time, I trimmed only the blue piece into a full kite shape.
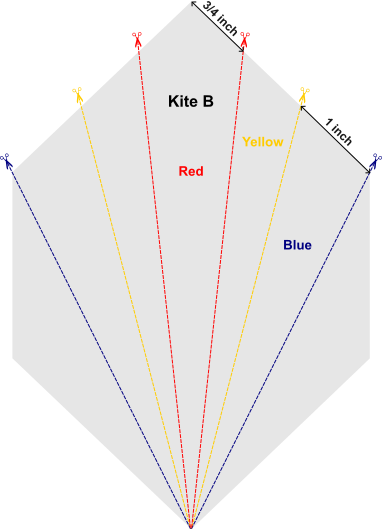
Then, instead of quartering the red and yellow pieces, I trimmed them along their natural angles to create narrower stripes. (I’ll include the specific cut measurements above for those who want to follow exactly.) These angled stripes give Kite B a bold, soaring look across the card front.
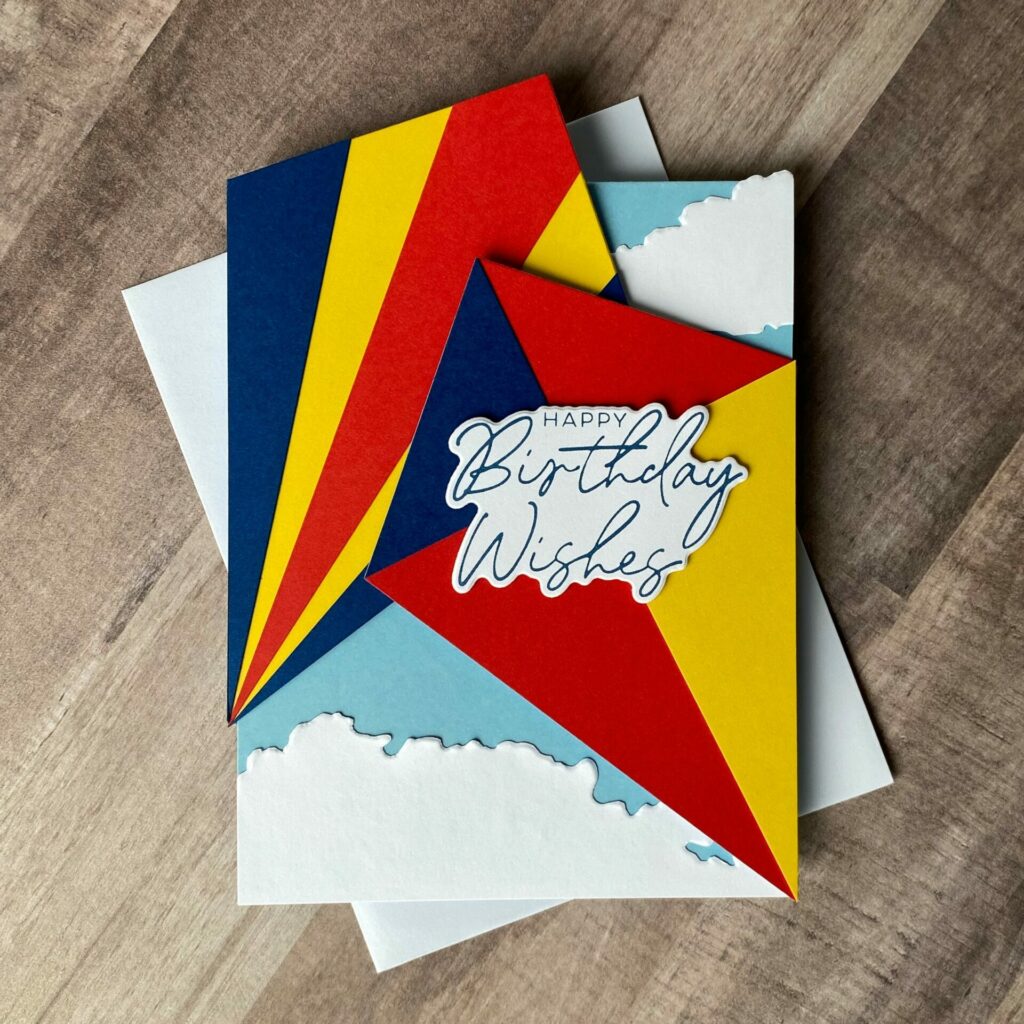
Finishing the Card Front
To finish assembling the card front, I adhered Kite A onto the right gatefold flap and Kite B onto the left flap, making sure the points aligned neatly at the center when the card is closed.
For the sentiment, I used the Happy Birthday Wishes BetterPress plate from the Let’s Celebrate Sentiments set by Spellbinders. I pressed it with cosmic sky BetterPress ink onto white cardstock, then die-cut it using the coordinating die. To add a little dimension, I attached the sentiment to the center of Kite A with foam squares.
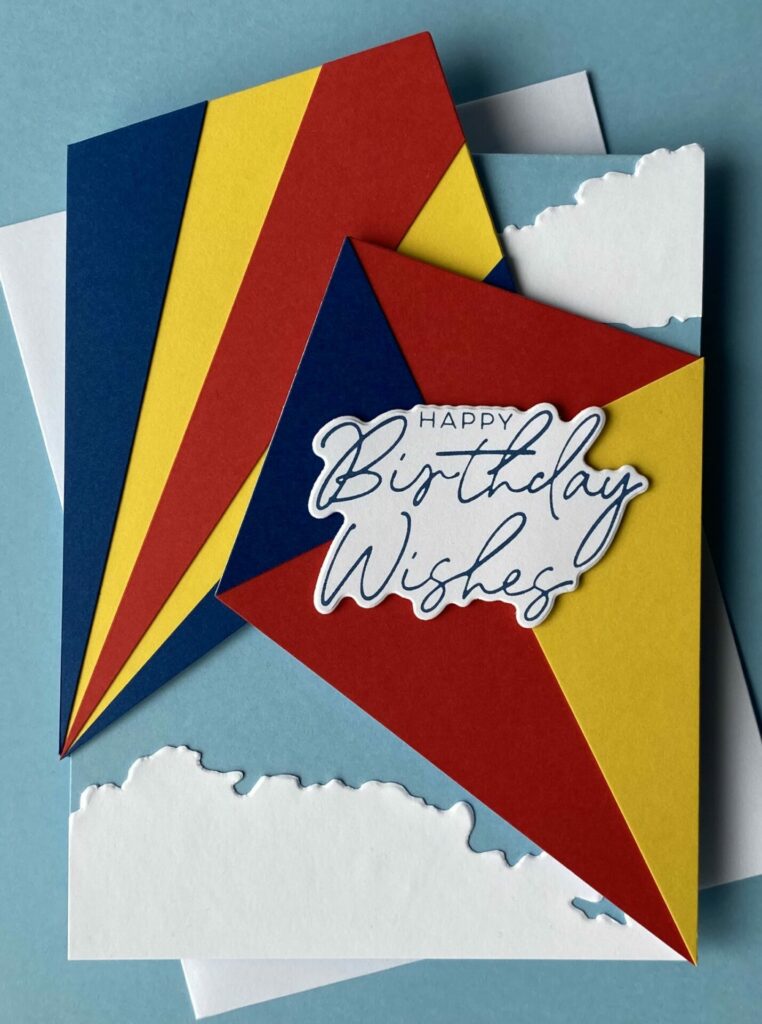
The bright kites and layered clouds give this birthday card such a fun, cheerful energy — perfect for making someone’s special day feel even more festive!
Stamping the Inside
To complete the card, I die-cut a white panel using the largest die from the Spellbinders Percision Layering A2 B die set, which provides a perfectly sized layer for an A2 card. I stamped a sentiment in blue ink onto this panel and adhered it to the inside of the card with glue, adding a heartfelt message to complement the cheerful front design.
Your Turn to Fly!
And that’s how I created this bright and cheerful Fly a Kite gatefold birthday card! I love how the colorful kites and layered clouds come together to make such a fun, uplifting scene. This design could easily be adapted for other occasions too — just swap out the sentiment or colors to fit your celebration. I hope this tutorial inspired you to try building your own kite-themed cards! If you do, I’d love to see what you create — be sure to tag me (@silversgrove or @grovecrafted) over on Instagram! Until next time, happy crafting!
If you had fun creating this Fly a Kite Gatefold Card, you’ll definitely want to check out my Dino-Mite Smiles Card tutorial too!
Looking for more ideas? Check out these adorable Card Tutorials perfect for kids!