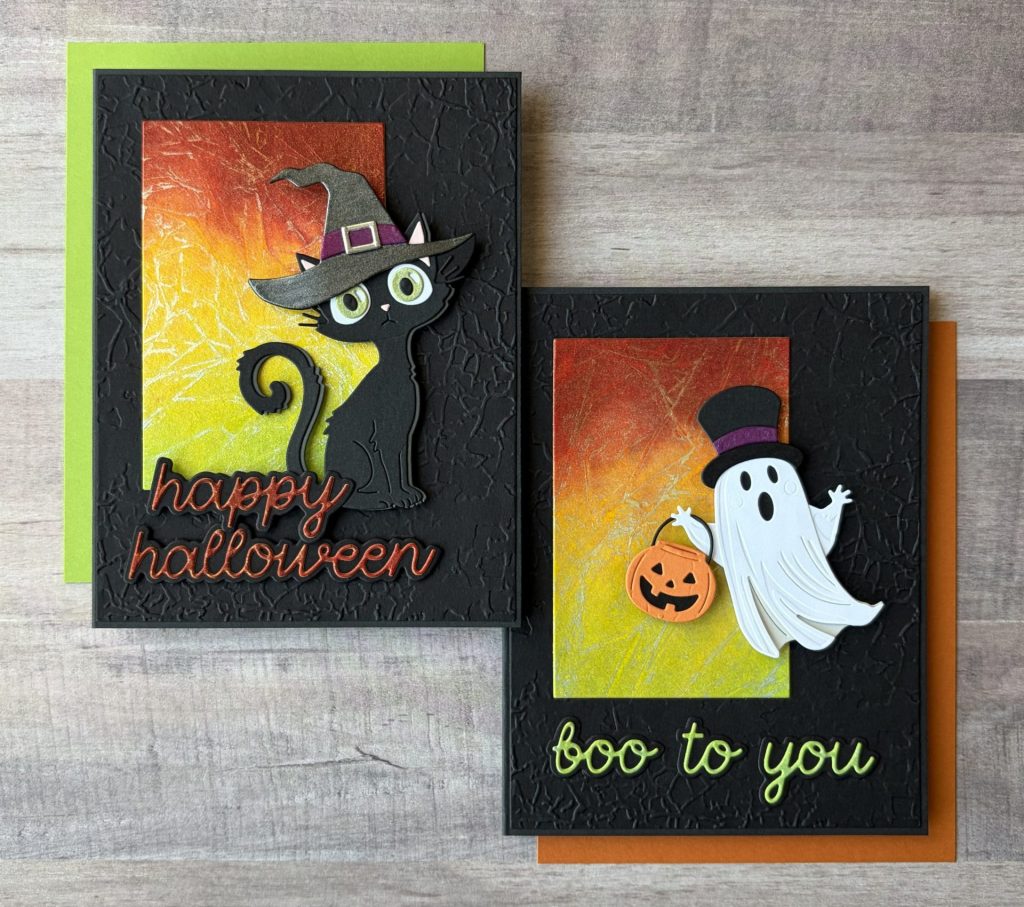
Spooktacular Halloween Cards
Spellbinders – Spooktacular Collection by Simon Hurley
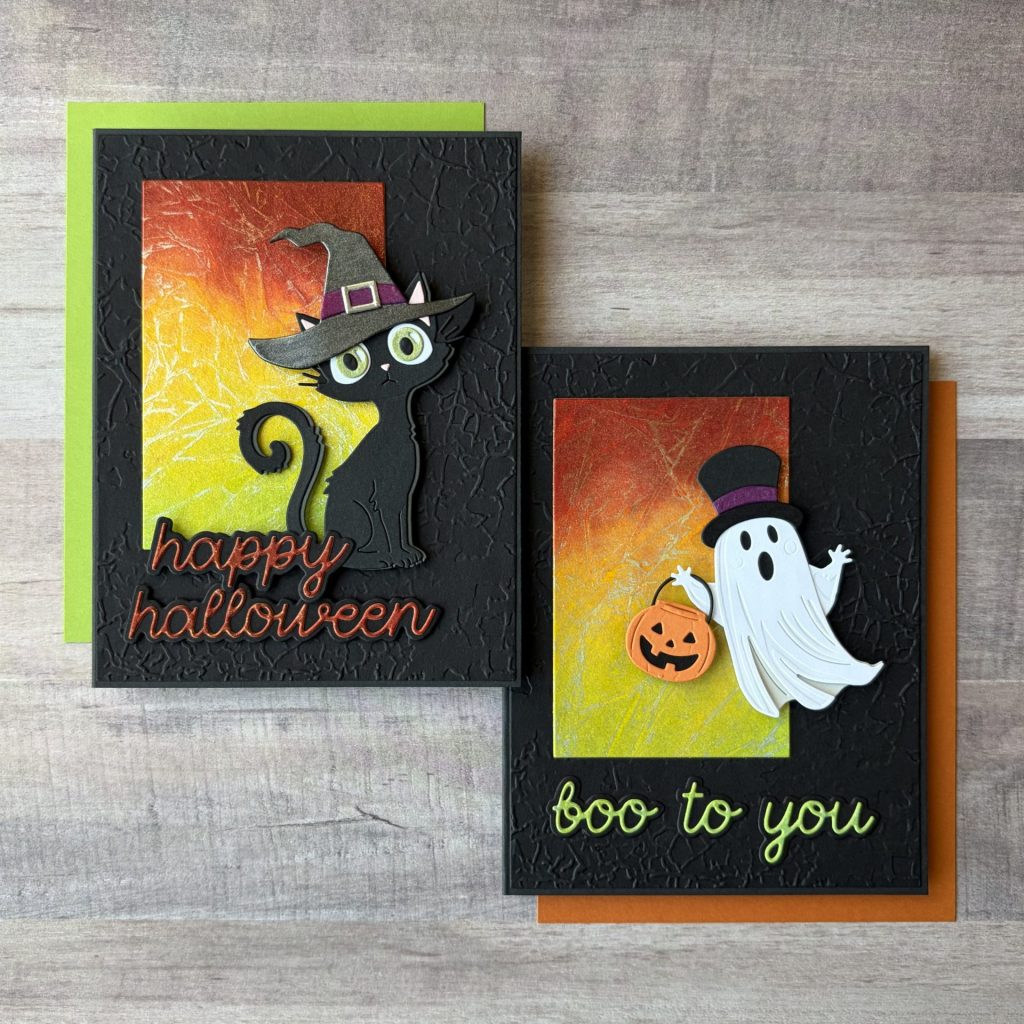
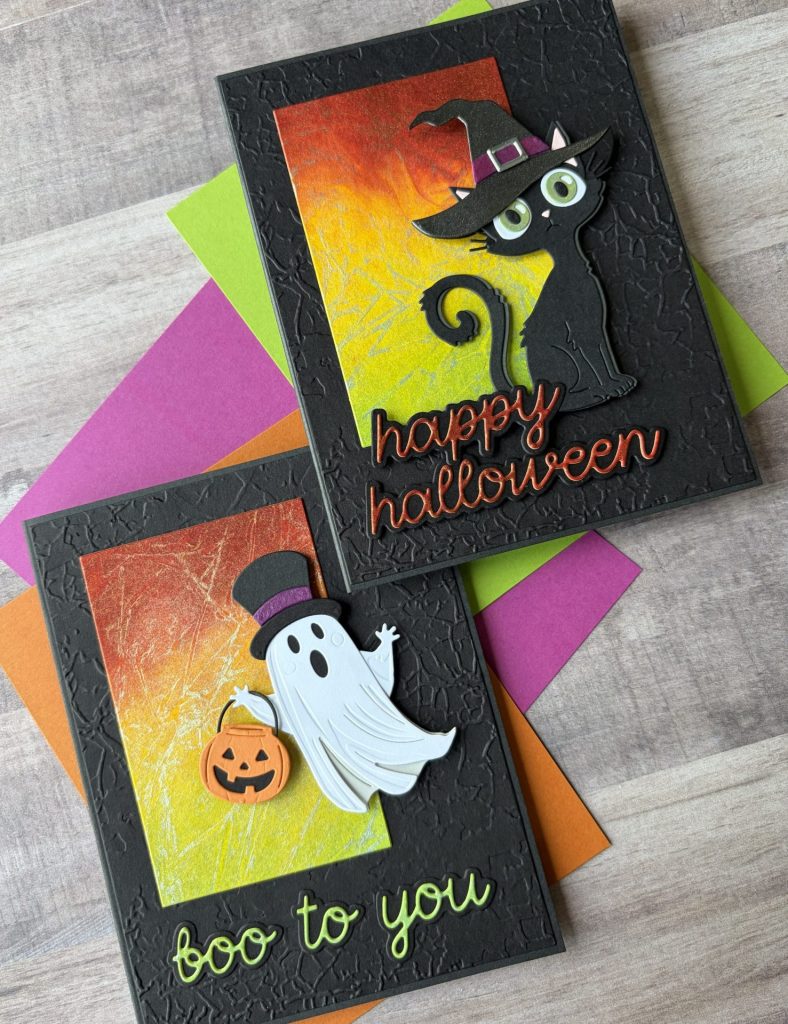
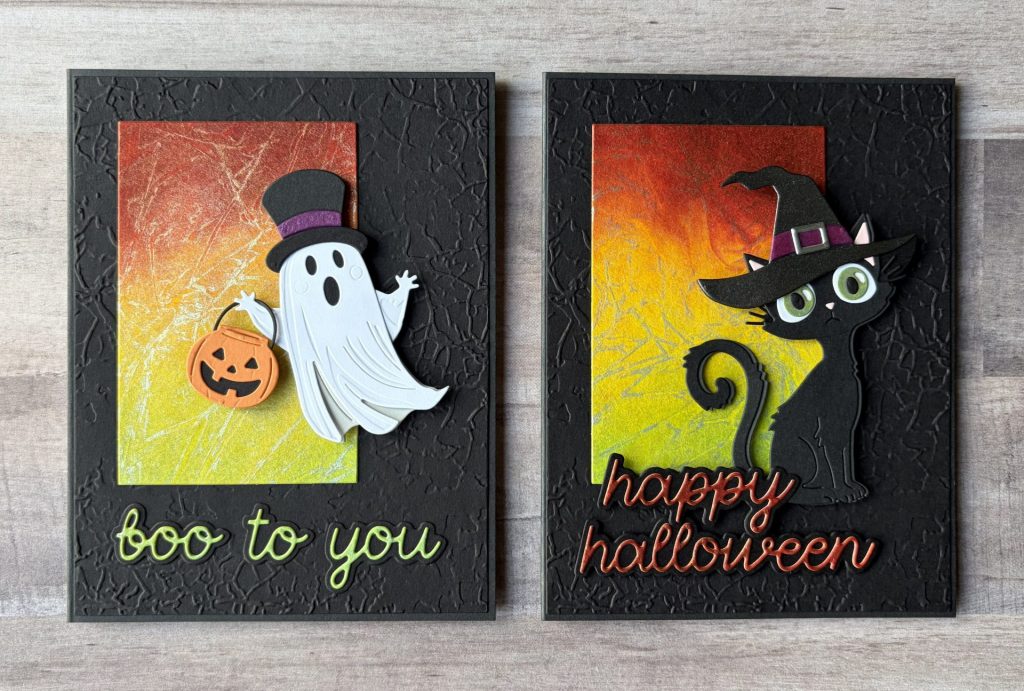
Hello crafty friends! Halloween crafting is in full swing, and I couldn’t resist diving into the Spooktacular Collection by Simon Hurley for Spellbinders! This charming new release is full of playful Halloween vibes, more sweet than spooky. Today I’m sharing two cards featuring the Bewitched and Boo Crew die sets, paired with a textured background and a fun crackle inking technique that really makes the cards shine.
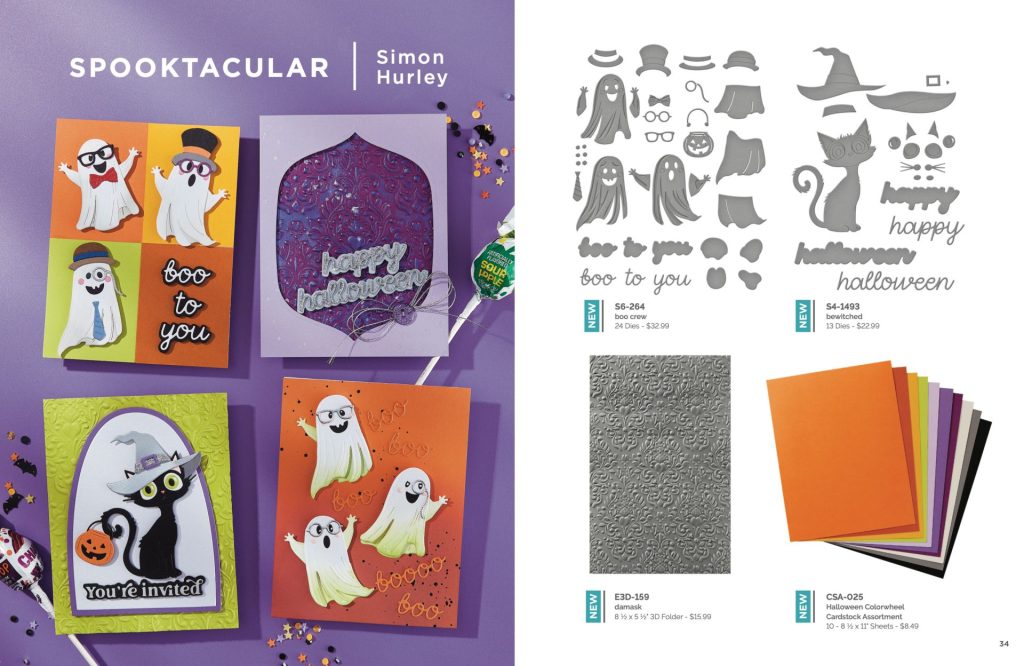
The Spooktacular Collection
The Spooktacular Collection by Simon Hurley for Spellbinders captures Halloween with charm and whimsy rather than fright. It features sets like Boo Crew, which lets you layer playful ghosts with fun accessories, and Bewitched, a die set that crafts an adorable black cat donning a witch’s hat—complete with a layered “Happy Halloween” sentiment. The collection is rounded out by a richly detailed Damask 3D embossing folder, offering a gothic-elegant background that complements the cute characters. Together, they strike a delightful balance of spooky and sweet, perfect for festive cards, tags, and other fall paper crafts.
Shop the full Spooktacular Collection here.
Disclosure
This post includes affiliate links—if you decide to shop through them, I may earn a small commission (at no extra cost to you). Money earned via affiliate links helps pay the fees to keep this blog up and running. Thanks so much for supporting GroveCrafted and helping me keep the crafty inspiration coming!
Crackle Ink Technique
Tips for Inking
Before we dive in, here are a few quick tips to help you get the best results:
- Shake those mica stains really well! This keeps the mica and ink evenly mixed and prevents the spray nozzle from clogging.
- Work on a glass mat surface — the plastic wrap clings perfectly to it, keeping your paper securely in place and helping it dry nice and flat.
- Use regular plastic wrap (cling wrap) — not Press’n Seal. It won’t give the same results!
- The more crinkles and folds in your plastic wrap, the more beautiful mica lines and texture you’ll get.
For this technique you’ll want to work on a glass mat surface. Any glass mat will do but my personal favorite is the magnetic glass craft mat from Glassboard Studio. The glass surface is so silky-smooth and easy to clean, no lingering stains or ghosting, even after messy paint or ink sessions. And the magnetic backing? Genius. It keeps my stencils and papers exactly where I want them.
If you would like to add this handy tool to your craft room enter code SYLVIA at checkout to save 15% OFF your entire order!
Supplies Used
- Canson Watercolor Paper – Cold Press 140lb | BA | AMZ |
- Distress Spray Stain:
- Glass Mat | Gassboard | Sb.com | AMZ |
- Mighty Mister | SB | Sb.com |
- Plastic Wrap
- Paper Towel
Now, let’s jump into the crackle ink technique tutorial and start creating some shimmering, spooky magic!
Step-by-Step Crackle Ink Technique
- Prep your paper
Cut a piece of watercolor paper to the size you need for your project, leaving a little extra if you plan to die cut later. - Set up your workspace
Lay a paper towel on your glass mat, then place your watercolor paper on top. - Shake and spray
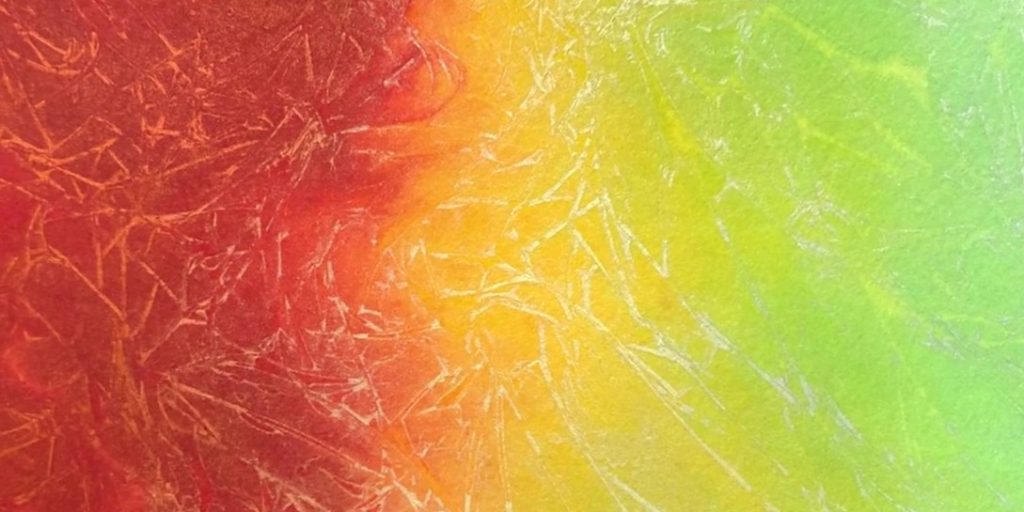
Give your Distress Mica Stains a good shake to mix all that gorgeous shimmer. Lightly mist your paper with water to help the inks blend. - Add color
- Spray Burning Ember at the top,
- Harvest Moon in the middle,
- and Wicked Elixir at the bottom.
Let the colors overlap slightly for a smooth transition.
- Remove the paper towel
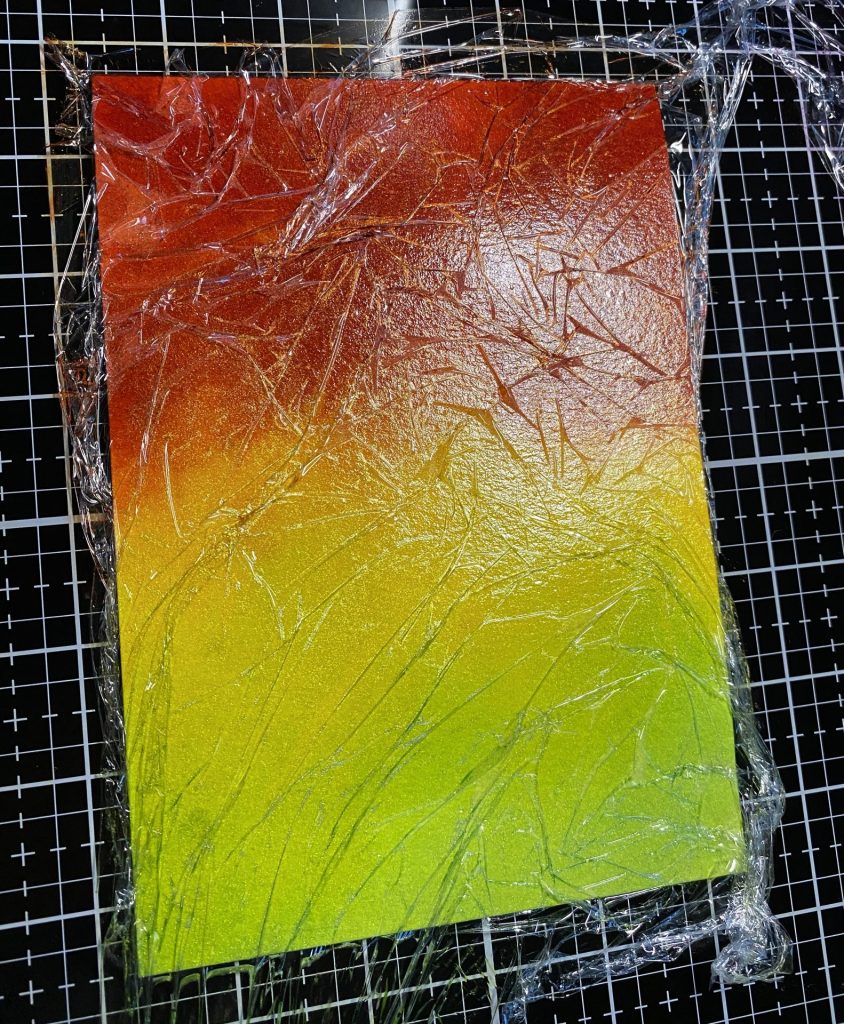
Carefully lift it away and place your watercolor paper directly onto the glass mat (inked side up). - Add the magic
Tear off a piece of plastic wrap larger than your paper and mist it with water. Lay the wet side down over your inked paper. - Create texture
Use your fingers to crinkle and press the plastic wrap until you’re happy with the pattern.
- Let it dry completely
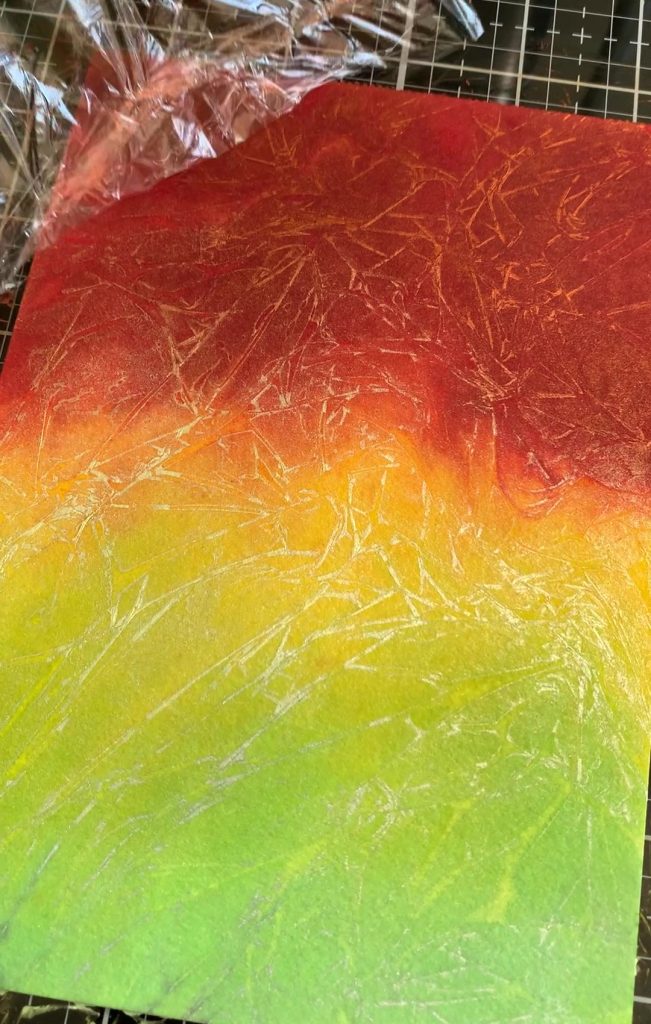
Set it aside to dry overnight. - Reveal the results
Peel off the plastic wrap to uncover the shimmery crackle effect.
Want to see this technique in action? Check out my Instagram Reel for a quick video demo!
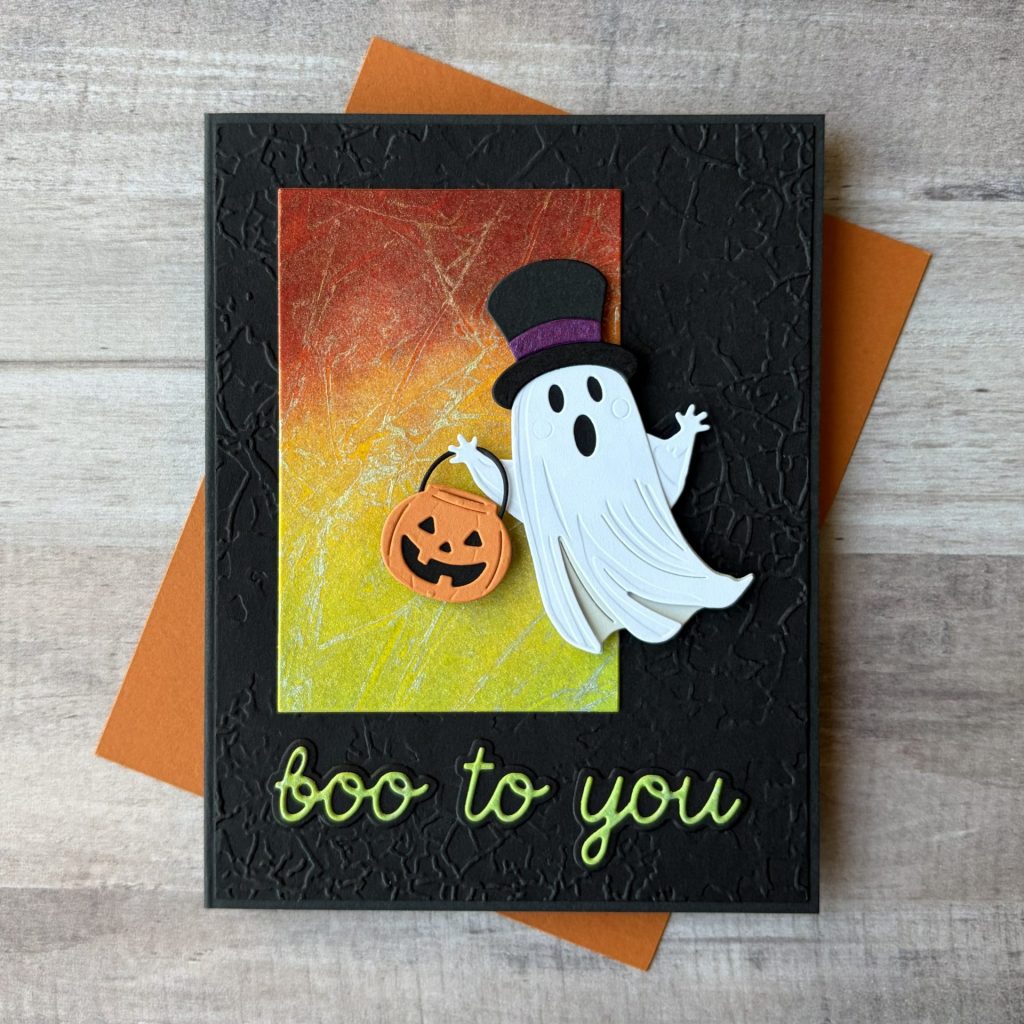
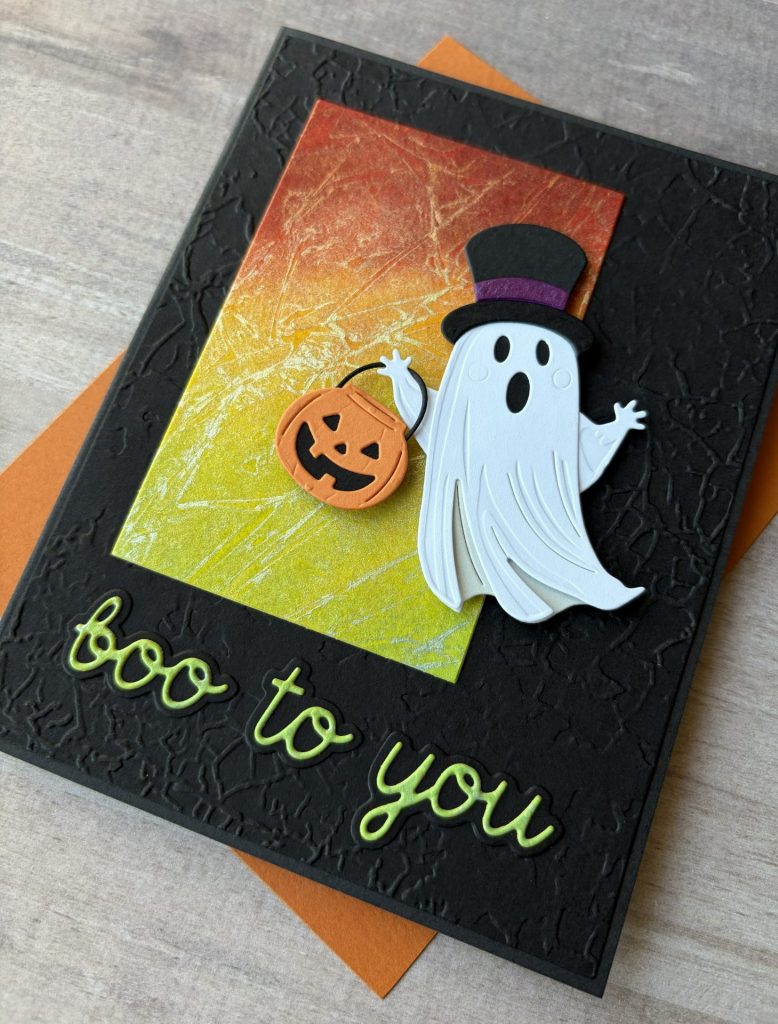
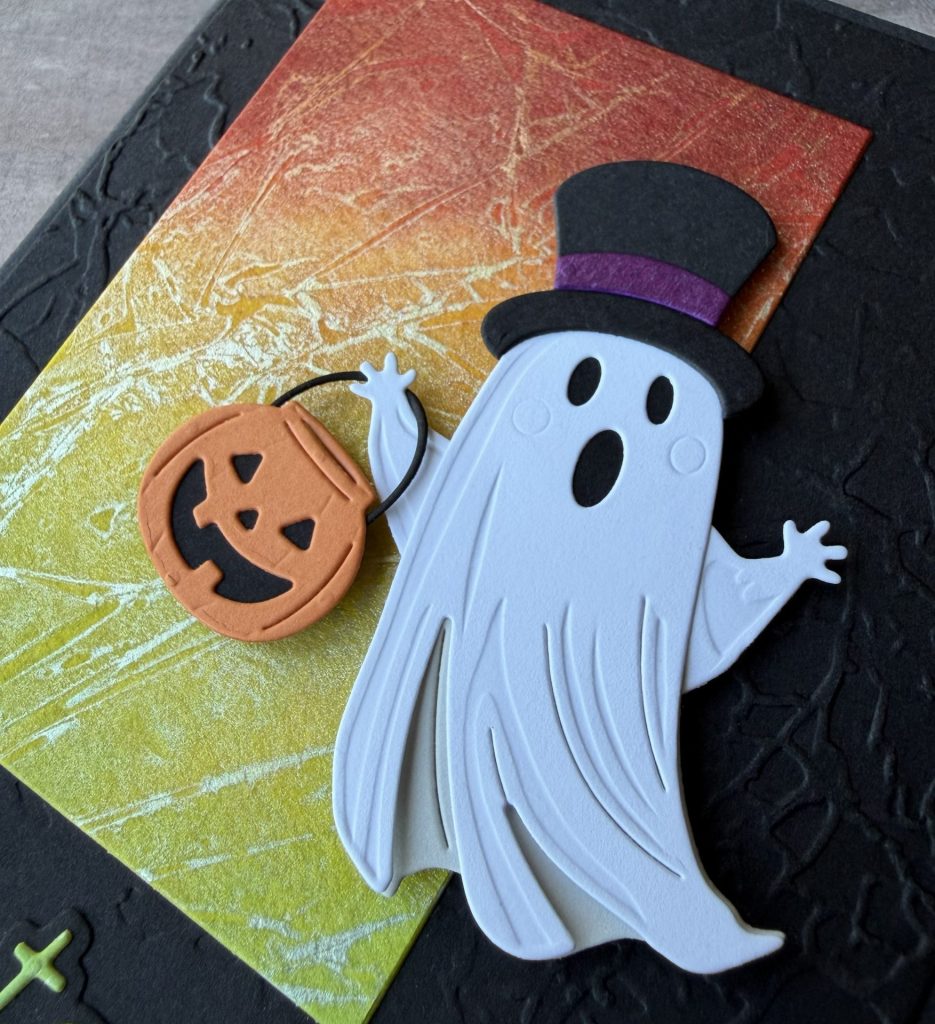
Spooktacular Halloween Cards
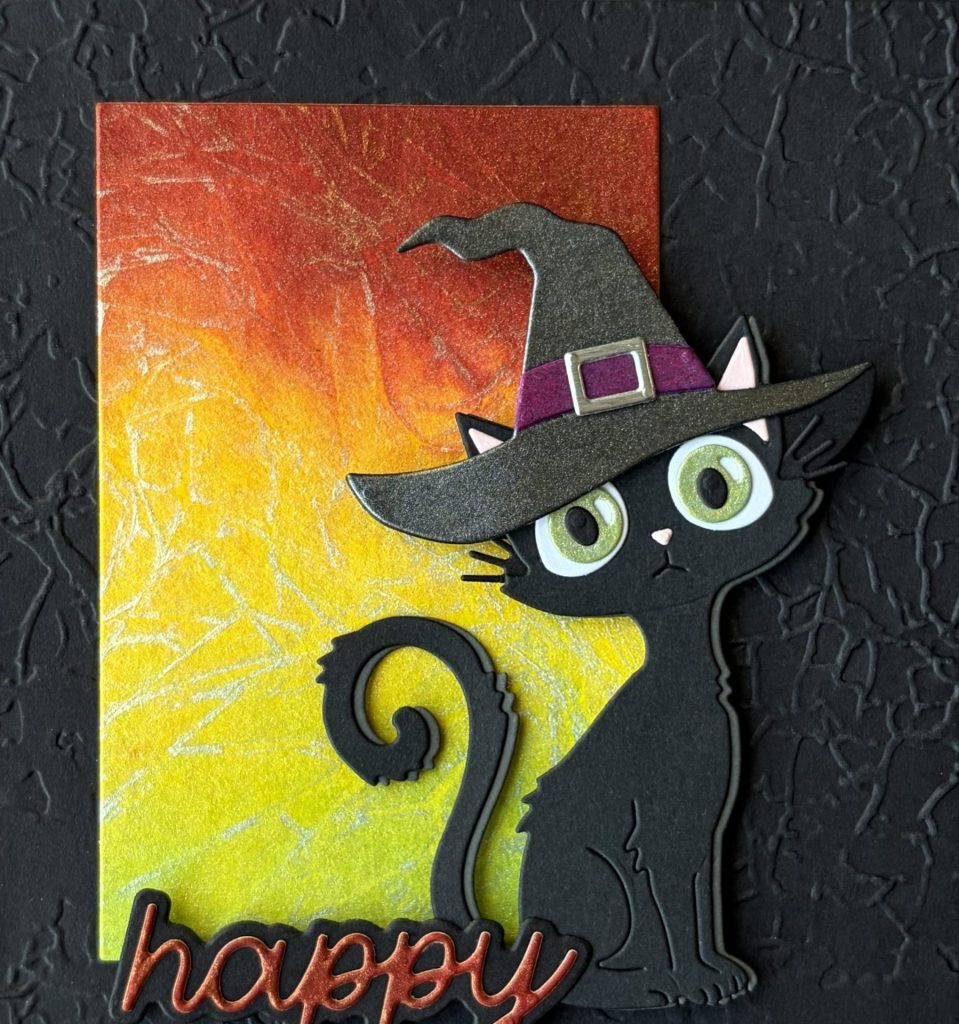
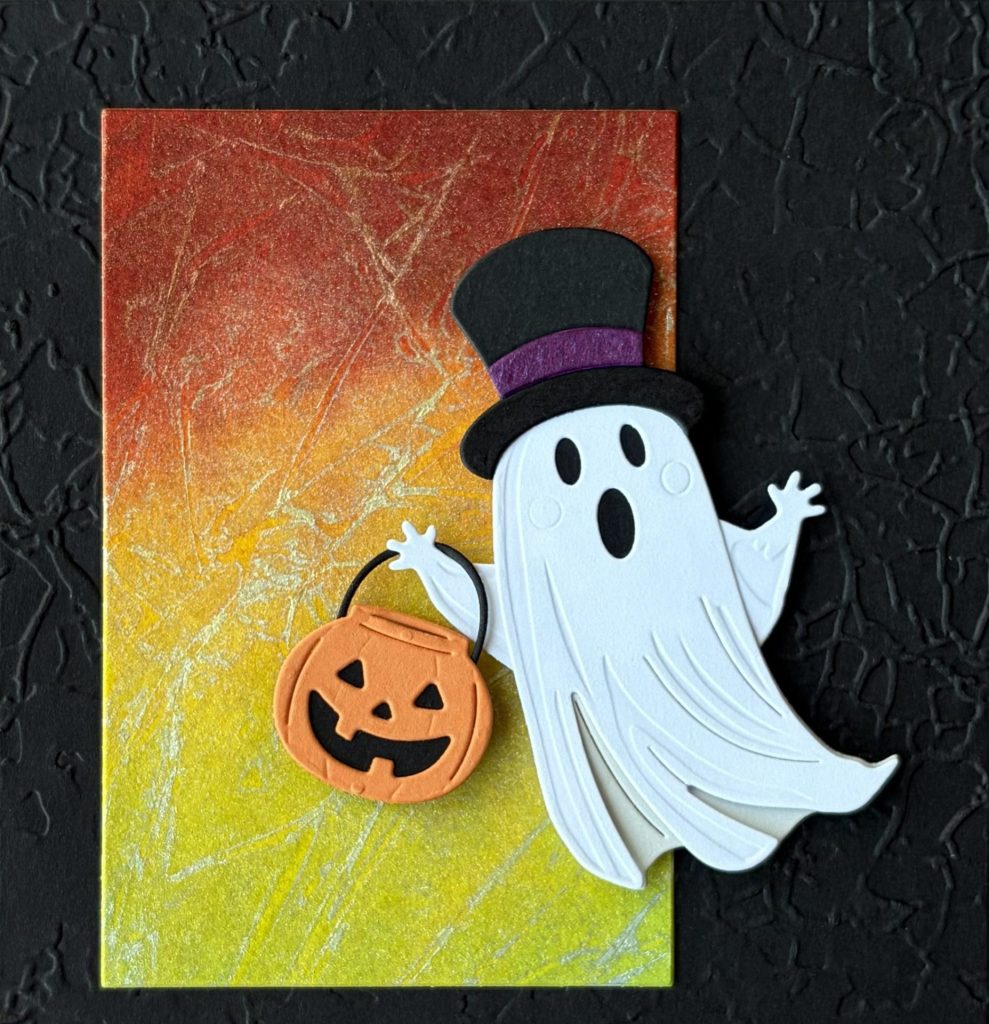
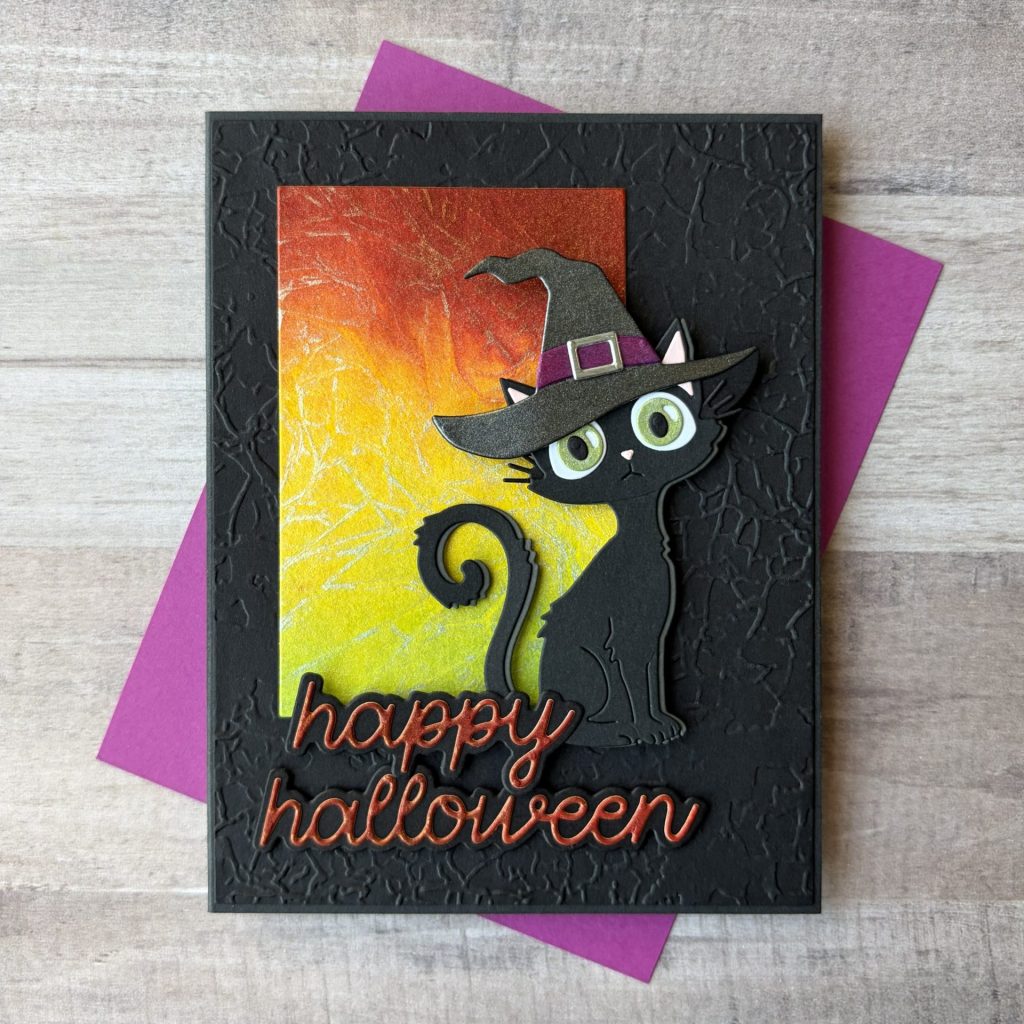
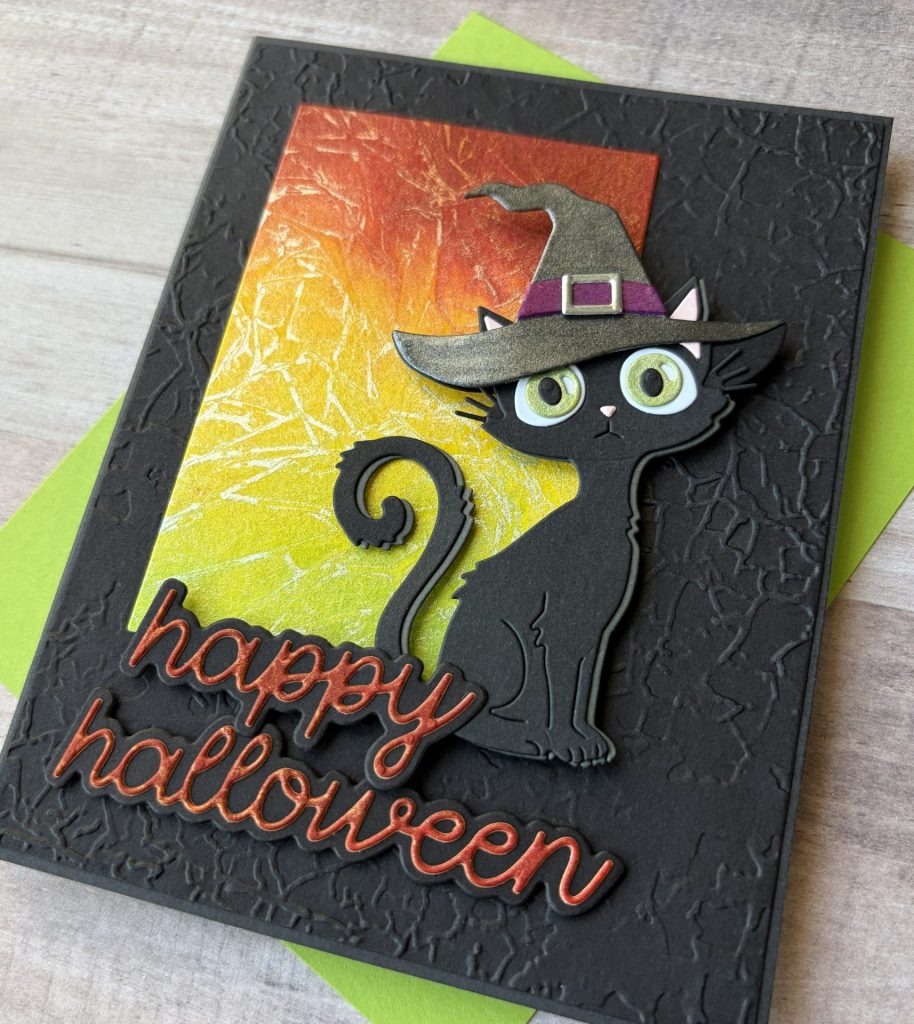
These two handmade Halloween cards showcase the playful charm of the Spooktacular Collection. Featuring the Bewitched and Boo Crew die sets, each card brings a different kind of Halloween magic to life. One with a mischievous black cat in her witchy hat, and the other with an adorable ghost ready for trick-or-treating fun. Paired with the shimmery crackle ink backgrounds and embossed textures, these designs capture the perfect balance of spooky and sweet, making them a delightful addition to your Halloween card lineup.
Supplies Used
- Spellbinders Cutting Dies – Bewitched #S4-1493 | SB | Sb.com |
- Spellbinders Cutting Dies – Boo Crew #S6-264 | SB | Sb.com |
- Spellbinders 3D Embossing Folder – Crackle Paint #E3D-156 | SB | Sb.com |
- Spellbinders Cutting Dies – Percision Layering A2 B #S5-494 | SB | Sb.com |
- Spellbinders ColorWheel Cardstock:
- Spellbinders Essentials Cardstock –Graphite
- Spellbinders Treasured Cardstock – Silver #SCSP-002 | SB | Sb.com |
- Distress Mica Stain:
- Crinkle Inked Panel
Tools Used
- Spellbinders Platinum Six | SB | Sb.com |
- Tim Holtz Paper Trimmer | Sb.com | AMZ |
- EK Scoring Board | AMZ |
- Bearly Art Glue | SB | Sb.com |
- SSS Embellishment Wand | SSS |
- Foam Squares – Black | SSS |
Card Instructions
Here’s how to make your own version of these Spooktacular Halloween Cards.
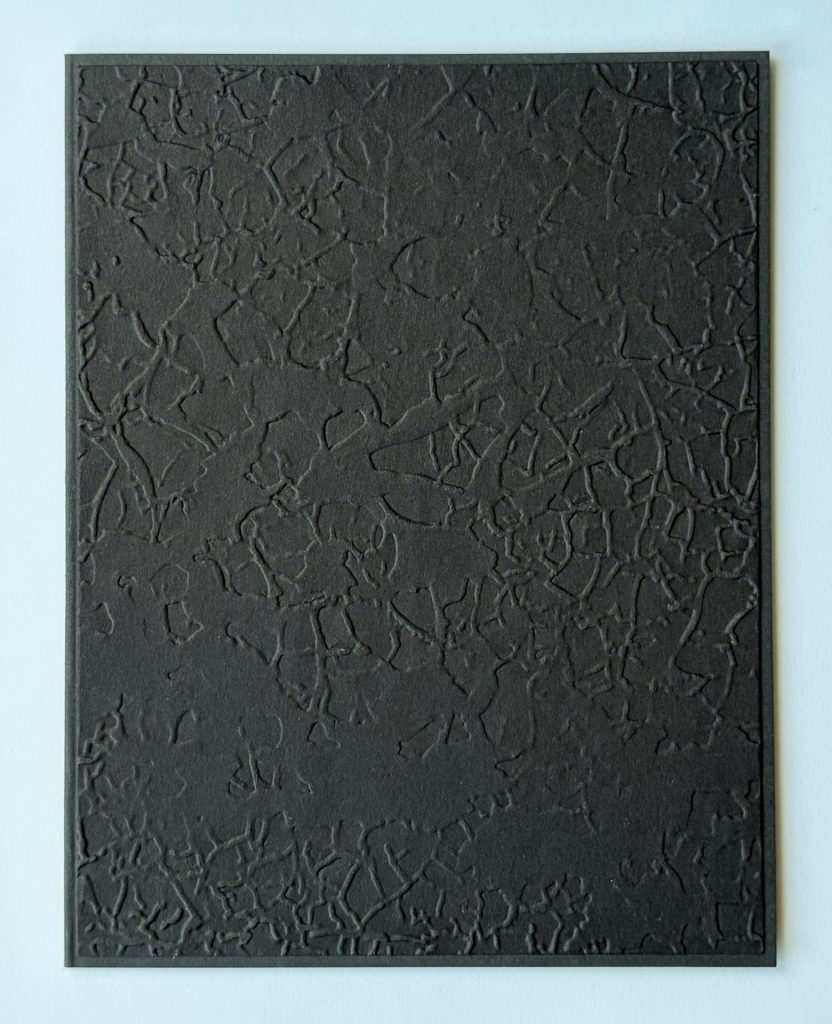
Card Base
- Start by creating an A2 card base (4¼” x 5½”) from Raven cardstock.
- Cut another panel of Raven cardstock to 4¼” x 5½”.
- Emboss this panel using the Crackle Paint 3D embossing folder.
- Die cut it with the largest die from the Precision Layering A2 B set for a clean, even edge.
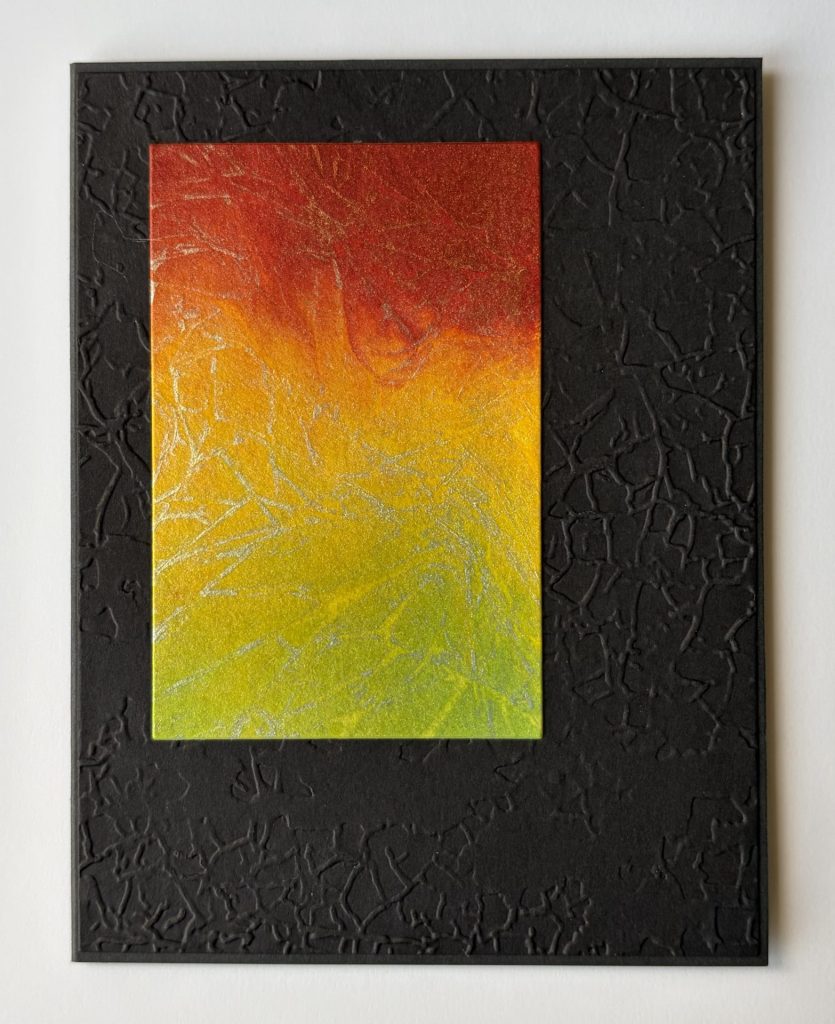
- Adhere the embossed panel to the card front using glue.
- Die cut your crackle-inked background using the eighth largest die (2 3/8″ x 3 5/8″) from the same set.
- Adhere it to the top left area of your card front with glue.
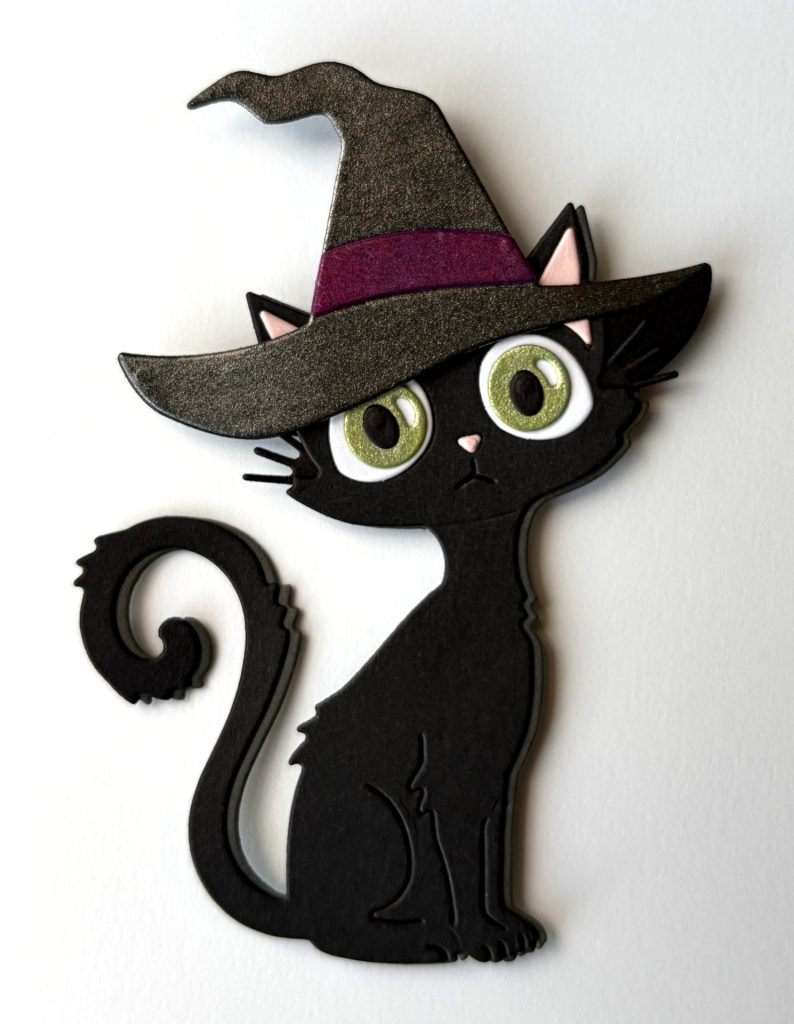
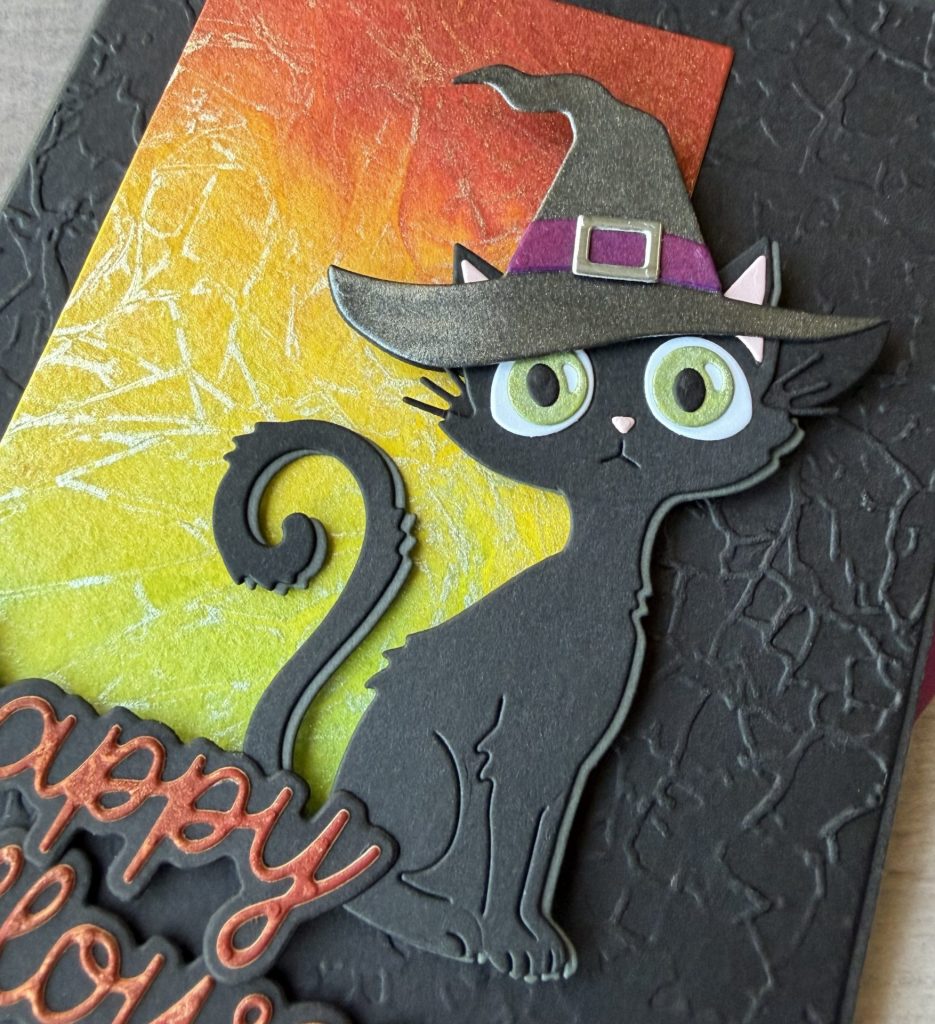
Black Cat
- Use the Bewitched die set to cut your pieces from the following cardstock colors:
- Blush – Ears and nose
- Graphite – Cat body (for the drop shadow)
- Raven – Cat body, whiskers, hat, and pupils
- White – Hat band, eye layers (solid + iris)
- Silver – Hat buckle
- Add color and shimmer with Distress Mica Stains:
- Wicked Elixir – Iris of the eyes
- Fortune Teller – Hat band
- Empty Tomb – Hat front layer
- Let the ink dry completely, then assemble your cat with glue.
- Add foam squares to the back and attach it to the right side of the crackle-inked panel.
Ghost
- Use the Boo Crew die set to cut your pieces from the following cardstock colors:
- Carrot – Pumpkin bucket
- Fog – Ghost back layer
- Raven – Top hat, face, bucket back layer & handle
- White – Ghost & arms
- Add color and shimmer with Distress Mica Stains:
- Fortune Teller – Hat band
- Let the ink dry completely, then assemble your ghost with glue.
- Add foam squares to the back and attach it to the right side of the crackle-inked panel.

Sentiments
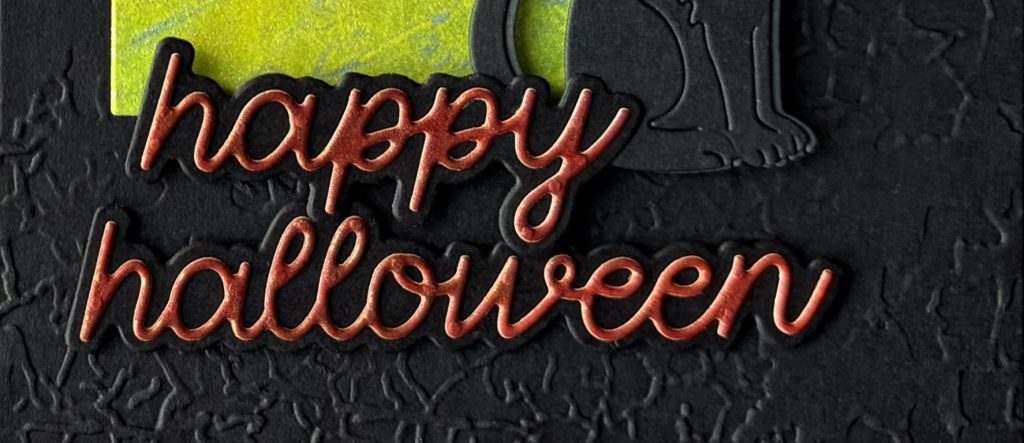
Black Cat Card
- Die cut “Happy Halloween” from the leftover orange crackle-inked paper.
- Cut the shadow layer from Raven cardstock.
- Glue the layers together, then attach the sentiment to the card using foam squares.
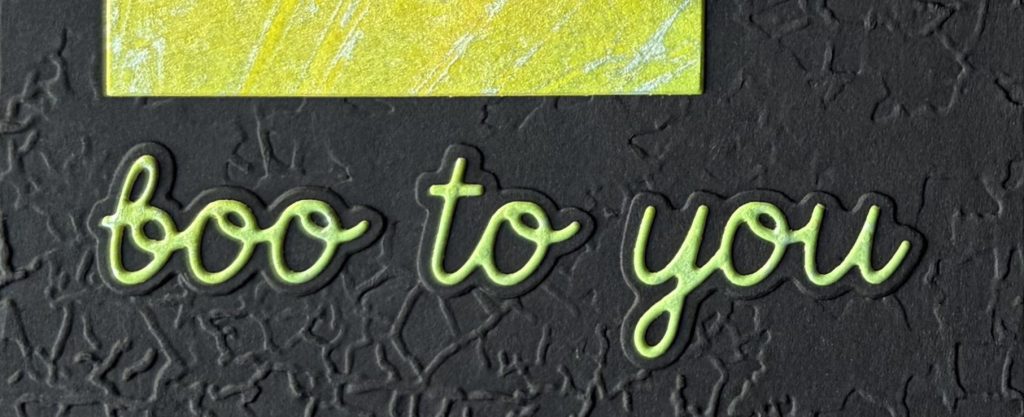
Ghost Card
- Die cut “boo to you” from the leftover green crackle-inked paper.
- Cut the shadow layer from Raven cardstock.
- Glue the pieces together and attach the sentiment to your card front.
And that’s it! You’ll have two adorable Halloween cards with rich texture, shimmer, and playful charm. Perfect for sharing a little spooky fun this season.
Simply Spook-tacular!
I hope you enjoyed these Spooktacular Halloween card ideas as much as I enjoyed bringing them to life! Between the shimmery mica-stained backgrounds, the crackle textures, and those playful die-cut characters from the Bewitched and Boo Crew sets, these cards strike just the right balance of spooky and sweet. The Spooktacular Collection truly makes it easy to craft handmade cards that are full of personality and Halloween charm.
Whether you’re sending them off to kids, friends or just crafting for fun, these cards are sure to bring a smile (and maybe a friendly little fright!) I hope this post has inspired you to pull out your inks, play with texture, and create your own hauntingly cute Halloween designs.
If you give this technique a try, I’d love to see what you make! Be sure to tag me (@silversgrove or @grovecrafted) on Instagram or find me at Grove Crafted on Facebook.
Happy crafting!
If you’re in the mood for even more crafty tricks and treats, be sure to check out my Pupkin Halloween Card next (coming soon) — it’s a howl-o-ween cutie you won’t want to miss! 🎃