Everyday Legends Cards
Spellbinders Clubs | March 2026
Hello, crafty friends!
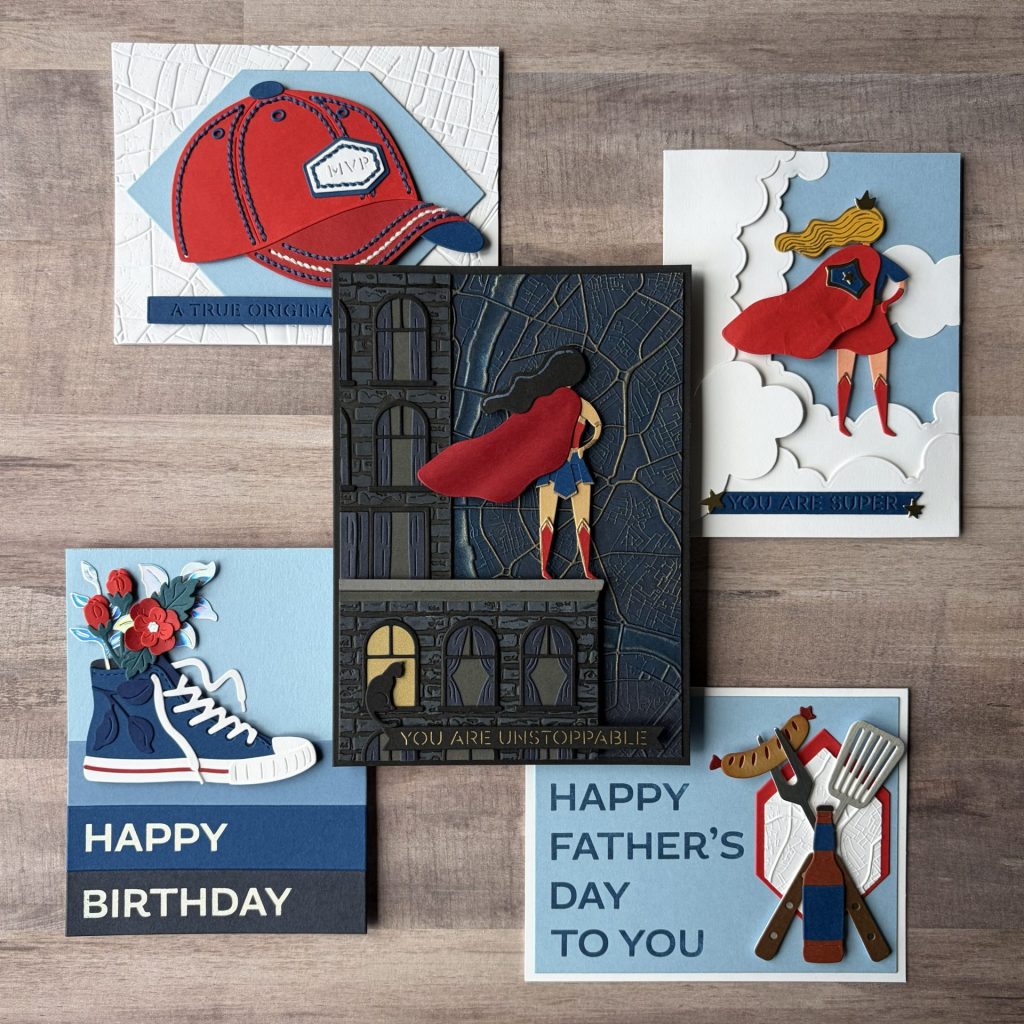
Today I’m sharing the March Spellbinders Clubs. This months theme is Everyday Legends, and they’re all about celebrating the heroes, champions, and everyday MVPs in our lives. These club kits lean into sporty details, bold textures, and uplifting sentiments that make it easy to create cards full of energy and encouragement. I had so much fun mixing and matching the Spellbinders March clubs to create five very different cards, from a dramatic superhero scene to playful sneaker and cap designs. Each project highlights how versatile these club kits can be when layered together.
Before getting started, here’s a quick peek at what makes the March Spellbinders clubs super.
Disclosure
This post includes gifted products and affiliate links—if you decide to shop through them, I may earn a small commission (at no extra cost to you). Money earned via affiliate links helps pay the fees to keep this blog up and running. Thanks so much for supporting GroveCrafted and helping me keep the crafty inspiration coming!
Spellbinders March Clubs
The Everyday Legends theme for the March Spellbinders Clubs celebrates the heroes and champions we encounter in everyday life. Each monthly club kit combines creative versatility with dynamic designs. Perfect for cardmakers and paper crafters who want to create encouraging, celebratory cards. From sporty icons to unstoppable superheros with uplifting sentiments, these thoughtfully crafted kits help you cheer on life’s MVPs and celebrate every win, big or small.
The 5 Clubs I Used To Make My Cards
- Small Die of the Month – Unstoppable

- Large Die of the Month – Classic Kicks
- Stitching Die of the Month – Everyday MVP
- Press & Foil of the Month – Greetings Maker
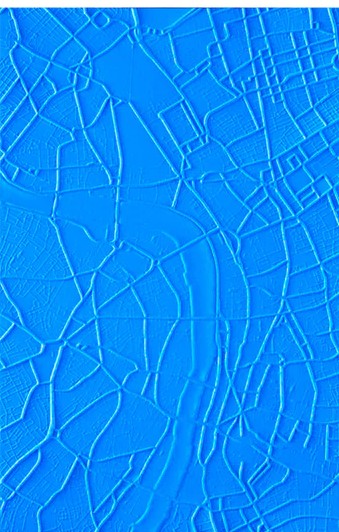
- 3D Embossing Folder of the Month – Urban Grid


Before we dive into the March cards, here’s a quick overview of how the Spellbinders Clubs work.
About Spellbinders Clubs
If you’re new to Spellbinders Clubs, they’re monthly subscriptions that deliver exclusive crafting goodies right to your doorstep. From dies and stitching to embossing, stamping, hot foiling, and more, there’s truly something for everyone. It’s such a fun way to keep your creativity flowing while building a collection of unique products you won’t find anywhere else. You can explore all the Spellbinders club options here, or jump straight to the individual clubs that interest you below:
- Small Die of the Month | USA | UK | A compact set of versatile dies for layering, accenting, and detailed die cutting.
- Large Die of the Month | USA | UK | Larger-scale die sets perfect for focal points and dramatic cut-outs.
- Stitching Die of the Month | USA | UK | Dies designed for faux stitching or real thread work to add texture and handcrafted flair.
- Press & Foil of the Month | USA | UK | A combined BetterPress and hot foil club delivering plates and foil for elegant pressed and foiled card elements.
- Stencil of the Month | USA | UK | Detailed stencils for layering ink, creating backgrounds, and adding dimensional design.
- Clear Stamp & Die of the Month | USA | UK | Coordinating clear stamps with dies to create stamped images and precisely cut elements.
- 3D Embossing Folder of the Month | USA | UK | Deep-textured folder for rich, dimensional embossing effects.
- Embossing Folder of the Month | USA | UK | Embossing folder that add textured designs to panels and backgrounds.
And if you happen to love all the clubs in a given month, you may want to check out the All Clubs Crate.
All Clubs Crate
- All Clubs Crate | USA | UK |
- Includes all eight club products
- Two exclusive bonus item—only available in this bundle.
- 10 – 8.5 x 11 sheets of ColorWheel Cardstock that coordinates
- 15% off select Spellbinders products everyday!
- 1 Free Shipping Coupon to use every month.
It’s also a fantastic value! You’ll save 58% compared to purchasing all the clubs separately.
How It Works
- The sign-up window is open from the 6th–27th of each month.
- Your first kit will charge immediately, and future kits will bill on the 5th of each month.
- Kits ship by the end of each month.
- You can cancel anytime!
If you have questions, be sure to check out the Club FAQ’s page for full details, terms, and conditions.
Jump to Your Favorite Design
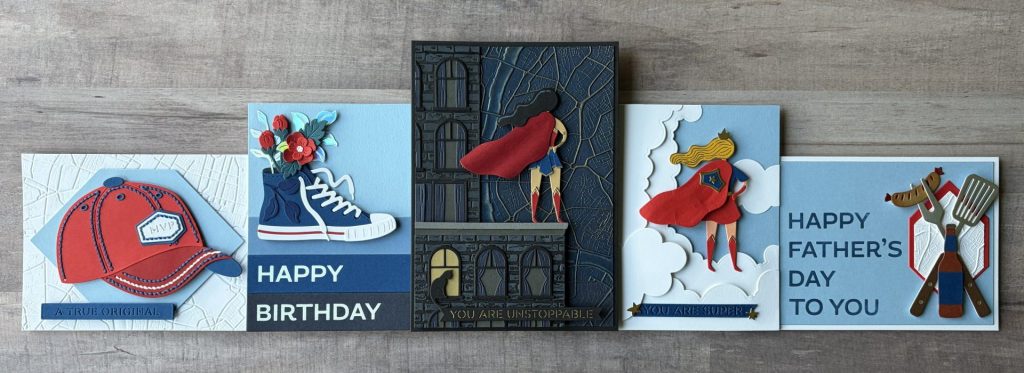
- Stitched Baseball Cap Card (Left)
- Classic Kicks Birthday Card (Left Middle)
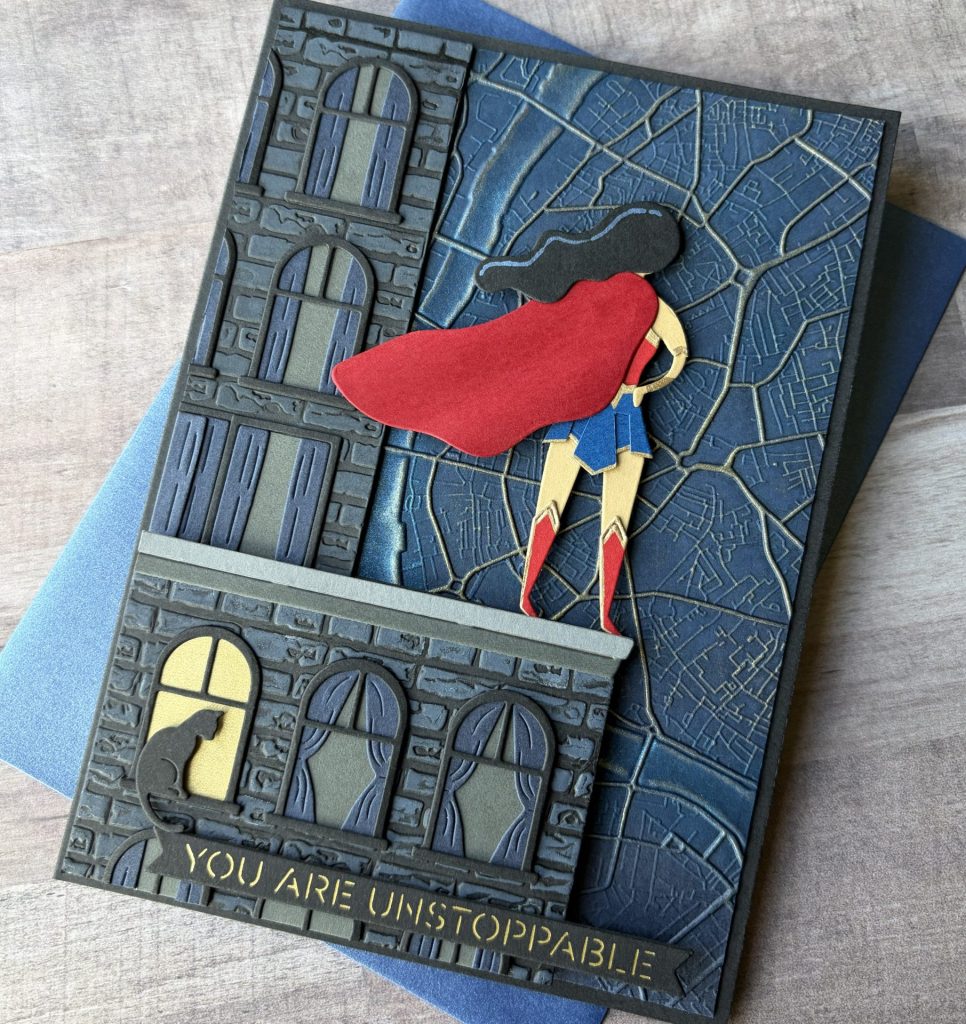
- Wonder-ful City Hero Card (Middle)
- Super Girl Card (Right Middle)
- Father’s Day BBQ Card (Right)
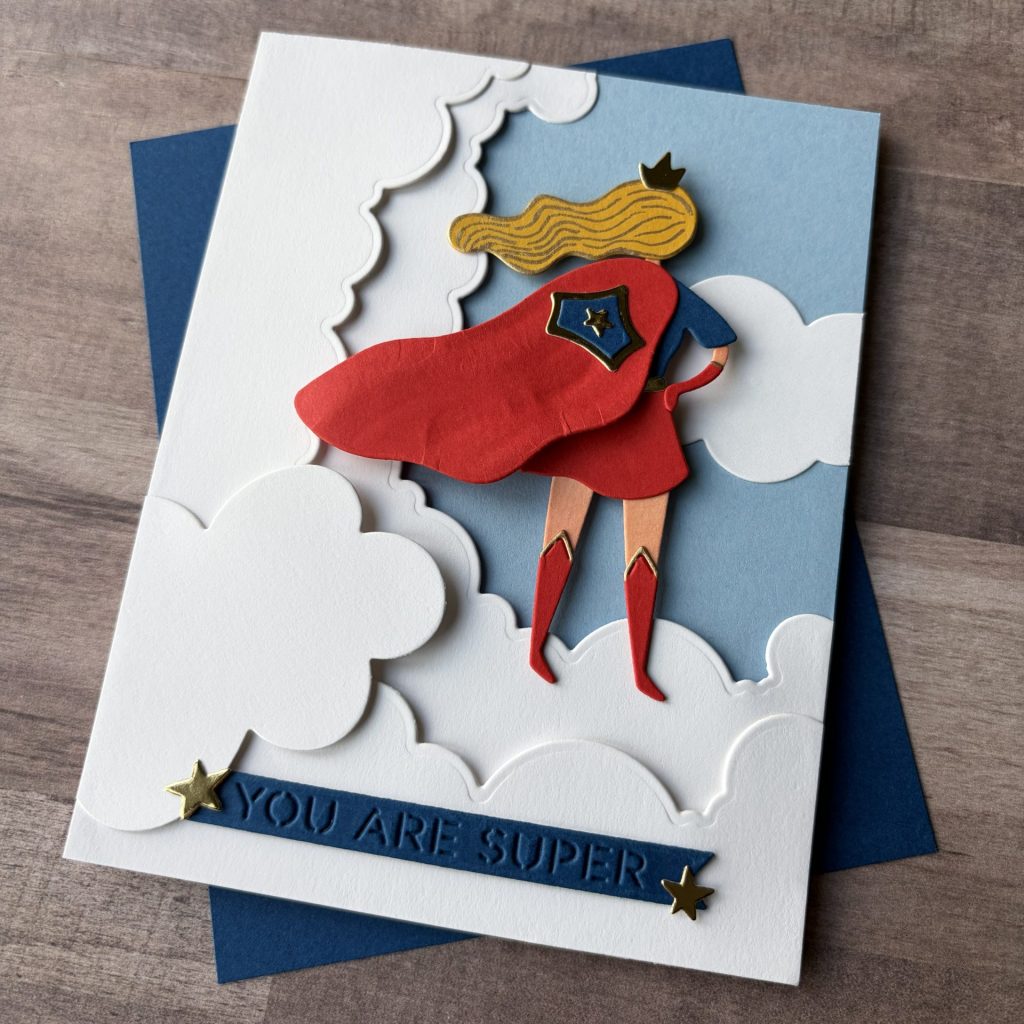
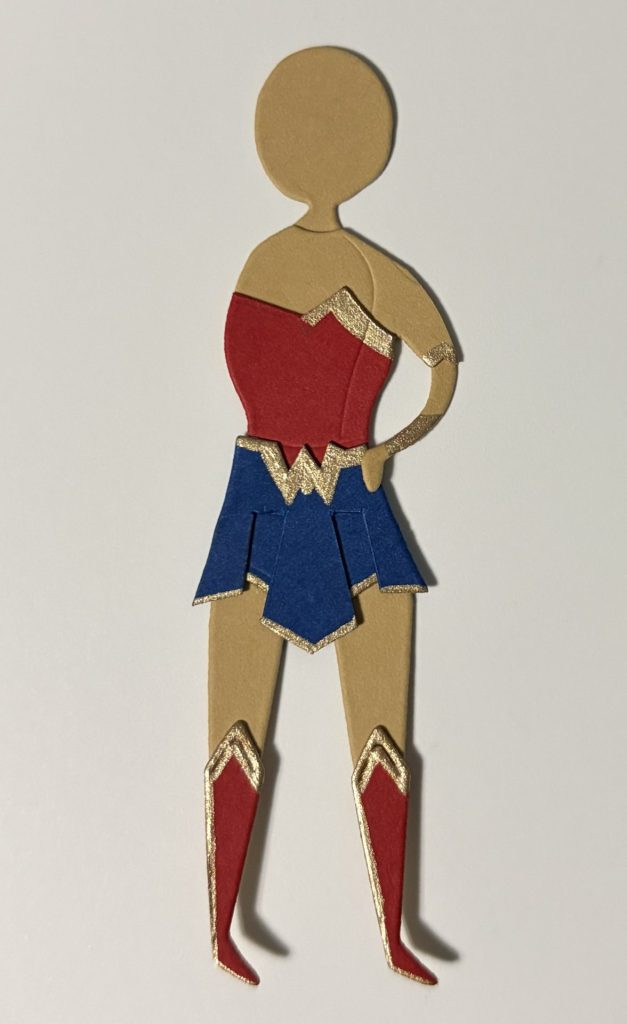
Super Girl Card
Small Die Club
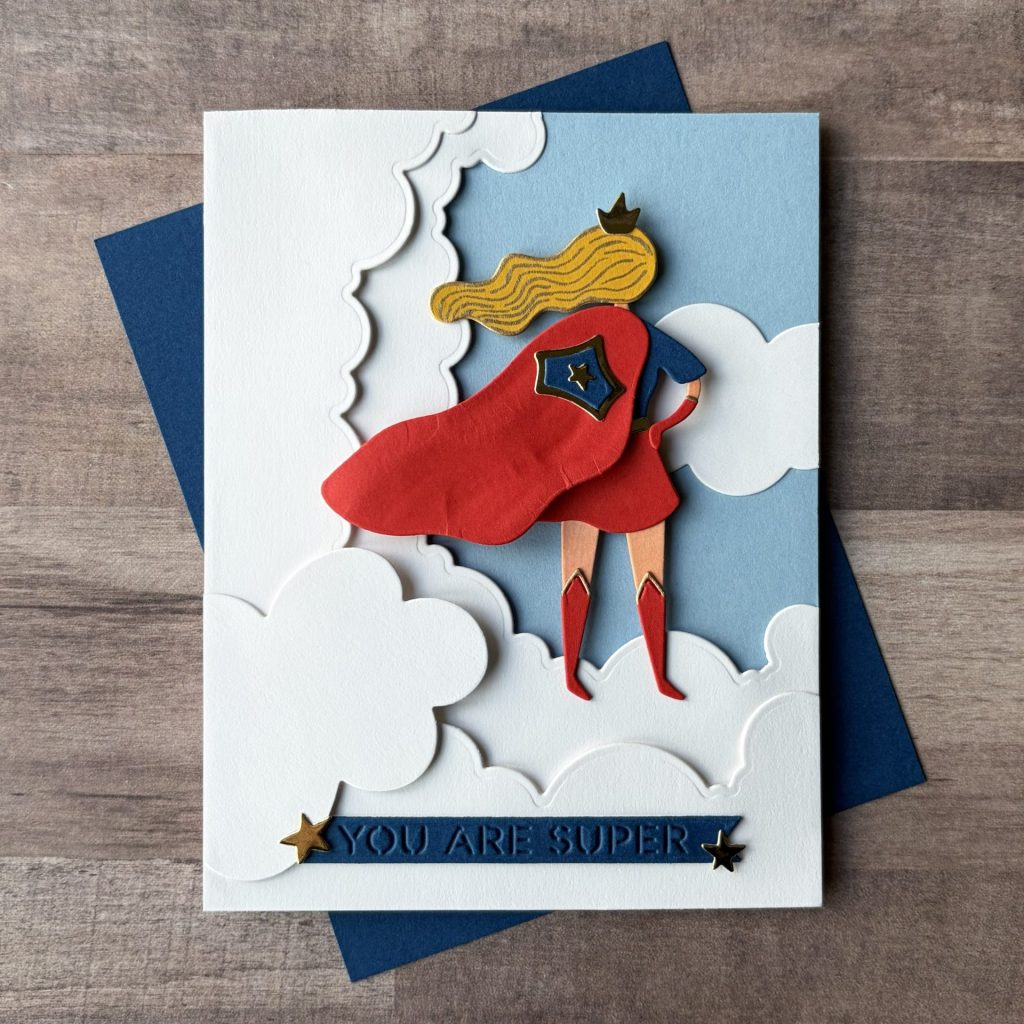
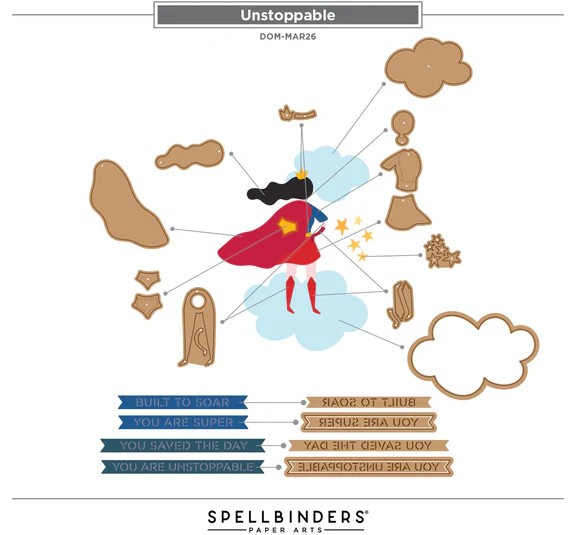
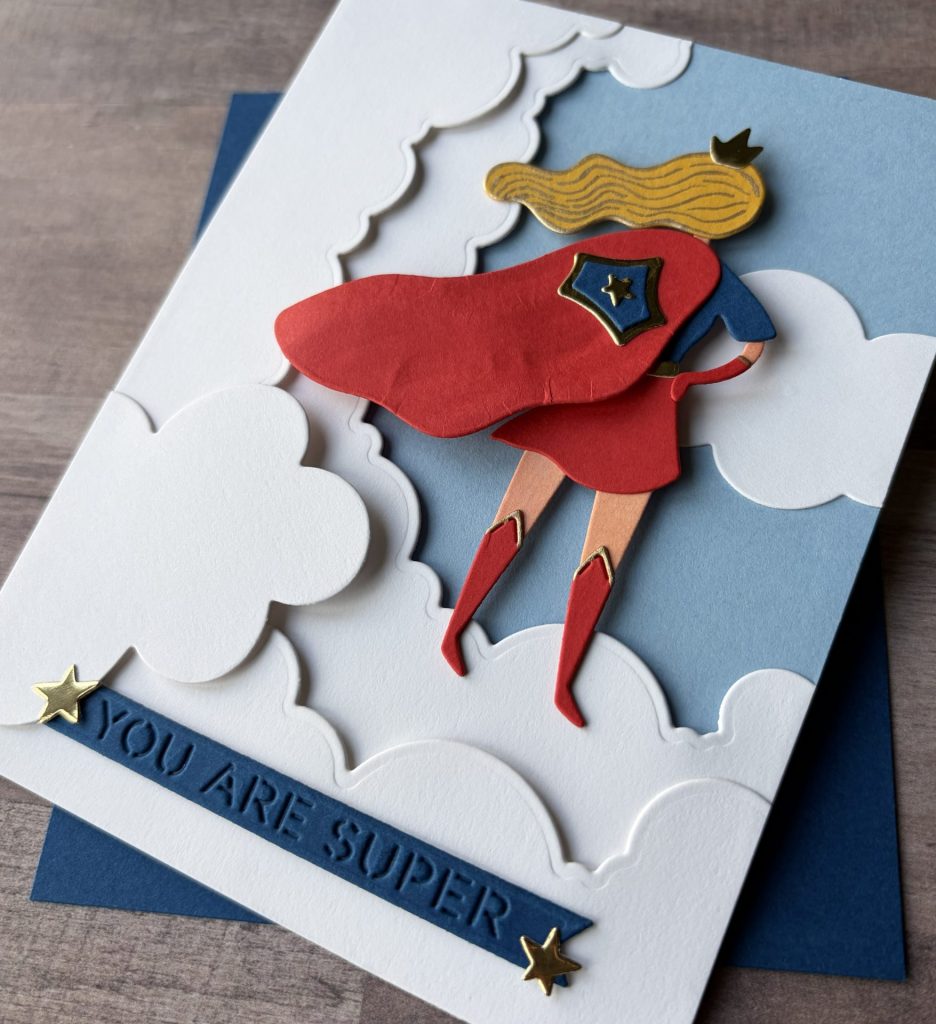
For my first card using the March Spellbinders Clubs, I created a superhero scene in the clouds with the Small Die of the Month, Unstoppable. The layered super girl character and cape gives the design movement and dimension. I framed the scene with soft clouds and a sky background to make the figure feel like she’s flying right off the card. The “You Are Super” sentiment ties the whole design together and makes it perfect for encouragement, congratulations, or cheering someone on.
Card Details
Clubs Used
- Small Die of the Month
Card Base
- A2 Size: 4¼” x 5½”
- Cardstock: Cascade
Clouds
- Die Set: Tunnel Clouds – use the large & medium die
- Die Set: Unstoppable – Clouds
- Cardstock Color: Classic White
- Adhere with glue and 1mm foam squares.
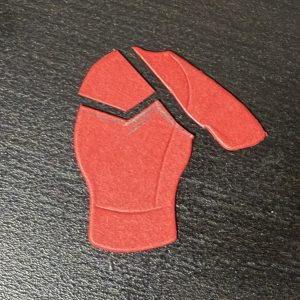
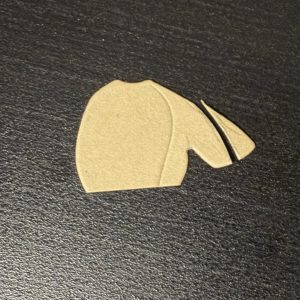
Super Girl
- Die Set: Unstoppable
- Cardstock Color:
- Poppy – cape, skirt, boots, & glove
- Chiffon – head, legs, & arm
- Tuscan – hair
- Cosmic Sky – shirt & sheild insert
- Gold Mirror – belt, crown, sheild, & star
- Gold Metallic Gel Pen – boots, glove, & hair
- Assemble die-cuts with glue.
- Adhere with 2mm foam squares.
Refer to the guide below for the Unstoppable assembly instructions.
Sentiment Banner
- Die Set: Unstoppable
- Cardstock Color:
- Cosmic Sky – “You Are Super” banner
- Gold Mirror – stars
- Adhere with glue.
Supplies Used – Super Girl Card
- Spellbinders Small Die of the Month – Unstoppable #DOM-MAR26 | SB |
- Spellbinders Cutting Dies – Tunnel Clouds #S6-233 | SB | Sb.com |
- Spellbinders ColorWheel Cardstock:
- Spellbinders Treasured Cardstock – Gold #SCSP-001 | SB | Sb.com |
- Sakura Gelly Roll Pen – Metallic Gold – #551 | SB | Blick |
Tools Used
- Spellbinders Platinum Six | SB | Sb.com |
- Tim Holtz Paper Trimmer | Sb.com |
- Bearly Art Glue | SB | Sb.com |
- SSS Embellishment Wand | SSS |
- Foam Squares – White 1mm & 2mm
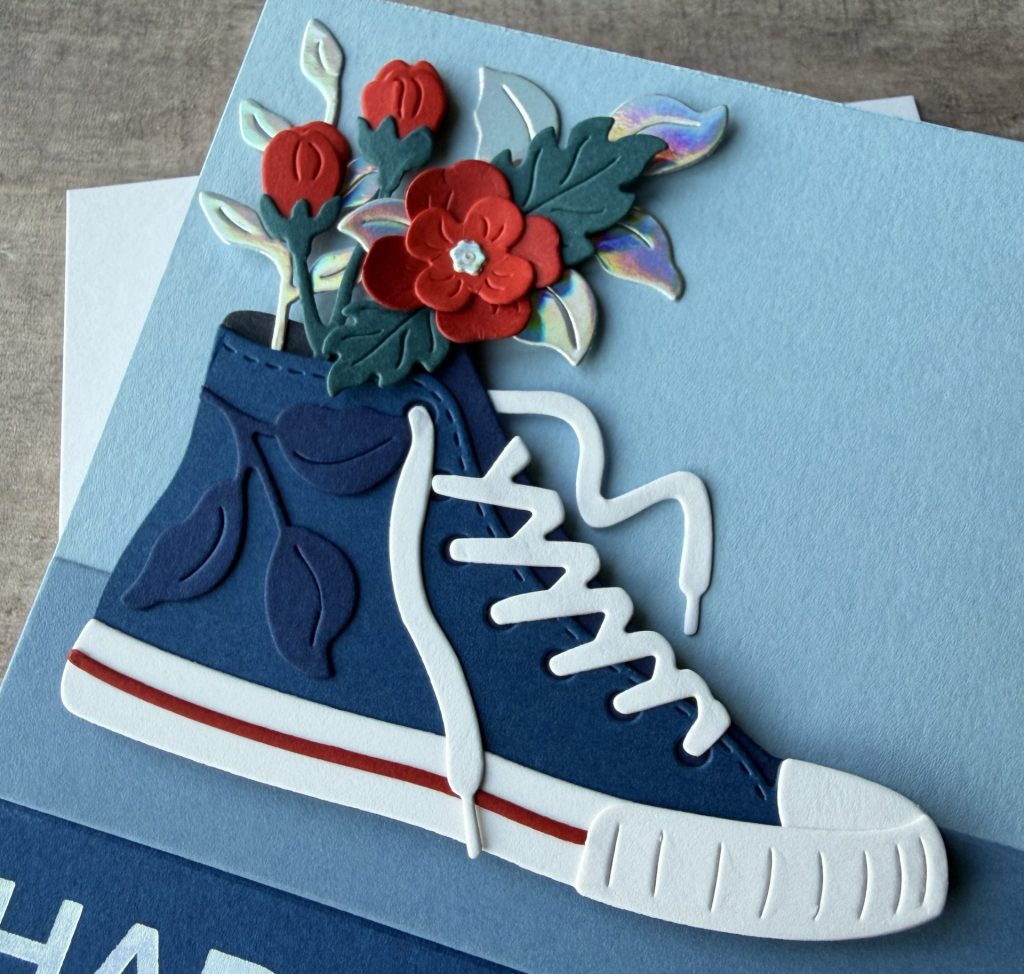
Classic Kicks Birthday Card
Large Die Club

For this card I paired the Large Die of the Month, Classic Kicks with the Press & Foil of the Month, Greetings Maker. The sneaker filled with flowers creates a fun twist, mixing the sporty style with a softer, floral element. The bold “Happy Birthday” greeting keeps the design clean and modern while letting the die-cut classic sneaker shine.
Card Details
Clubs Used
- Large Die of the Month
- Press & Foil of the Month
Card Base
- A2 Size: 4¼” x 5½”
- Cardstock: Cascade
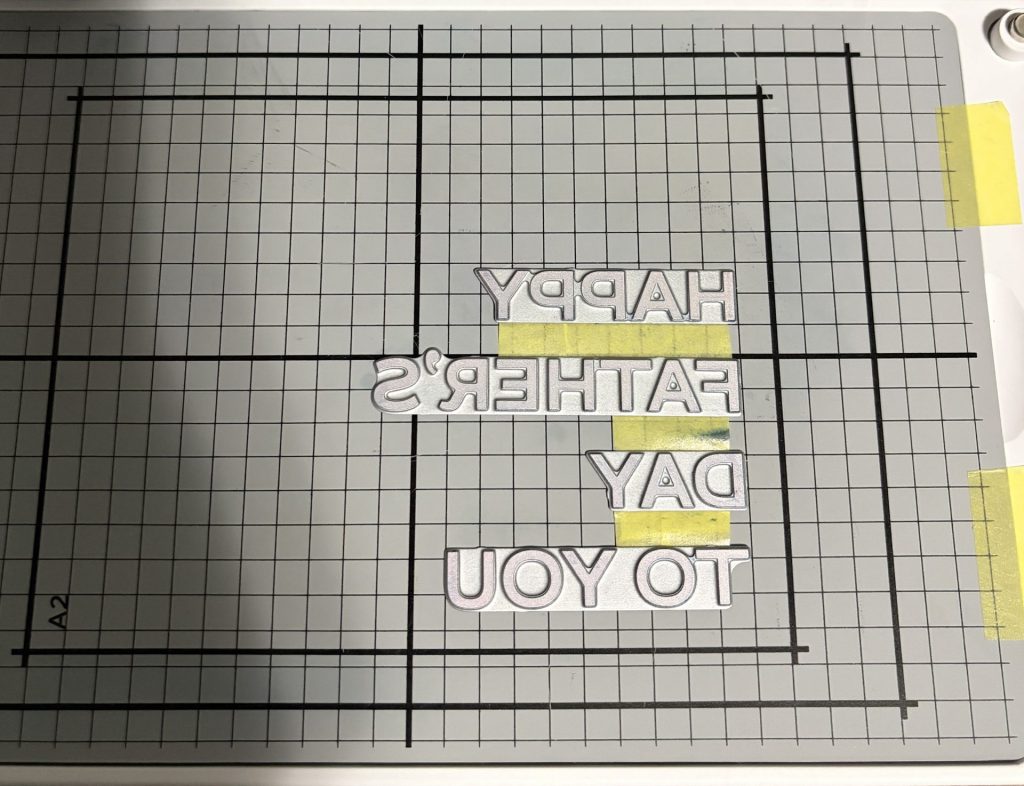
Foiled Sentiment
- Press Plate: Greetings Maker
- Cardstock: Celestial
- Cardstock: Cosmic Sky – HAPPY
- Cardstock: Indigo – BIRTHDAY
- Foil: Prism
- Glimmer first, then die cut.
- Adhere with glue.
Sneaker
- Die Set: Classic Kicks
- Cardstock Color:
- Pomegranate – stripe
- Cosmic Sky – shoe front & back layer, & big leaf branch
- Indigo – shoe inside
- Classic White – sole & laces
- Color the Cosmic Sky shoe back layer & big leaf branch with a Lapis Lazuli Olo marker.
- Assemble die-cuts with glue.
- Adhere with 2mm foam squares.
Refer to the guide below for the Classic Kicks assembly instructions.
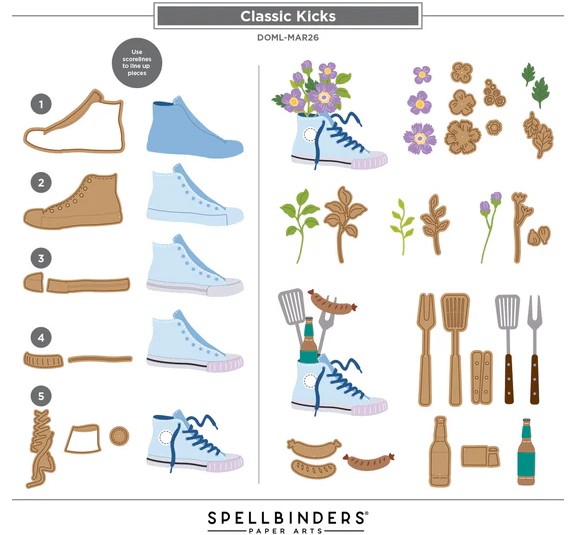
Flowers
- Die Set: Classic Kicks
- Cardstock Color:
- Poppy – small flower & flower buds
- Pomegranate – medium flower
- Oceanside – bud stem & leaves
- Holographic – big & small leaf branch & flower center
- Assemble die-cuts with glue.
- Adhere with 1mm foam squares.

Supplies Used – Classic Kicks Birthday Card
- Spellbinders Large Die of the Month – Classic Kicks #DOML-MAR26 | SB |
- Spellbinders Press & Foil of the Month – Greetings Maker #BPOM-MAR26 | SB |
- Spellbinders ColorWheel Cardstock:
- Simon Says Stamp Cardstock – Holographic | SSS |
- Spellbinders Glimmer Hot Foil – Prism #GLF-032 | SB | Sb.com |
- Olo Brushtip Marker – Lapis Lazuli #B 0.6 | Sb.com | Blick |
Tools Used
- Spellbinders Platinum Six | SB | Sb.com |
- Spellbinders Glimmer Hot Foil System | SB | Sb.com |
- Tim Holtz Paper Trimmer | Sb.com |
- Bearly Art Glue | SB | Sb.com |
- Best Ever Craft Tape – 5/8 in | SB | Sb.com |
- SSS Embellishment Wand | SSS |
- Foam Squares – White 1mm & 2mm
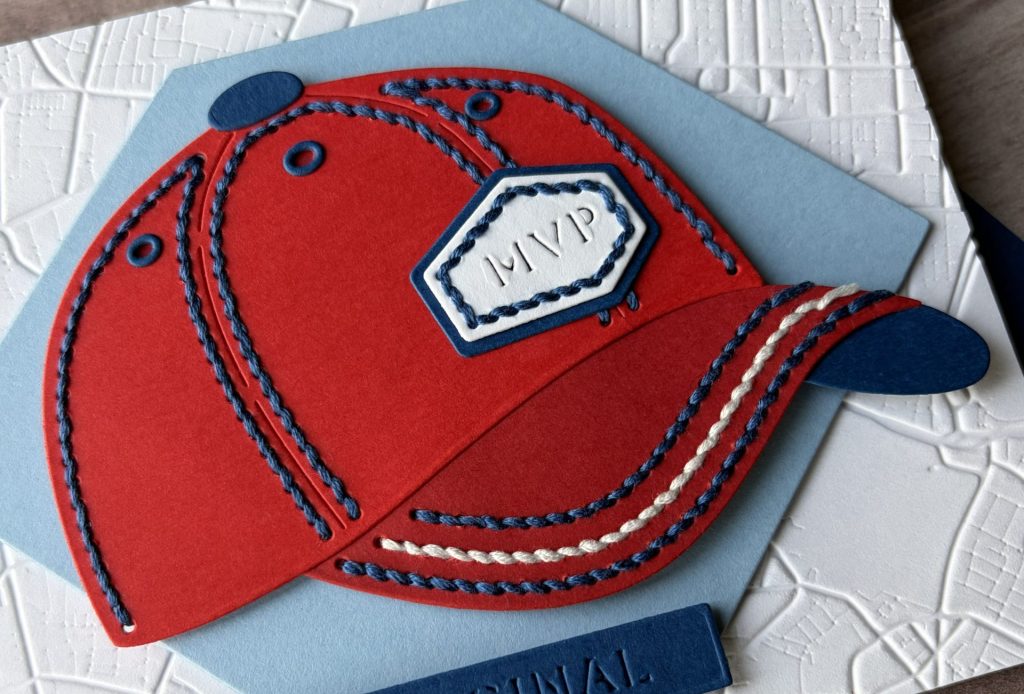
Stitched Baseball Cap Card
Stitching Die Club

This card features the Stitching Die of the Month, Everyday MVP paired with the 3D Embossing Folder of the Month, Urban Grid. The stitched baseball cap creates a fun, sporty focal point while the embossed background adds subtle city-inspired texture. I kept the colors bold and simple. I used classic red, blue, and white to really emphasize the athletic feel of the design. The stitching details bring a wonderful handmade touch that makes this card feel extra special.
Card Details
Clubs Used
- Stitching Die of the Month
- 3D Embossing Folder of the Month
Card Base
- A2 Size: 4¼” x 5½”
- Cardstock: Classic White
- Embossing Folder: Urban Grid
Blue Hexi-Gem
- Die Set: Essential Hexi-Gems – second largest die
- Cardstock: Cascade
- Adhere with 1mm foam squares.
Stitched Hat
- Die Set: Everyday MVP
- Cardstock Color:
- Poppy – hat cap (stitched & solid)
- Pomegranate – hat brim (stitched & solid)
- Cosmic Sky – brim shadow, button, eyelets, & solid patch
- Classic White – MVP patch
- Stitching Thread:
- DMC Midnight Blue #312
- DMC White #Blanc
- Adhere with 2mm foam squares.
Refer to the guide below for the Everyday MVP assembly instructions.
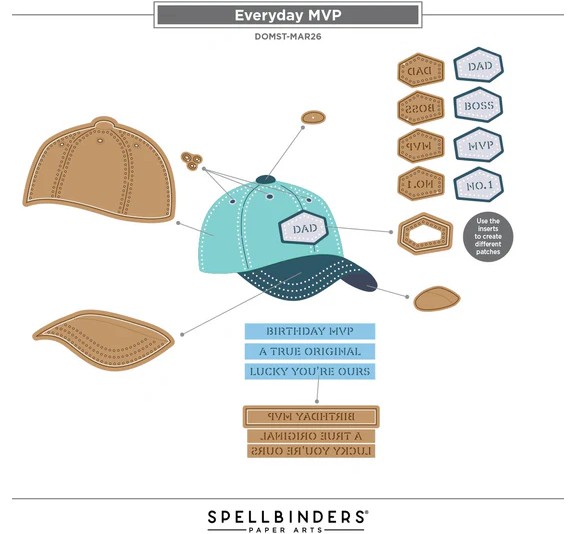
Sentiment Banner
- Die Set: Everyday MVP
- Cardstock Color:
- Cosmic Sky – “A True Original” banner
- Adhere with 2mm foam squares.

Supplies Used – Stitched Baseball Cap Card
- Spellbinders Stitching Die of the Month – Everyday MVP #DOMST-MAR26 | SB |
- Spellbinders 3D Embossing Folder of the Month – Urban Grid #3EOM-MAR26 | SB |
- Spellbinders Cutting Dies – Essential Hexi-Gems #S5-588 | SB | Sb.com |
- Spellbinders ColorWheel Cardstock:
- DMC 6 Strand Floss:
- Midnight Blue #312
- White #Blanc
Tools Used
- Spellbinders Platinum Six | SB | Sb.com |
- Tim Holtz Paper Trimmer | Sb.com |
- Bearly Art Glue | SB | Sb.com |
- Best Ever Craft Tape – 5/8 in | SB | Sb.com |
- Mighty Mister | SB | Sb.com |
- SSS Embellishment Wand | SSS |
- Foam Squares – White 1mm & 2mm
- Stitching Needle
- Scissors
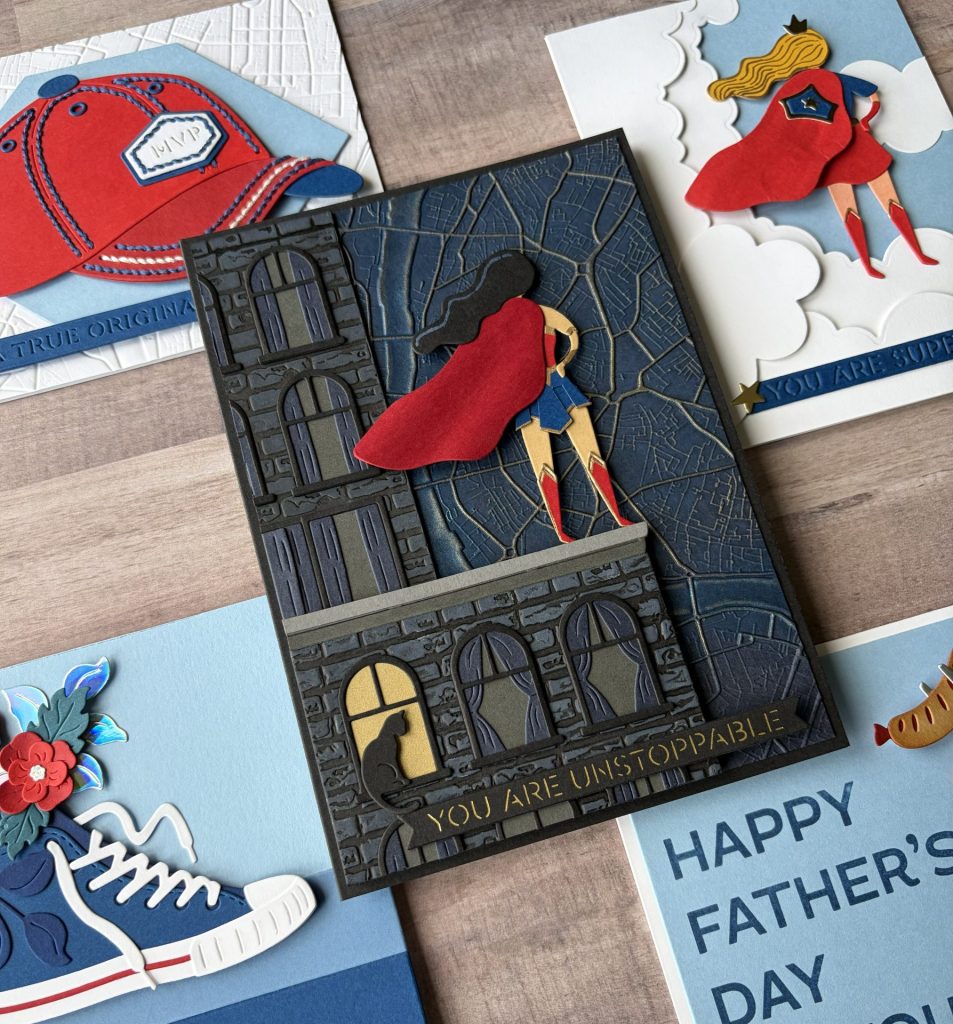
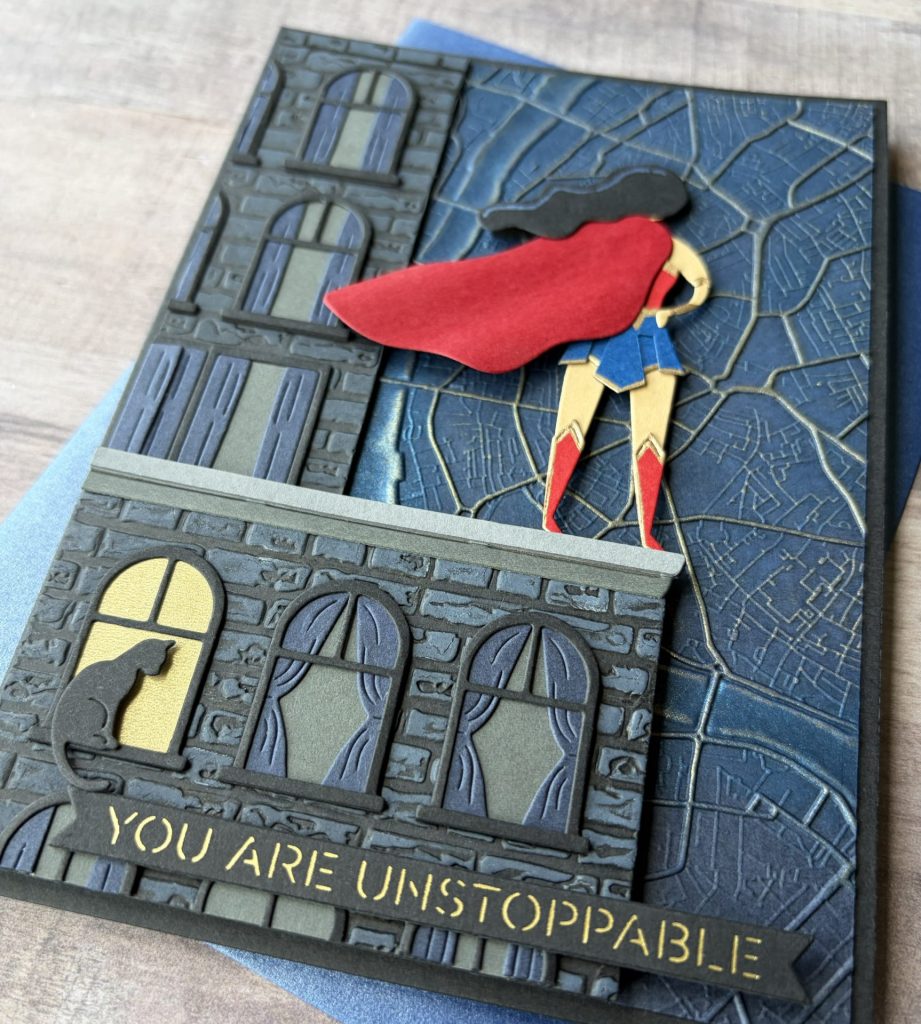
Wonder-ful City Hero Card
3D Embossing Folder Club
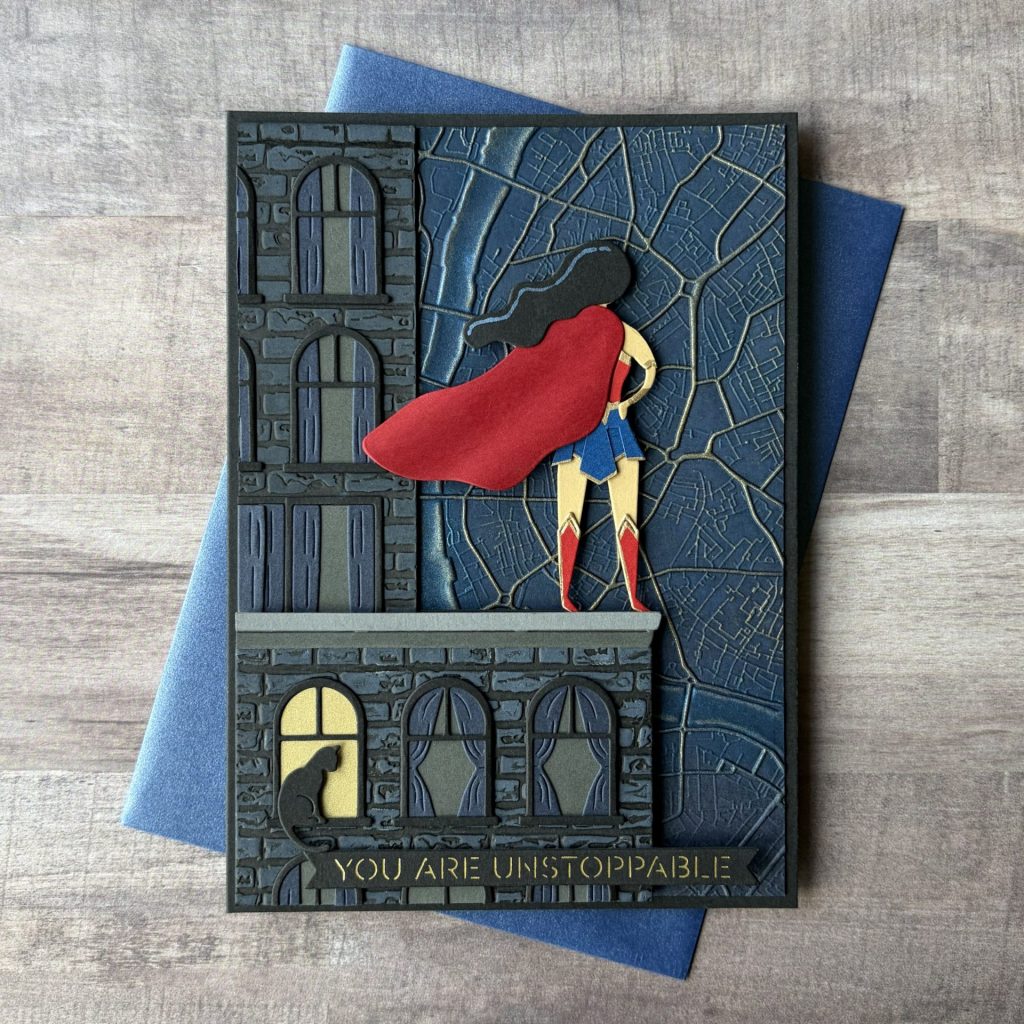
I was so happy with how this card turned out! So naturally it became the centerpiece of the blog post. This A7 card combines the Small Die of the Month, Unstoppable with the Urban Grid 3D Embossing Folder to create a moody cityscape backdrop. The darker color palette gives the card a cinematic feel, with the superhero standing on the rooftop overlooking the city. I love how the city grid texture adds depth and structure to the background while the layered building details help build the urban scene.
Card Details
Clubs Used
- 3D Embossing Folder of the Month
- Small Die of the Month
Card Base
- A7 Size: 5” x 7”
- Cardstock: Raven
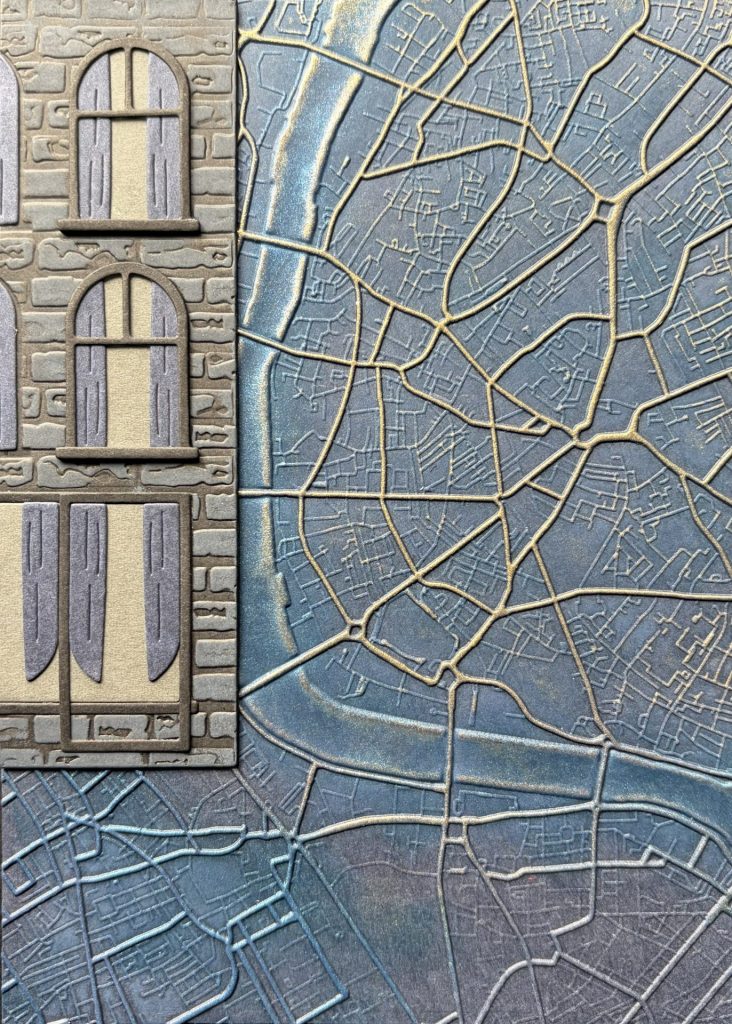
Embossed City Map Background
- 3D Embossing Folder: Urban Grid
- Cardstock: Indigo – cut to 5 x 7 inches
- Emboss then trim to size: 4¾ x 6¾ inches
- Metallic Ink:
- Coastline – apply with tiny blending tool
- Solid Gold – apply with brayer
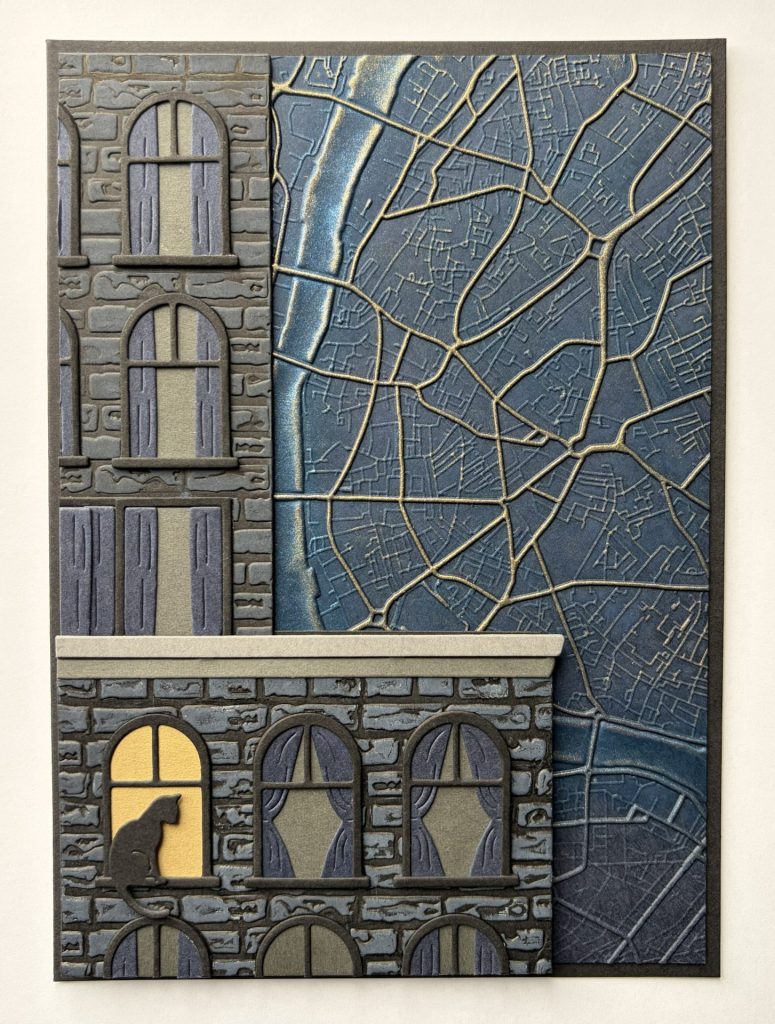
Embossed Brick Building
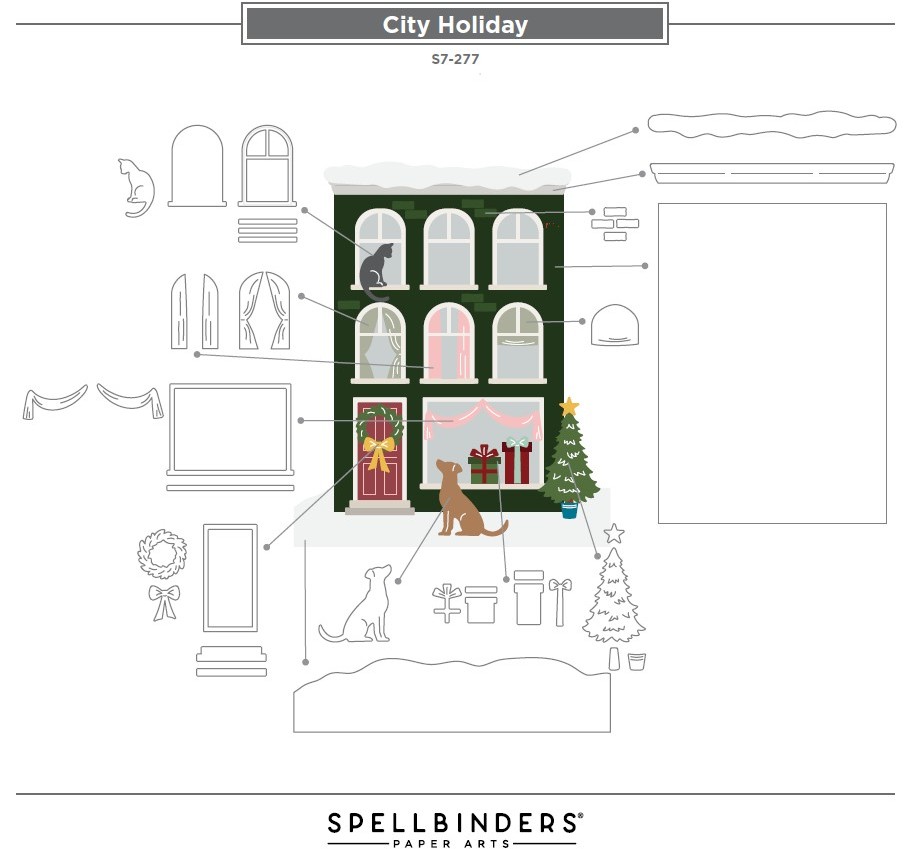
- Die Set: City Holiday
- 3D Embossing Folder: Brick by Brick
- Cardstock: Raven – cut to 4 x 5½ inches (x2)
- Distress Oxide Ink: Black Soot & Lost Shadow
Building Instructions
- Cut two Raven black cardstock panels to 4 x 5½ inches.
- Emboss the black cardstock panels using the Brick by Brick embossing folder.
- Die cut two buildings from the embossed panels using the City Holiday building die.
- Ink both building die-cuts by rolling Black Soot Distress Oxide Ink over the bricks with a brayer.
- Then, lightly ink one of the building with Lost Shadow Distress Oxide Ink using a brayer.
- Apply the ink lightly so the coverage is sporadic and uneven for a worn look.
- Trim the Black Soot building so it measures 1½ inches wide. (use the right side)
- Trim the Lost Shadow building so it measures 2¼ inches tall. (use the top half)
- Reinforce the die cuts by gluing a slightly smaller piece of black heavyweight cardstock to the back of each building.
- Adhere the narrow Black Soot building to the top left corner of the Indigo Urban Grid embossed panel.
Building Die-Cuts
- Die Set: City Holiday
- Cardstock Color:
- Indigo – curtains
- Anchor – roof
- Graphite – solid arch window (x7) & roof
- Raven – all window sills, window frames, & cat
- Gold Pearl Metallic – solid arch window
Refer to the guide below for the City Holiday assembly instructions.
- Assemble and attach die-cut pieces together using glue.
- Adhere the cat with 1mm black foam squares.
- Attach the assembled front building to the bottom left corner of the Indigo Urban Grid embossed panel with 2mm black foam squares.
- Then, adhere the Urban Grid embossed panel to the card base with glue.
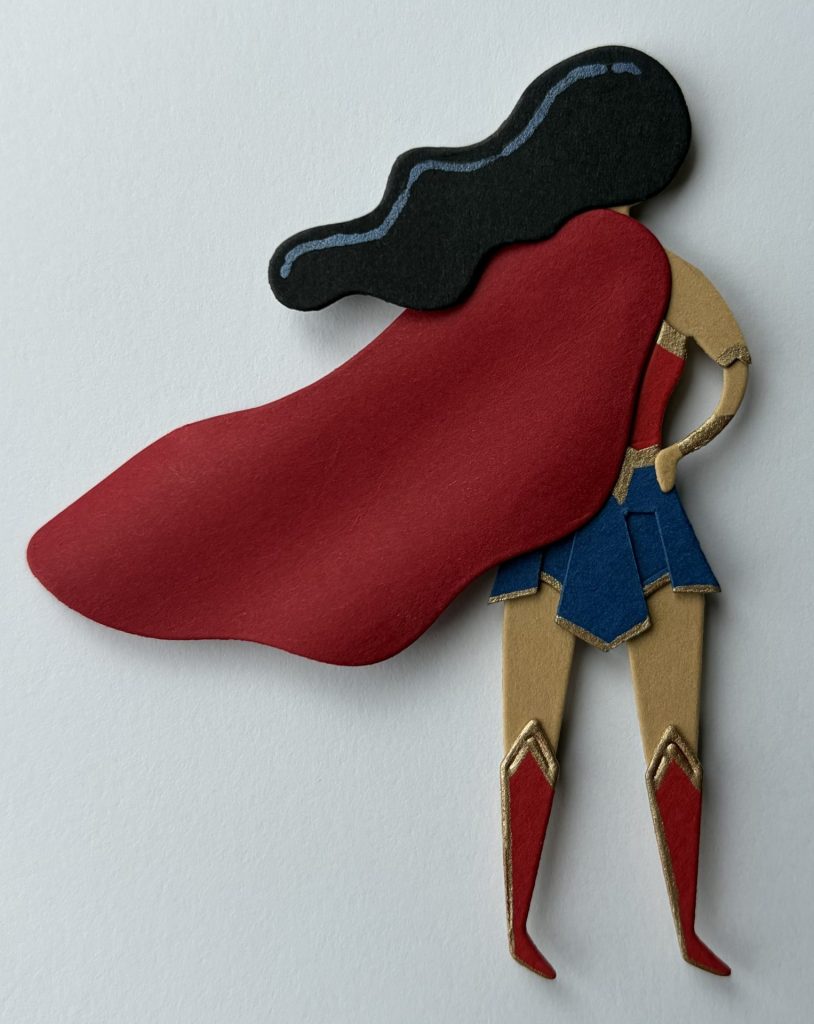
Superhero Die-Cuts
- Die Set: Unstoppable
- Cardstock Color:
- Poppy – shirt & boots
- Pomegranate – cape
- Cosmic Sky – skirt & larger shield shape
- Fawn – shirt, head, legs, & arm
- Raven – hair
- Gold Metallic Gel Pen – boots, top, skirt, & arm
- Blue-Black Metallic Gel Pen – hair
- Trim some of the die-cut with scissors. (details below)
- Assemble die-cut pieces with glue.
- Adhere with 2mm foam squares.
Refer to the guide below for the Unstoppable assembly instructions.
Customized Superhero Instructions
- Use a pencil to sketch out cut lines.
- Trim the clothing pieces—the Poppy Shirt, Fawn Shirt, and Cosmic Sky Skirt—using scissors.
- Use the Cosmic Sky larger shield shape die-cut for the skirt under layer.
- Before gluing add decorative details to the boots, top, skirt, and arm using a gold metallic gel pen.
- Highlight the hair by adding a few accents with a blue-black metallic gel pen.

Sentiment Banner
- Die Set: Unstoppable
- Foil: Matte Gold
- Cardstock Color:
- Raven – “You Are Unstoppable” banner
- Adhere with glue and 2mm foam squares.
Supplies Used – Wonder-ful City Hero Card
- Spellbinders Small Die of the Month – Unstoppable #DOM-MAR26 | SB |
- Spellbinders 3D Embossing Folder of the Month – Urban Grid #3EOM-MAR26 | SB |
- Spellbinders Cutting Dies – City Holiday #S7-277 | SB | Sb.com |
- Spellbinders 3D Embossing Folder – Brick by Brick #3EOM-OCT25 | SB |
- Spellbinders ColorWheel Cardstock:
- Spellbinders Essentials Cardstock – Graphite
- Spellbinders Treasured Cardstock – Gold #SCSP-001 | SB | Sb.com |
- Spellbinders Glimmer Hot Foil – Matte Gold #GLF-002 | SB | Sb.com |
- Sakura Gelly Roll Pen:
- Distress Oxide Ink:
- Lisa Horton Cloud 9 Metallic Ink:
Tools Used
- Spellbinders Platinum Six | SB | Sb.com |
- Spellbinders Glimmer Hot Foil System | SB | Sb.com |
- Tim Holtz Paper Trimmer | Sb.com |
- Bearly Art Glue | SB | Sb.com |
- Best Ever Craft Tape – 5/8 in | SB | Sb.com |
- Mighty Mister | SB | Sb.com |
- Tiny Blending Tool | Sb.com |
- Tim Holtz Brayer | Sb.com |
- SSS Embellishment Wand | SSS |
- Foam Squares 1mm – Black | SB |
- Foam Squares 2mm – Black | SB |
- Scissors
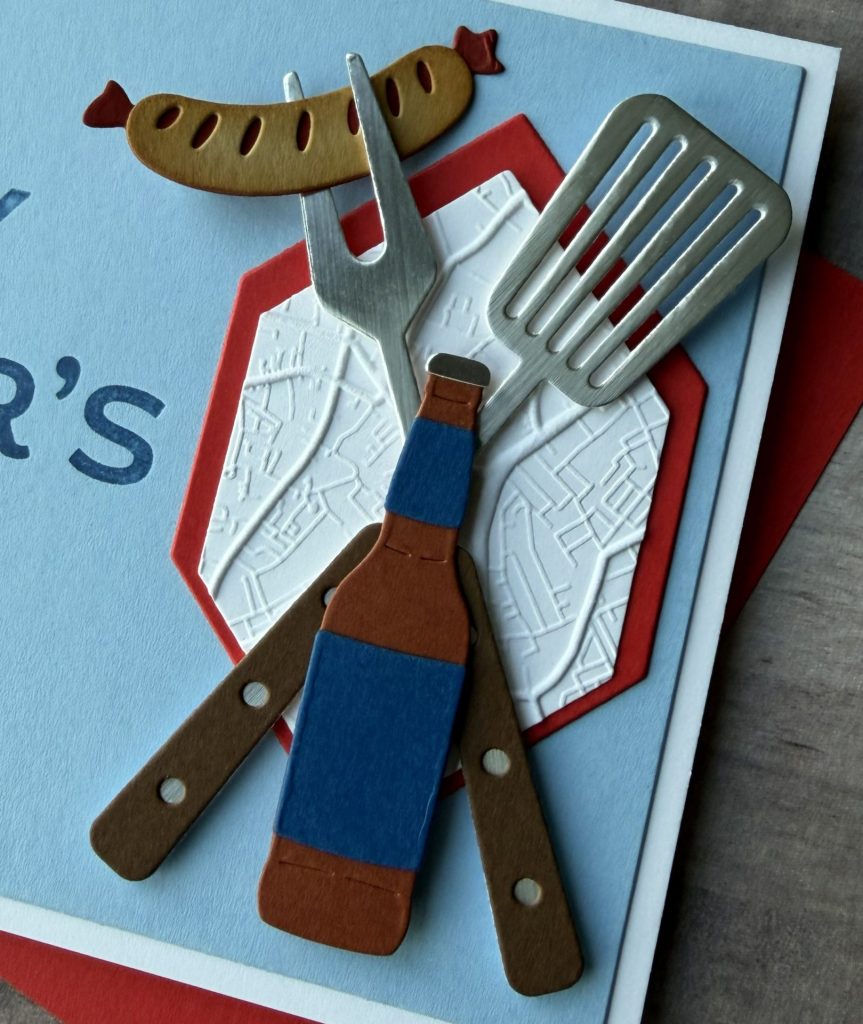
Father’s Day BBQ Card
Press & Foil Club

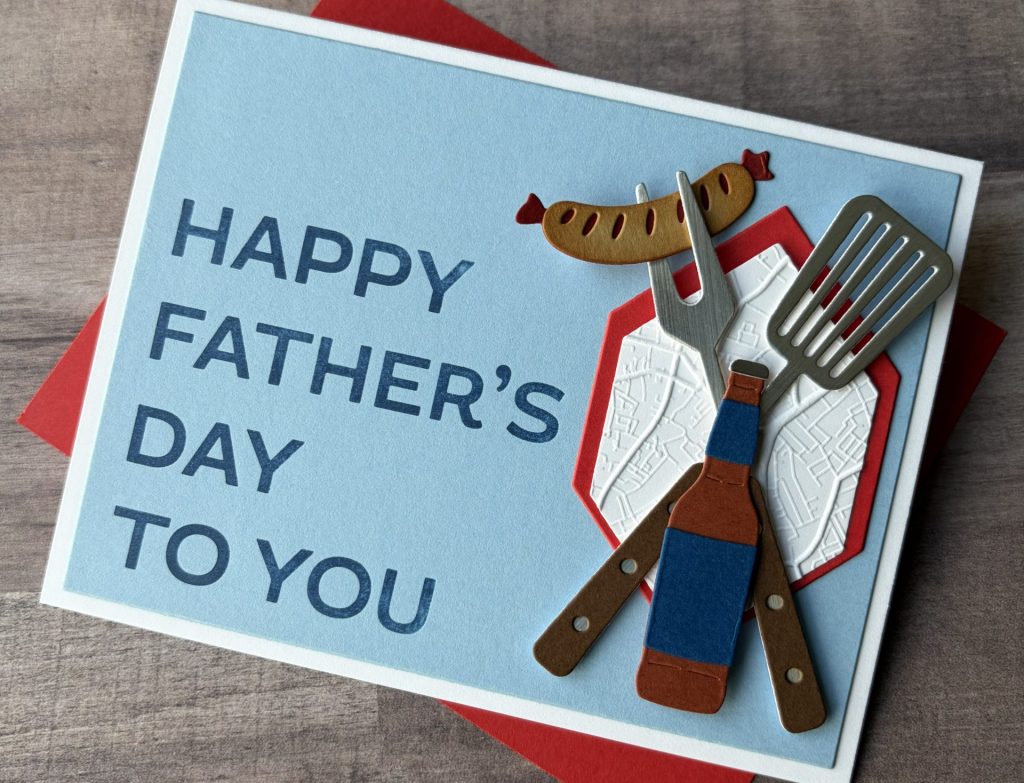
This card also uses the Classic Kicks dies along with the Greetings Maker sentiments, but this time with a Father’s Day theme. The crossed grilling tools and beer bottle create a playful backyard barbecue emblem, perfect for celebrating dad. I used the Urban Grid 3D embossing folder behind the crest to add subtle texture while keeping the layout simple and graphic.
Card Details
Clubs Used
- Press & Foil of the Month
- Large Die of the Month
- 3D Embossing Folder of the Month
Card Base
- A2 Size: 4¼” x 5½”
- Cardstock: Classic White
Pressed Sentiment
- Press Plate: Greetings Maker
- Cardstock: Cascade
- BetterPress Ink: Cosmic Sky
- Die Set: Percision Layering A2 A – second largest die
- Press first, then die cut.
- Adhere with glue.
Hexi-Gem Crest
- Die Set: Essential Hexi-Gems
- Cardstock: Poppy – 7th smallest die
- Cardstock: Classic White – 6th smallest die
- Embossing Folder: Urban Grid
- Adhere with glue.
Grilling Essentials
- Die Set: Classic Kicks
- Cardstock Color:
- Pomegranate – sausage back layer
- Cinnamon – beer bottle
- Cosmic Sky – bottle labels
- Fawn – sausage front layer
- Truffle – grilling tool handles
- Classic White – grilling tools
- Brushed Silver – grilling tools & bottle cap
Refer to the guide below for the Classic Kicks assembly instructions.
- Shade the fawn sausage die-cut with Brushed Corduroy ink using a tiny blending tool.
- Glue the white grilling tool die-cuts to the back of the Brushed Silver die-cuts to add stability and support.
- Assemble die-cut pieces with glue.
- Adhere with 1mm & 2mm foam squares.
Supplies Used – Father’s Day BBQ Card
- Spellbinders Press & Foil of the Month – Greetings Maker #BPOM-MAR26 | SB |
- Spellbinders Large Die of the Month – Classic Kicks #DOML-MAR26 | SB |
- Spellbinders 3D Embossing Folder of the Month – Urban Grid #3EOM-MAR26 | SB |
- Spellbinders Cutting Dies – Essential Hexi-Gems #S5-588 | SB | Sb.com |
- Spellbinders Cutting Dies – Percision Layering A2 A #S5-487 | SB | Sb.com |
- Spellbinders ColorWheel Cardstock:
- Spellbinders Treasured Cardstock – Silver #SCSP-002 | SB | Sb.com |
- BetterPress Ink – Cosmic Sky #BPI-003 | SB | Sb.com |
- Distress Ink – Brushed Corduroy | Sb.com |
Tools Used
- Spellbinders Platinum Six | SB | Sb.com |
- Spellbinders BetterPress Letterpress System | SB | Sb.com |
- Tim Holtz Paper Trimmer | Sb.com |
- Bearly Art Glue | SB | Sb.com |
- Best Ever Craft Tape – 5/8 in | SB | Sb.com |
- Tiny Blending Tool | Sb.com |
- SSS Embellishment Wand | SSS |
- Foam Squares – White 1mm & 2mm
This Is My Kind of Clubbing
I love how the March Spellbinders Clubs work together to create a wide variety of cards, from bold superhero scenes to sporty everyday designs. The Everyday Legends theme is perfect for encouragement cards, birthdays, and celebrating the MVPs in your life. Whether you enjoy stitching, foiling, die cutting, or embossing, this month’s clubs offer plenty of creative possibilities.
And don’t forget the first rule of craft club…
TO HAVE FUN!!!
I hope these projects inspire you to pull out your club goodies and create something uplifting and legendary for someone special. If you try a new technique, or finally give stitching a go, I’d love to see it! Be sure to tag me (@silversgrove or @grovecrafted) on Instagram or at Grove Crafted on Facebook.
Until next time… keep crafting like an MVP.
Happy Crafting!
If you enjoyed these March Spellbinders Club projects, be sure to check out my previous blog posts featuring Spellbinders Clubs where I share more card inspiration and ideas using the monthly club kits. It’s a great way to see even more ways to mix, match, and stretch your supplies.