Farm Fresh Card Ideas
Spellbinders Clubs | April 2026
Hello, crafty friends!
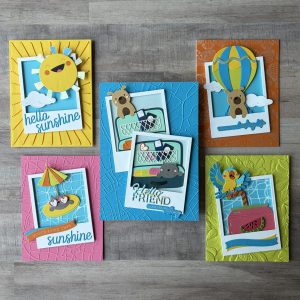
Today I’m sharing the April Spellbinders Clubs. This month’s Farm to Craft theme is filled with cozy textures, garden-fresh elements, and charming details that make handmade cards feel extra special. I had sow much fun creating these five cards using this month’s kits, mixing dies, foiling, embossing, and stitching to bring each design to life. Each project highlights just how versatile these kits are when combined, while still coming together beautifully with that fresh-from-the-farm feel.
Before we dig in, here’s a quick look at what makes the April Spellbinders Clubs sow farm-fresh and full of homegrown happiness!🌱
Disclosure
This post includes gifted products and affiliate links—if you decide to shop through them, I may earn a small commission (at no extra cost to you). Money earned via affiliate links helps pay the fees to keep this blog up and running. Thanks so much for supporting GroveCrafted and helping me keep the crafty inspiration coming!
Spellbinders April Clubs
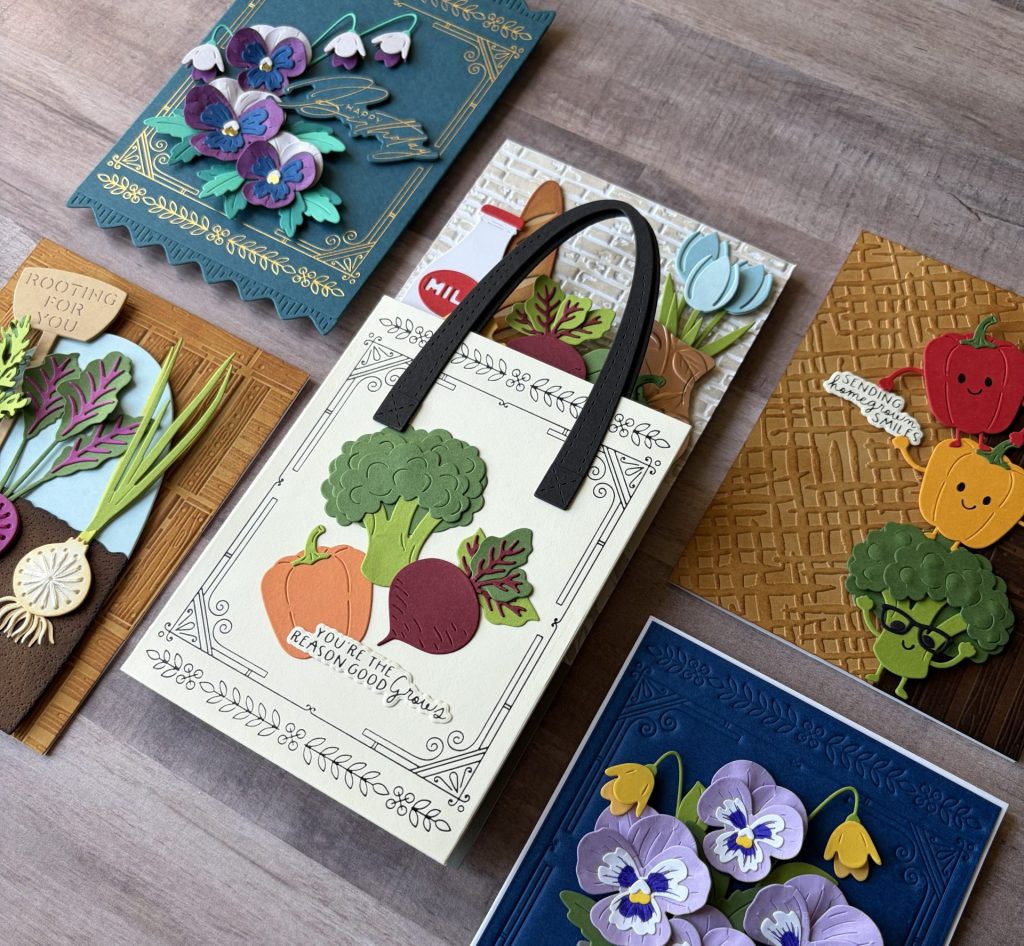
The Farm to Craft theme for the April Spellbinders Clubs brings the charm of the farmer’s market right to your craft desk. From overflowing market totes filled with veggies, and homemade goodies to coordinating dies, stamps, and textures, the kits celebrate all things homegrown and handmade. This theme is full of nature made, mix-and-match elements that make it easy to create bright, cheerful cards with a down-to-earth feel. Perfect for spring crafting and adding a touch of farm-fresh fun to your projects.
The Clubs I Used To Make My Cards
- Small Die of the Month – Pansy Seed Co.

- Large Die of the Month – Market Tote
- Stitching Die of the Month – Rooting For You
- Press & Foil of the Month – Seed Co. Border
- Embossing Folder of the Month – Market Weave
- 3D Embossing Folder of the Month – Market Crates
Before we dive into the April cards, here’s a quick overview of how the Spellbinders Clubs work.
About Spellbinders Clubs
If you’re new to Spellbinders Clubs, they’re monthly subscriptions that deliver exclusive crafting goodies right to your doorstep. From dies and stitching to embossing, stamping, hot foiling, and more, there’s truly something for everyone. It’s such a fun way to keep your creativity flowing while building a collection of unique products you won’t find anywhere else. You can explore all the Spellbinders club options here, or jump straight to the individual clubs that interest you below:
- Small Die of the Month | USA | UK | A compact set of versatile dies for layering, accenting, and detailed die cutting.
- Large Die of the Month | USA | UK | Larger-scale die sets perfect for focal points and dramatic cut-outs.
- Stitching Die of the Month | USA | UK | Dies designed for faux stitching or real thread work to add texture and handcrafted flair.
- Press & Foil of the Month | USA | UK | A combined BetterPress and hot foil club delivering plates and foil for elegant pressed and foiled card elements.
- Stencil of the Month | USA | UK | Detailed stencils for layering ink, creating backgrounds, and adding dimensional design.
- Clear Stamp & Die of the Month | USA | UK | Coordinating clear stamps with dies to create stamped images and precisely cut elements.
- 3D Embossing Folder of the Month | USA | UK | Deep-textured folder for rich, dimensional embossing effects.
- Embossing Folder of the Month | USA | UK | Embossing folder that add textured designs to panels and backgrounds.
And if you happen to love all the clubs in a given month, you may want to check out the All Clubs Crate.
All Clubs Crate
- All Clubs Crate | USA | UK |
- Includes all eight club products
- Two exclusive bonus item—only available in this bundle.
- 10 – 8.5 x 11 sheets of ColorWheel Cardstock that coordinates
- 15% off select Spellbinders products everyday!
- 1 Free Shipping Coupon to use every month.
It’s also a fantastic value! You’ll save 58% compared to purchasing all the clubs separately.
How It Works
- The sign-up window is open from the 6th–27th of each month.
- Your first kit will charge immediately, and future kits will bill on the 5th of each month.
- Kits ship by the end of each month.
- You can cancel anytime!
If you have questions, be sure to check out the Club FAQ’s page for full details, terms, and conditions.
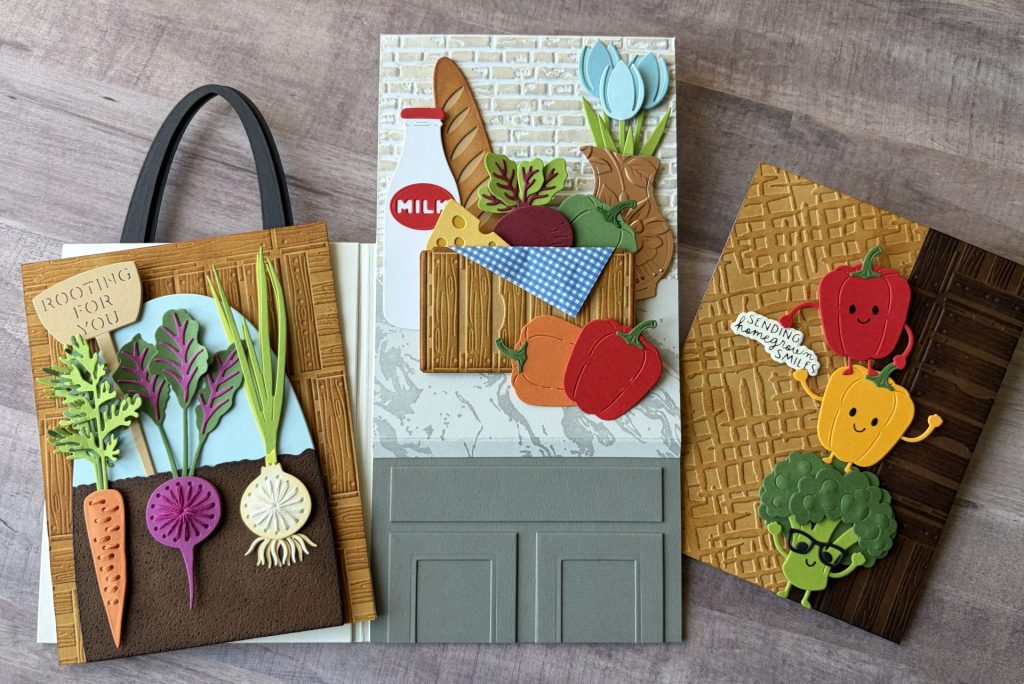
Jump to Your Favorite Design
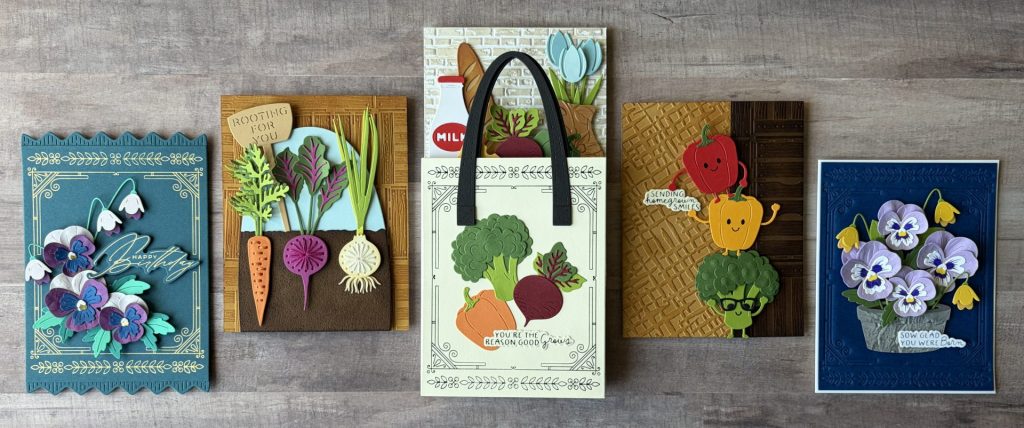
- Fancy Pansies Birthday Card (Left)
- Stitched Garden Roots Card (Left Middle)
- Market Tote Slimline (Middle)
- Stacked Veggie Smiles Card (Right Middle)
- Potted Pansy Birthday Card (Right)
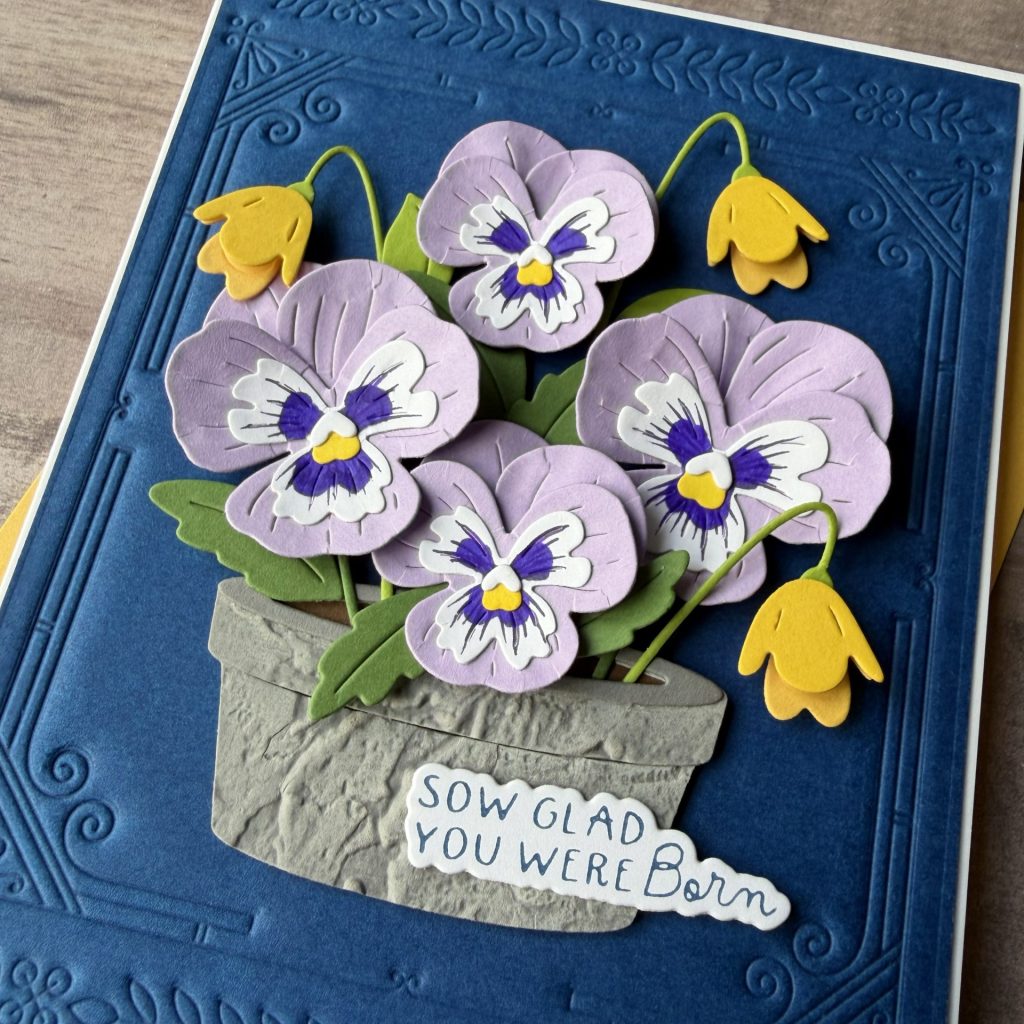
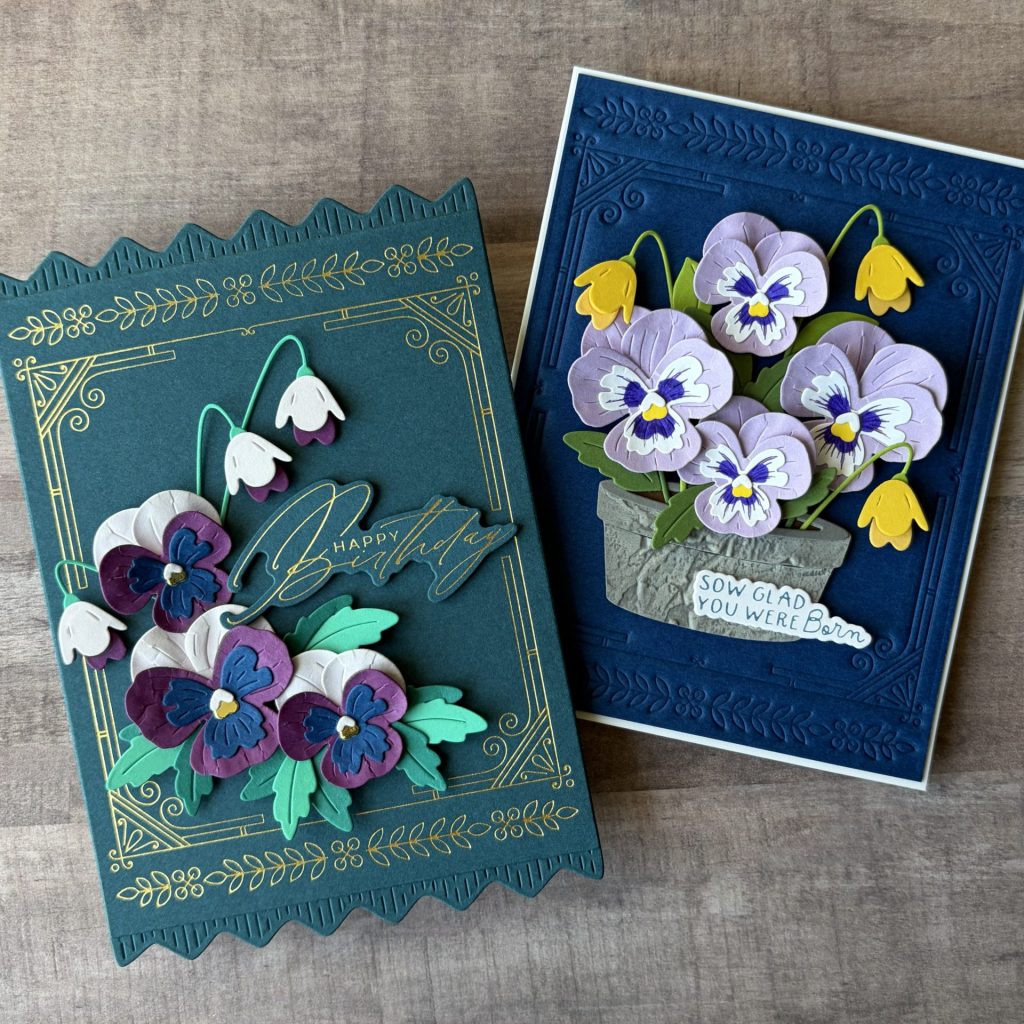
Potted Pansy Birthday Wishes
Small Die Club

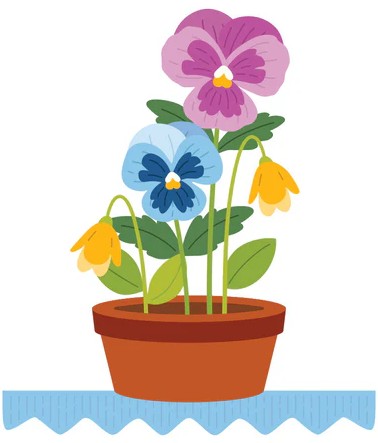
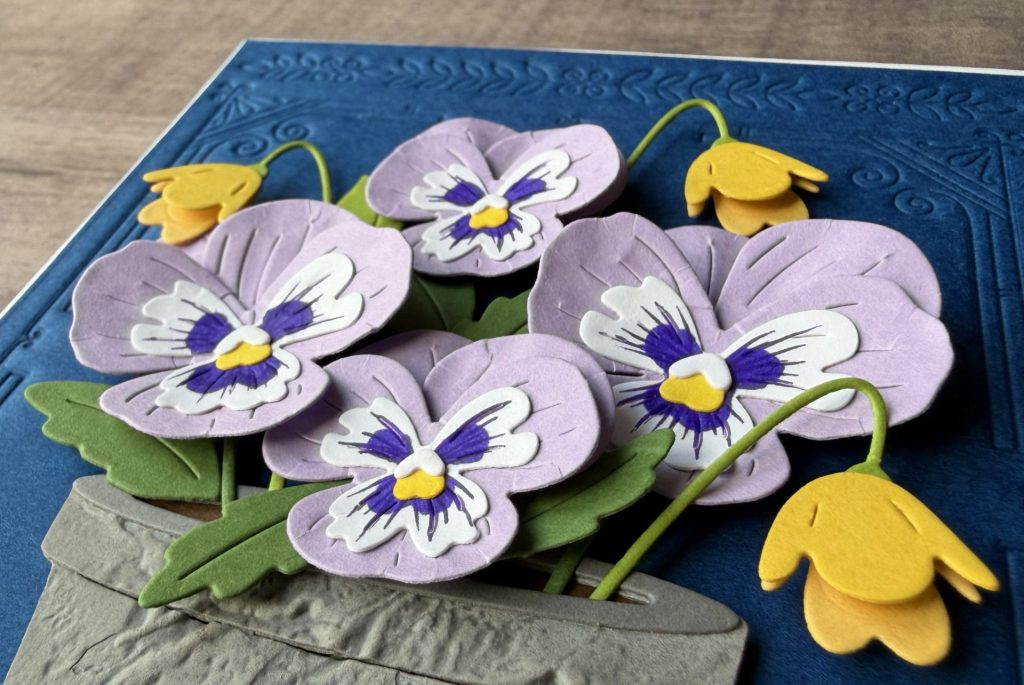
For my first card using the April Spellbinders Clubs, I created some sweet florals with the Pansy Seed Co. Small Die of the Month. I layered the pansies into a little potted arrangement against a rich blue embossed background, which really helps those soft purples and yellows pop. The sentiment, “Sow Glad You Were Born,” adds a playful touch, making this a perfect birthday card with a bit of garden charm.
Card Details
Clubs Used
- Small Die of the Month
- Press & Foil of the Month
Card Base
- A2 Size: 4¼” x 5½”
- Cardstock: Classic White
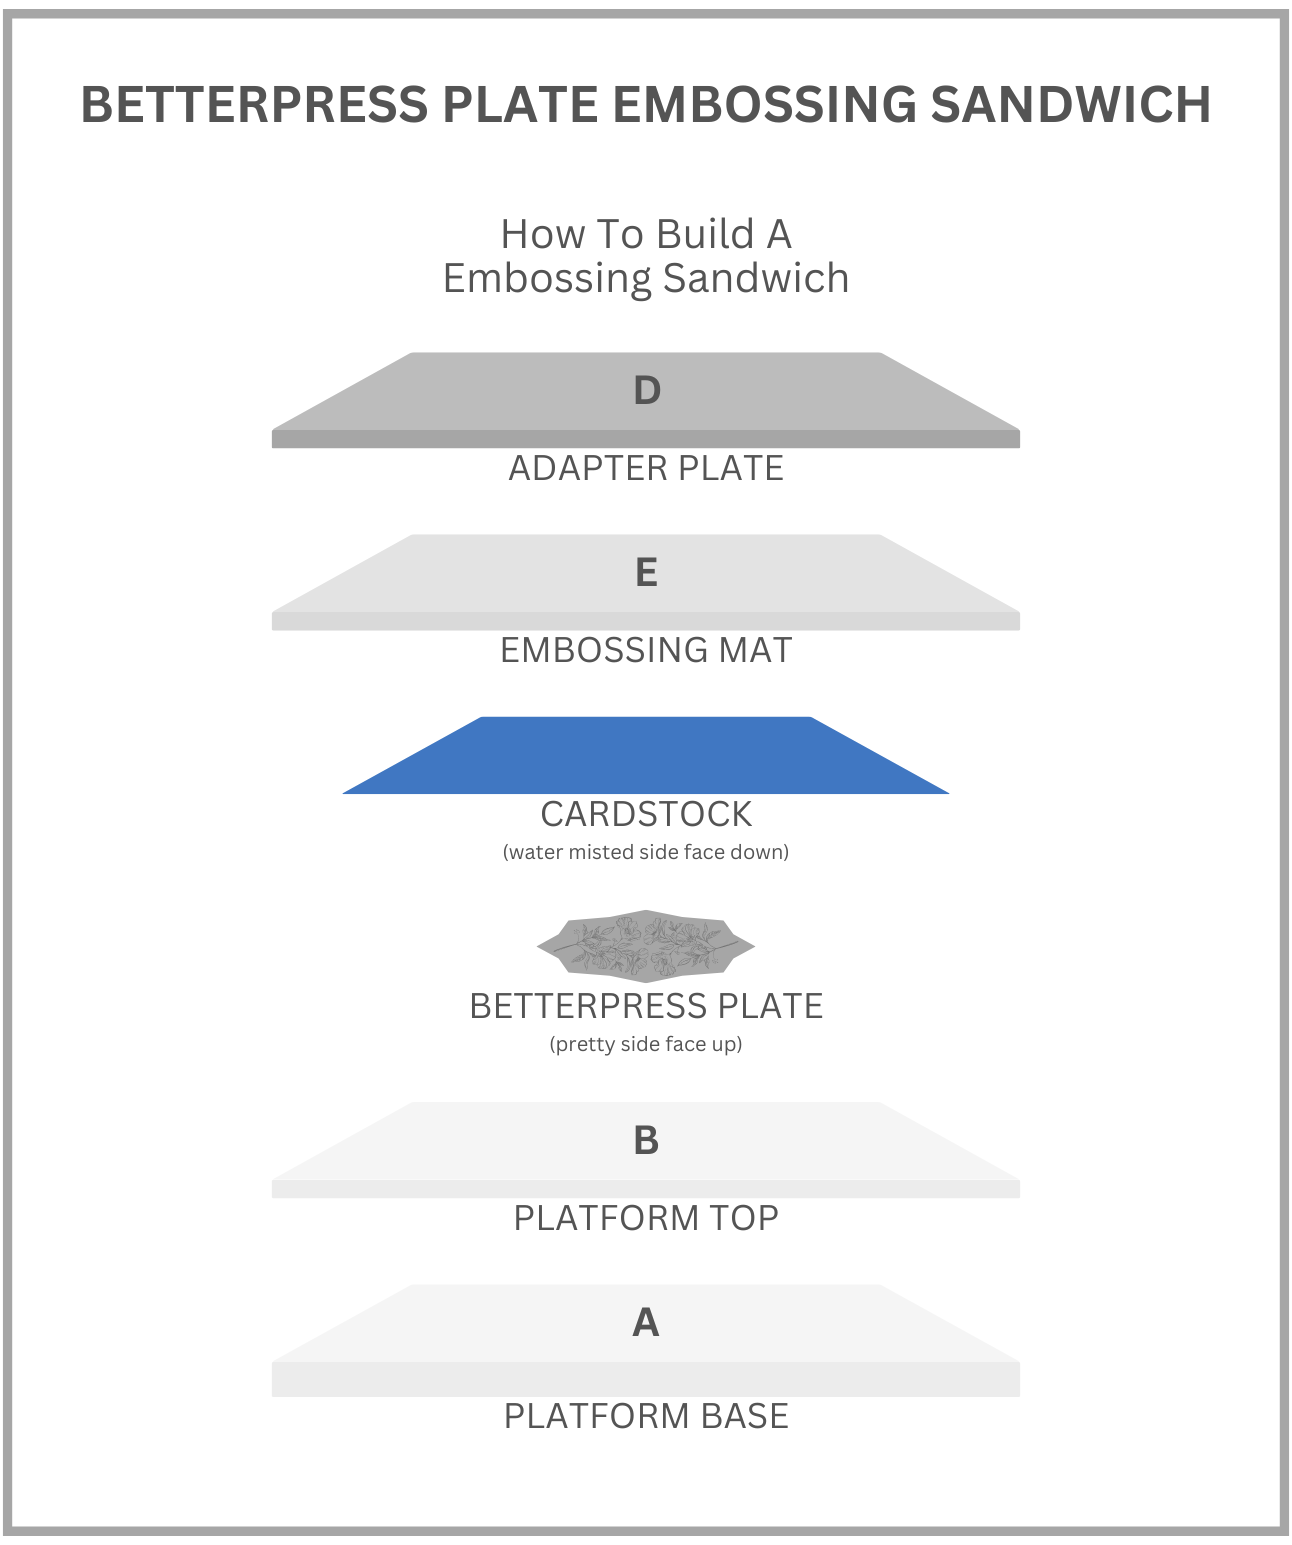
Pressed Background
- Press Plate: Seed Co. Border
- Cardstock: Cosmic Sky
- Lightly mist the front of your cardstock with water.
- Build your embossing sandwich as shown in the image I created below.
- Place the cardstock on top of the BetterPress plate, centering it evenly on all sides.
- Run the sandwich through your die-cutting machine.
- Remove the cardstock and place it under the D adapter plate to dry flat.
- Once dry, trim the panel to 4 1/8” x 5 3/8”.
- Glue the trimmed panel to the white card front.
Flower Pot
- Die Set: Pansy Seed Co.
- Embossing Folder: Plaster
- Oxide Ink: Pumice Stone – apply with your finger
- Cardstock Colors:
- Truffle – dirt
- Anchor – flower pot
- Assemble die-cuts with glue.
- Don’t glue along the bottom dirt line so that a stems can be tucked it later.
- Adhere with 1mm foam squares.
Pansy Flowers
- Die Set: Pansy Seed Co.
- Cardstock Colors:
- Sunkissed – small flower (top layer) & pansy centers
- Beeswax – small flower (back layer)
- Rainforest – small flower leaves & stem
- Fern – pansy leaves & stem
- Lavender – pansy petals
- Classic White – pansy inner layer & tiny heart centers
- Add details to the white pansy inner layer with a purple micron pen.
- Shape the flowers using shaping tools.
- Assemble die-cuts with glue.
- Adhere with 1mm and 2mm foam squares.
Sentiment
- Press Plate: Seed Co. Border
- Cardstock: Classic White
- Ink: Cosmic Sky
- Adhere with glue and 2mm foam squares.
Supplies Used – Potted Pansy Birthday Card
- Spellbinders Small Die of the Month – Pansy Seed Co. #DOM-APR26 | SB |
- Spellbinders Press & Foil of the Month – Seed Co. Border #BPOM-APR26 | SB |
- Spellbinders 3D Embossing Folder – Plaster #E3D-103 | SB | Sb.com |
- Spellbinders ColorWheel Cardstock:
- Spellbinders Essentials Cardstock – Sunnkissed
- Distress Oxide Ink – Pumice Stone | SB | Sb.com |
- BetterPress Ink – Cosmic Sky #BPI-003 | SB | Sb.com |
- Sakura Micron Pen 05 – Purple | Blick |
Tools Used
- Spellbinders Platinum Six | SB | Sb.com |
- Spellbinders BetterPress Letterpress System | SB | Sb.com |
- Tim Holtz Paper Trimmer | Sb.com |
- Tim Holtz – Shaping Kit #665304 | Sb.com | Sizzix |
- Handy Craft Tool Set | SB | Sb.com |
- Bearly Art Glue | SB | Sb.com |
- Best Ever Craft Tape – 5/8 in | SB | Sb.com |
- Mighty Mister | SB | Sb.com |
- Foam Squares 1mm – White | SB | Sb.com |
- Foam Squares 2mm – White | Sb.com |
- Foam Squares 3mm – White | Sb.com |
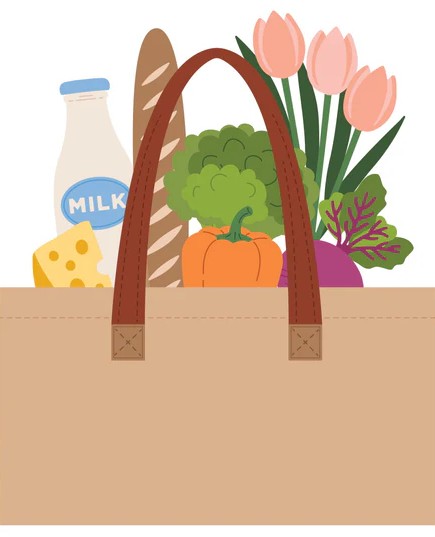
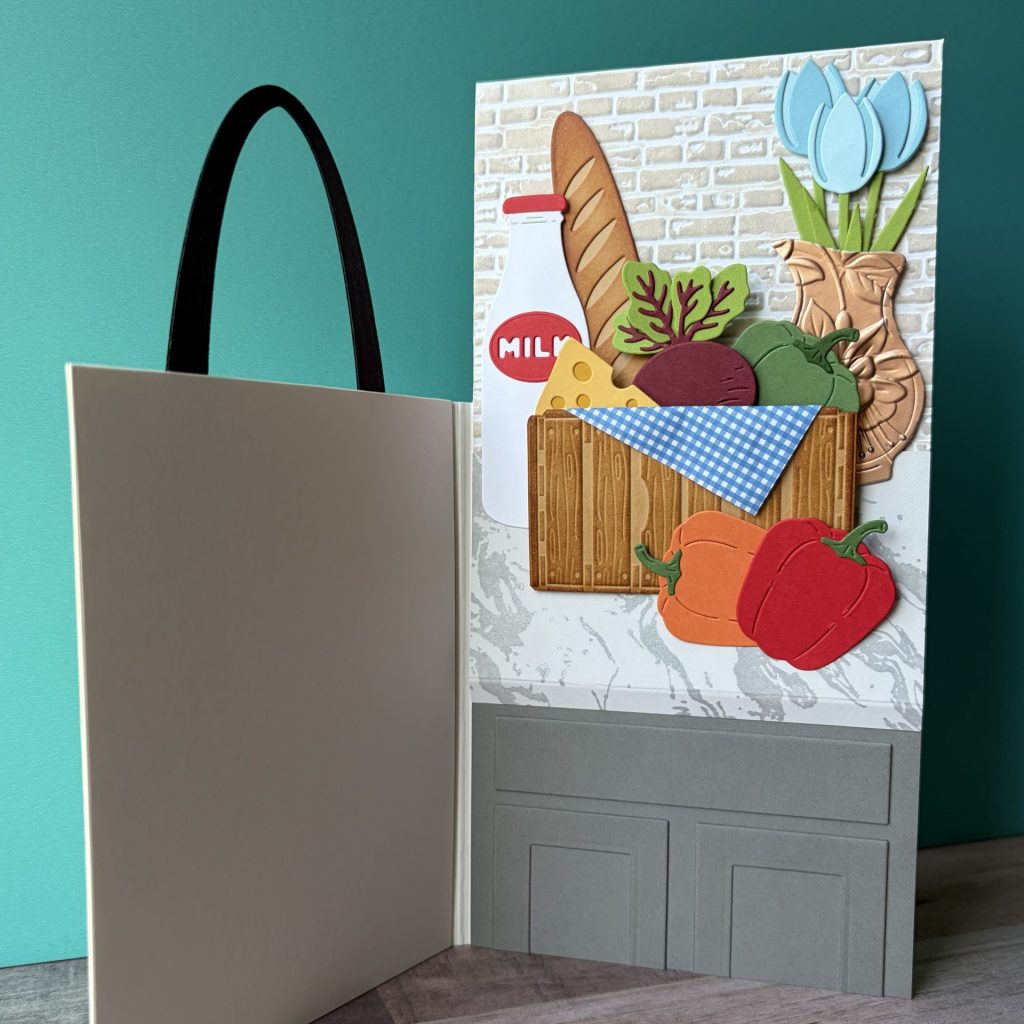
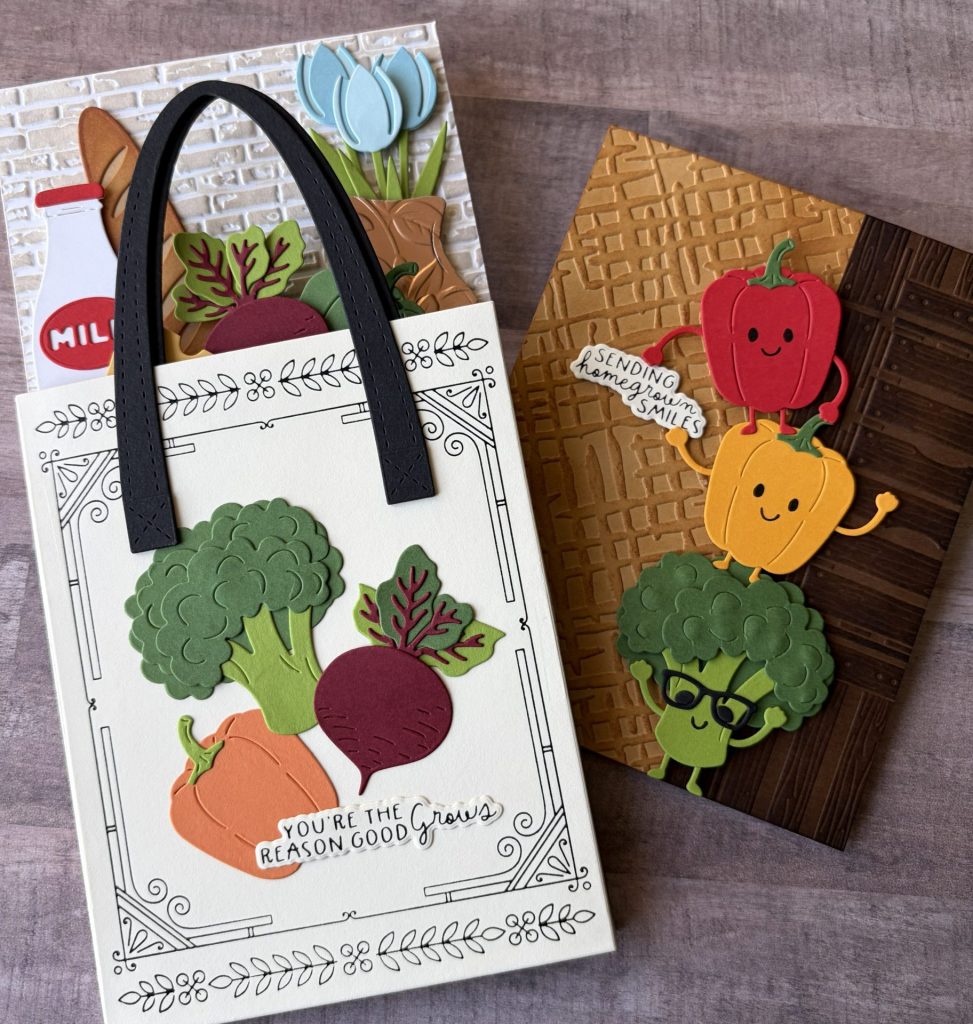
Market Tote Slimline
Large Die Club
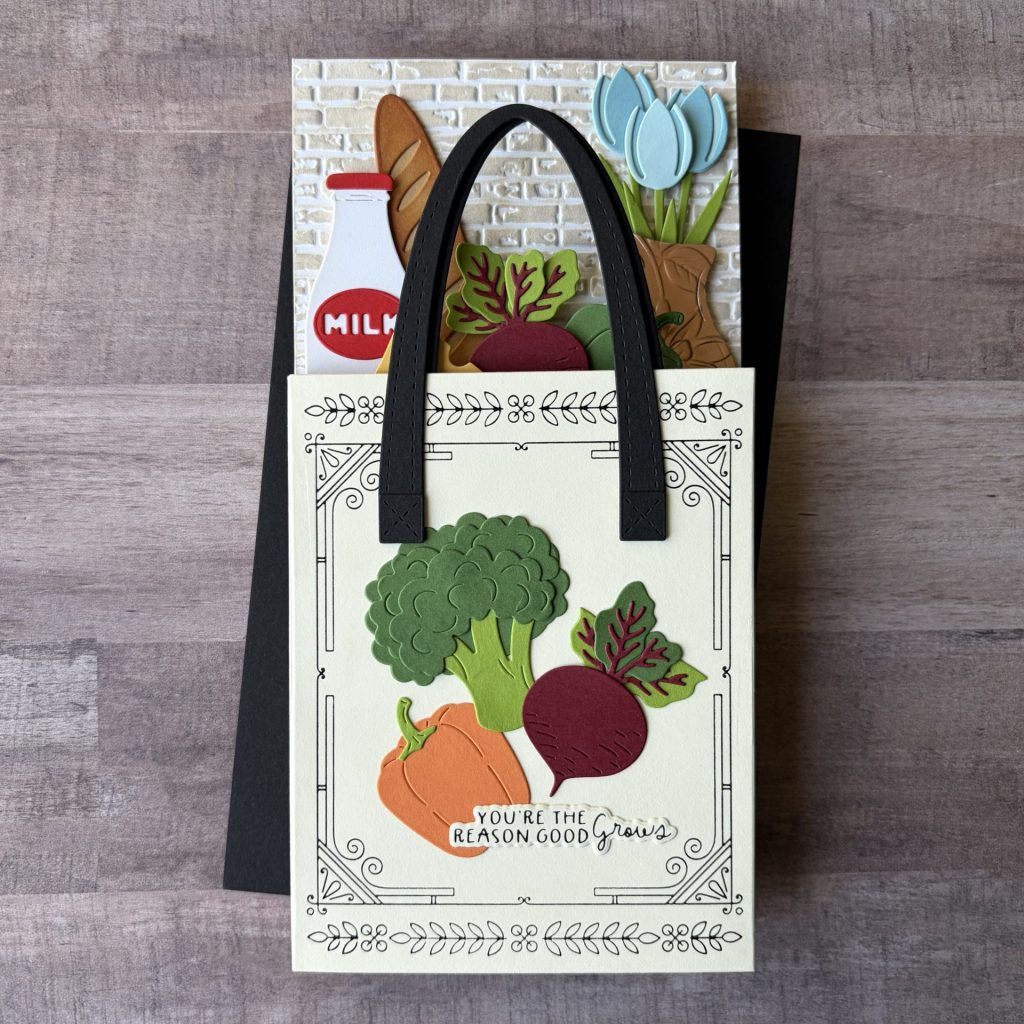
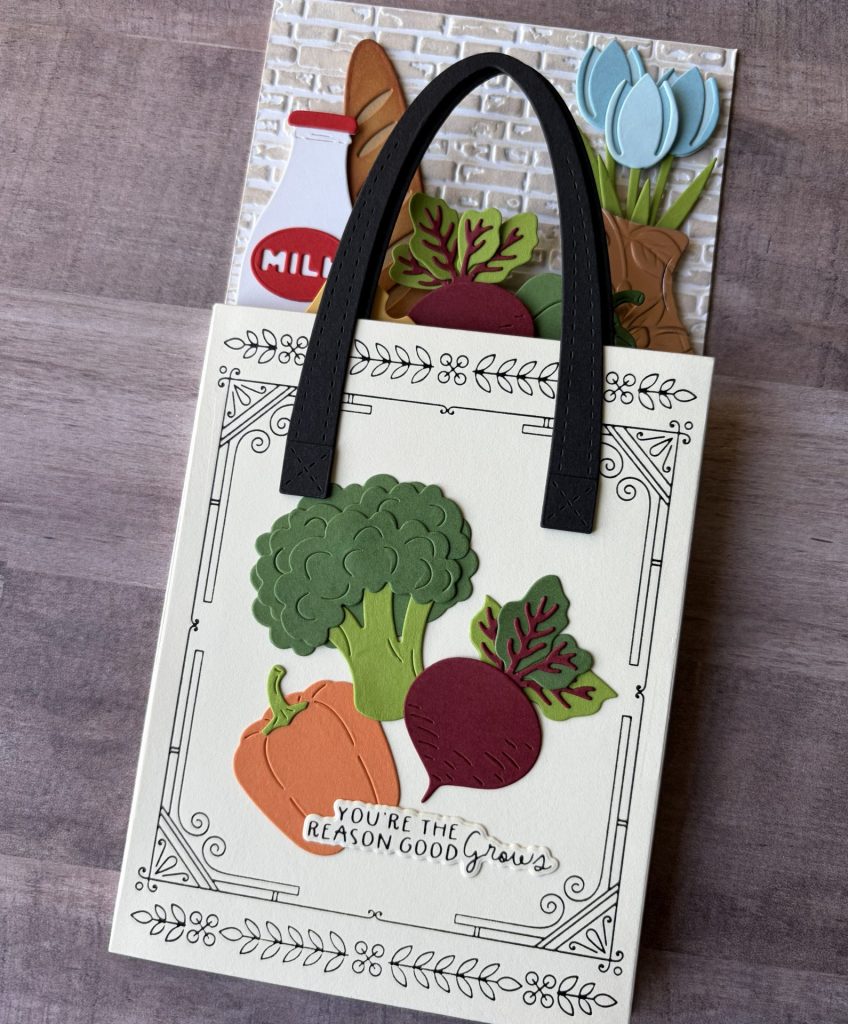
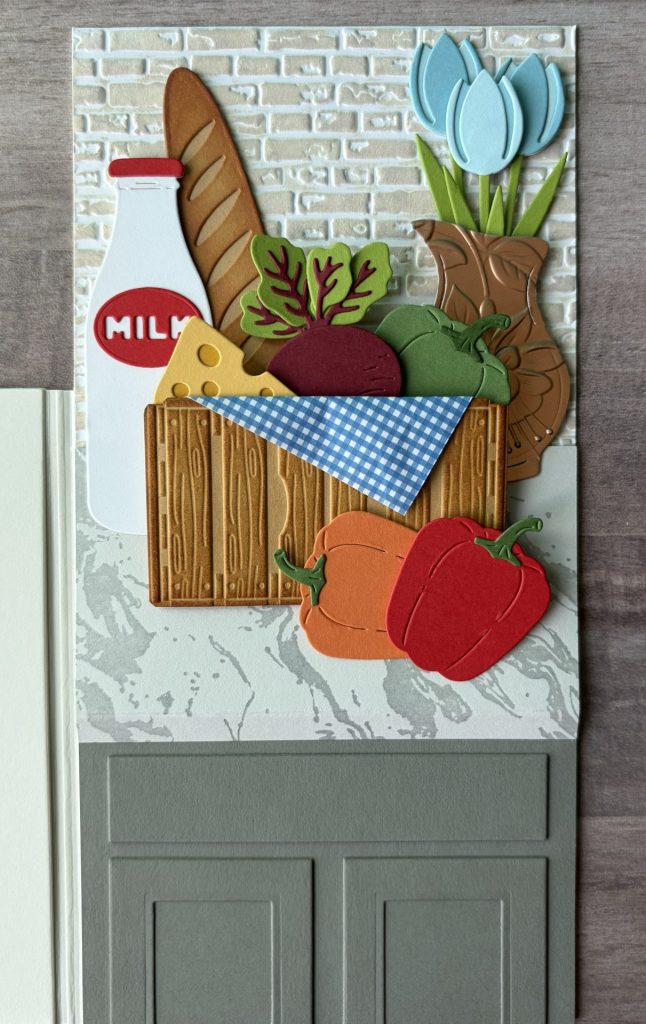
This slimline card features the Market Tote Large Die of the Month paired with the Seed Co. Border Press & Foil of the Month. I love how the front showcases a tote overflowing with fresh goodies like bread, milk, and veggies. But when you open it up, it reveals a charming kitchen counter scene filled with even more farm-fresh goodness. It really captures that cozy farmer’s market feel. The black handles, foiled border, and colorful veggies come together to create a whimsical and eye-catching tote bag card design.
Card Details
Clubs Used
- Large Die of the Month
- Press & Foil of the Month
- 3D Embossing Folder of the Month
Card Base
- Size: 4¼” x 8½”
- Cardstock: Alabaster
- Score your card base to create a ¼” spine
- Trim 3 inches off the top of the card front using scissors.
- The finished card front should measure 4¼” x 5½” (A2 size).
- The back panel should measure 4¼” x 8½”.
Foiled Border
- Press Plate: Seed Co. Border
- Cardstock: Alabaster
- Foil: Black
- Die Set: Precision Layering A2 A – largest die
- Adhere border panel to card front using glue.
Market Tote Bag
- Die Set: Market Tote
- Veggie Cardstock Colors:
- Broccoli – rainforest & fern
- Bell Pepper – carrot & rainforest
- Beet – merlot, rainforest, & fern
- Tote Handles – raven (x4)
- Glue two handles together to make them sturdier. Do this for both handles.
- Adhere the veggies using glue.
- Attach one handle to the top center of the card front.
- Add the second handle slightly offset behind the first.
- Place 1mm black foam squares between the handles to create dimension and stability.
- Cut a panel from alabaster cardstock using the largest Precision Layering A2 A die.
- Glue this panel to the inside of the card front to cover the back of the handles.
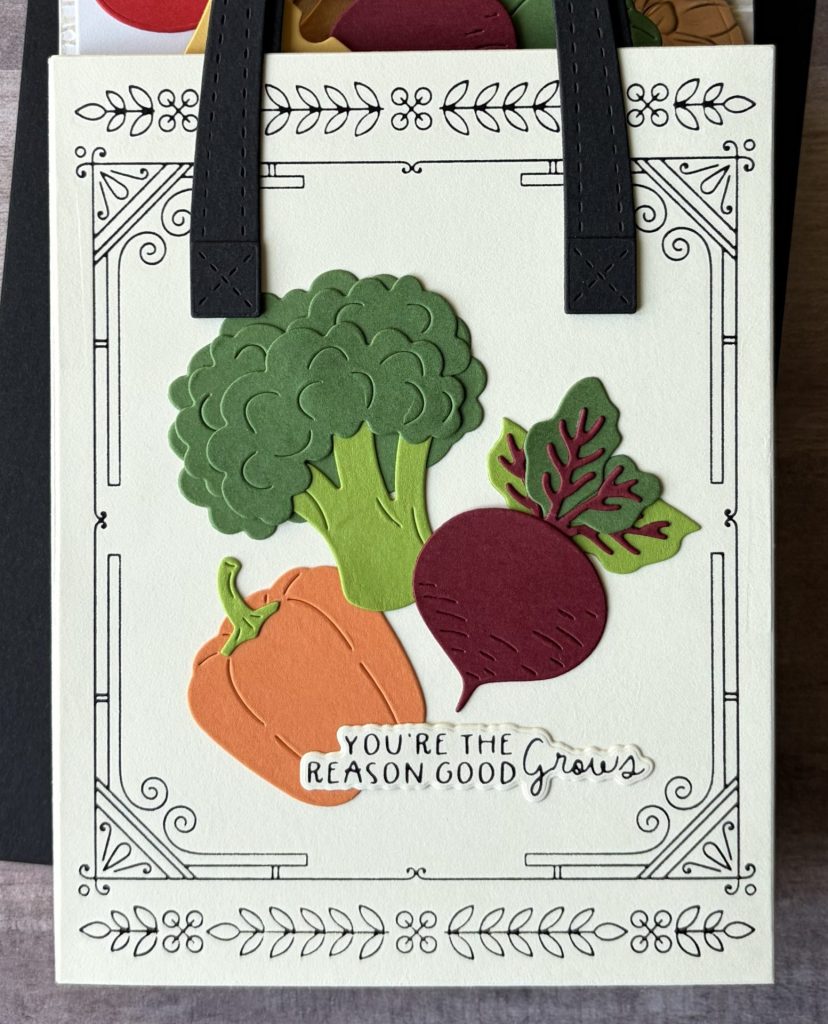
Sentiment
- Press Plate: Seed Co. Border
- Foil: Black
- Cardstock Color:
- Alabaster – “You’re The Reason Good Grows”
- Adhere with glue.
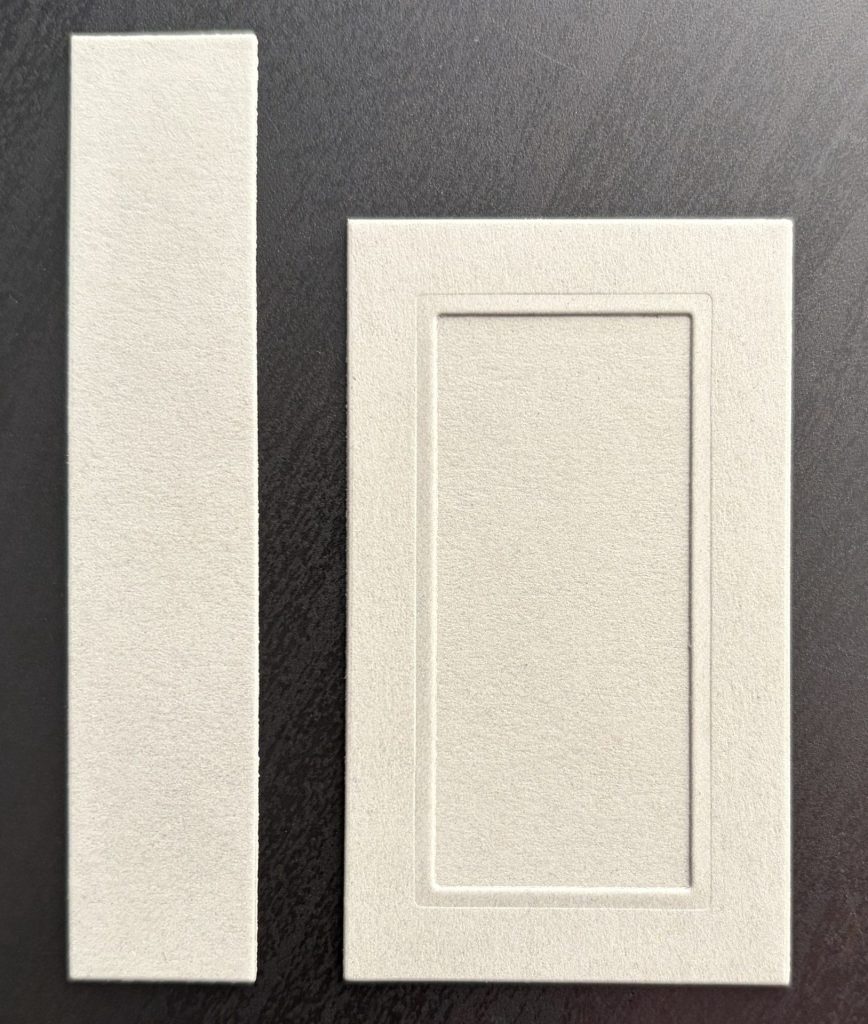
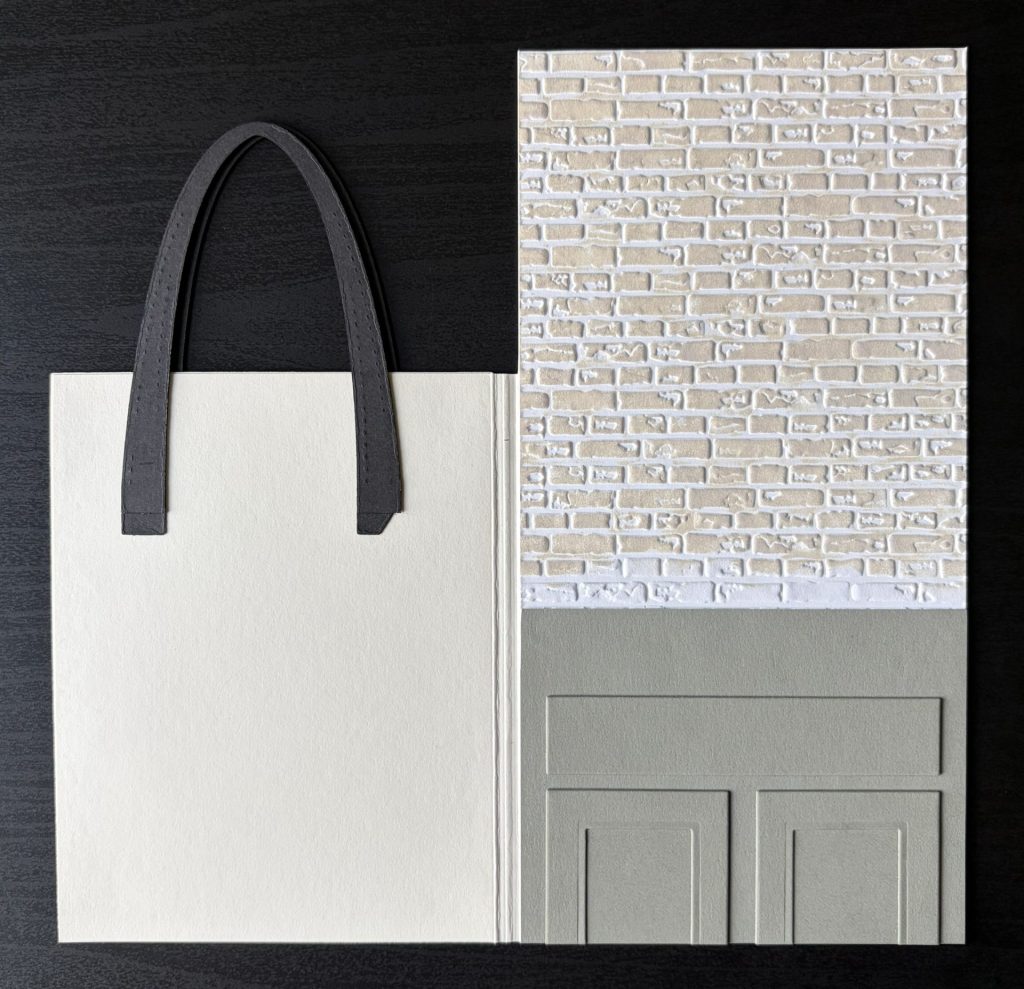
Card Inside Scene
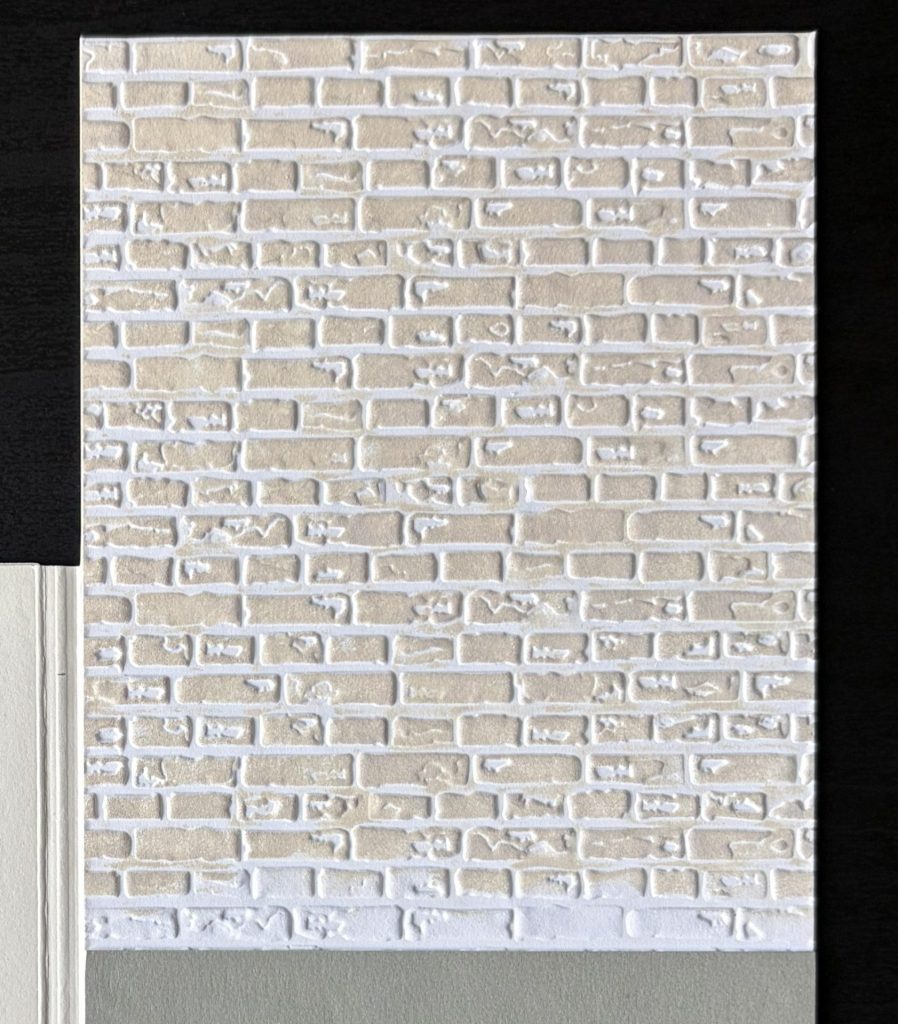
Brick Backsplash
- Size: 4¼” x 8½”
- Embossing Folder: Brick by Brick
- Cardstock: Classic White
- Oxide Ink: Pumice Stone – apply with you finger or a brayer.
Kitchen Cabinet
- Cardstock: Lunar Gray
- Die Set: Precision Mini Slimline A – 2nd smallest die
- Cut 2 and glue them together for stability.
- This creates the cabinet drawer.
- Die Set: Precision Layering A2 A – 3rd & 6th smallest die
- Cut the larger solid rectangle and then the two together to create the frame.
- Glue them together then cut it in half. This creates the cabinet doors.
- Cabinet base layer is 4¼” x 3”
- Adhere with glue.
Kitchen Counter Top
- Press Plate: Gilded Marble
- Cardstock: Fog
- Ink: Lost Shadow
- Metallic Ink: Silver Shine
- Tool: BetterPress
- Trim to 4¼” x 2½” and score at a ¼” from the bottom.
- Adhere using glue at the top and a foam strip just above the score line.

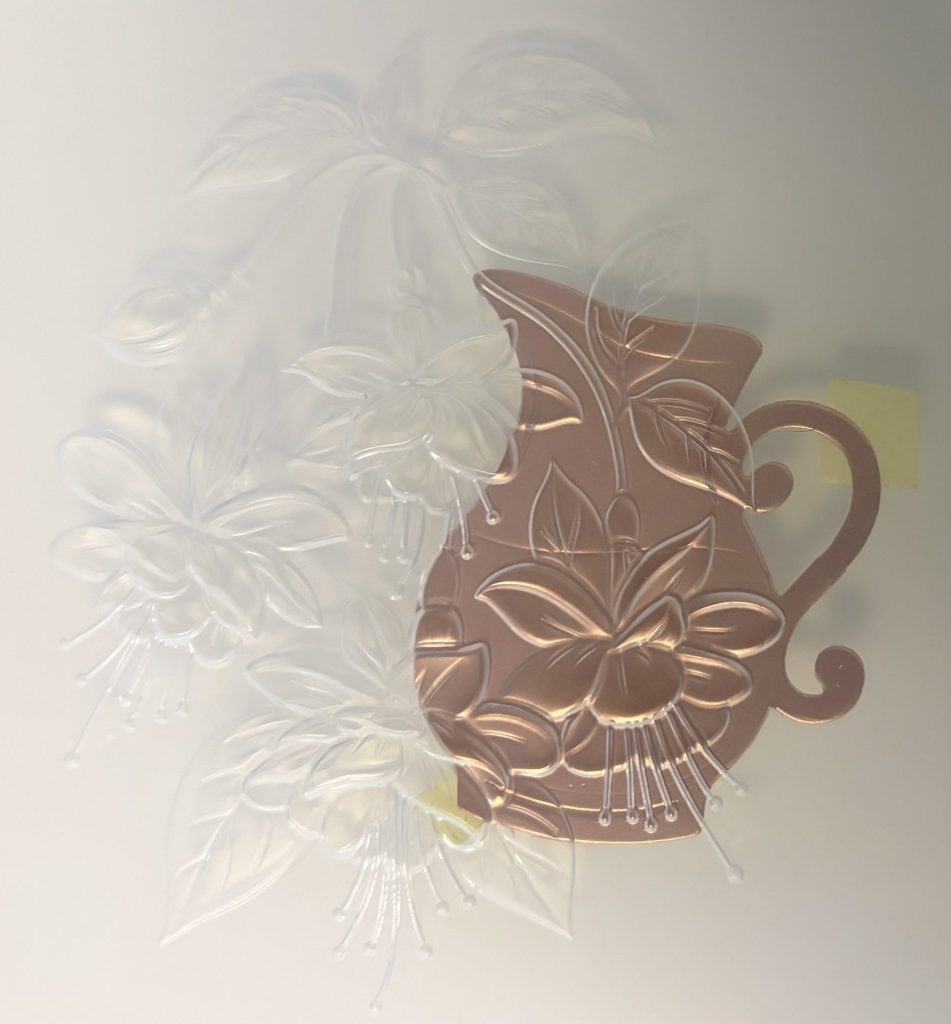
Flower Vase
- Die Set: Pink Lemonade Stand
- Embossing Folder: Magical Fuchsia
- Cardstock: Matte Rose Gold
- Trim off the handle with scissors.
- Adhere with 1mm foam squares.
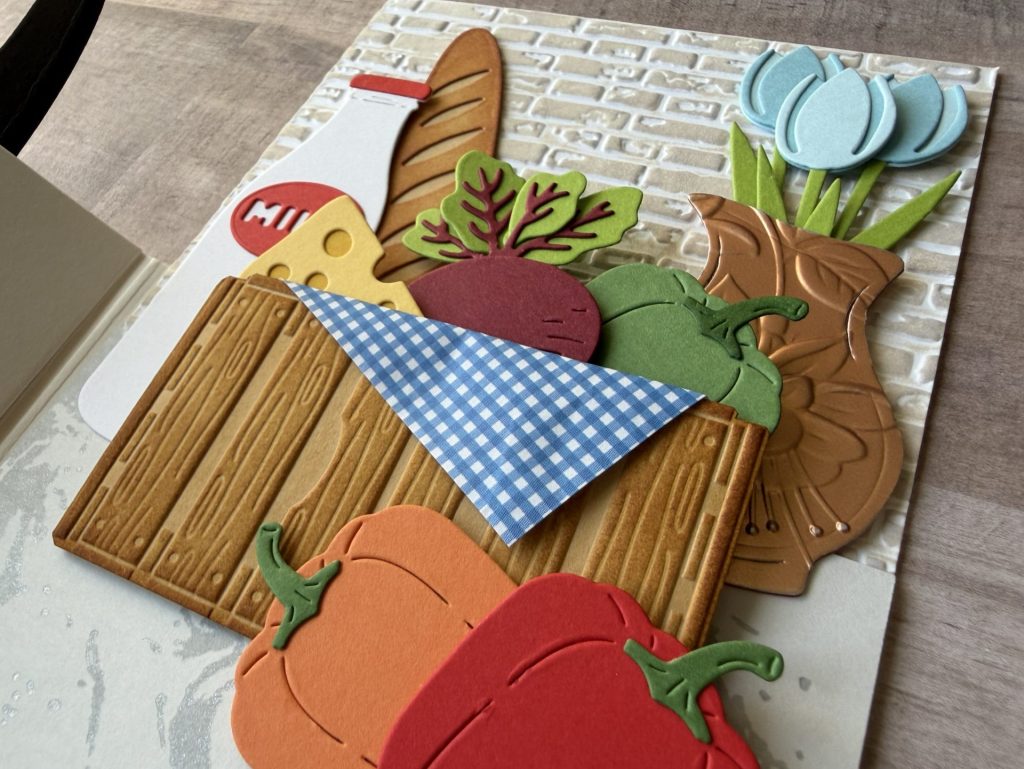
Market Crate
- Embossing Folder: Market Crates
- Cardstock: Fawn
- Ink: Brushed Corduroy – apply with tiny blending tool.
- Die Set: Market Tote – pop up side flaps
- Fussy cut the crate with scissors and add pattern paper to create the cloth.
- Adhere pop up side flaps with glue.
Counter Top Groceries
- Die Set: Market Tote
- Cardstock Colors:
- Bell Peppers – poppy, carrot, & fern
- Beet – Merlot & rainforest
- Cheese – beeswax & tuscan
- Milk – poppy & classic white
- Bread – fawn with tea dye ink blending on the top layer
- Tulips – breeze, malibu, & rainforest
- Assemble die cuts with glue.
- Adhere with 1mm, 2mm, & 3mm foam squares.
Supplies Used – Market Tote Slimline
- Spellbinders Large Die of the Month – Market Tote #DOML-APR26 | SB |
- Spellbinders Press & Foil of the Month – Seed Co. Border #BPOM-APR26 | SB |
- Spellbinders 3D Embossing Folder of the Month – Market Crates #3EOM-APR26 | SB |
- Spellbinders Cutting Dies – Precision Layering A2 A #S5-487 | SB | Sb.com |
- Spellbinders Cutting Dies – Precision Layering Mini Slimline #S4-1158
- Spellbinders Cutting Dies – Pink Lemonade Stand #S6-269 | SB | Sb.com |
- Spellbinders 3D Embossing Folder – Magical Fuchsia #E3D-172 | SB | Sb.com |
- Spellbinders 3D Embossing Folder – Brick by Brick #3EOM-OCT25 | SB |
- Altenew Press Plate – Gilded Marble #ALT10048 | SB | Sb.com |
- Spellbinders ColorWheel Cardstock:
- Poppy | SB | Sb.com |
- Merlot | SB | Sb.com |
- Carrot | SB | Sb.com |
- Beeswax | SB | Sb.com |
- Tuscan | SB | Sb.com |
- Rainforest | SB | Sb.com |
- Fern | SB | Sb.com |
- Breeze | SB | Sb.com |
- Malibu | SB | Sb.com |
- Alabaster | SB | Sb.com |
- Fawn | SB | Sb.com |
- Fog | SB | Sb.com |
- Raven | SB | Sb.com |
- Classic White | SB | Sb.com |
- Spellbinders Essentials Cardstock – Lunar Gray
- Spellbinders Treasured Cardstock – Rose Gold #SCSP-003 | SB | Sb.com |
- Spellbinders Glimmer Hot Foil – Black #GLF-010 | SB | Sb.com |
- Distress Ink:
- Distress Oxide Ink – Pumice Stone | SB | Sb.com |
- Lisa Horton Cloud 9 Metallic Ink – Silver Shine | Sb.com |
Tools Used
- Spellbinders Platinum Six | SB | Sb.com |
- Spellbinders Glimmer Hot Foil System | SB | Sb.com |
- Spellbinders BetterPress Letterpress System | SB | Sb.com |
- Tim Holtz Paper Trimmer | Sb.com |
- Handy Craft Tool Set | SB | Sb.com |
- Bearly Art Glue | SB | Sb.com |
- Best Ever Craft Tape – 5/8 in | SB | Sb.com |
- Mighty Mister | SB | Sb.com |
- Tiny Blending Tool | Sb.com |
- Foam Squares 1mm – White | SB | Sb.com |
- Foam Squares 2mm – White | Sb.com |
- Foam Squares 3mm – White | Sb.com |
- Foam Strips – White | SB | Sb.com |
- Foam Squares 1mm – Black | SB |
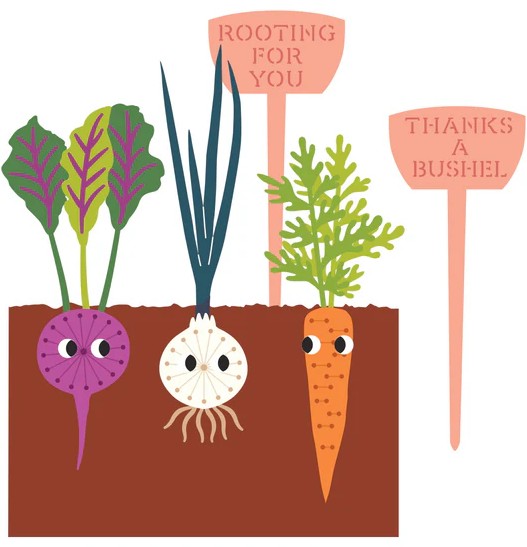
Stitched Garden Roots Card
Stitching Die Club
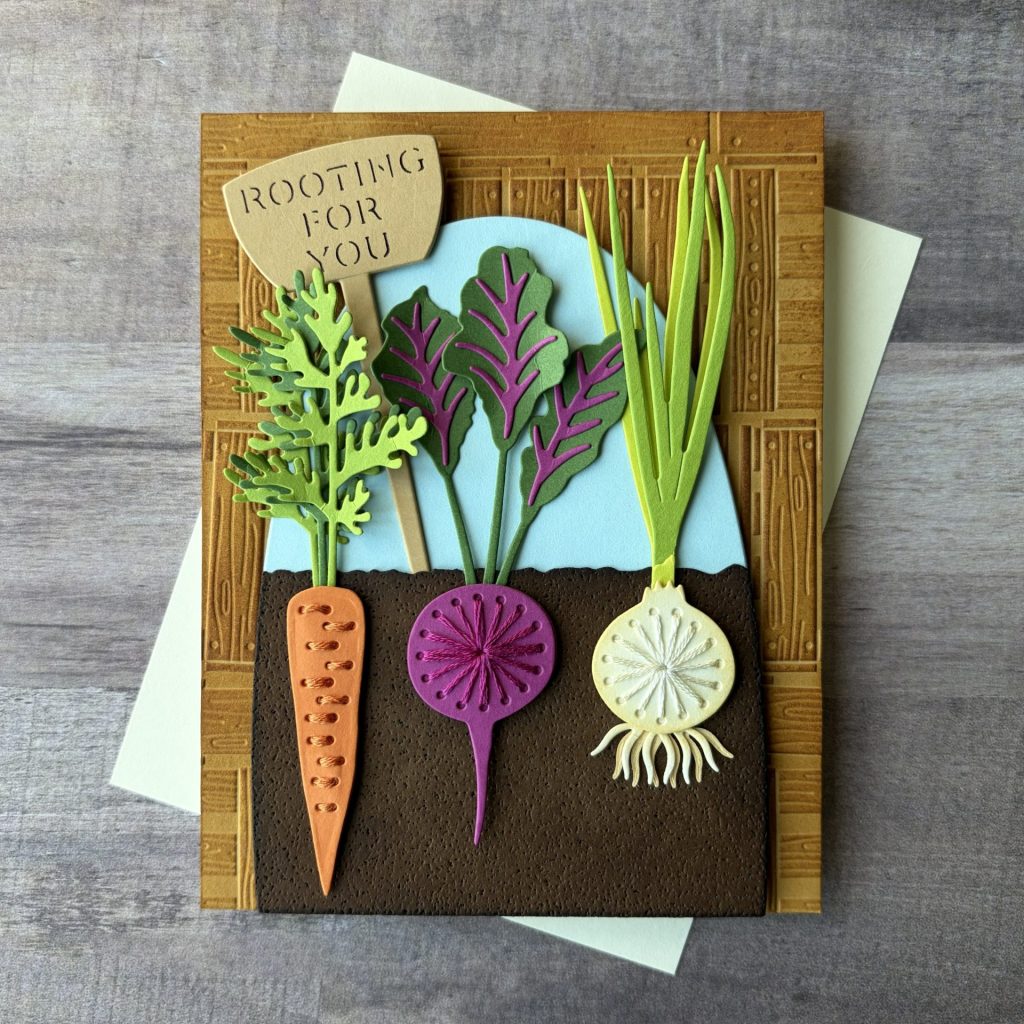
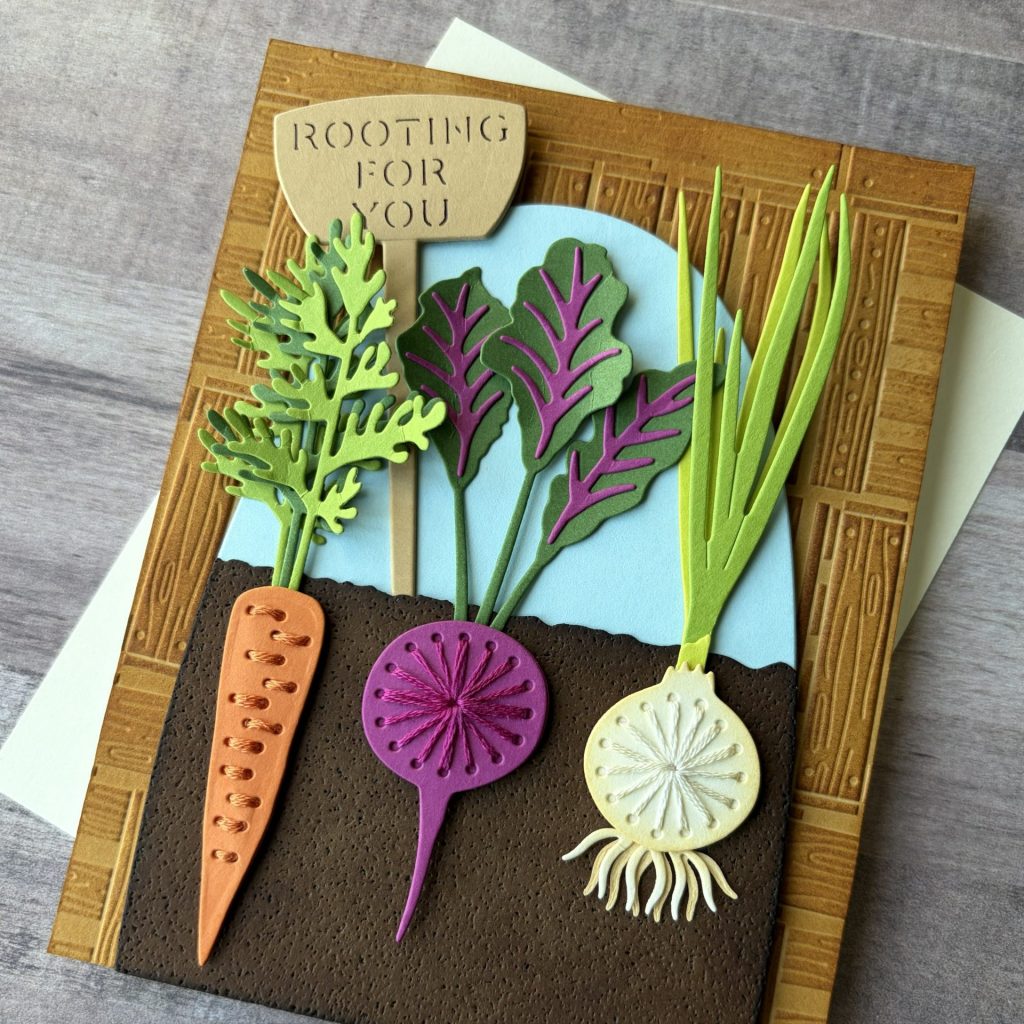
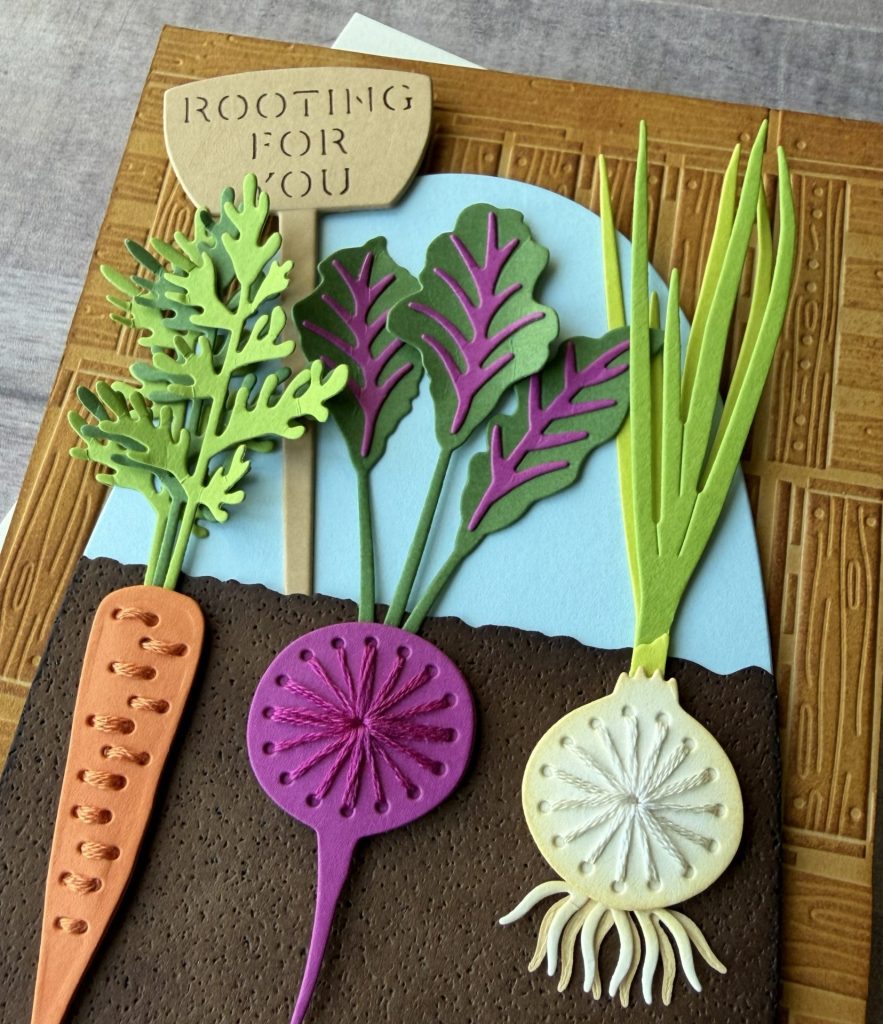
For this card I used the Rooting For You Stitching Die of the Month along with the Market Crates 3D Embossing Folder. This one has such a fun, earthy feel with the root vegetables lined up in their little soil bed. The stitched details add that extra handmade texture, and the crate-style background really pulls the whole farm theme together. It’s simple, but full of personality.
Card Details
Clubs Used
- Stitching Die of the Month
- 3D Embossing Folder of the Month
Card Base
- A2 Size: 4¼” x 5½”
- Cardstock: Fawn
- Embossing Folder: Market Crates
- Ink: Brushed Corduroy – apply with tiny blending tool.
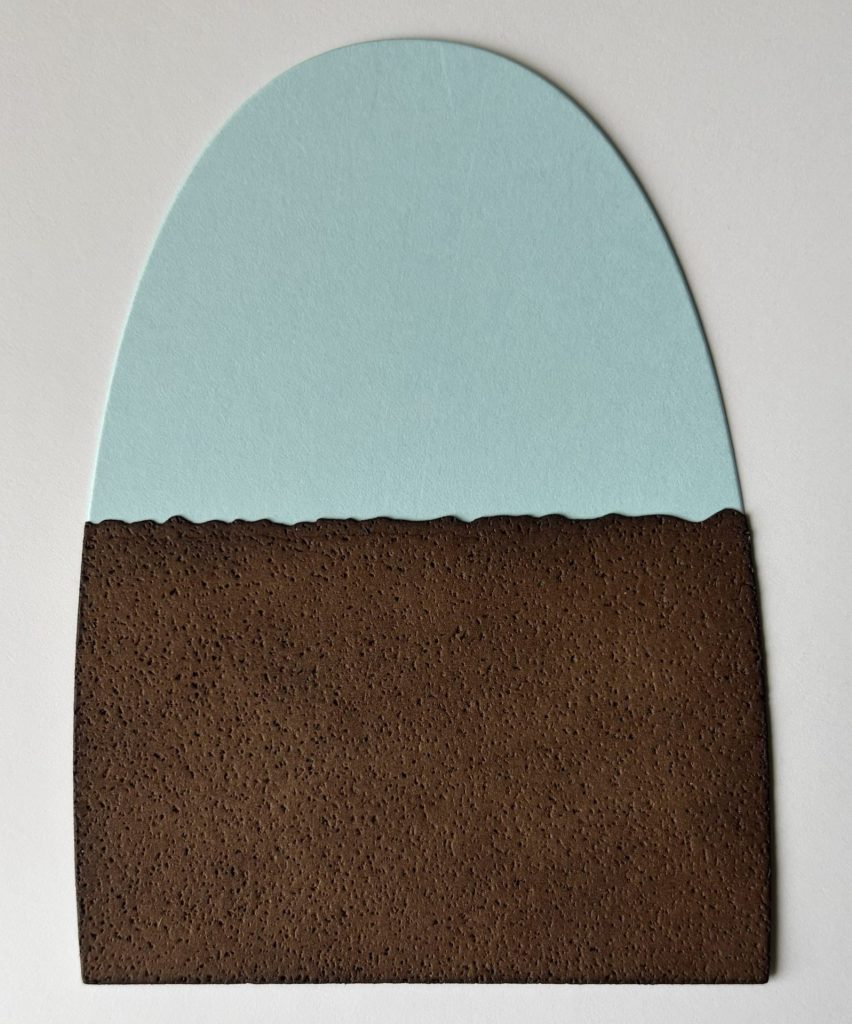
Arch
- Die Set: Arch Labels & Tag – 4th largest die
- Cardstock: Breeze
- Die Set: Rooting for You – dirt
- Cardstock: Truffle
- Ink: Ground Espresso – apply with tiny blending tool around the edges.
- Dry embossed with rough sandpaper for texture.
- Assemble with glue.
- Don’t glue along the top dirt line so that a sign can be tucked behind it later.
- Adhere to card base with 2mm foam squares.
Vegetable Die-cuts
- Die Set: Rooting For You
- Carrot Cardstock Colors:
- Carrot – carrot (stitched & solid)
- Rainforest – carrot leaves (x2)
- Fern – carrot leaves
- Beet Cardstock Colors:
- Mulberry – beet (stitched & solid) & leaf veins
- Fern – beet leaves
- Onion Cardstock Colors:
- Alabaster – onion (stitched & solid) & roots (x2)
- Peridot – onion leaves & tiny piece
- Rainforest – onion leaves
- Ink: Antique Linen
- Shade the edges of the stitched onion and roots with antique linen distress ink.
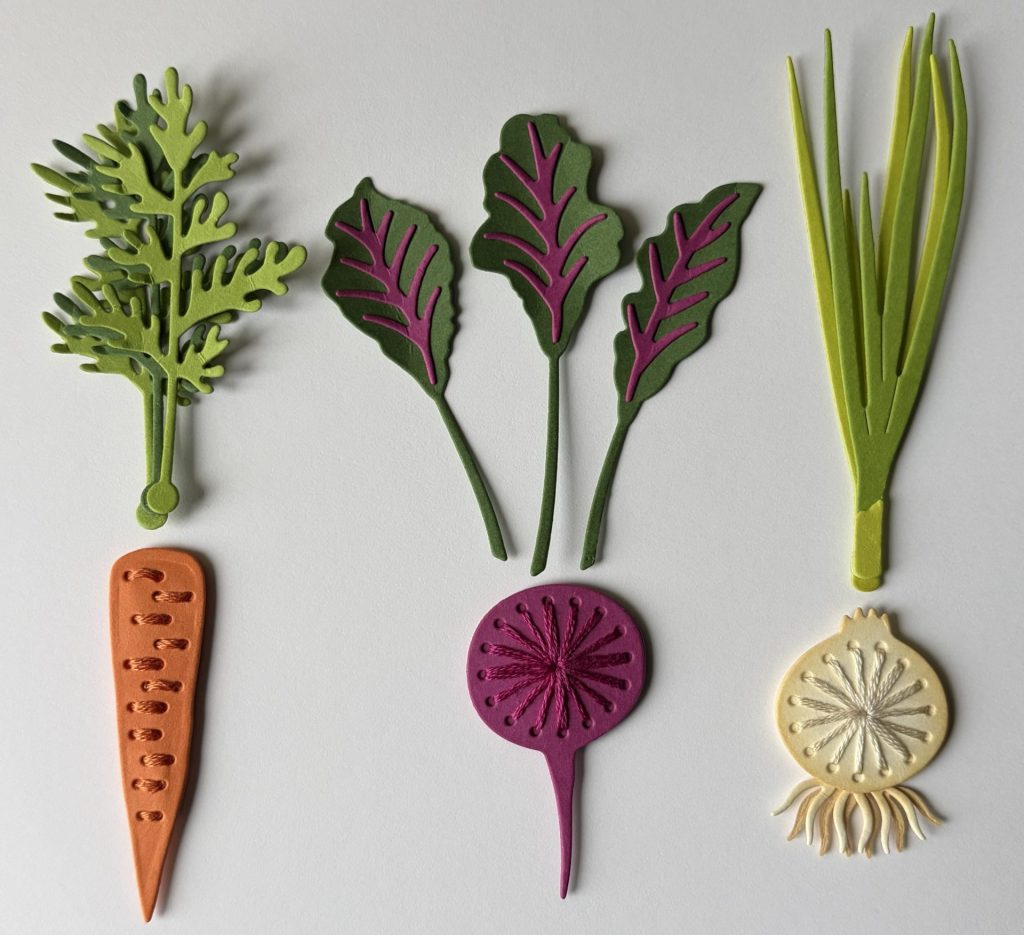
Stitched Vegetables
- Stitching Needle: #22
- Stitching Thread:
- Carrot – #922
- Beet – #718
- Onion – #712
- Assemble vegetables with glue and adhere with 1mm foam squares.
Foiled Sentiment Sign
- Die Set: Rooting For You
- Foil: Espresso Bean
- Cardstock Color: Fawn – “Rooting For You” sign
- Glimmer first, then die cut.
- Cut a second sign from fawn cardstock and glue it behind for stability.
- Adhere with 3mm foam squares.
Supplies Used – Stitched Garden Roots Card
- Spellbinders Stitching Die of the Month – Rooting For You #DOMST-APR26 | SB |
- Spellbinders 3D Embossing Folder of the Month – Market Crates #3EOM-APR26 | SB |
- Spellbinders Cutting Dies – Arch Labels & Tag #S5-624 | SB | Sb.com |
- Spellbinders ColorWheel Cardstock:
- Spellbinders Glimmer Hot Foil – Espresso Bean #GLF-036 | SB | Sb.com |
- Distress Ink:
- DMC 6 Strand Floss:
- Lt Copper #922
- Plum #718
- Cream #712
Tools Used
- Spellbinders Platinum Six | SB | Sb.com |
- Spellbinders Glimmer Hot Foil System | SB | Sb.com |
- Tim Holtz Paper Trimmer | Sb.com |
- Handy Craft Tool Set | SB | Sb.com |
- Bearly Art Glue | SB | Sb.com |
- Best Ever Craft Tape – 5/8 in | SB | Sb.com |
- Mighty Mister | SB | Sb.com |
- Tiny Blending Tool | Sb.com |
- Foam Squares 1mm – White | SB | Sb.com |
- Foam Squares 2mm – White | Sb.com |
- Foam Squares 3mm – White | Sb.com |
- Rough Sand Paper
- Stitching Needle #22
- Scissors
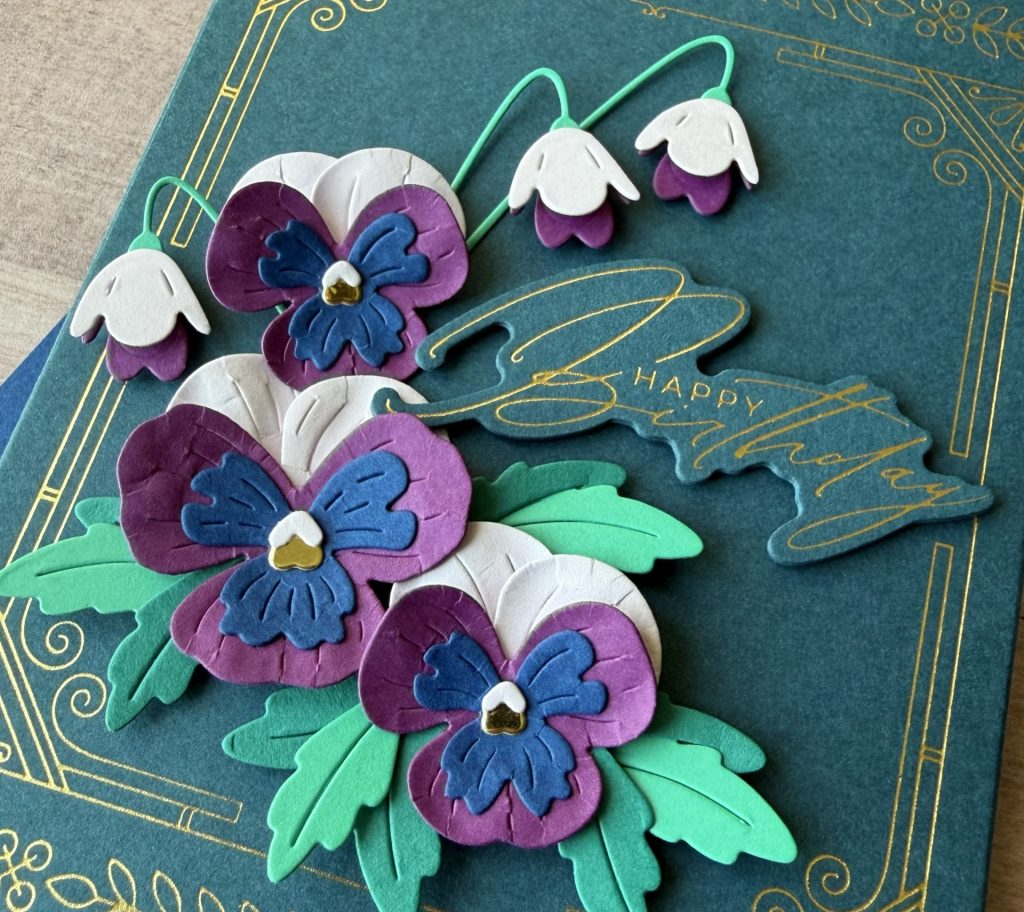
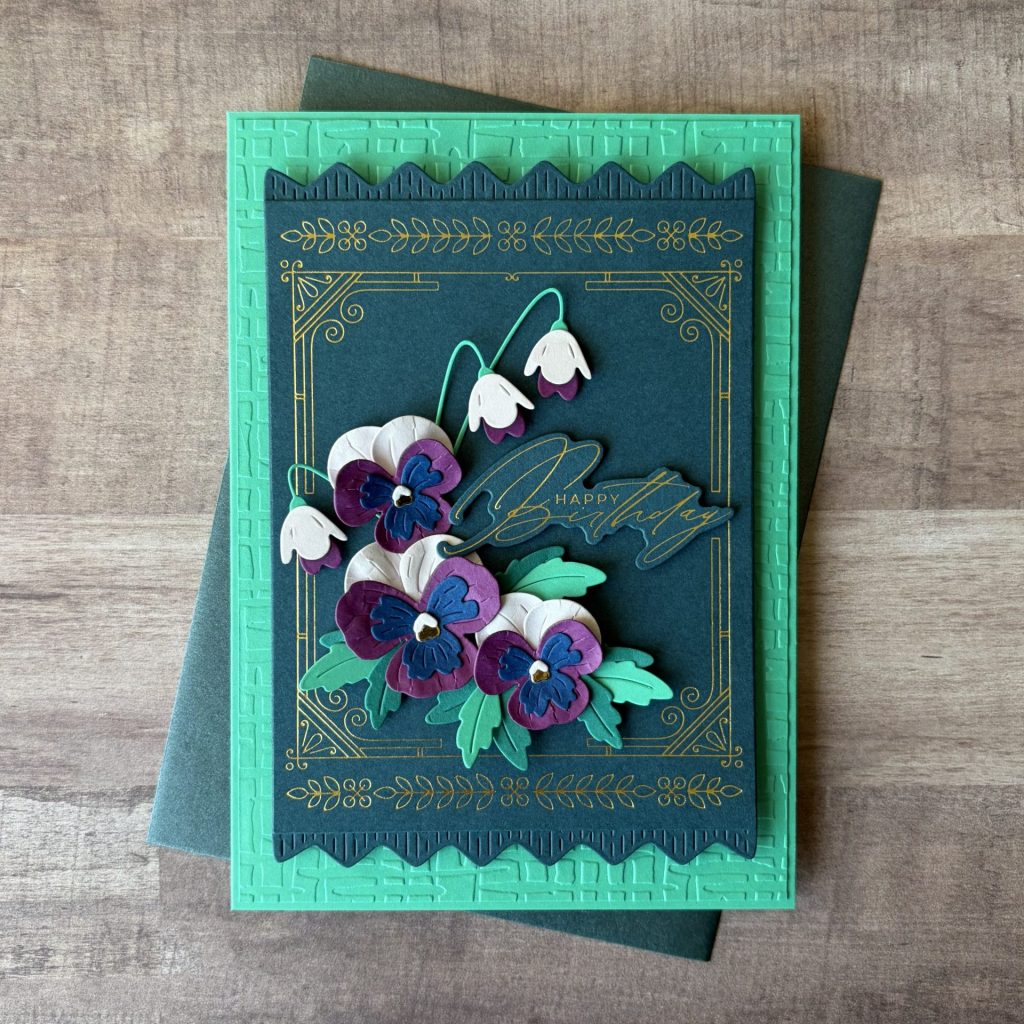
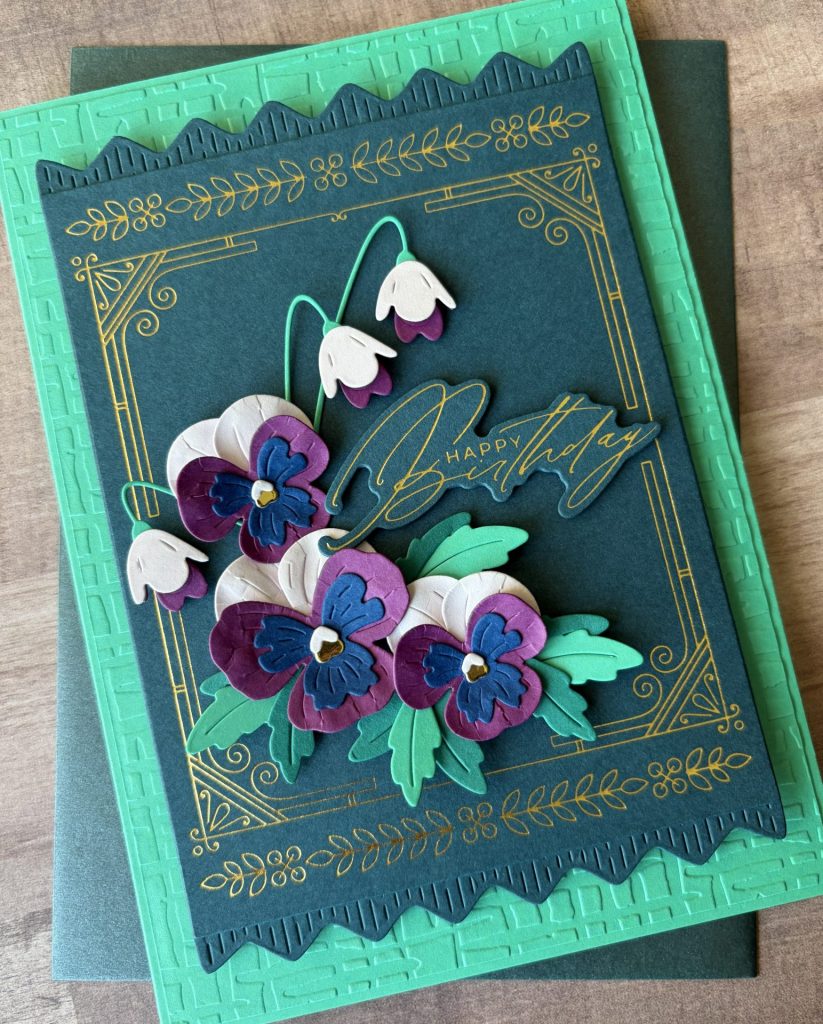
Fancy Pansies Birthday Card
Press & Foil Club
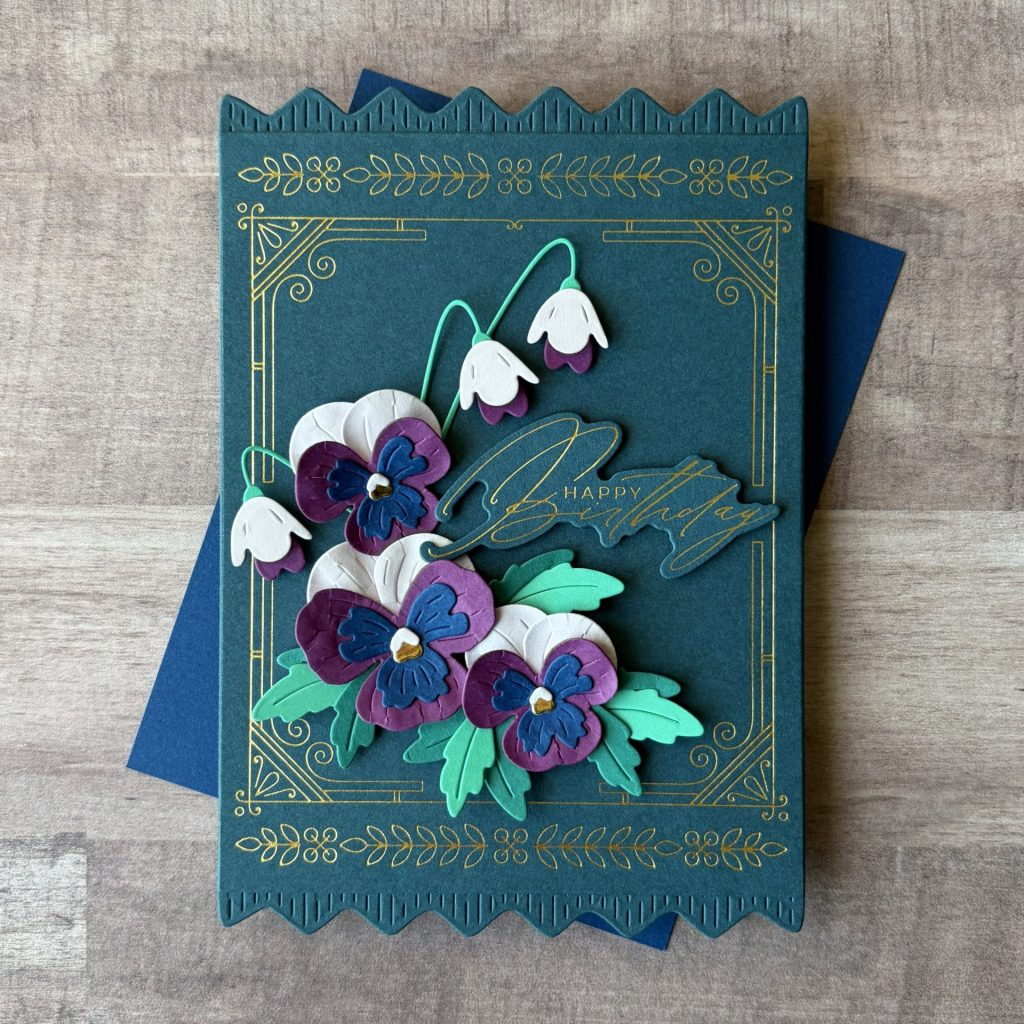
This card combines the Seed Co. Border Press & Foil of the Month with the Pansy Seed Co. Small Die of the Month. The gold foiling adds such a beautiful elegance against that deep teal background, while the pansy florals soften the look and keep it feeling fresh and organic. I love this balance of polished and playful, it’s one of those cards that feels a little extra special.
Card Details
Clubs Used
- Press & Foil of the Month
- Small Die of the Month
Card Base
- A2 Size: 4¼” x 5½”
- Cardstock: Oceanside
Foiled Border
- Press Plate: Seed Co. Border
- Cardstock: Oceanside
- Foil: Gold
- Die Set: Percision Layering A2 A – largest die
Seed Packet Edge
- Die Set: Pansy Seed Co.
- Cardstock Colors:
- Oceanside – seed packet edge (x2)
- Adhere behind the foiled A2 panel using glue.
Foiled Sentiment
- Press Plate: Crafty Hugs Sentiments
- Foil: Gold
- Cardstock Color: Oceanside – “Happy Birthday”
- Adhere with 1mm black foam squares.
Pansy Flowers
- Die Set: Pansy Seed Co.
- Cardstock Colors:
- Teal Topaz – curved stem & pansy leaves
- Blue Spruse – pansy leaves (x2)
- Cosmic Sky – pansy inner layer
- Fairy Tale – pansy 2-petals, tiny heart centers, & small flower (top layer)
- Violet – pansy 3-petals & small flower (back layer)
- Gold Mirror – pansy centers
- Shape the flowers using shaping tools.
- Assemble die-cuts with glue.
- Adhere with 1mm and 2mm black foam squares.
With the seed packet edge, this card measures about 6 inches tall. You can keep it as a shaped card or adhere it onto a 5″ x 7″ embossed card base for a more classic look. Add craft foam underneath for extra dimension and lift.
Supplies Used – Fancy Pansies Birthday Card
- Spellbinders Small Die of the Month – Pansy Seed Co. #DOM-APR26 | SB |
- Spellbinders Press & Foil of the Month – Seed Co. Border #BPOM-APR26 | SB |
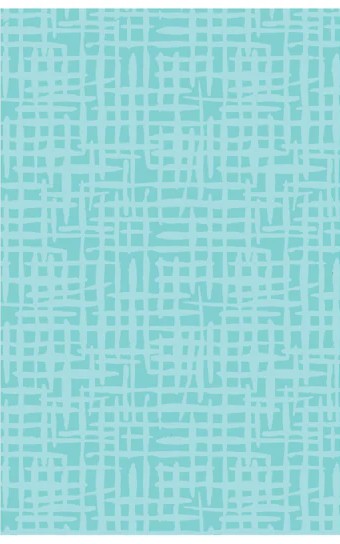
- Spellbinders Embossing Folder of the Month – Market Weave #EOM-APR26 | SB |
- Spellbinders Cutting Dies – Percision Layering A2 A #S5-487 | SB | Sb.com |
- Spellbinders BetterPress Plate – Crafty Hugs Sentiments #BP-298 | SB | Sb.com |
- Spellbinders ColorWheel Cardstock:
- Spellbinders Treasured Cardstock – Gold #SCSP-001 | SB | Sb.com |
- Spellbinders Glimmer Hot Foil – Gold #GLF-014 | SB | Sb.com |
Tools Used
- Spellbinders Platinum Six | SB | Sb.com |
- Spellbinders Glimmer Hot Foil System | SB | Sb.com |
- Tim Holtz Paper Trimmer | Sb.com |
- Handy Craft Tool Set | SB | Sb.com |
- Bearly Art Glue | SB | Sb.com |
- Best Ever Craft Tape – 5/8 in | SB | Sb.com |
- Foam Squares 1mm – Black | SB |
- Foam Squares 2mm – Black | SB |
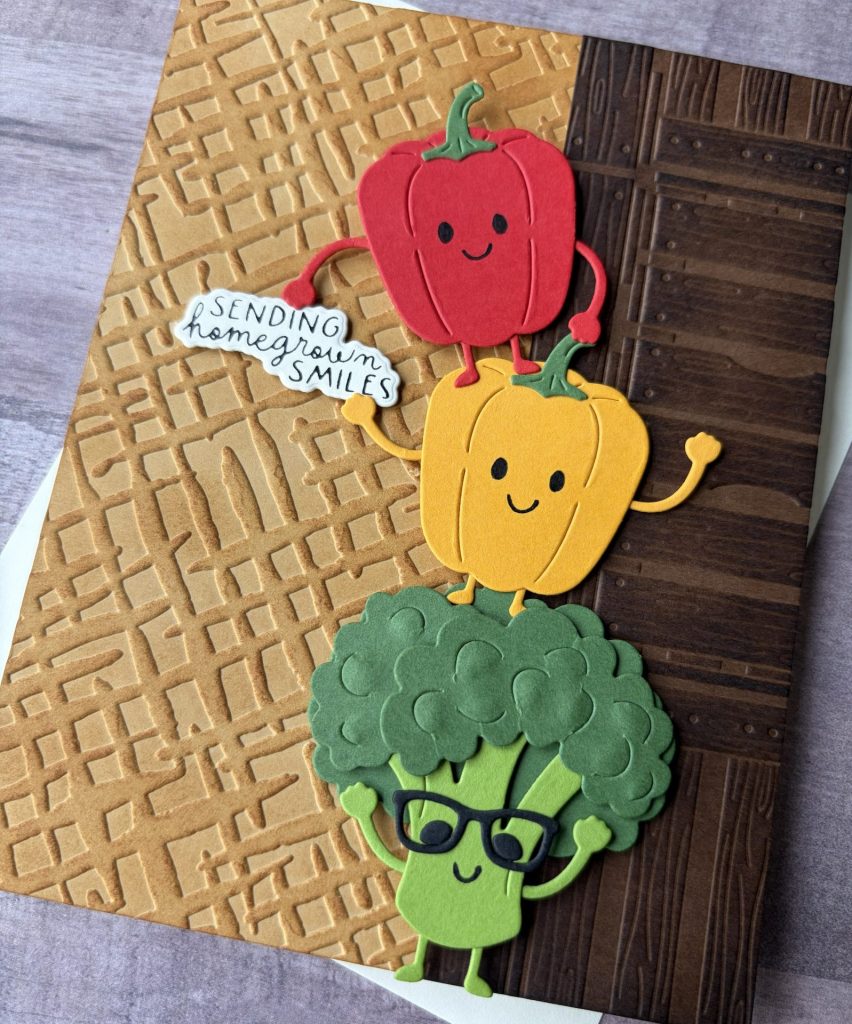
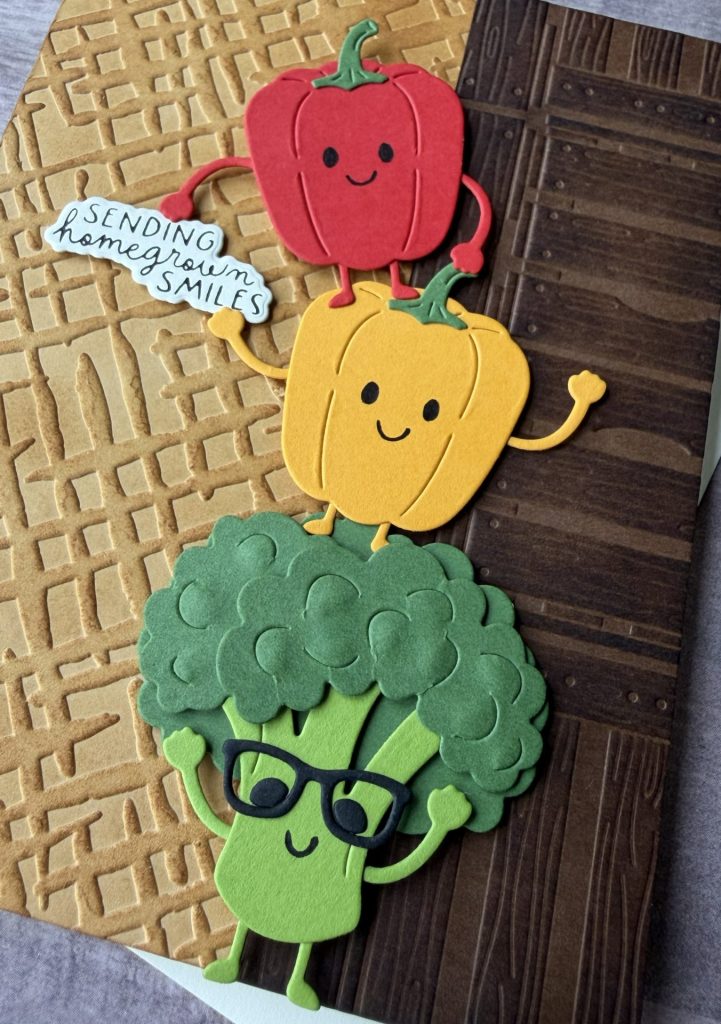
Stacked Veggie Smiles Card
3D Embossing Folder Club
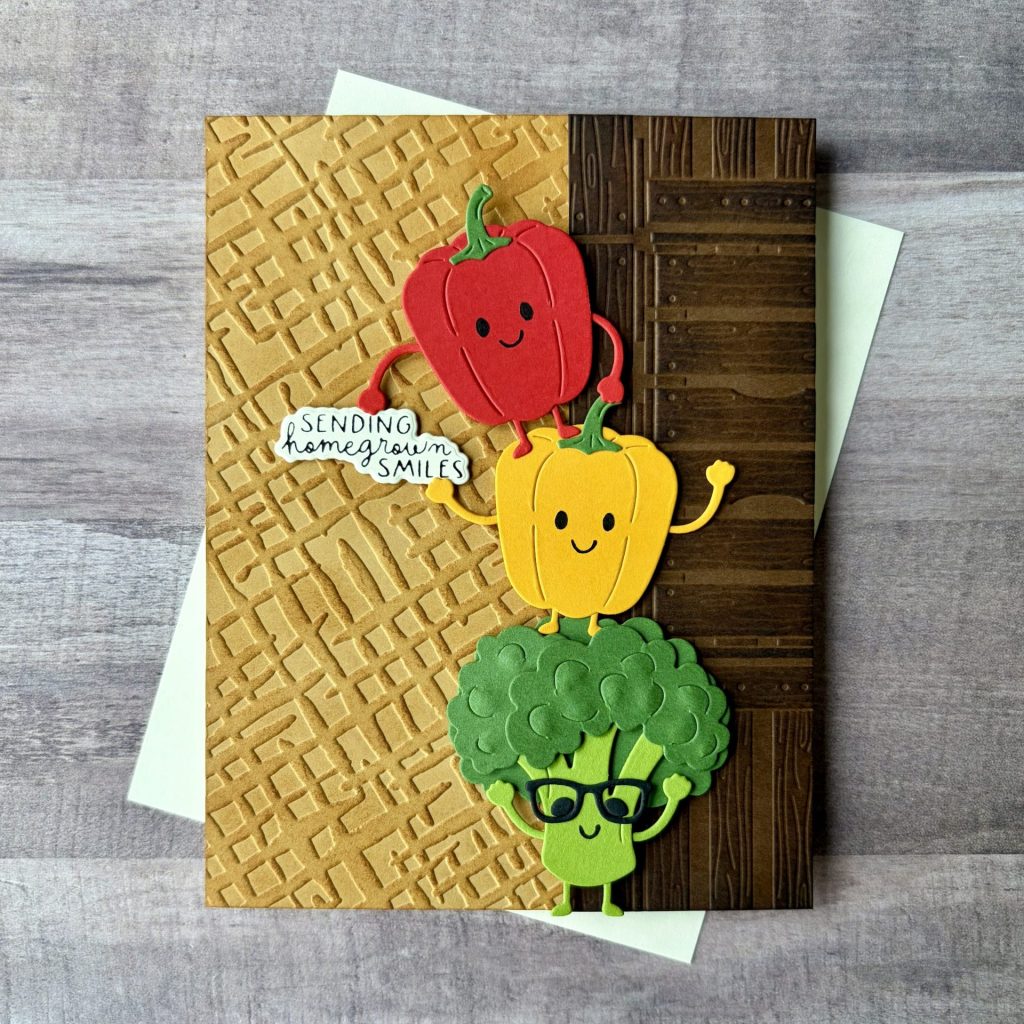
On this card, I went with a more whimsical approach using the Market Tote Large Die of the Month paired with the Market Crates 3D Embossing Folder and Market Weave Embossing Folder for lots of texture. The stacked veggies with their cute little faces bring in a fun, lighthearted vibe, and the “Sending homegrown smiles” sentiment ties it all together perfectly. This one just makes me smile, it’s impossible not to love those happy veggies!
Card Details
Clubs Used
- 3D Embossing Folder of the Month
- Large Die of the Month
- Embossing Folder of the Month
- Press & Foil of the Month
Card Base
- A2 Size: 4¼” x 5½”
- Cardstock: Fawn
- Embossing Folder: Market Weave
- Ink: Brushed Corduroy – apply with tiny blending tool.
Embossed Crates
- Embossing Folder: Market Crates
- Cardstock: Truffle – cut to 2 x 5¾ inches
- Emboss then trim to size: 1¾ x 5½ inches
- Ink: Ground Espresso – apply with tiny blending tool.
- Adhere to the right side of the card base with glue.
Vegetable Die-cuts
- Die Set: Market Tote
- Veggie Cardstock Colors:
- Bell Pepper – poppy & saffron
- Broccoli – rainforest & fern
- Die Set: Summertime Wade Pool – arms & legs cut from poppy, saffron, & rainforest cardstock
- Die Set: Boo Crew – glasses cut from black cardstock
- Die Set: Rooting For You – eyes cut from black cardstock
- Add shaping to the broccoli head using a shaping tool.
- Draw faces to the bell peppers and broccoli with a black micron pen.
- Assemble bell peppers with glue and the broccoli with glue and 1mm foam squares.
- Adhere to card with 1mm & 2mm foam squares.
Sentiment
- Press Plate: Seed Co. Border
- Foil: Black
- Cardstock Color: Alabaster – “SENDING homegrown SMILES”
- Adhere with 1mm foam squares.
Supplies Used – Stacked Veggie Smiles Card
- Spellbinders Large Die of the Month – Market Tote #DOML-APR26 | SB |
- Spellbinders Stitching Die of the Month – Rooting For You #DOMST-APR26 | SB |
- Spellbinders Press & Foil of the Month – Seed Co. Border #BPOM-APR26 | SB |
- Spellbinders 3D Embossing Folder of the Month – Market Crates #3EOM-APR26 | SB |
- Spellbinders Embossing Folder of the Month – Market Weave #EOM-APR26 | SB |
- Spellbinders Cutting Dies – Summertime Wade Pool #DOM-JUN24 | SB |
- Spellbinders Cutting Dies – Boo Crew #S5-487 | SB | Sb.com |
- Spellbinders ColorWheel Cardstock:
- Spellbinders Glimmer Hot Foil – Black #GLF-010 | SB | Sb.com |
- Distress Ink:
- Sakura Micron Pen 03 – Black | Blick |
Tools Used
- Spellbinders Platinum Six | SB | Sb.com |
- Spellbinders Glimmer Hot Foil System | SB | Sb.com |
- Tim Holtz Paper Trimmer | Sb.com |
- Handy Craft Tool Set | SB | Sb.com |
- Tim Holtz – Shaping Kit #665304 | Sb.com | Sizzix |
- Bearly Art Glue | SB | Sb.com |
- Best Ever Craft Tape – 5/8 in | SB | Sb.com |
- Mighty Mister | SB | Sb.com |
- Tiny Blending Tool | Sb.com |
- Foam Squares 1mm – White | SB | Sb.com |
- Foam Squares 2mm – White | Sb.com |
This Is My Kind of Clubbing
I love how the April Spellbinders Clubs come together to create such a wide variety of cards, all tied together with this charming Farm to Craft theme. From pretty pansies and market totes to textured backgrounds and stitched veggie details, these kits are perfect for spring cards, birthdays, and sending a little handmade encouragement and happiness. Whether you enjoy stitching, foiling, die cutting, or embossing, this month’s clubs are full of farm-fresh inspiration.
And don’t forget the first rule of craft club…
TO HAVE FUN!!!
I hope these projects inspire you to pull out your club goodies and create something sweet and garden fresh. If you try a new technique, or finally give stitching a go, I’d love to see it! Be sure to tag me (@silversgrove or @grovecrafted) on Instagram or at Grove Crafted on Facebook.
Until next time… keep crafting and growing creativity.🌱
Happy Crafting!
If you enjoyed these April Spellbinders Club projects, be sure to check out my previous blog posts featuring Spellbinders Clubs where I share more card inspiration and ideas using the monthly club kits. It’s a great way to see even more ways to mix, match, and stretch your supplies.