City Holiday Cards & Tags
Spellbinders – City Holiday Collection by Yana Smakula
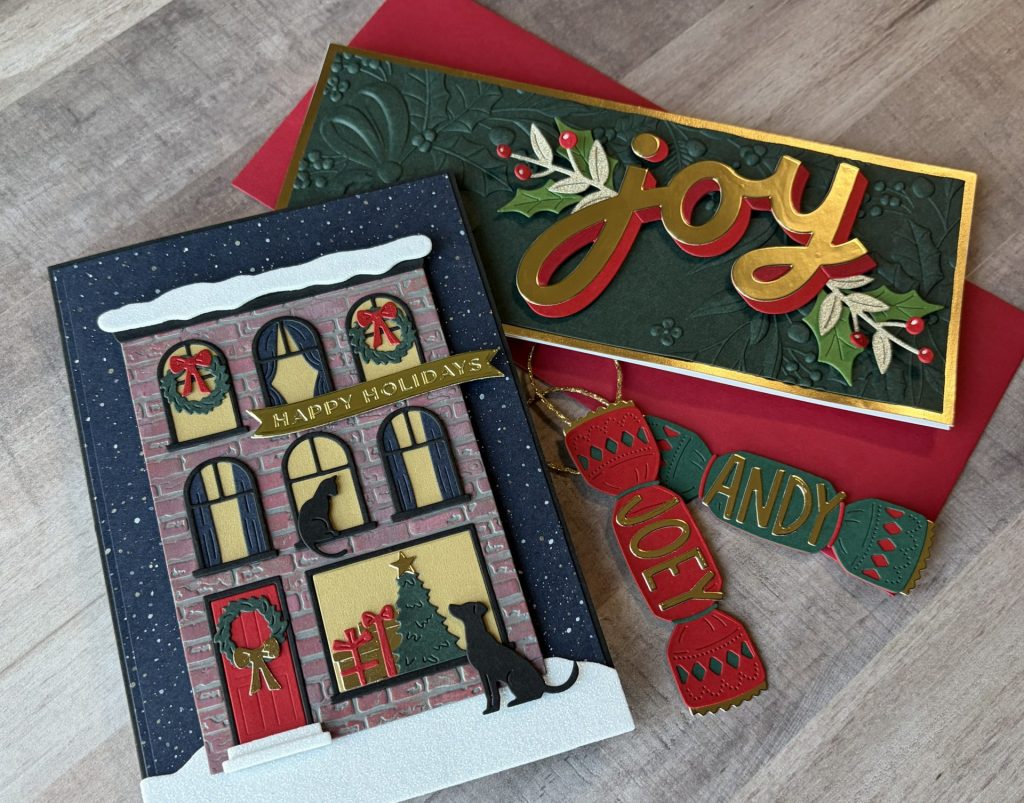
Hello, crafty friends! Holiday card making is one of my favorite ways to slow down and enjoy the season. The City Holiday Collection by Yana Smakula for Spellbinders makes it easy to create projects that feel festive and full of charm. Today I’m sharing three holiday projects using this collection. Two are handmade cards, and the third is a fun personalized tag idea you can use in so many ways.

Disclosure
This post includes affiliate links—if you decide to shop through them, I may earn a small commission (at no extra cost to you). Money earned via affiliate links helps pay the fees to keep this blog up and running. Thanks so much for supporting GroveCrafted and helping me keep the crafty inspiration coming!
City Holiday Collection
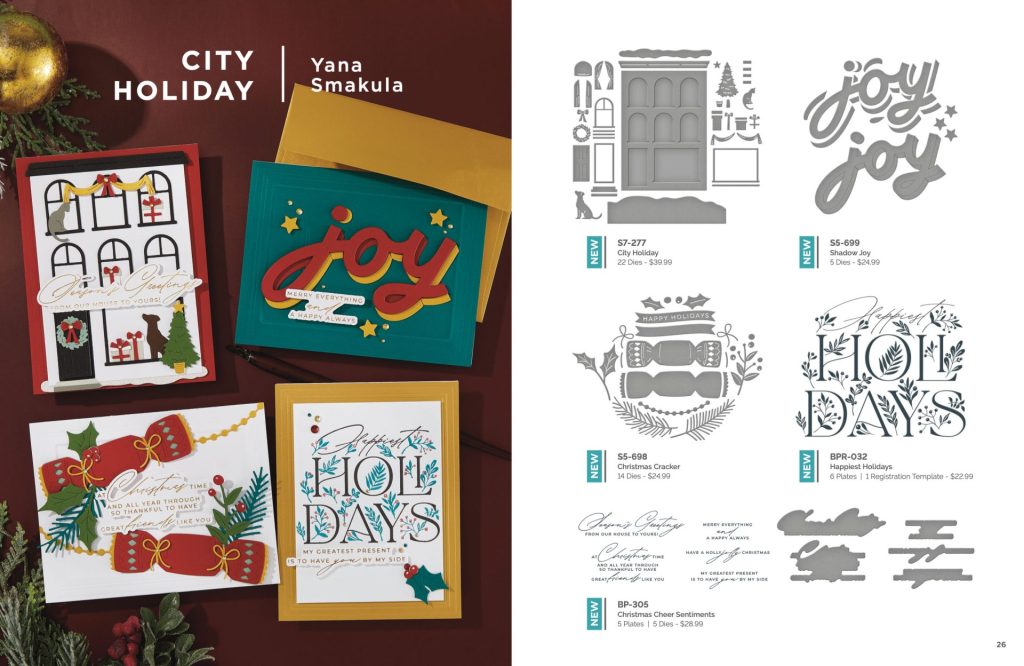
The City Holiday Collection by Yana Smakula for Spellbinders brings together urban architectural flair and festive holiday motifs. With elements like city-style building fronts, bold sentiment dies, letterpress sentiment plates, and intricate decorative accents, this collection adds a distinctive contemporary twist to seasonal projects.
- City Holiday – A die set that builds a three-story holiday building scene, complete with windows, a front door, snow-covered roof, wreaths, gifts, a tree, and even a little cat and dog.
- Shadow Joy – A die set that creates a large lowercase “joy” focal sentiment in a shadow-layered format, plus star accents for embellishment.
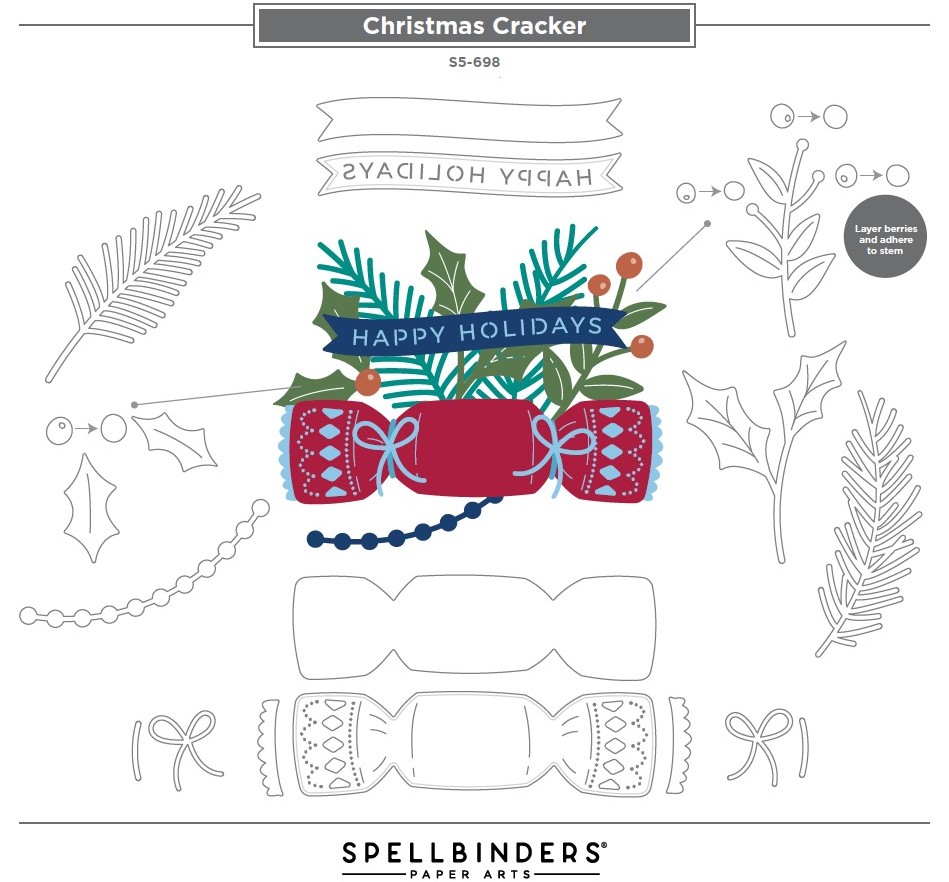
- Christmas Cracker – A die set that builds a festive Christmas cracker motif along with holly leaves & berries, pine sprigs, and a “Happy Holidays” banner.
- Happiest Holidays – BetterPress plates and a registration template, designed to help you build a multi-color letter-press “Happiest Holidays” sentiment with a backdrop of holly berries and sprigs.
- Christmas Cheer Sentiments – A BetterPress sentiment set featuring five warm holiday greetings, each with coordinating plate and die.
Be sure to explore the full City Holiday Collection to discover all the coordinating products.
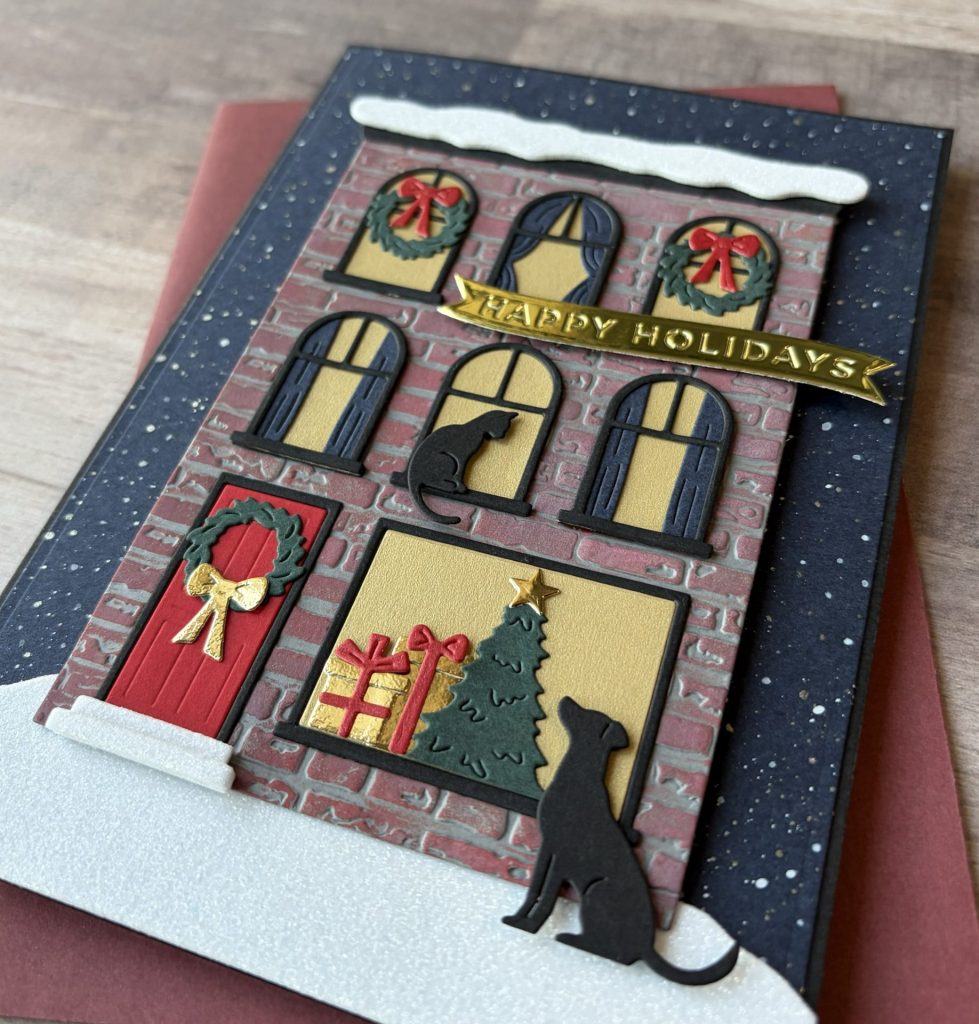
City Holiday Card
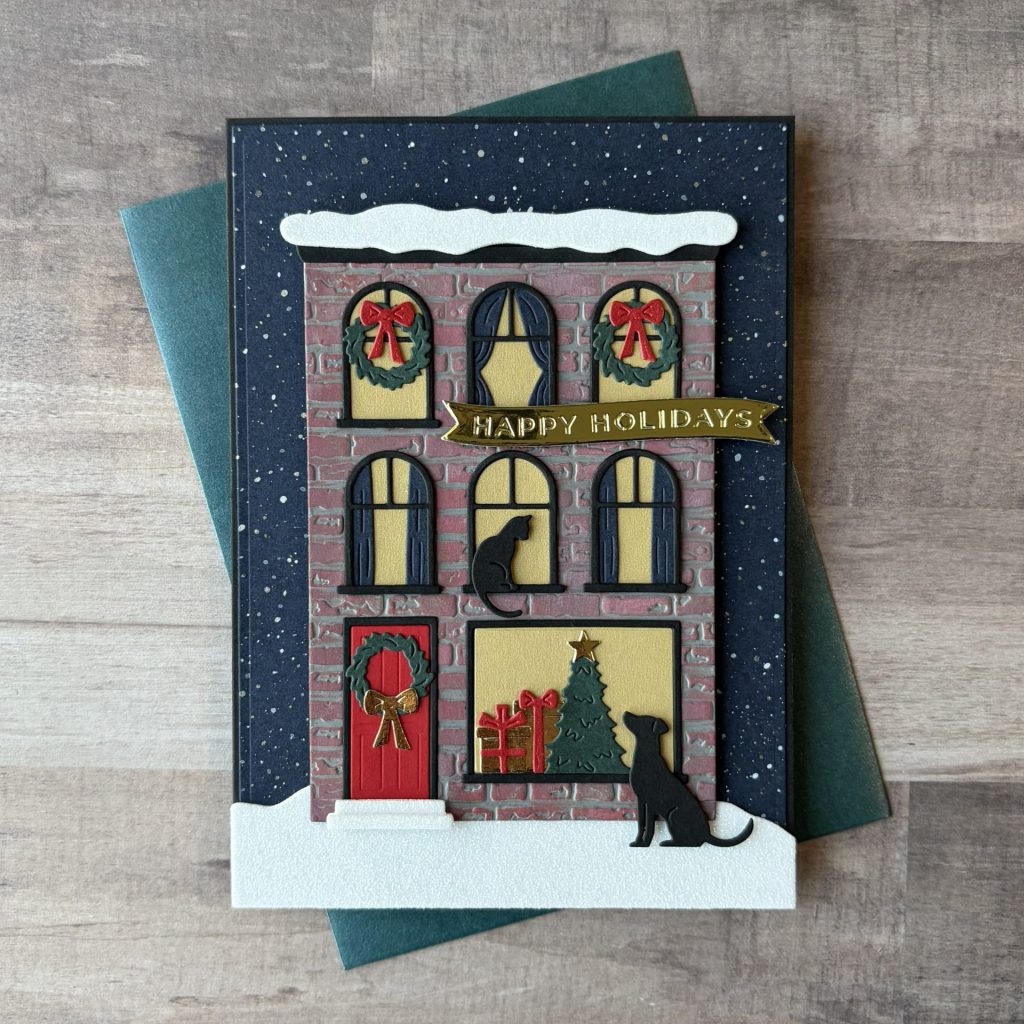
This card is all about the details. The City Holiday die set creates a charming city building that feels warm and welcoming. I love how the windows tell a little holiday story. The wreaths, snow accents, and banner add classic Christmas charm. The tiny cat in the window and the dog outside bring so much personality. This card feels cozy, nostalgic, and full of holiday magic.
City Holiday Card Details
Card Base
- A7 Size – 5 x 7 inches
- Cardstock – Raven – black
Snowy Background
- Cardstock – Indigo – navy
- Die Set – 5×7 Matting Basics A – use the largest die
- Snow – Splatter White – opaque watercolor
Embossed Brick Building
- Cardstock – Anchor – gray
- Trim to 4 x 5½ inches.
- Emboss with Brick by Brick 3D embossing folder.
- Ink the bricks with Fired Brick and Aged Mahogany distress oxides using your finger.
- Die cut with the City Holiday building die.
- Glue a slightly smaller piece of heavyweight cardstock to the back for stability.
City Holiday Building Die-Cuts
- Die Set – City Holiday
- Die cut the following pieces:
- Pomegranate – Door
- Forest – Christmas tree & wreath (x3)
- Indigo – Curtains (x3)
- Raven – Roof, window sill & frames (x6), door frame, cat, & dog
- Gold Mirror Metallic – Wreath bow, gifts, & star
- Gold Pearl Metallic – Solid windows
- Ruby Pearl Metallic – Gift bows & wreath bow (x2)
- White Glitter Foam – Snow & door steps
Refer to the guide below for the City Holiday assembly instructions.
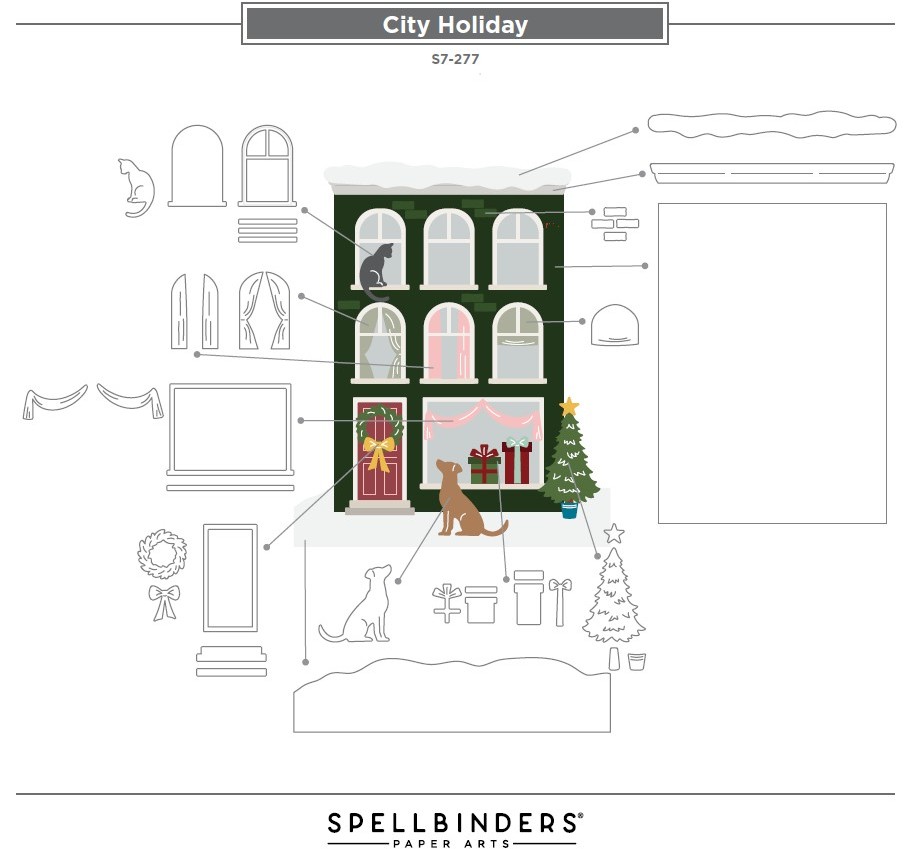
- Attach die-cut pieces together using glue except;
- Cat & Dog – 1mm black foam squares.
- Then, adhere the assembled city holiday building to the card base with 2mm black foam squares.
Sentiment Banner
- Cardstock – Gold Mirror – metallic
- Die Set – Christmas Cracker – “Happy Holidays” sentiment banner
- Adhere – 1mm foam squares – between the windows and use glue on the window sills.

Supplies Used – City Holiday Card
- Spellbinders Cutting Dies – City Holiday #S7-277 | SB | Sb.com |
- Spellbinders Cutting Dies – Christmas Cracker #S5-698 | SB | Sb.com |
- Spellbinders Cutting Dies – 5×7 Matting Basics A #S6-001 | SB | Sb.com |
- Spellbinders 3D Embossing Folder – Brick by Brick #3EOM-OCT25 | SB |
- Spellbinders ColorWheel Cardstock:
- Spellbinders Essentials Cardstock – Forest
- Spellbinders Treasured Cardstock – Gold #SCSP-001 | SB |
- Spellbinders Treasured Cardstock – Ruby #SCSP-018 | SB | Sb.com |
- Spellbinders Pop-Up Glitter Foam – White #SCS-291 | SB | Sb.com |
- Spellbinders Opaque Watercolor – Splatter White | SB | Sb.com |
- Tim Holtz Distress Oxide Ink
View the full list of tools used for all projects here
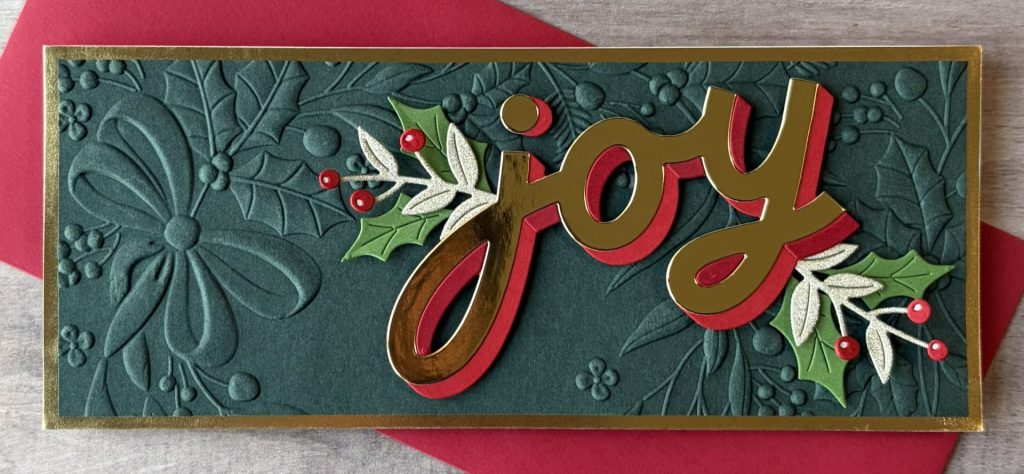
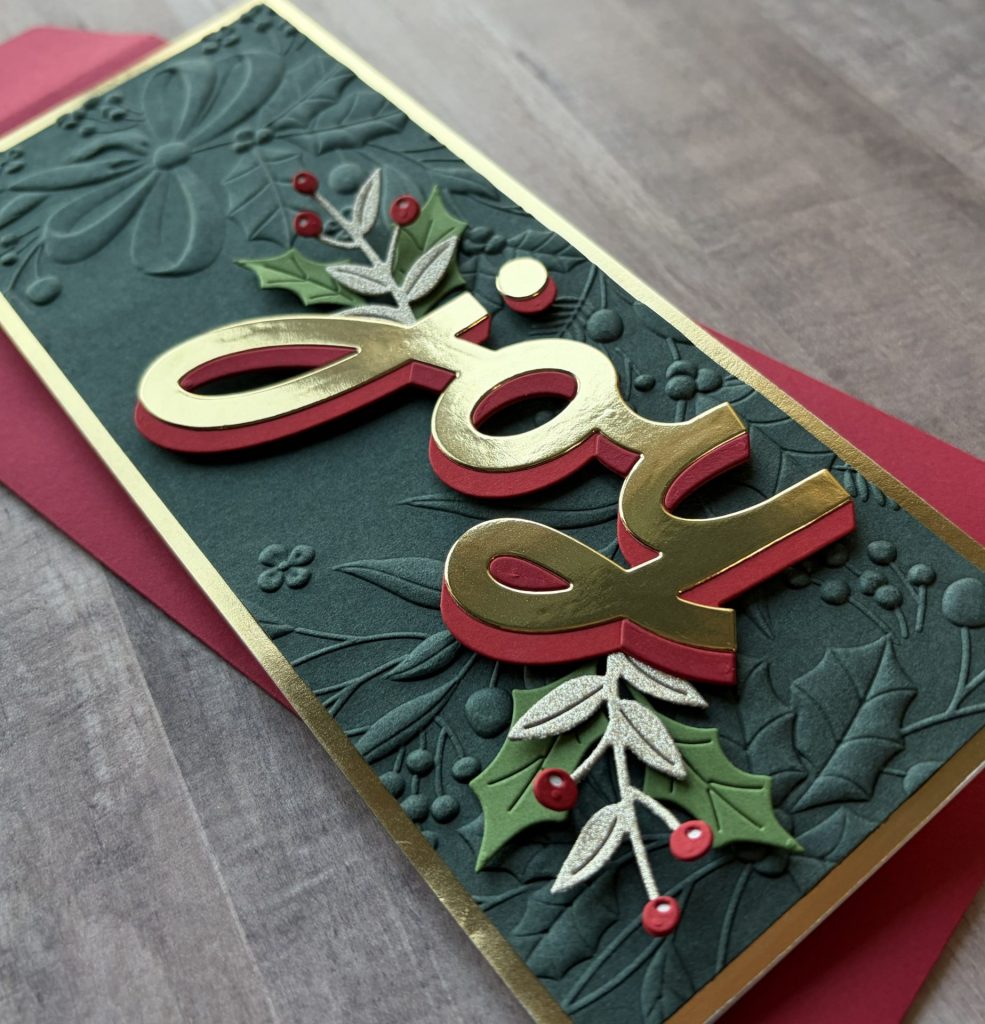
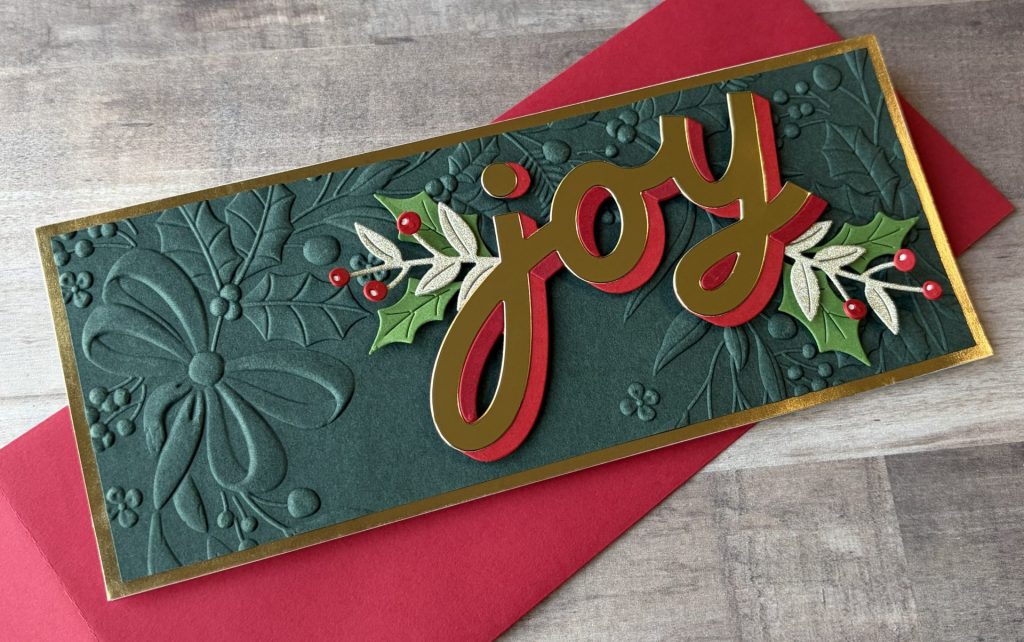
Joy Slimline Card
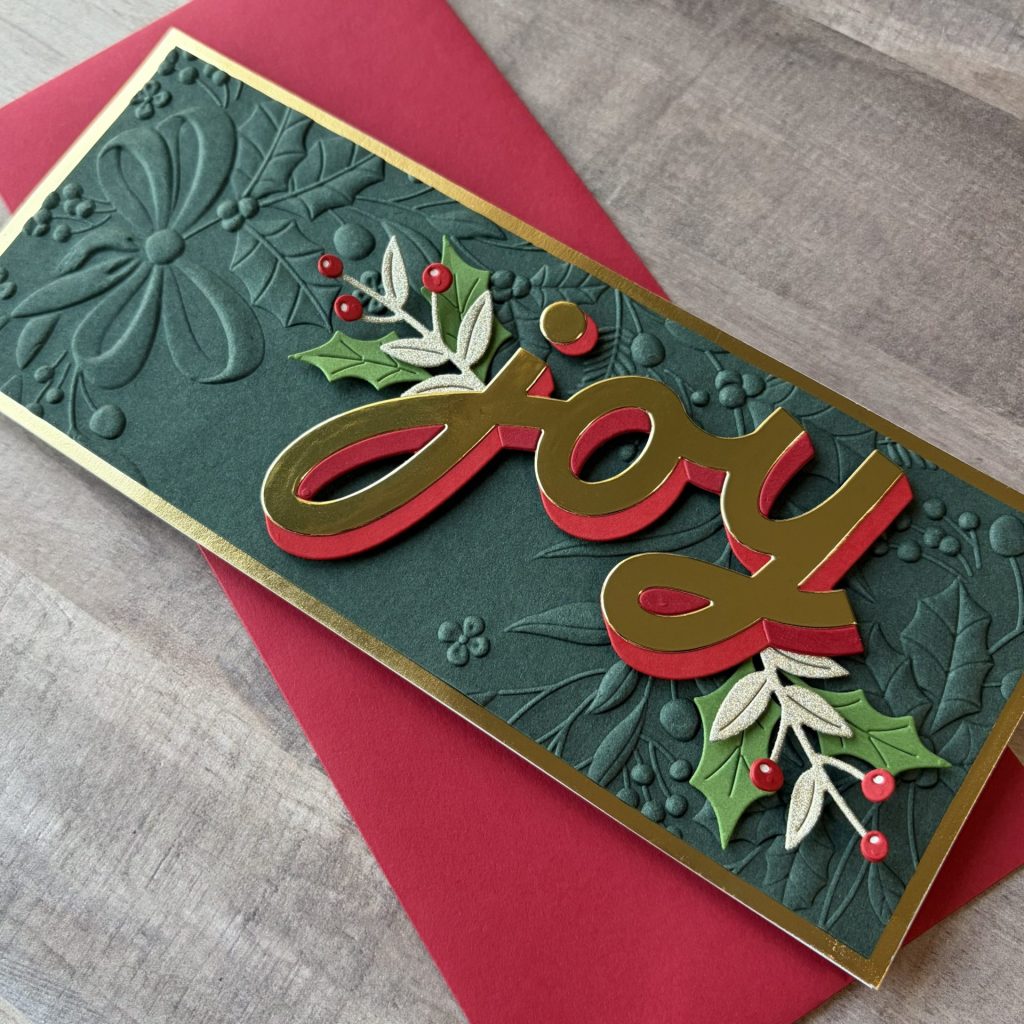
This card focuses on the bold Shadow Joy die set. The large “joy” sentiment instantly becomes the star of the design. Layered cardstock adds beautiful dimension and polish. The pressed holly background brings in subtle texture while keeping the design clean. This card is perfect when you want a simple yet striking holiday look.
Joy Slimline Card Details
Card Base
- Slimline Size – 3½ x 8½ inches
- Make the card base from Forest cardstock
- Trim Gold Mirror cardstock to 3½ x 8½ inches.
- Die cut the “joy” sentiment top layer from the center of this.
- Glue Gold Mirror cardstock to card base.
Embossed Background
- Cardstock – Forest – dark green
- Size – 3¼ x 8¼ inches.
- 3D Embossing Folder – Holiday Floral Swag
- Glue embossed panel to card front.
Shadow Joy Die-Cuts
- Die Set – Shadow Joy
- Die cut the following pieces:
- Gold Mirror – “joy” top layer
- Pomegranate – “joy” bottom layer
- Cranberry – Upper shadow pieces (gold in assembly guide)
Refer to the guide below for the joy assembly instructions.
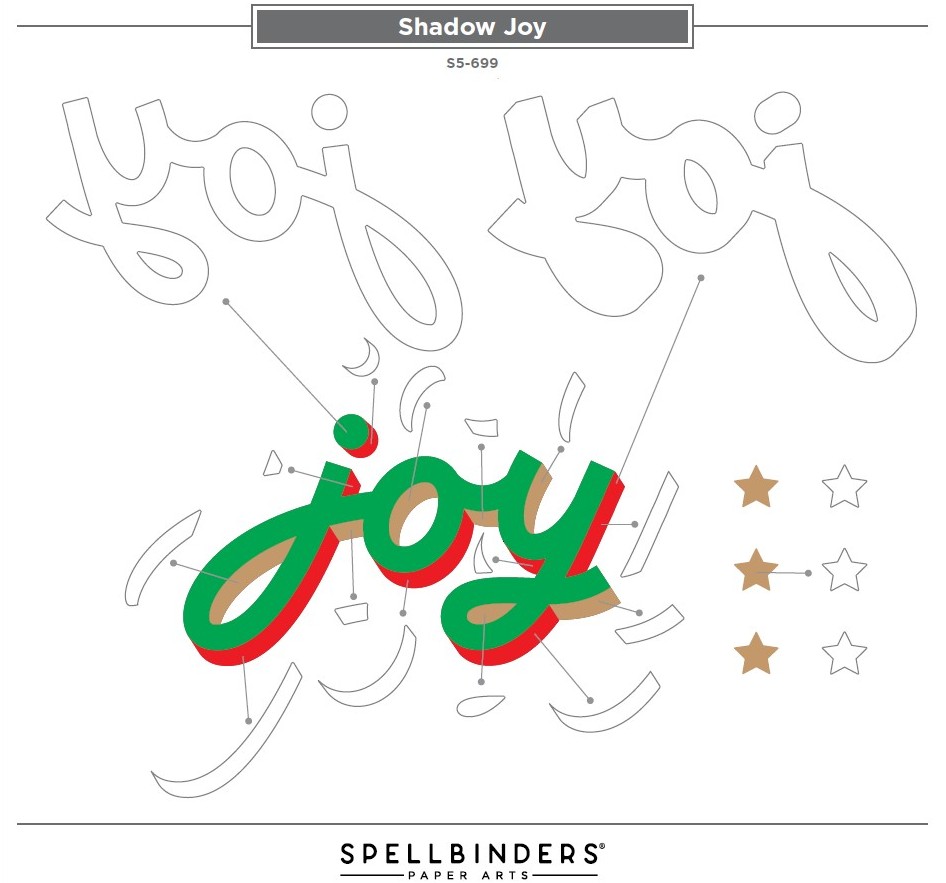
- Adhere die-cut pieces together using glue.
- Attach assembled sentiment to card with 2mm foam squares.
Foliage Die-Cuts
- Die Set – Christmas Cracker
- Die cut the following pieces:
- Golden Sparkle – Berry branch
- Pomegranate – Berries
- Fern – Holly leaf sprig
- Attach foliage to the card using 1mm foam squares and glue.
Supplies Used – Joy Slimline Card
- Spellbinders Cutting Dies – Shadow Joy #S5-699 | SB | Sb.com |
- Spellbinders Cutting Dies – Christmas Cracker #S5-698 | SB | Sb.com |
- Spellbinders 3D Embossing Folder – Holiday Floral Swag #E3D-041 | SB | Sb.com |
- Spellbinders ColorWheel Cardstock:
- Spellbinders Essentials Cardstock – Forest
- Spellbinders Treasured Cardstock – Gold #SCSP-001 | SB |
- Tim Holtz idea-ology Kraft Stock Sparkle – Golden | SSS |
View the full list of tools used for all projects here
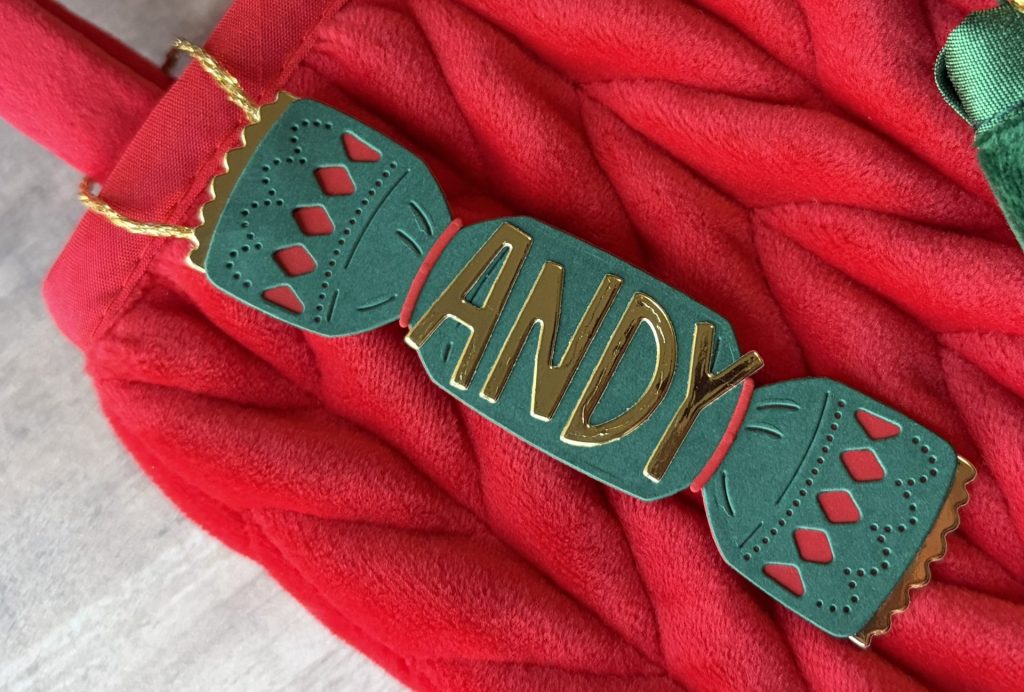
Personalized Christmas Cracker Tags
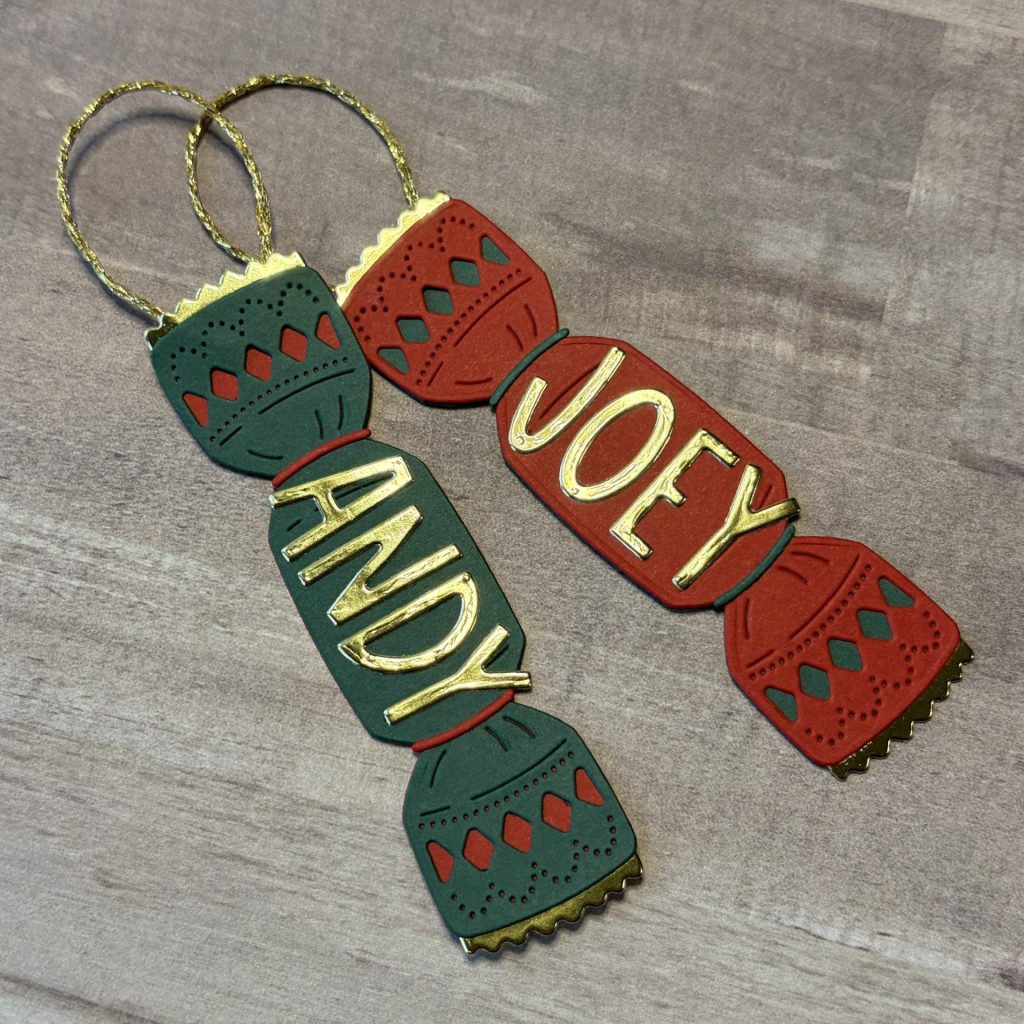
These personalized tags were made using the Christmas Cracker die set. They are such a fun and versatile project. You can use them as gift tags on presents or name tags on stockings. They also work beautifully as place cards for your holiday dinner table. You can even turn them into ornaments to hang on the tree. Adding names or short sentiments makes each one feel extra special.
Personalized Cracker Tag Details
Christmas Cracker Die-Cuts
- Die Set – Christmas Cracker
- Die cut the following pieces:
- Gold Mirror – Scalloped edge
- Forest – Christmas cracker detail layer
- Pomegranate – Christmas cracker solid & string ties
- Adhere pieces together using glue.
- Don’t glue the solid backer layer on until after you add your hanging cord/ribbon
Refer to the guide below for the joy assembly instructions.
Hanging Twine
- Cut desired length of Gold Cord. Mine was 4 inches.
- Glue the ends to the back of the detailed Christmas cracker layer.
- Then, glue on the solid Christmas cracker layer.
- Put something heavy on it while it dries.
Add Name
- Die Set – Santa Greetings – Sizzix Tim Holtz
- Die cut name letter from Gold Mirror cardstock.
- With this set you can really only do short names (under 4 letters).
- If you like this font, this set Vault Hippity Hop has the same font at a slightly smaller scale.
If you have longer names you could also hand letter them yourself with a metallic gold pen.

Supplies Used – Christmas Cracker Tags
- Spellbinders Cutting Dies – Christmas Cracker #S5-698 | SB | Sb.com |
- Sizzix Tim Holtz Thinlits Colorize Dies – Santa Greetings #666338 | Sb.com |
- Spellbinders ColorWheel Cardstock – Pomegranate | SB | Sb.com |
- Spellbinders Essentials Cardstock – Forest
- Spellbinders Treasured Cardstock – Gold #SCSP-001 | SB |
- Vivant Flashy Metallic Cord – Gold | SB |
View the full list of tools used for all projects here
Your City Holiday Story Begins
The City Holiday Collection is incredibly versatile. It works beautifully for cards, tags, and so many other holiday projects. Whether you love detailed scenes or clean designs, this collection has something for everyone. It’s perfect for creating meaningful handmade pieces during the holiday season.
I hope these ideas inspired you to add a little cozy handmade wonder to your holiday season. If they have, I’d love to see what you make! Be sure to tag me (@silversgrove or @grovecrafted) on Instagram or at Grove Crafted on Facebook.
Wishing you a season filled with warmth, joy, and handmade magic.
Happy Holidays!


Tools Used
- Spellbinders Platinum Six | SB | Sb.com |
- Tim Holtz Paper Trimmer | Sb.com | Ranger | AMZ |
- Mighty Mister | SB | Sb.com |
- Bearly Art Glue | SB | Sb.com |
- Best Ever Craft Tape – ¼ in | SB | Sb.com |
- SSS Embellishment Wand | SSS |
- Foam Squares 1mm & 2mm – Black
- Die Pick
If you’re looking for more Christmas card inspiration, be sure to check out my other Holiday/Christmas Blog Posts. You’ll find more festive ideas, techniques, and creative ways to use your supplies.