Mediterranean Moments
Spellbinders – La Dolce Vita Collection
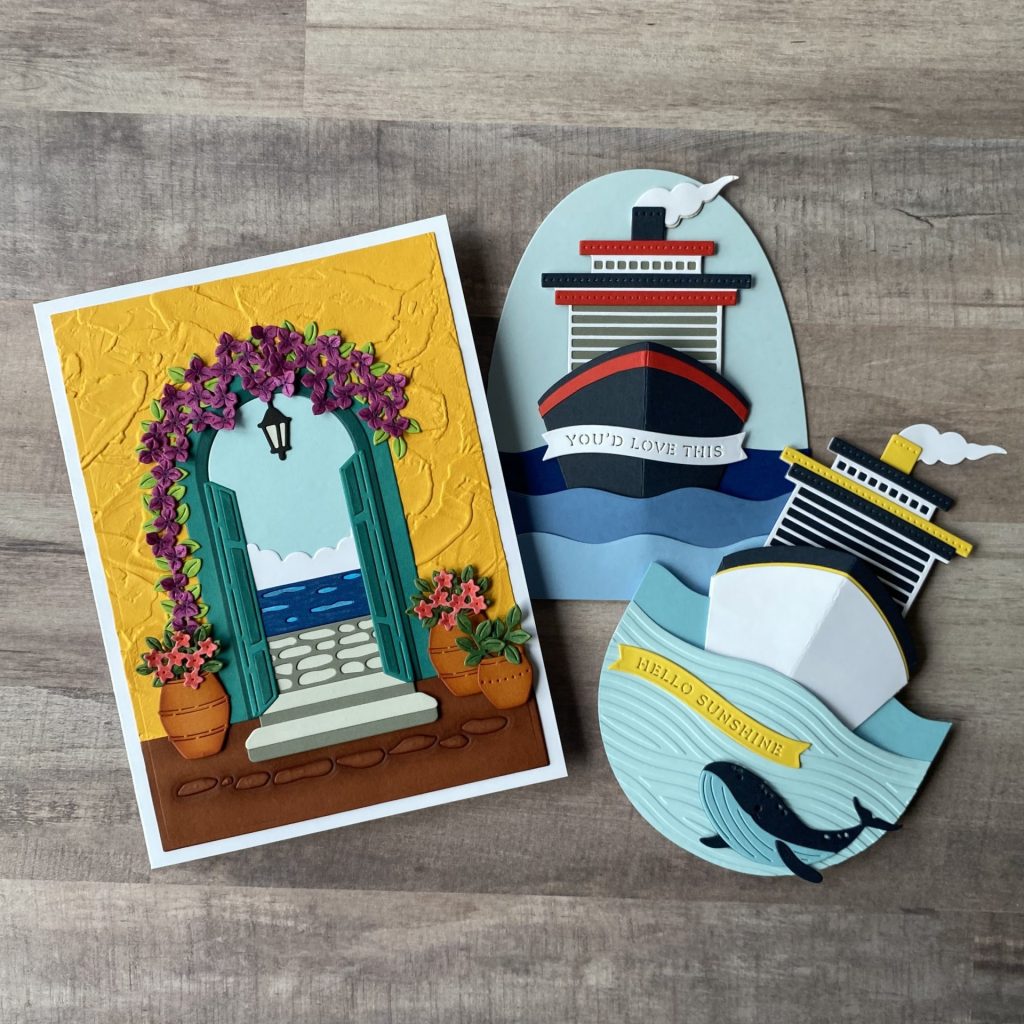
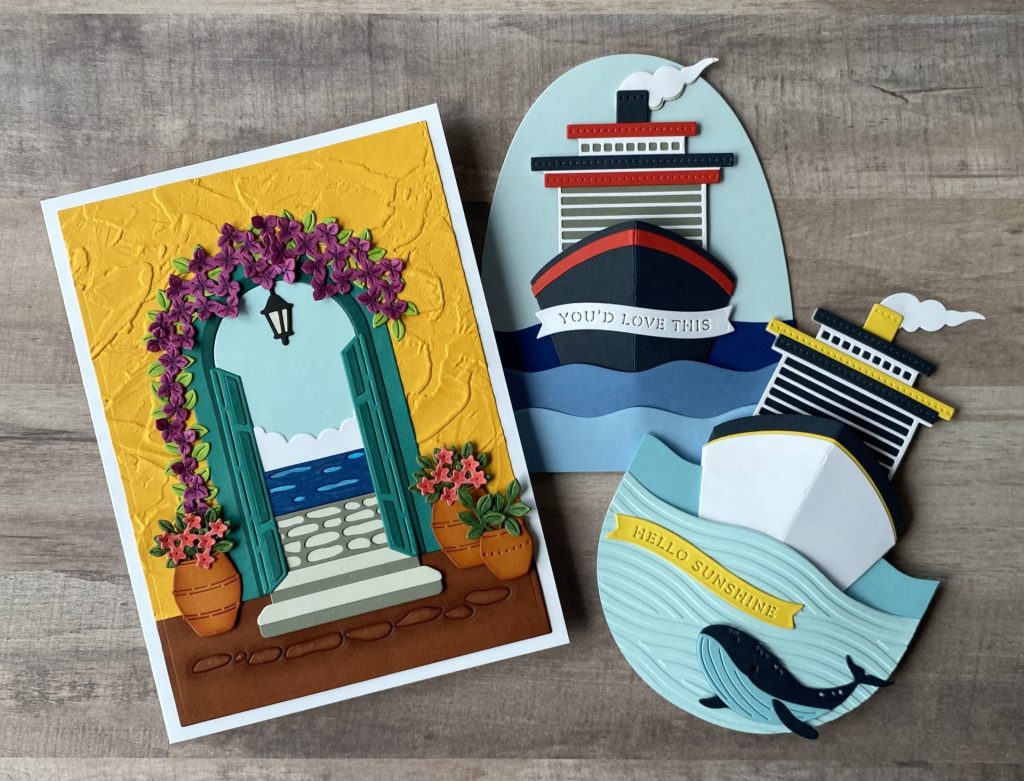
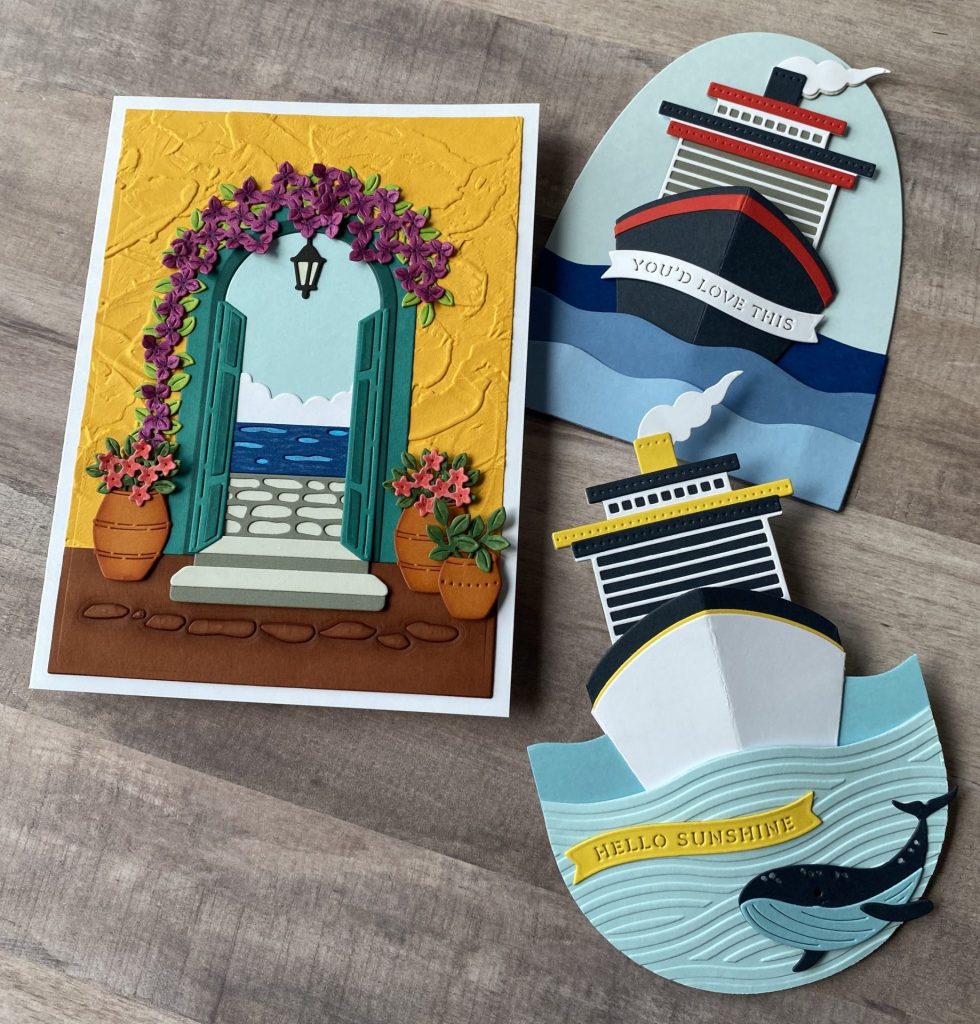
Hello, crafty friends! If you’re dreaming of sun-soaked adventures and breezy coastal views, you’re going to love today’s post! I’m sharing three handmade cards featuring the Beyond the Door and Deckside Dreams die sets from the gorgeous La Dolce Vita Collection by Spellbinders. This collection is full of charming Mediterranean details—arched doorways, cruise ships, citrusy vibes, and more—that instantly transport your paper projects to a relaxing seaside escape. Whether you’re into detailed die-cutting, playful scene-building, or just love a vacation-inspired aesthetic, these cards are sure to spark a little creative wanderlust.

The La Dolce Vita Collection by Spellbinders is a radiant, Mediterranean-inspired crafting line designed to bring the warmth and elegance of the Italian coast to your paper projects. It includes a variety of etched dies—each featuring intricate designs that evoke sun-dappled archways, cheerful lemons, beach scenes, and even a cruise ship deck.
Complementing these are the Lemon Fresco 3D embossing folder and the La Dolce Vita Sentiments BetterPress plate & die set, which add luxurious texture and crisp, typographic greetings. Whether you’re crafting letter-pressed sentiments, textured backgrounds, or vibrant summer scenes, this collection beautifully captures that “sweet life” vibe—perfect for bright, cheerful cards and keepsakes.
Be sure to explore the full La Dolce Vita Collection to discover all the coordinating dies and press plates.
Disclosure
I received this product to try out and share my honest thoughts with you. This post also includes affiliate links*—if you decide to shop through them, I may earn a small commission (at no extra cost to you). Money earned via affiliate links helps pay the fees to keep this blog up and running. Thanks so much for supporting GroveCrafted and helping me keep the crafty inspiration coming!
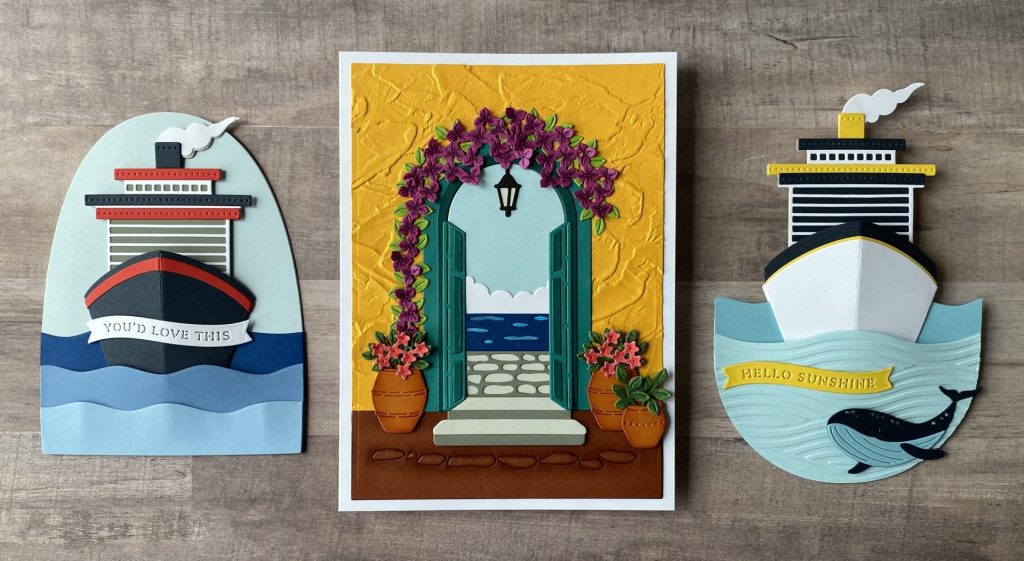
Jump to Your Favorite Design:
- Arched Cruise Ship Card (Left)
- Beyond the Door Card (Middle)
- Hello Sunshine Rocker Card (Right)
- Beyond the Door Supplies
- Deckside Dreams Supplies
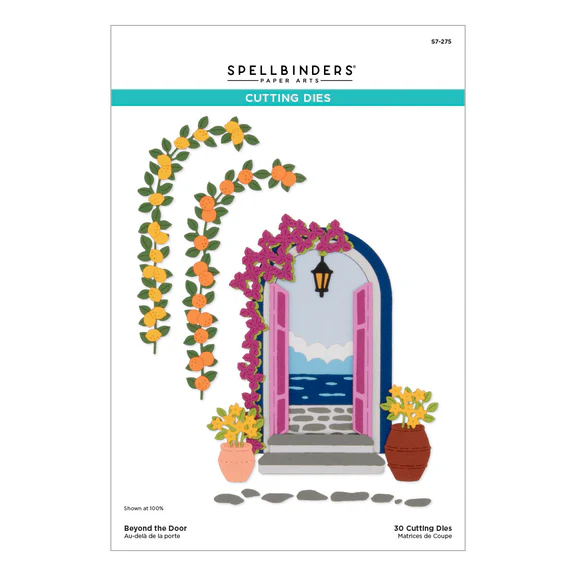
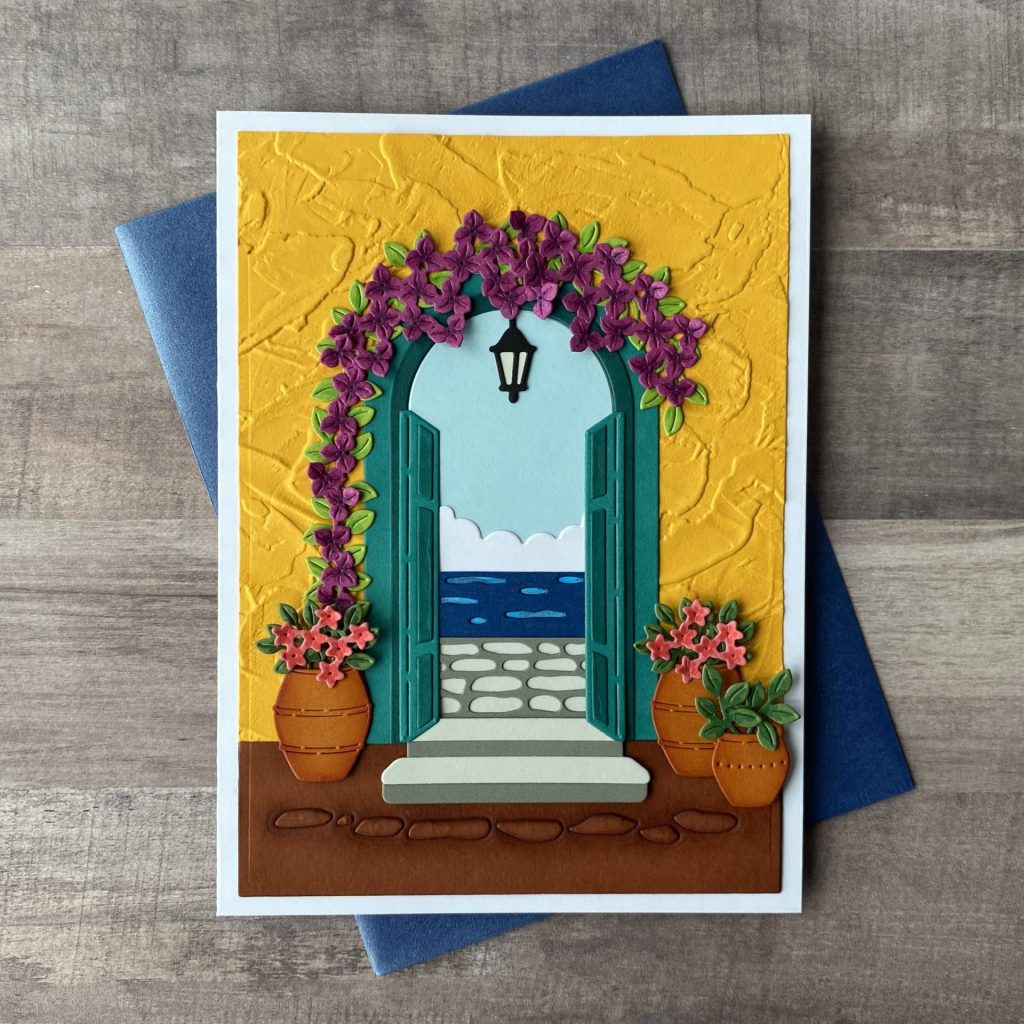
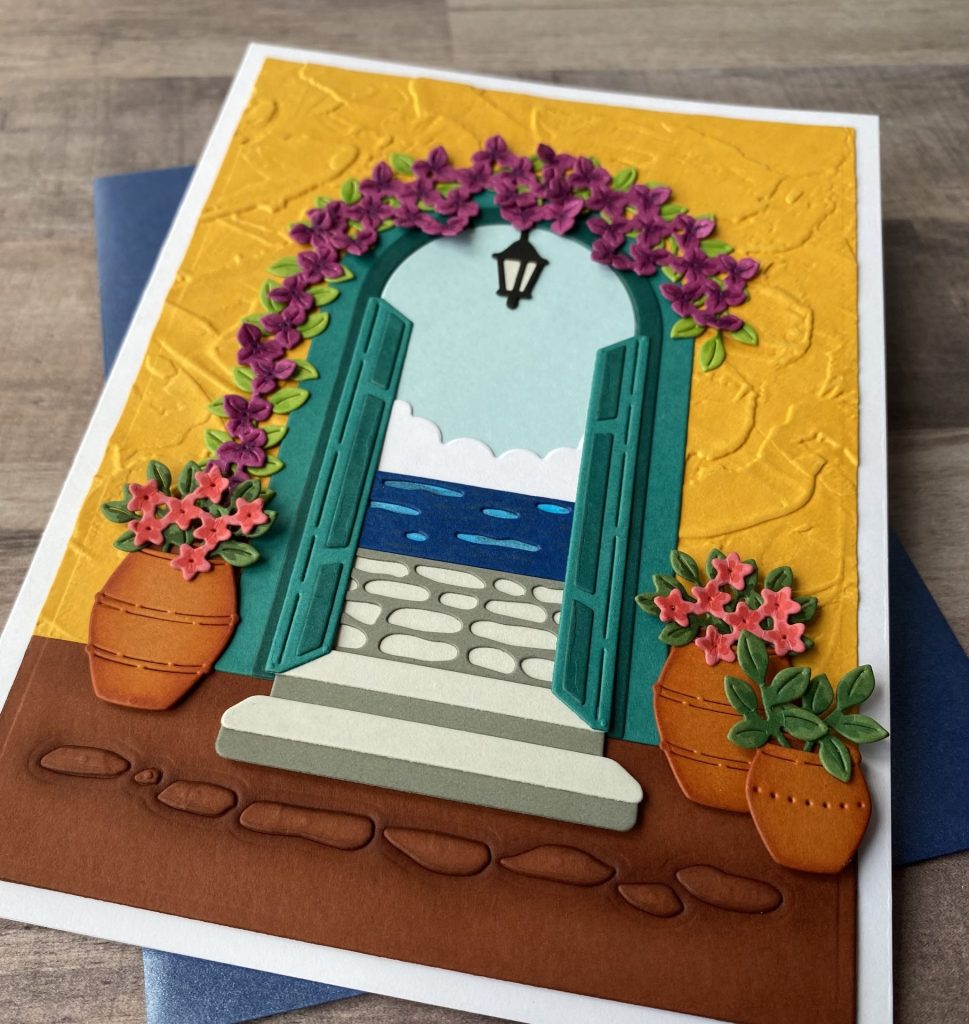
Beyond the Door Card
Card Base
- Start by creating an A7 card base (5″ x 7″) from Classic White cardstock.
- Die cut a background panel from Saffron cardstock using the largest die from the 5×7 Matting Basics A die set.
- Lightly mist the panel with water to help prevent cracking, then emboss it using the Plaster 3D embossing folder.
- Next, die cut a 1 3/8″ tall strip from Cinnamon cardstock using the same large die for a perfect match in width.
- Adhere the cinnamon strip to the bottom of the embossed panel, then glue the entire panel onto the card front.
Die Cutting
Cut the following pieces using the Beyond the Door die set from the cardstock colors listed below:
-
- Dahlia – Potted flowers
- Terra Cotta – Flower pots
- Cinnamon – Stone strip
- Rainforest – Archway leaves
- Fern – Potted leaves
- Blue Spruce – Arches and doors
- Breeze – Sky
- Cosmic Sky – Water
- Mulberry – Archway flowers
- Fog – Top steps, pavers, and inside lantern
- Lunar Gray – Step and pavers outlines
- Raven – Lantern
- Classic White – Clouds
Shading & Details
- Use a dark teal marker to color the skinny arch and door windows.
- Use markers to add shading to the flowers and leaves.
- Shade the terra cotta pots with Rusty Hinge ink using a small blending tool.
- Add shimmer with Distress Spritz:
- Picked Raspberry on the archway flowers
- Uncharted Mariner on the water
Assembly
Refer to the Beyond the Door assembly guide to build the scene.
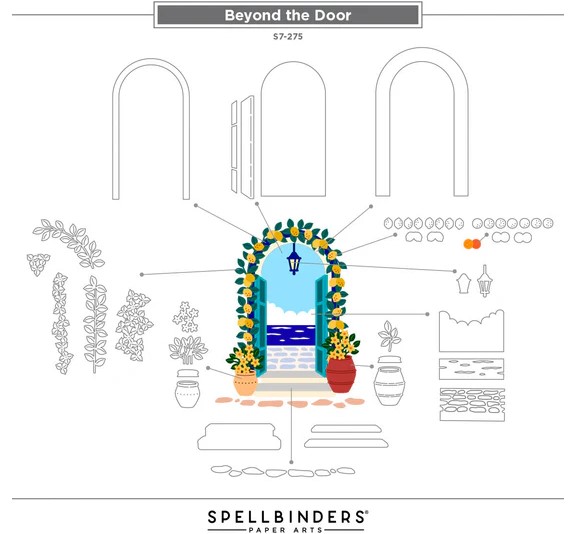
- Gently bend the flowers and leaves for added dimension before gluing.
- Use liquid glue to assemble the die-cut scene.
- Attach the flower pots and stairs with foam squares for a lifted, dimensional effect.
View the full list of tools and supplies used for this card here
Deckside Dreams Cards
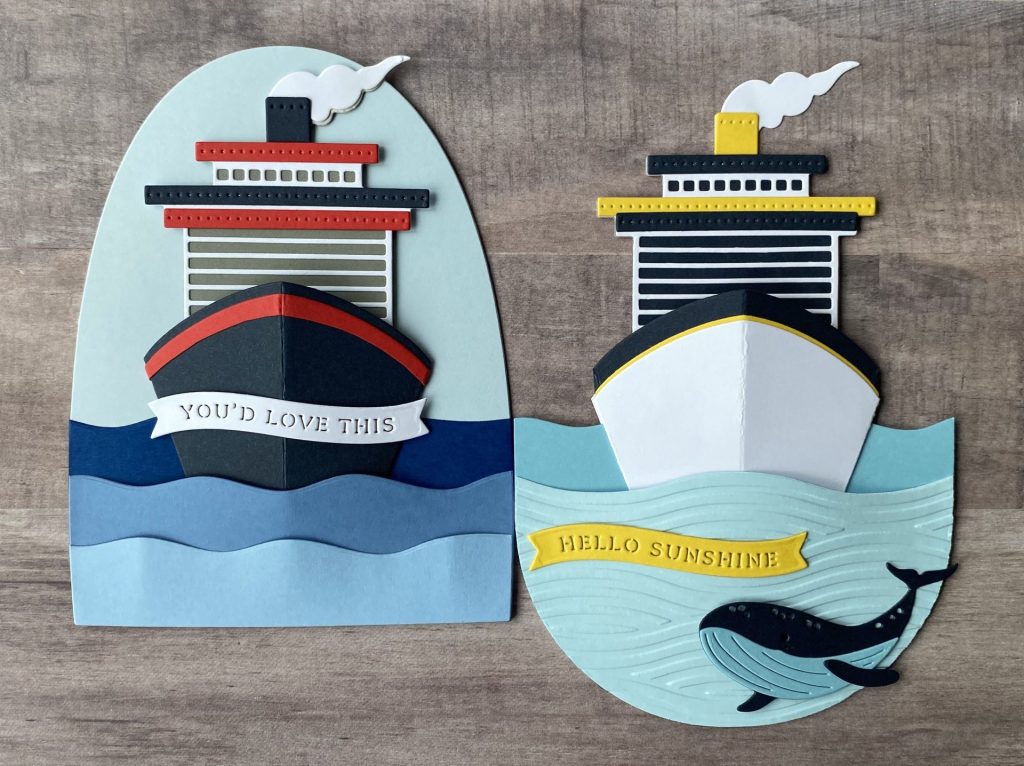
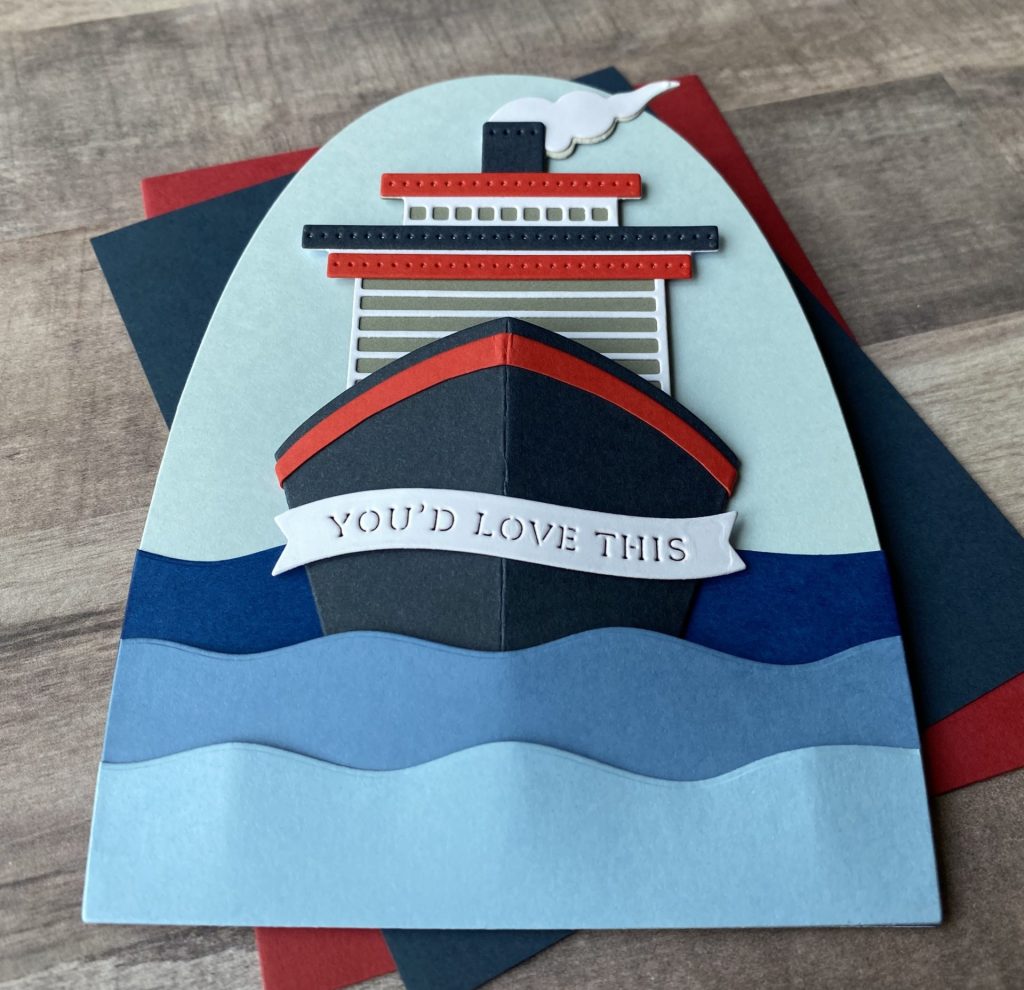
Arched Cruise Ship Card
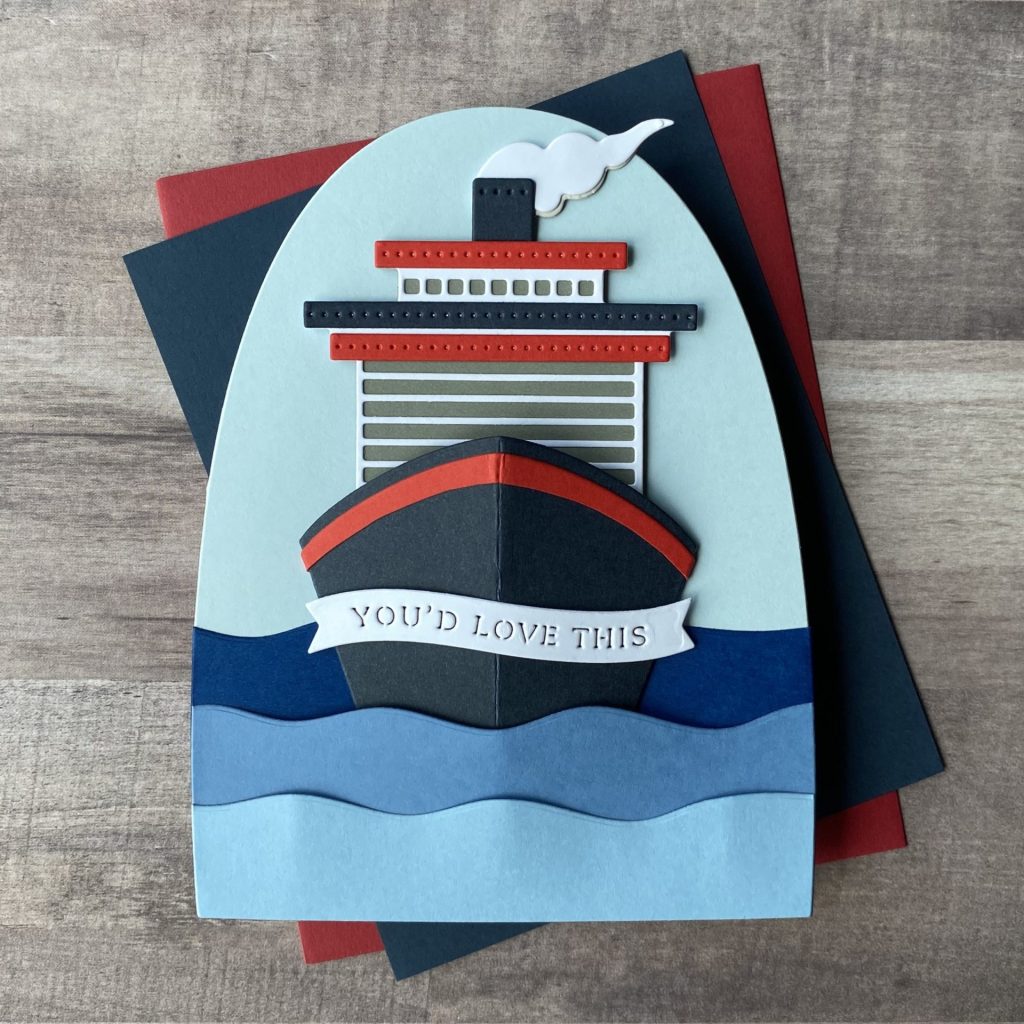
Card Base
- Create a side-folding A2 card base by die cutting Classic White cardstock with the largest die from the Arch Labels & Tag die set.
- Die cut another panel from Windy cardstock using the same large die, and adhere it to the front of the card base.
Ocean Waves
- Cut the following cardstock strips for the waves:
- Cosmic Sky – 2¼” x 4½”
- Celestial – 1¾” x 4½”
- Cascade – 1⅛” x 4½”
- Die cut the top edges of each strip using the wave die from the Deckside Dreams set.
- Then trim the bottom and sides of each wave layer using the same large Arch Labels & Tag die so they fit perfectly on the card front.
- Glue the cosmic sky wave directly to the card base.
Ship
- Die cut the ship pieces from the Deckside Dreams set using these cardstock colors:
- Poppy
- Indigo
- Lunar Gray
- Classic White
Refer to the Deckside Dreams assembly guide to build the ship.

- Assemble the ship following the Deckside Dreams assembly guide.
- Glue the assembled ship onto the card, partially overlapping the cosmic sky wave.
- Layer the celestial wave on top of the ship using foam squares and glue.
- Then layer the cascade wave above the celestial one, also using foam squares and glue for added dimension.
Sentiment
- Die cut “You’d Love This” from Classic White cardstock using the La Dolce Vita Banners die set.
- Attach the sentiment over the ship using foam squares to finish the card.
View the full list of tools and supplies used for this card here
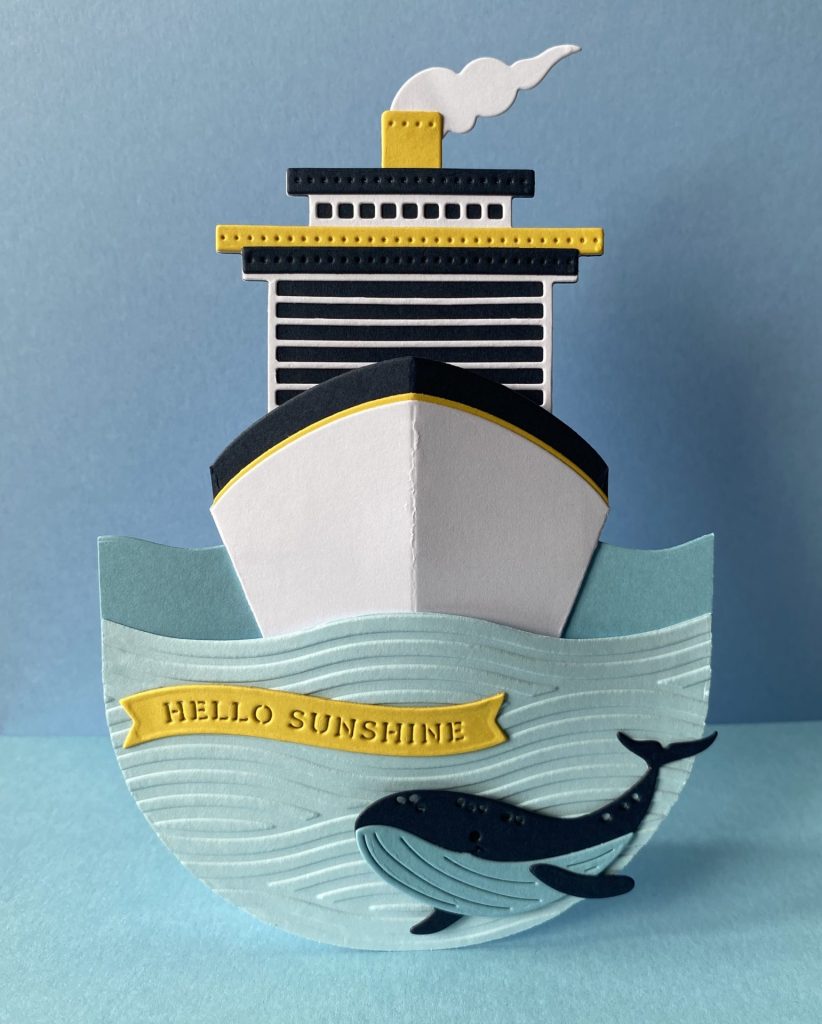
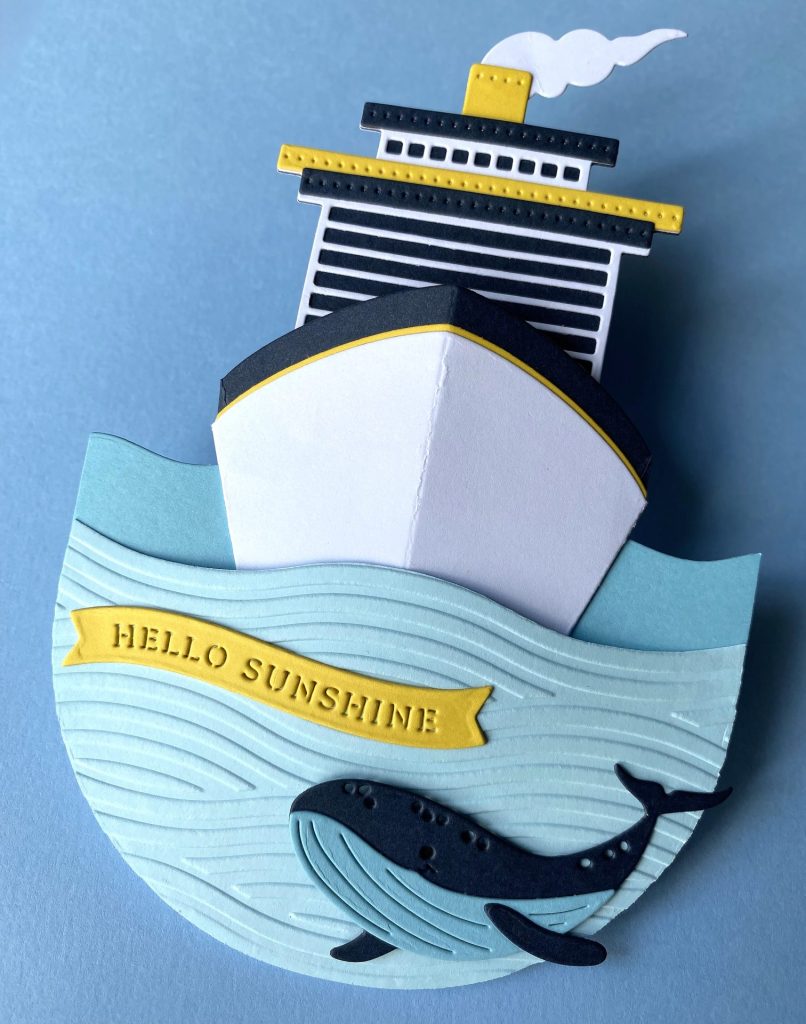
Hello Sunshine Rocker Card
This card was my attempt at making a rocker-style card. It didn’t rock quite as smoothly as I hoped. It’s a bit too tall and top-heavy—but hey, it still looks pretty cool!
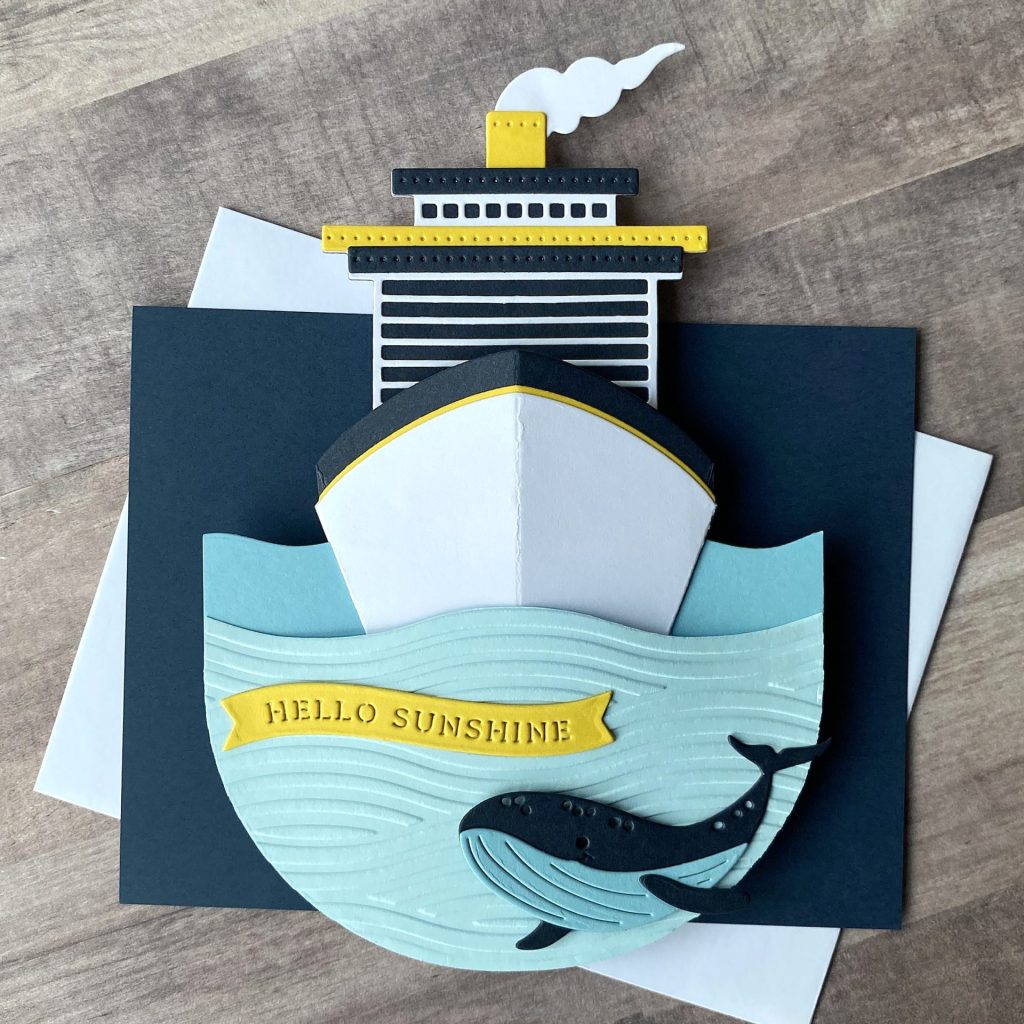
Card Base
- Start by die cutting Classic White cardstock with the largest die from the Essential Stylish Ovals die set.
- Score it down the center and fold to create the rocker base.
- Using the same die, cut a slightly larger-than-half oval from Malibu cardstock.
- Trim the top edge of the Malibu piece with the wave die from the Deckside Dreams set.
- Adhere it to the front of the folded card base with glue.
Ocean Waves
- Cut a 2¾” x 4½” piece of Breeze cardstock.
- Die-cut the bottom and sides using the same large Essential Stylish Ovals die to match the shape of the card front.
- Lightly mist it with water to prevent cracking, then emboss it with the Summertime Waves embossing folder.
- Fussy cut along the top to follow the embossed wave lines.
Ship
- Die cut the ship pieces from the Deckside Dreams set using these cardstock colors:
- Sunkissed
- Indigo
- Classic White
Refer to the Deckside Dreams assembly guide to build the ship.
- Assemble the ship following the Deckside Dreams assembly guide.
- Glue the completed ship onto the card so it overlaps the top of the Malibu wave.
- Adhere the embossed wave panel over the ship using glue.
Whale
- Die cut the whale pieces from cardstock:
- Assemble the whale and attach it toward the lower right with glue and foam squares for dimension.
Sentiment
- Die cut “Hello Sunshine” from Sunkissed cardstock using the La Dolce Vita Banners die set.
- Adhere the sentiment across the embossed wave to complete the card.
View the full list of tools and supplies used for this card here
Your Creative Getaway Starts Now!
From quaint doorways bursting with florals to ocean waves and cruise ship views, the La Dolce Vita Collection makes it easy to craft your own slice of summer bliss. These die sets are perfect for building dimensional scenes with a touch of whimsy and elegance. I had so much fun experimenting with different card styles, textures, and layers—especially with that rocker card. Even if it wobbled more than expected!
I hope these projects inspired you to dive into the collection and create something sunshine-filled and totally your own. If you do, I’d love to see your version—be sure to tag me (@silversgrove or @grovecrafted) on Instagram or at Grove Crafted on Facebook.
Until next time, happy crafting—and ciao for now!
Link Abbreviations
- SB – Spellbinders*
- Sb.com – Scrapbook.com*
- SSS – Simon Says Stamp
- AMZ – Amazon*
Disclosure: I received this product to try out and share my honest thoughts with you. This post also includes affiliate links*—if you decide to shop through them, I may earn a small commission (at no extra cost to you). Money earned via affiliate links helps pay the fees to keep this blog up and running. Thanks so much for supporting GroveCrafted and helping me keep the crafty inspiration coming!
Beyond the Door Supplies
- Spellbinders Cutting Dies – Beyond the Door #S7-275 | SB | Sb.com |
- Spellbinders Cutting Dies – La Dolce Vita Banners #S1-173 | SB | Sb.com |
- Spellbinders Cutting Dies – 5×7 Matting Basics A #S6-001 | SB |
- Spellbinders 3D Embossing Folder – Plaster #E3D-103 | SB | Sb.com |
- Spellbinders ColorWheel Cardstock:
- Dahlia | SB | Sb.com |
- Terra Cotta | SB | Sb.com |
- Cinnamon | SB | Sb.com |
- Saffron | SB | Sb.com |
- Rainforest | SB | Sb.com |
- Fern | SB | Sb.com |
- Blue Spruce | SB | Sb.com |
- Breeze | SB | Sb.com |
- Cosmic Sky | SB | Sb.com |
- Mulberry | SB | Sb.com |
- Fog | SB | Sb.com |
- Raven | SB | Sb.com |
- Classic White | SB | Sb.com |
- Spellbinders Essentials Cardstock – Lunar Gray
- Distress Spritz:
- Distress Ink – Rusty Hinge | Sb.com |
- Markers – A shade darker than Dahlia, Rainforest, Fern, Blue Spruce, Mulberry cardstocks
Tools
- Spellbinders Platinum Six | SB | Sb.com |
- Tim Holtz Paper Trimmer | Sb.com | AMZ |
- EK Scoring Board | AMZ |
- Bearly Art Glue | SB | Sb.com |
- Tiny Blending Tool | Sb.com |
- Foam Squares – White | SSS |
Deckside Dreams Supplies
- Spellbinders Cutting Dies – Deckside Dreams #S4-1447 | SB | Sb.com |
- Spellbinders Cutting Dies – La Dolce Vita Banners #S1-173 | SB | Sb.com |
- Spellbinders Cutting Dies – Arch Labels & Tag #S5-624 | SB | Sb.com |
- Spellbinders Cutting Dies – Essential Stylish Ovals #S5-562 | SB | Sb.com |
- Spellbinders Embossing Folder – Summertime Waves #EOM-JUN24
- Spellbinders 2023 Crafty Advent Calendar – Day 24 Whale Die Set
- Spellbinders ColorWheel Cardstock:
- Spellbinders Essentials Cardstock:
- Sunnkissed
- Lunar Gray
Tools
- Spellbinders Platinum Six | SB | Sb.com |
- Tim Holtz Paper Trimmer | Sb.com | AMZ |
- EK Scoring Board | AMZ |
- Bearly Art Glue | SB | Sb.com |
- Foam Squares – White | SSS |
If you enjoyed this crafty getaway with the La Dolce Vita cards, get ready to pack your bags—we’re heading to Japan next! Take a peaceful stroll through Kyoto with my Spring in Kyoto card tutorials.