A Blooming Tribute to Summer
Spellbinders – Summer Solstice Garden Collection by Susan Tierney-Cockburn
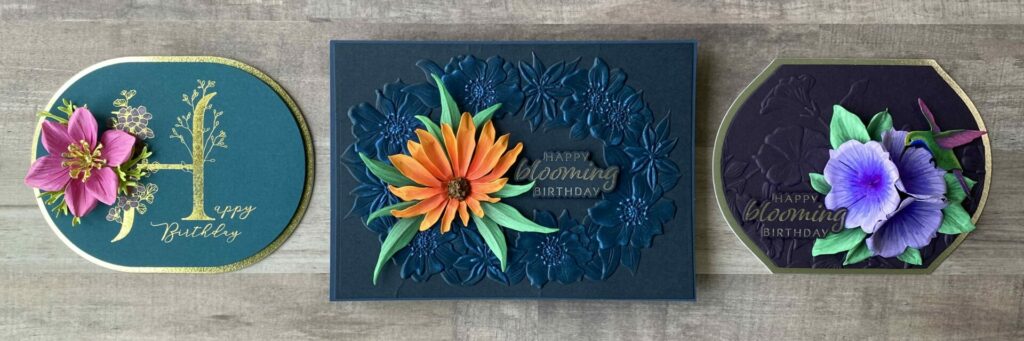
If you’re a fan of floral elegance and nature-inspired designs, you’re going to love the Summer Solstice Garden Collection by Susan Tierney-Cockburn for Spellbinders! This stunning collection is bursting with dimensional flower dies, graceful details, and a touch of summertime magic. I had so much fun creating with these intricate blooms—they’re perfect for adding a fresh, botanical feel to your cards, journals, or DIY décor. Whether you’re crafting for a birthday, sending a heartfelt note, or simply celebrating the beauty of the season, these dies make it easy to bring a garden of creativity to life.
The Summer Solstice Garden Collection

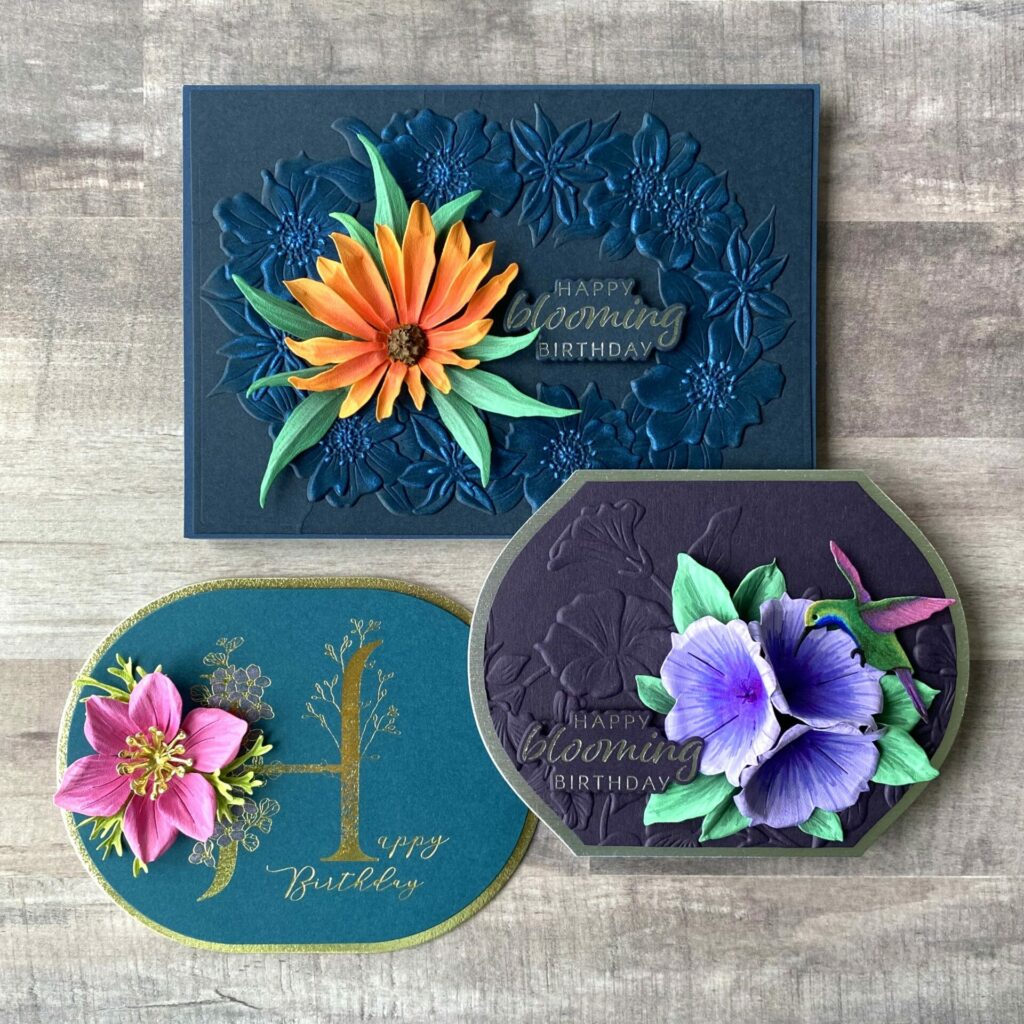
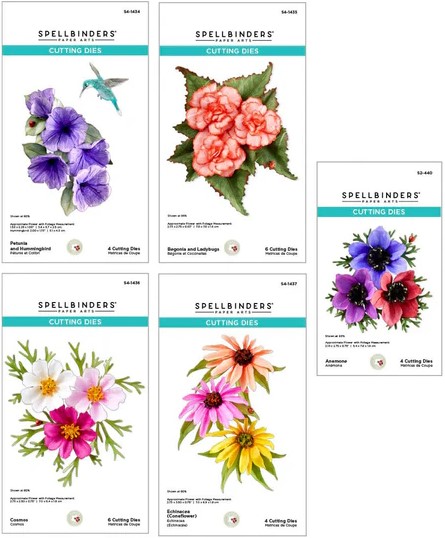
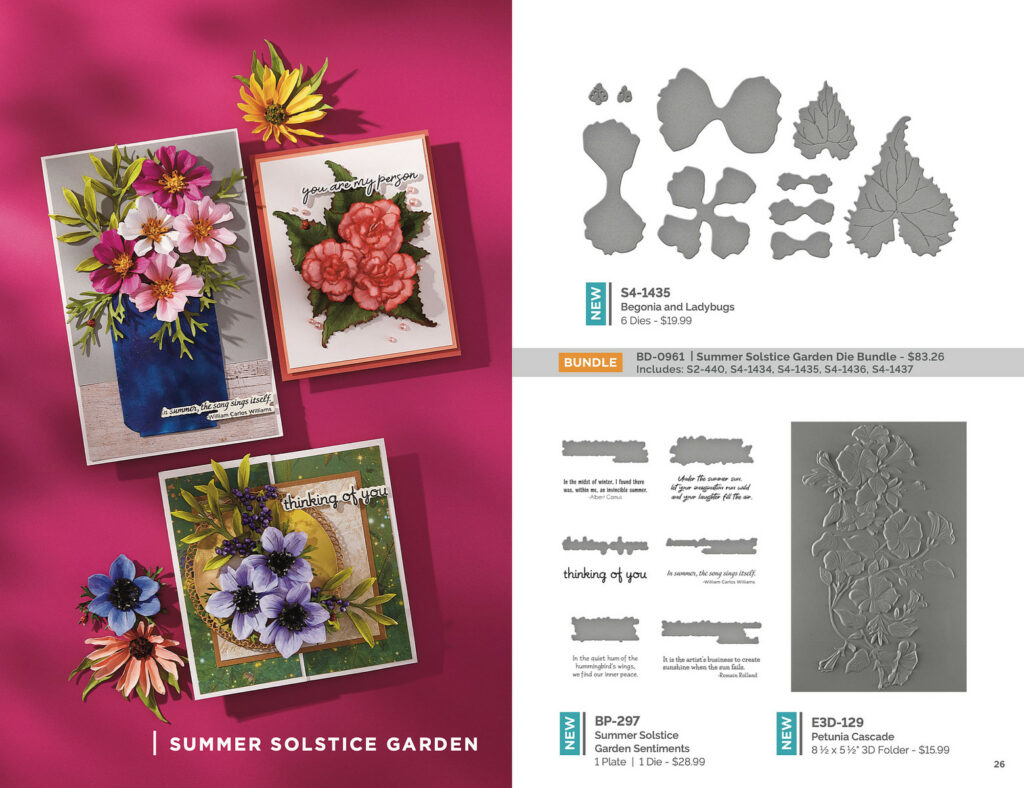
The Summer Solstice Garden Collection by Susan Tierney-Cockburn for Spellbinders captures the vibrant beauty of peak summertime blooms with exquisite detail and dimension. This collection includes the Anemone, Echinacea, Petunia & Hummingbird, Begonia & Ladybugs, and Cosmos dimensional flower die sets—each one thoughtfully designed to bring lifelike floral elegance to your projects.
Enhancing the collection is the Summer Solstice Garden Sentiments BetterPress Plate & Die Set, offering crisp, letterpress-style greetings that pair beautifully with the intricate florals. The Petunia Cascade 3D Embossing Folder adds rich texture, mimicking the natural beauty of cascading summer petals. Whether you use the sets individually or combine them, each piece in this collection brings the magic of midsummer to your handmade cards with stunning botanical artistry.
Explore the complete Summer Solstice Garden Collection here, and see how I brought these lush, garden-inspired designs to life in my handmade floral cards.
Disclosure: I received these products to try out and share my honest thoughts with you. This post also includes affiliate links*—if you decide to shop through them, I may earn a small commission (at no extra cost to you). Money earned via affiliate links helps pay the fees to keep this blog up and running. Thanks so much for supporting GroveCrafted and helping me keep the crafty inspiration coming!
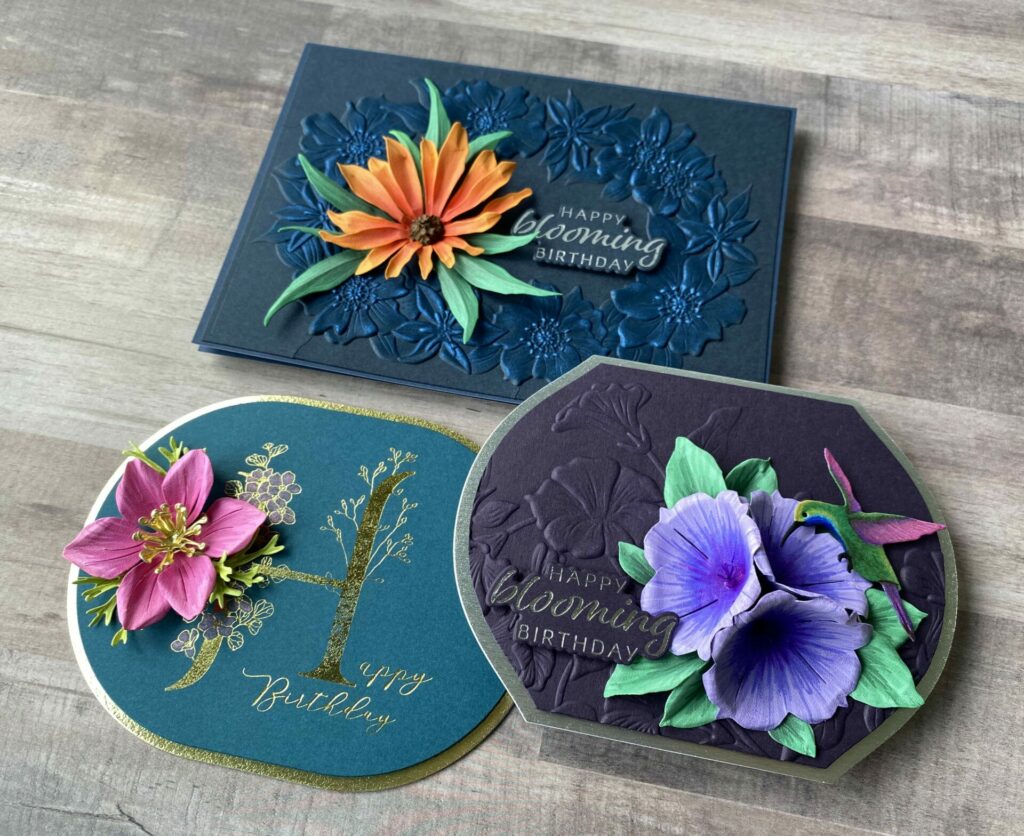
Jump to Your Favorite Design:
- Anemone – Top Left
- Echinacea – Top Right
- Petunia & Hummingbird – Bottom Left
- Begonia – Bottom Right (Left)
- Cosmos – Bottom Right (Right)
- Tools and Supplies
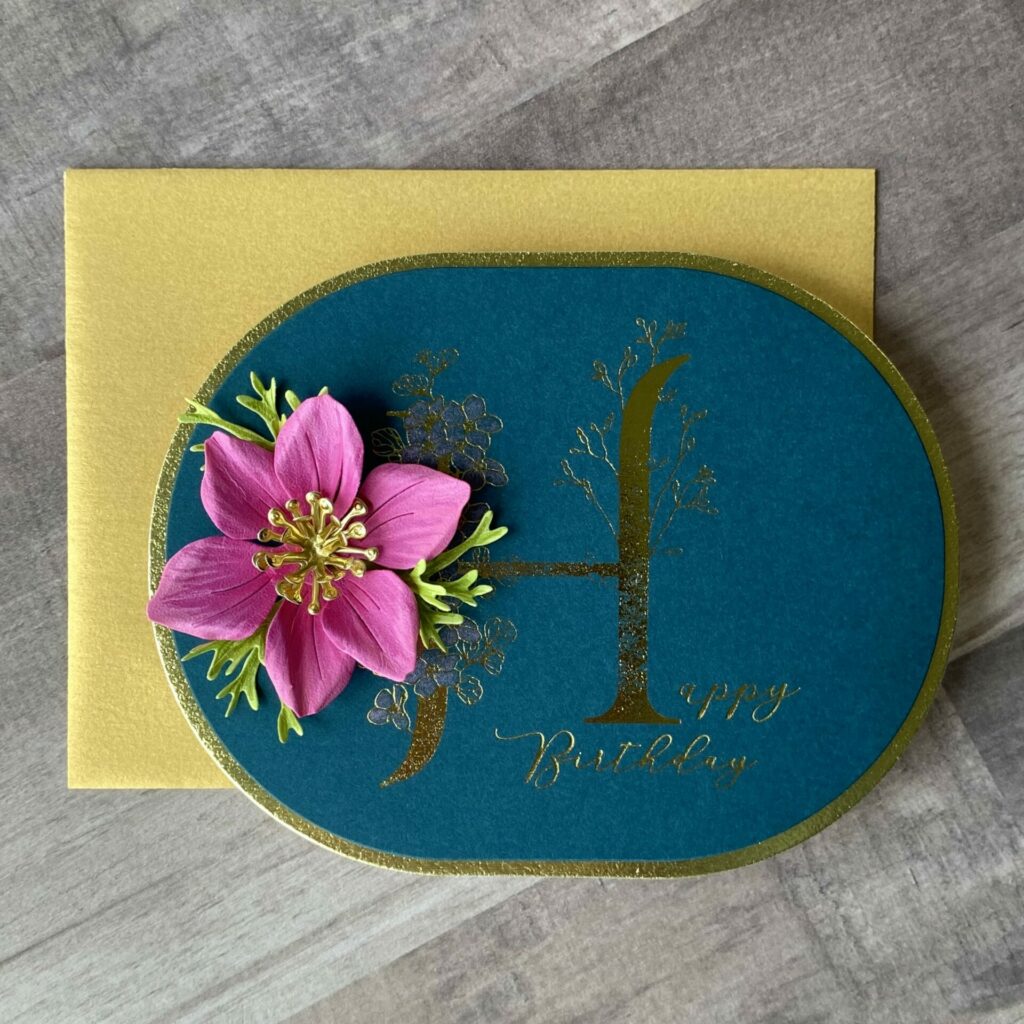
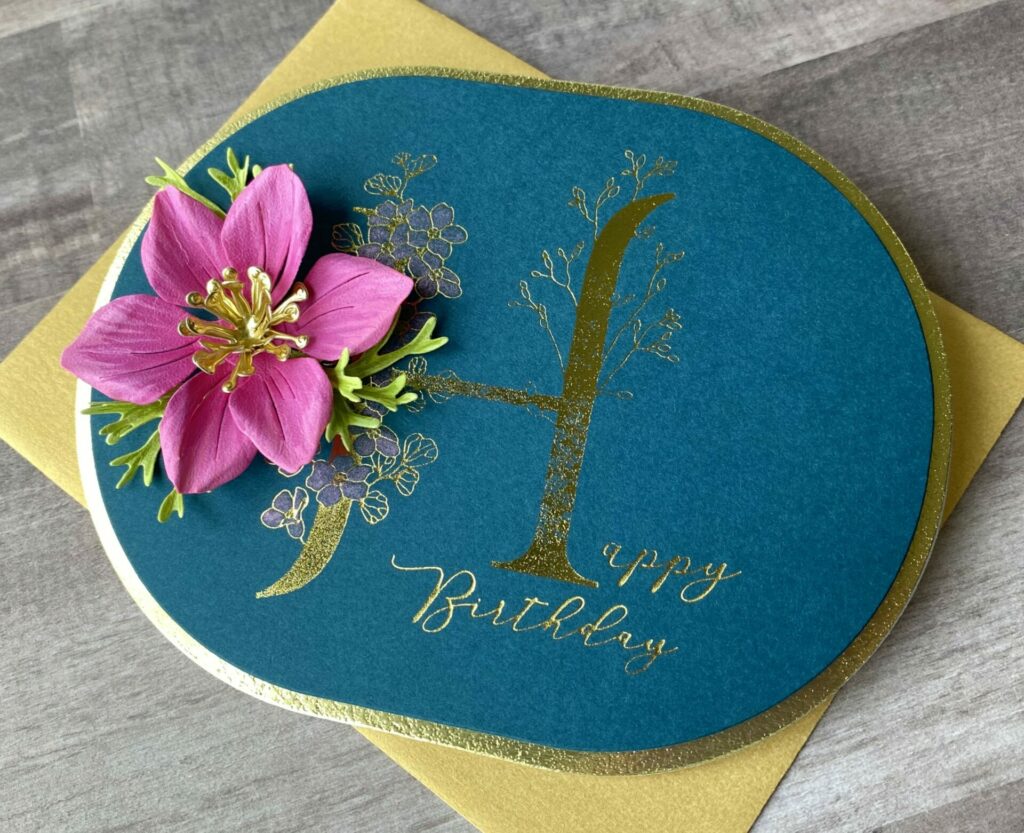
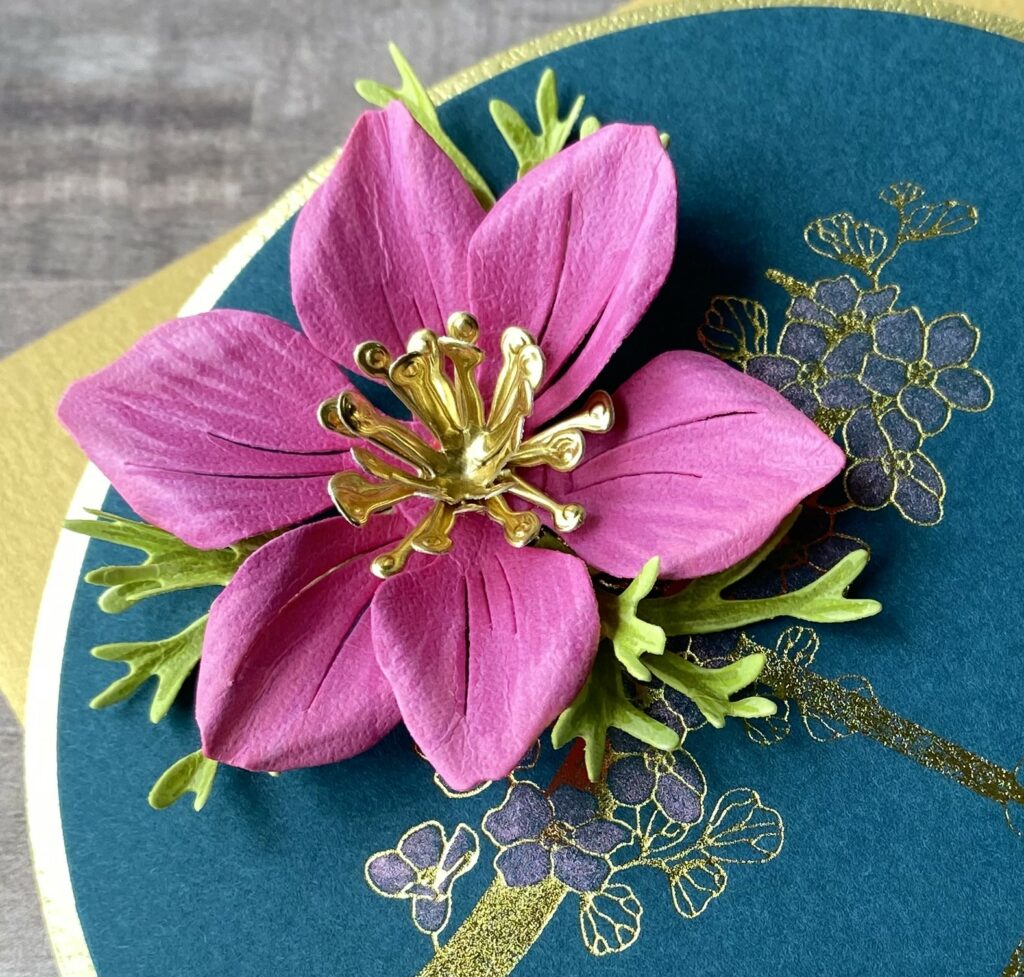
Anemone
Card Base
Create an A2 card base by die cutting Classic White cardstock with the largest die from the Essential Stylish Ovals die set.
Background Panel
Cut Gold Mirror cardstock using the same largest die from the Essential Stylish Ovals set. Emboss it with a glitter texture. (You’ll find full instructions in this Floral Butterfly Shaped Card Tutorial.)
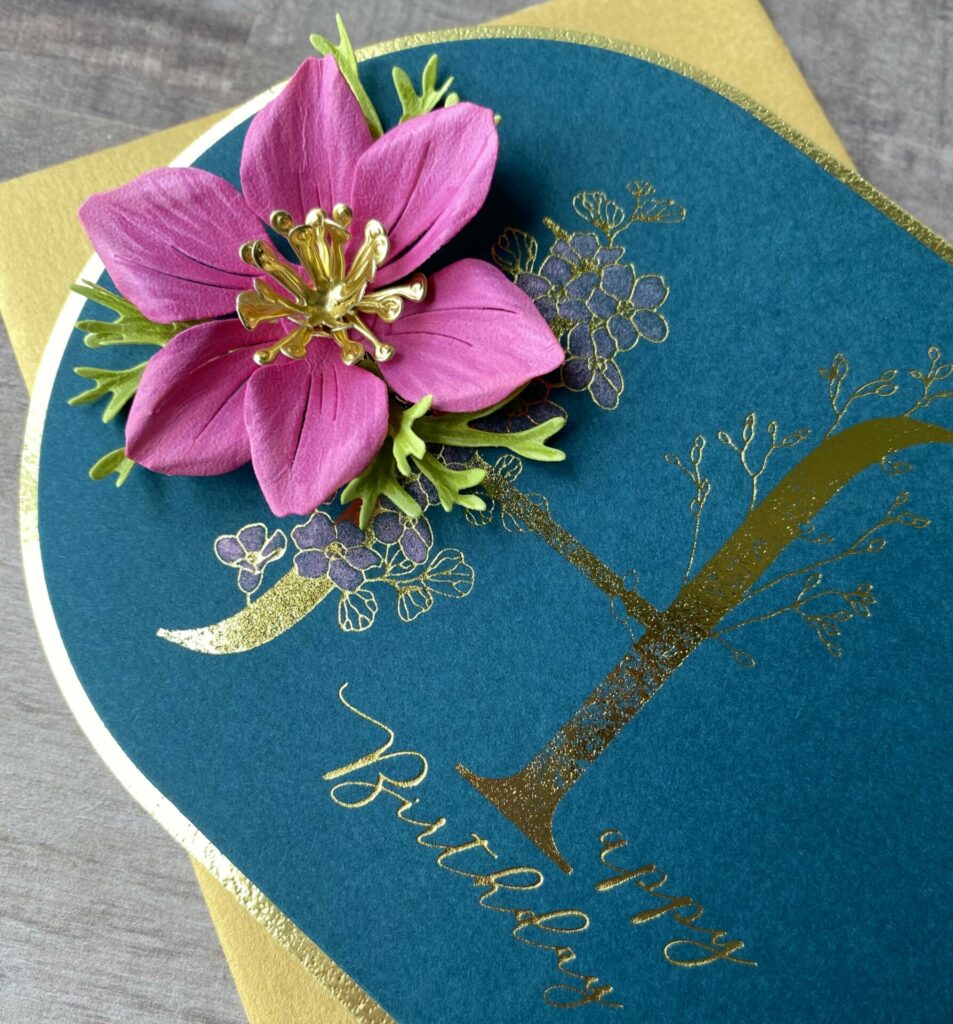
Glimmer Panel
Foil the Floral H BetterPress plate using Gold foil on Oceanside cardstock. Then, die cut the foiled panel with the second-largest die from the Essential Stylish Ovals set. Color the small flowers with Teal Twist Shimmer Interference Ink by Lisa Horton.
Flower
Use the Anemone die set to cut pieces from Susan’s Garden Specialty Cardstock. Color the flower petals with alcohol markers in pink and the leaves in green. Cut the flower centers from Gold Mirror cardstock.
See this Video Tutorial for Anemone assembly and shaping instructions.
View the full list of supplies used for the anemone card here
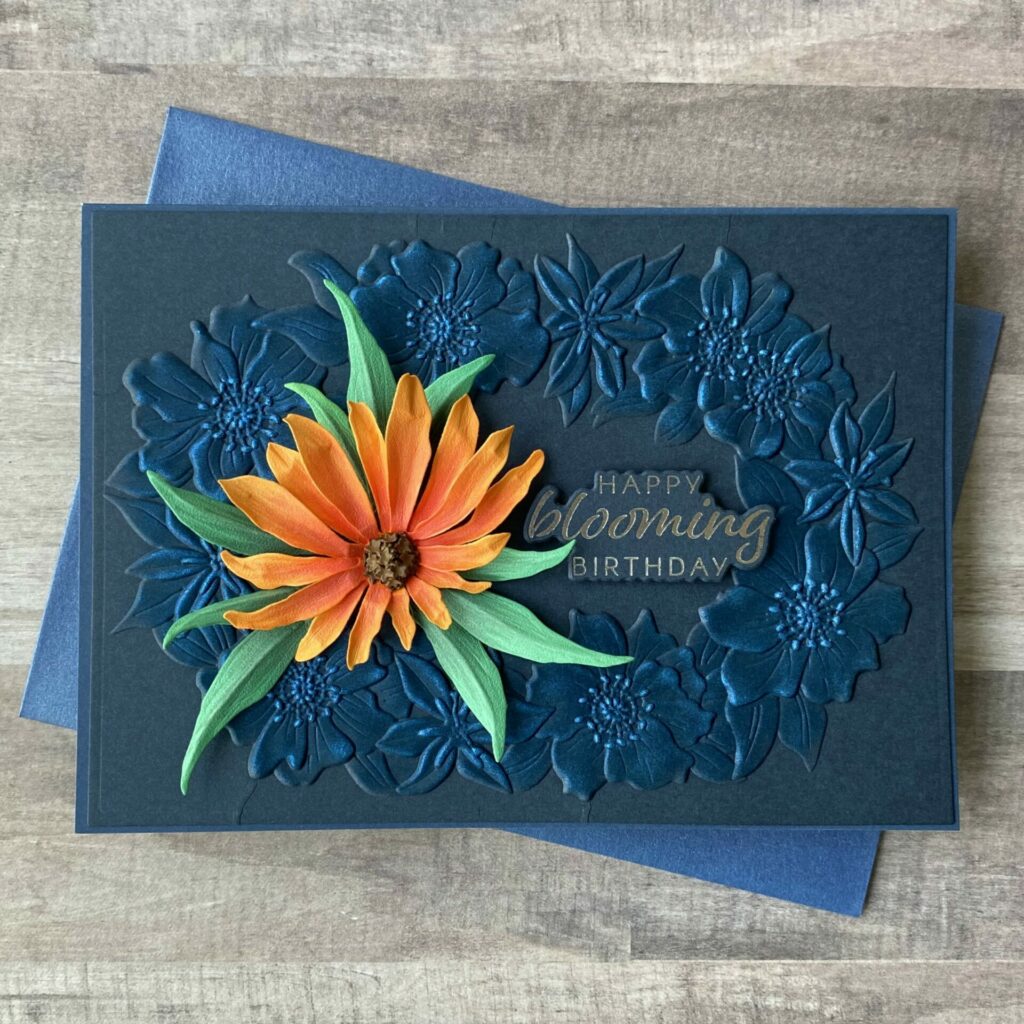
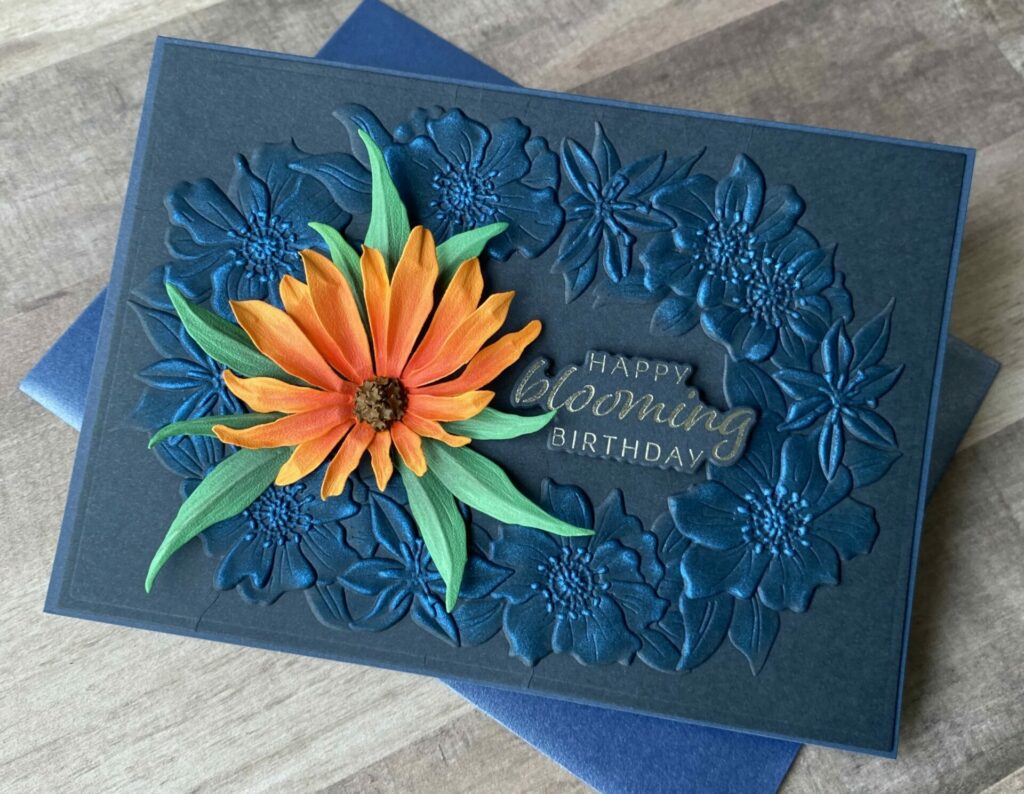
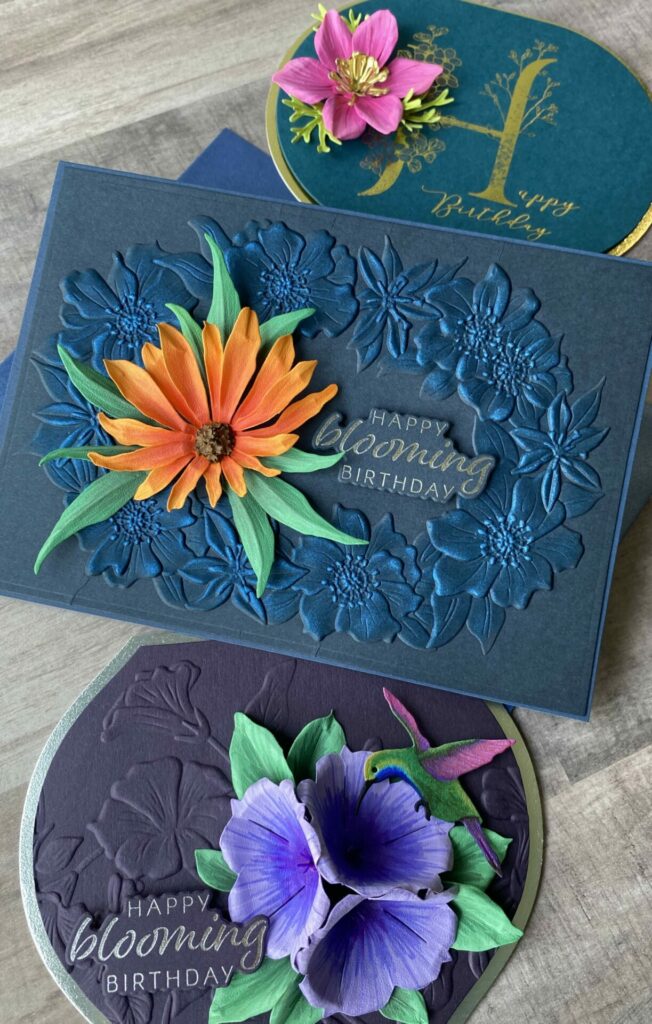
Echinacea
Card Base
Create an A7 card base using Indigo cardstock.
Embossed Background
Die cut Indigo cardstock with the largest die from the 5×7 Matting Basics A set. Emboss the panel using the Nature’s Botanical Wreath 3D embossing folder, then lightly ink the raised areas with Coastline Cloud 9 Metallic Ink using a tiny foam blending tool.
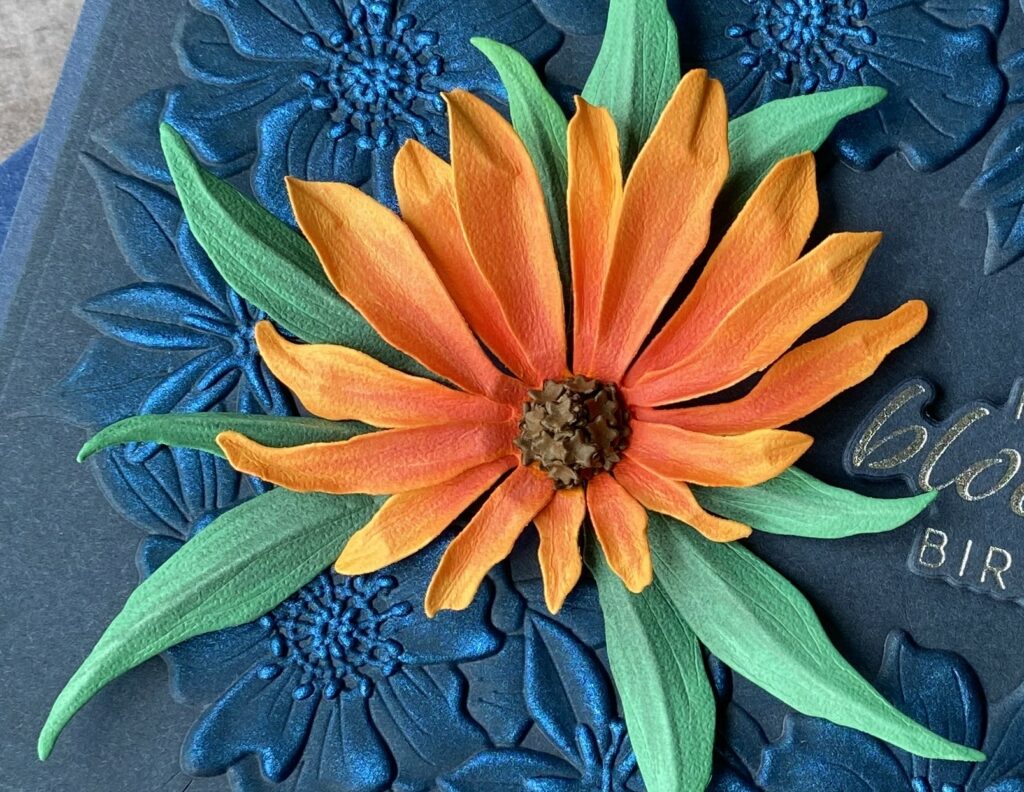
Flower
Use the Echinacea (Coneflower) die set to cut pieces from Susan’s Garden Specialty Cardstock. Color the flower petals with alcohol markers in shades of orange and the leaves in green. Cut the flower centers from Truffle cardstock.
See this Video Tutorial for Echinacea assembly and shaping instructions.
Sentiment
Foil the sentiment from the Nature’s Botanical Garden Sentiments BetterPress plate using Silver foil on Indigo cardstock. Die cut with the coordinating die and attach it to the card with foam squares.
View the full list of supplies used for the echinacea card here
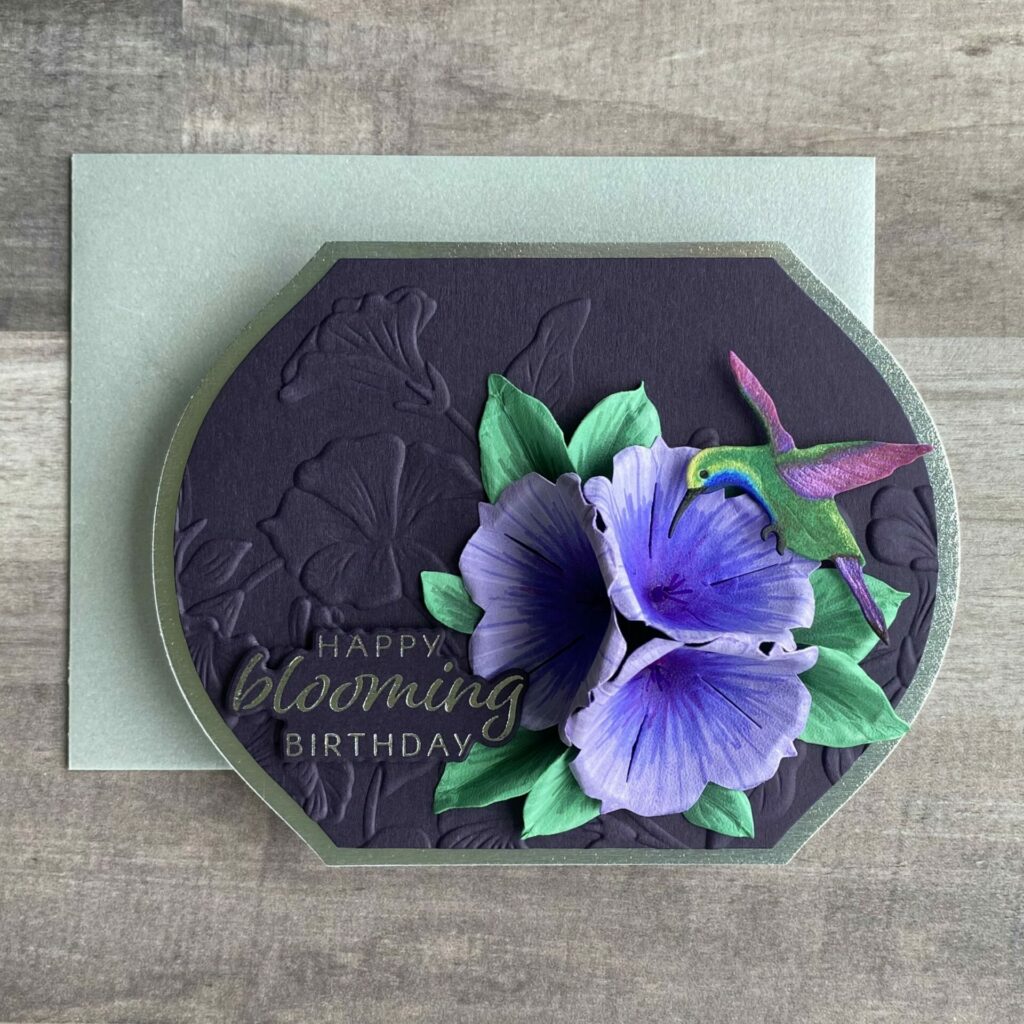
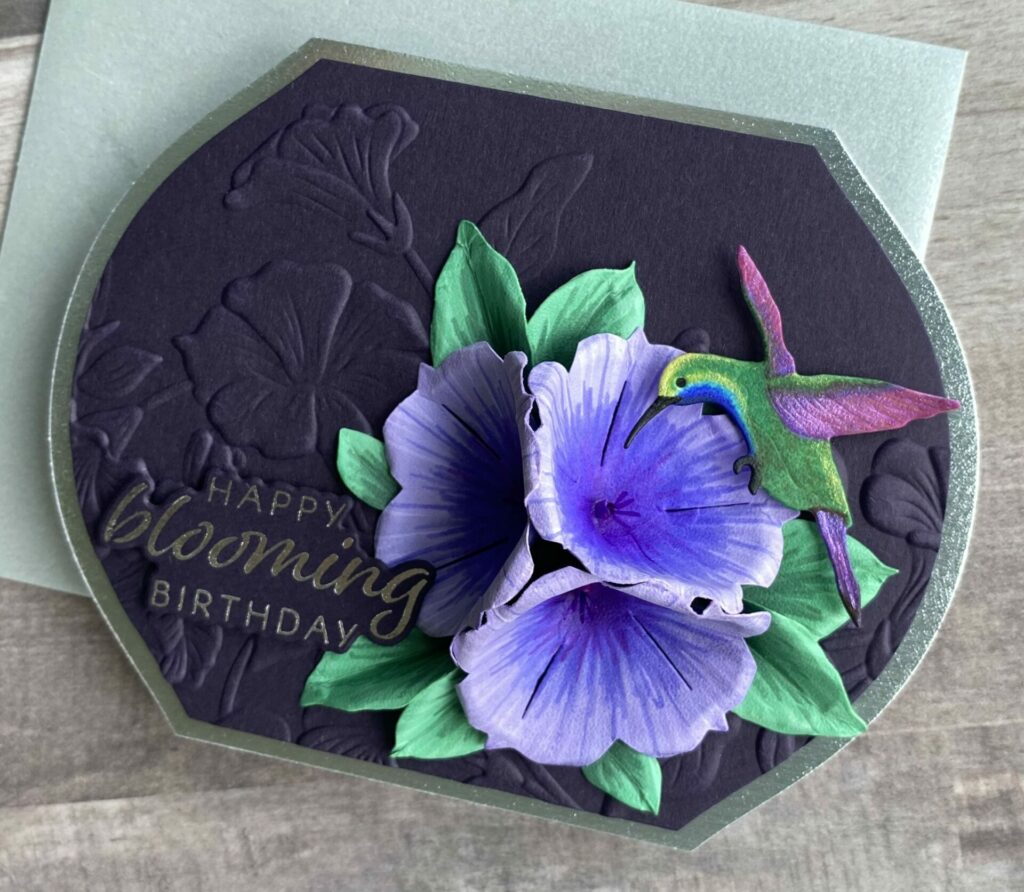
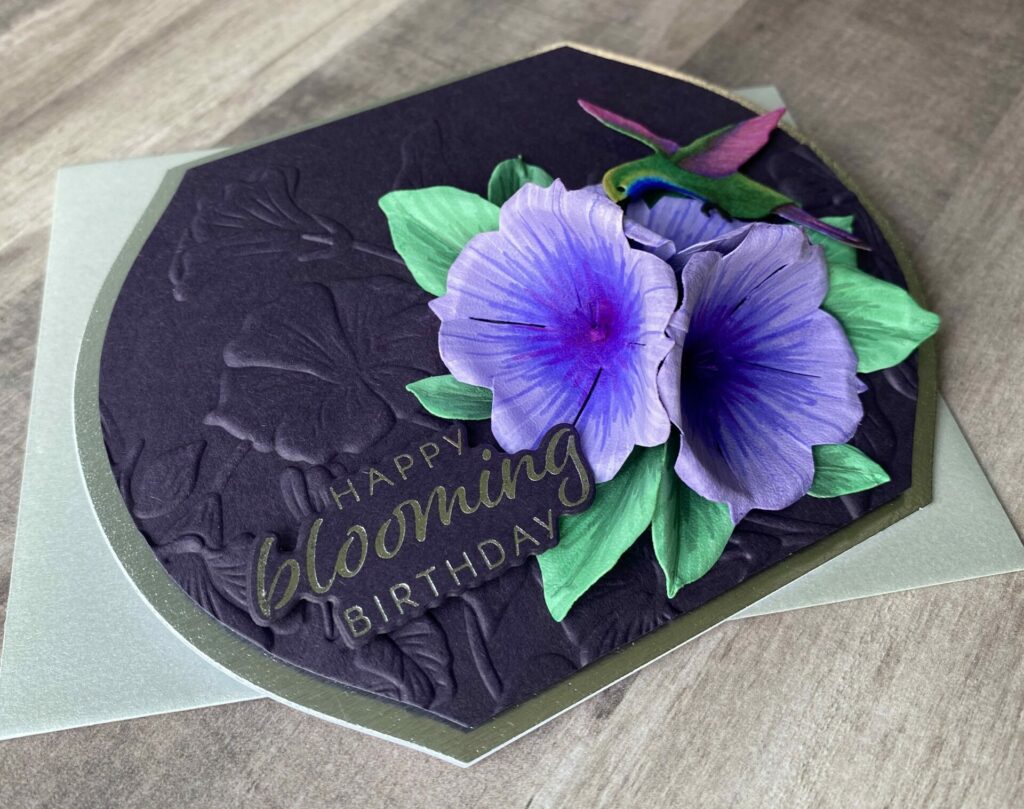
Petunia & Hummingbird
Card Base
Create an A2-sized card base by die cutting Classic White cardstock with the largest die from the Mirrored Arch Labels die set.
Background Panel
Die cut Silver Mirror cardstock using the same largest Mirrored Arch Labels die. Emboss the panel with a glitter texture. (You’ll find full instructions in this Floral Butterfly Shaped Card Tutorial.)
Embossed Layer
Cut Plum essentials cardstock with the second-largest die from the Mirrored Arch Labels set, then emboss it using the Petunia Cascade 3D embossing folder.
Flower
Die cut the flower pieces from the Petunia & Hummingbird die set using Susan’s Garden Specialty Cardstock. Color them with alcohol markers—purple for the flowers and green for the leaves.
See this Video Tutorial for Petunia & Hummingbird assembly and shaping instructions.
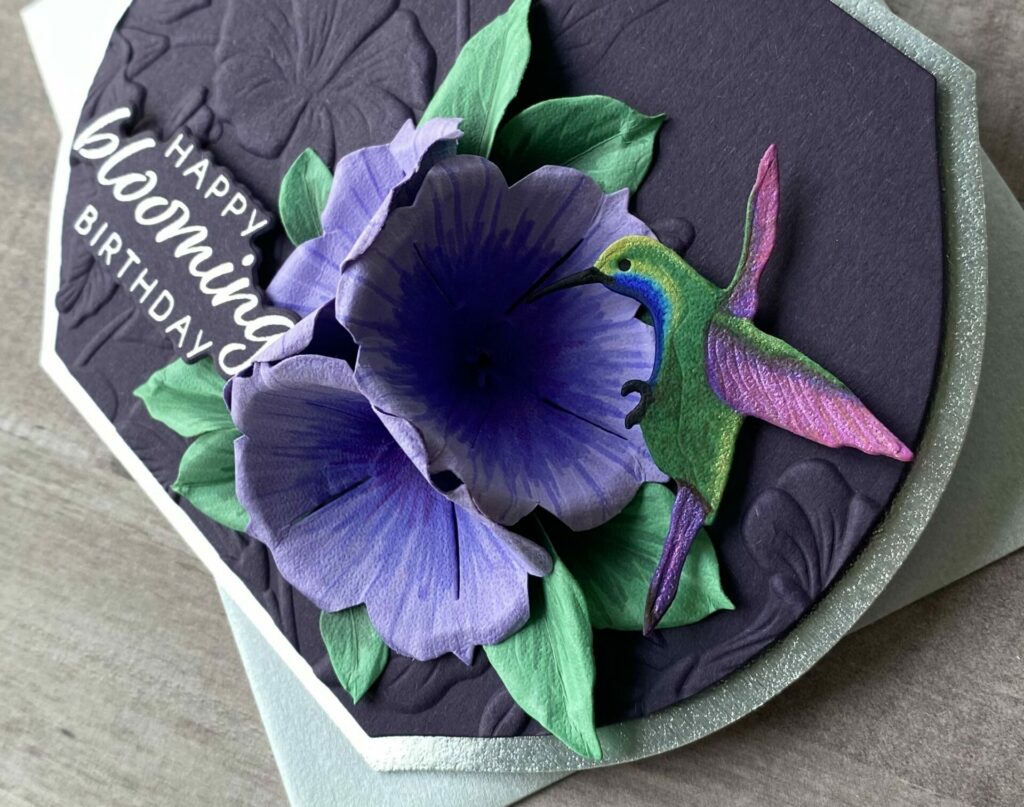
Hummingbird
Using the same die set and Susan’s Garden Specialty Cardstock, die cut the hummingbird. Color it with alcohol markers in shades of green, blue, purple, pink, and black. Add some shimmer by brushing on Distress Spritz to the head and wings. Glue a small piece of black cardstock behind the eye for added detail, then attach the hummingbird to the project with foam squares for dimension.
Sentiment
Foil the sentiment from the Nature’s Botanical Garden Sentiments BetterPress plate using Silver foil on Plum essentials cardstock. Die cut with the coordinating die and adhere it to the card with foam squares.
View the full list of supplies used for the petunia card here
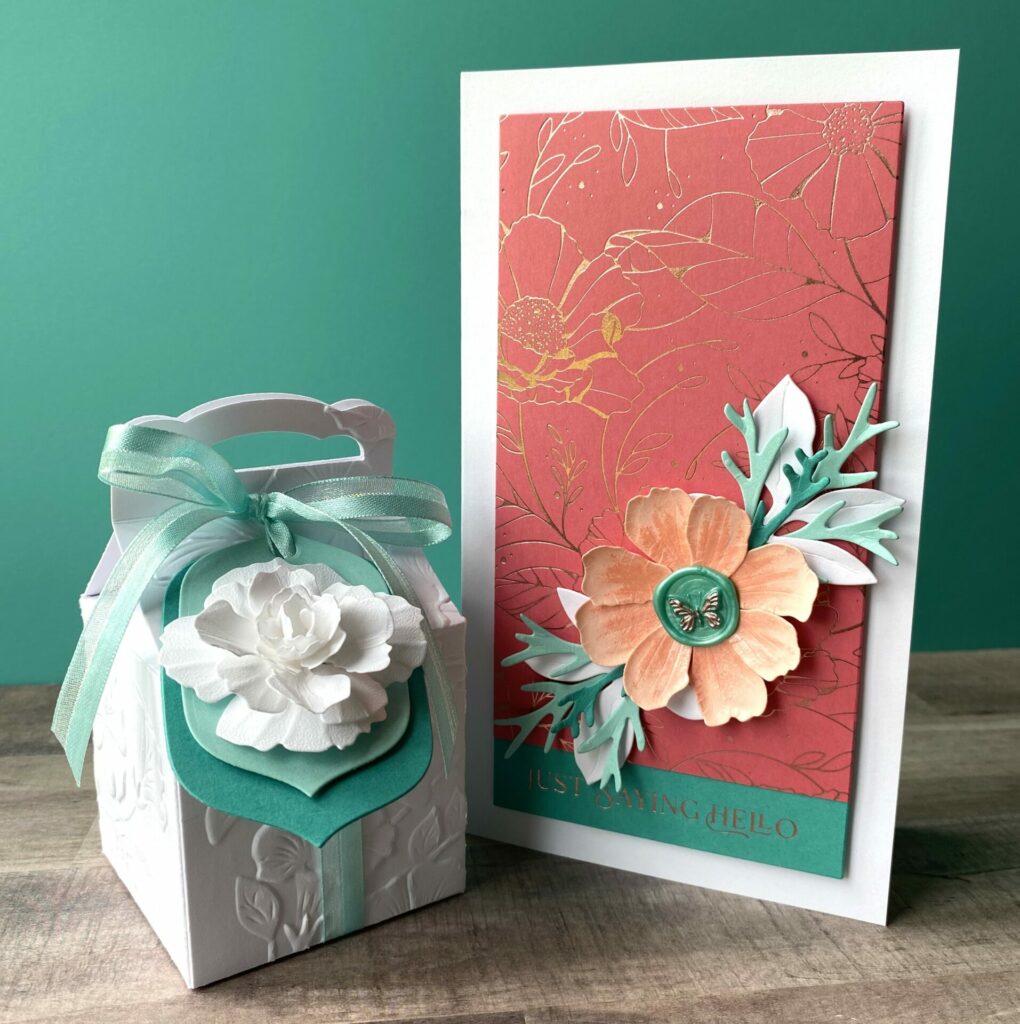
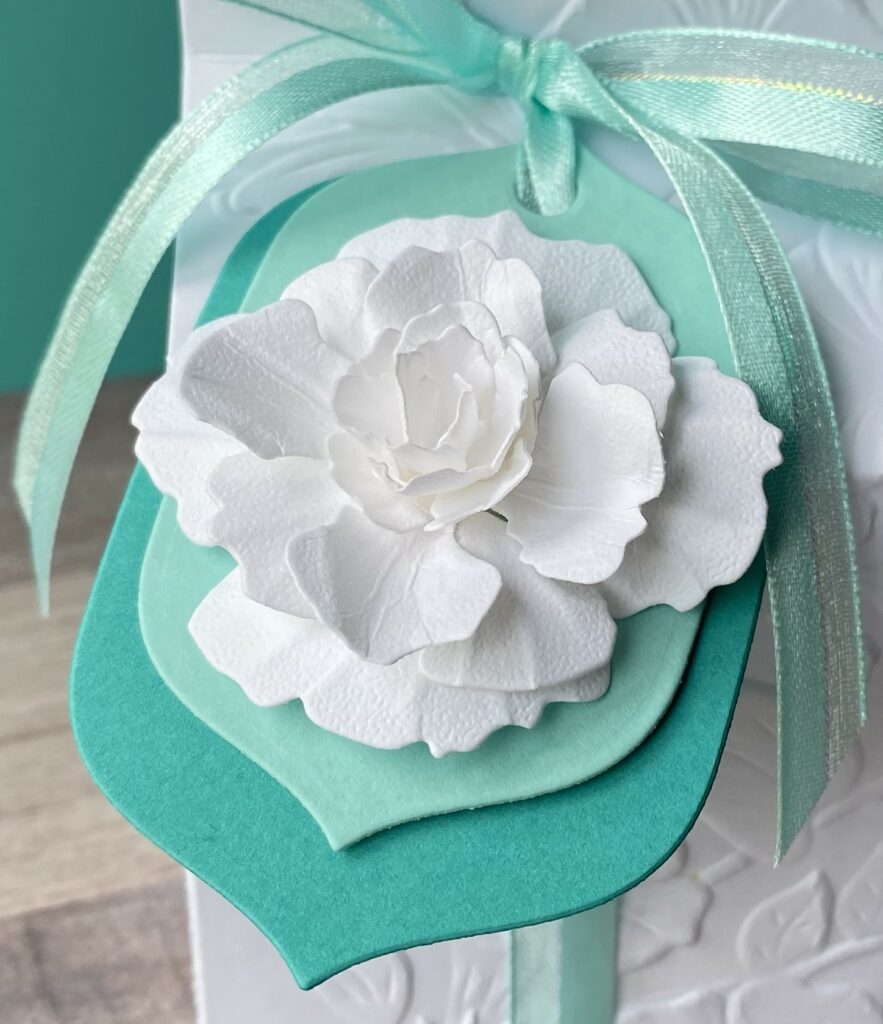
Begonia
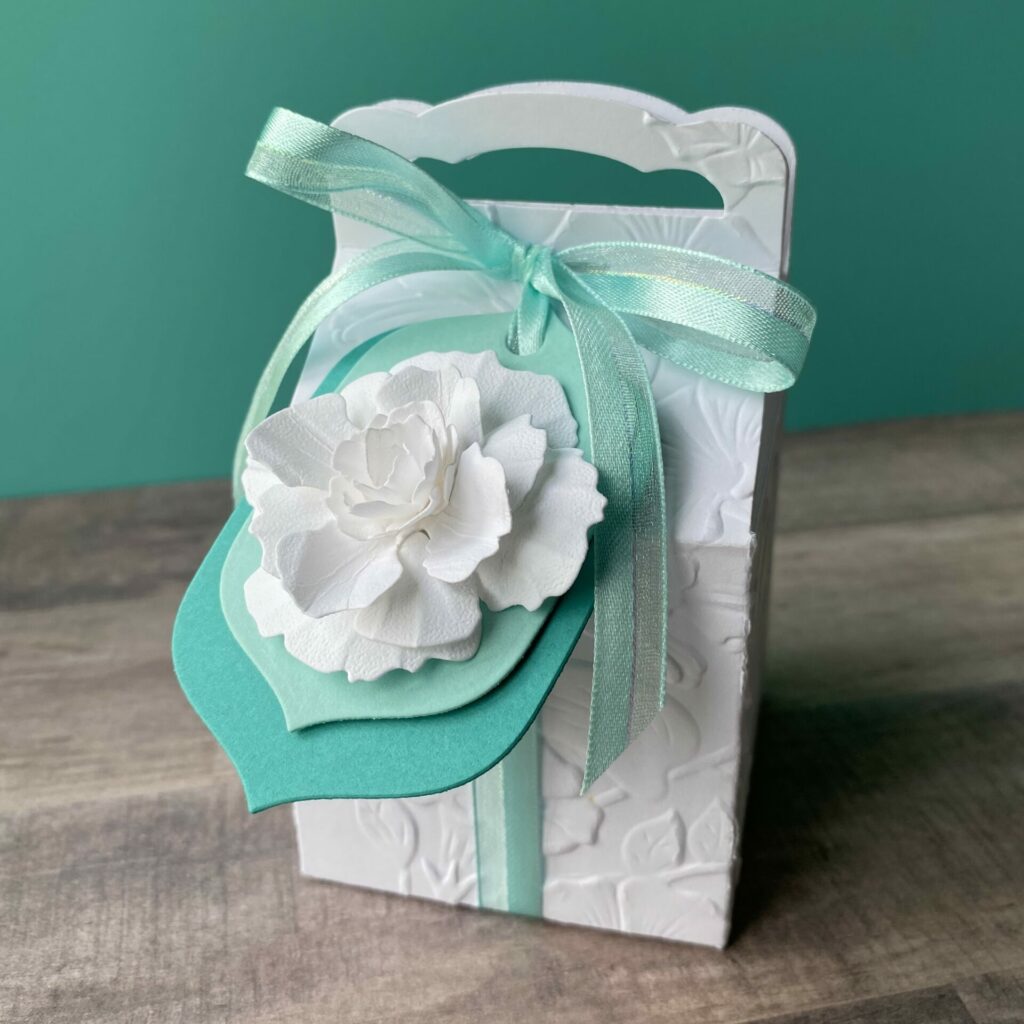
Tag
Die cut a tag from Waterfall cardstock using the tag die from the Fresh Picked Labels & Tag die set. Then, cut the next-largest tag layer from Teal Topaz cardstock. Punch a hole in the Teal Topaz tag and adhere the two layers together using glue and foam squares for dimension.
Flower
Use the Begonia & Ladybugs die set to cut pieces from Susan’s Garden Specialty Cardstock.
See this Video Tutorial for Begonia assembly and shaping instructions.
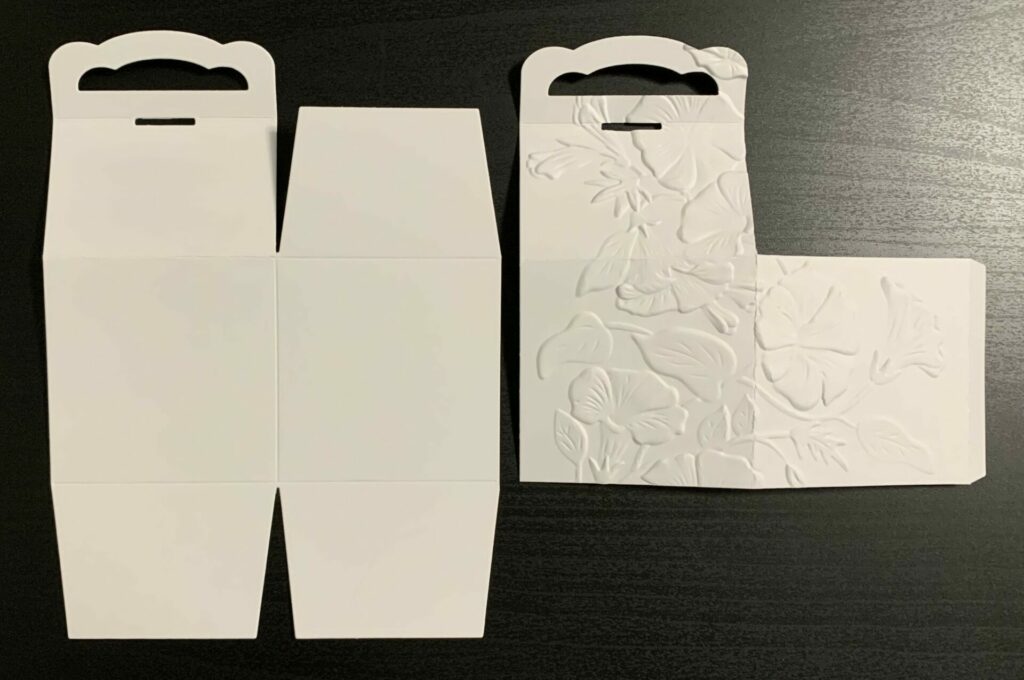
Box
Cut four Box pieces from Classic White cardstock using the Ribbon Box die set. Trim off the side flaps (refer to the photo below for guidance). Emboss two of the panels with the Petunia Cascade 3D embossing folder. Glue the embossed panels to the plain ones, then assemble the box. Lastly tie the tag to the box with ribbon.
View the full list of supplies used for the begonia card here
Cosmos
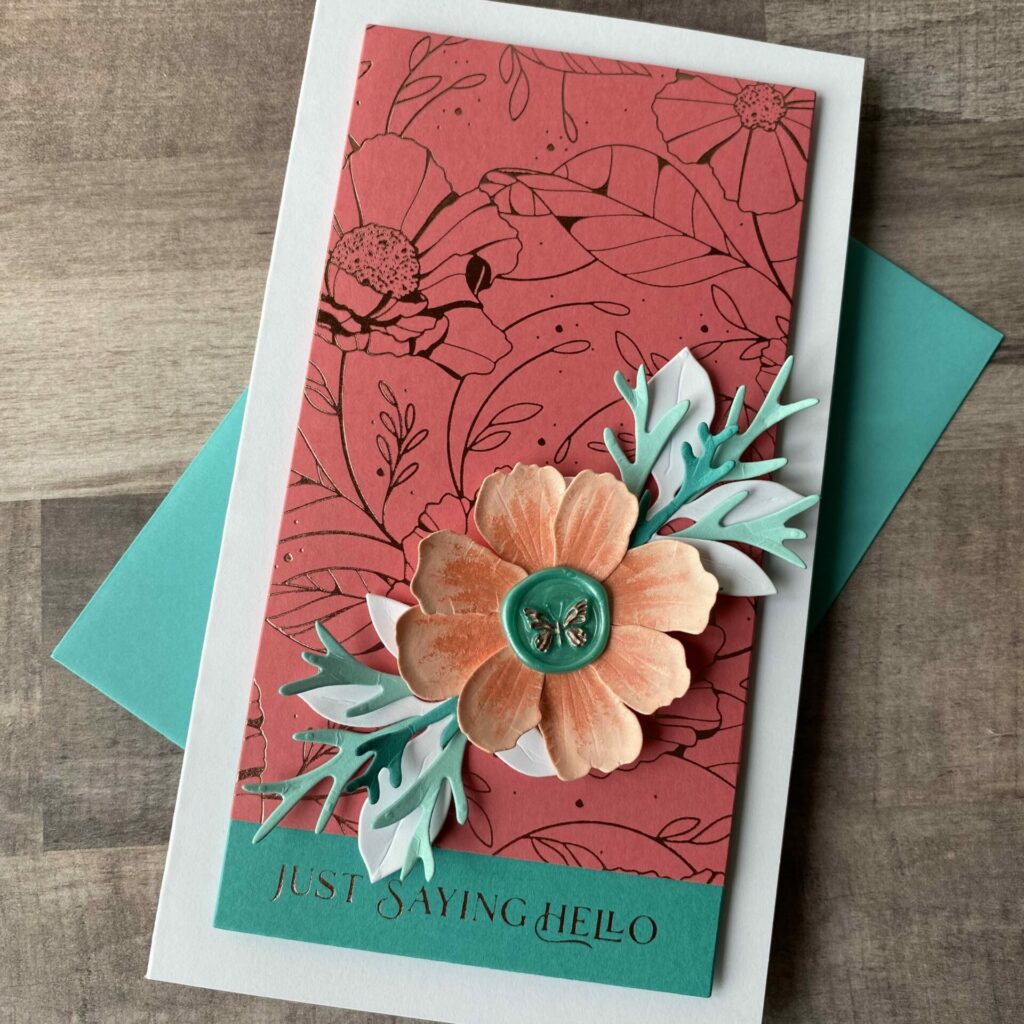
Card Base
Create a 4″ x 7″ card base using Classic White cardstock.
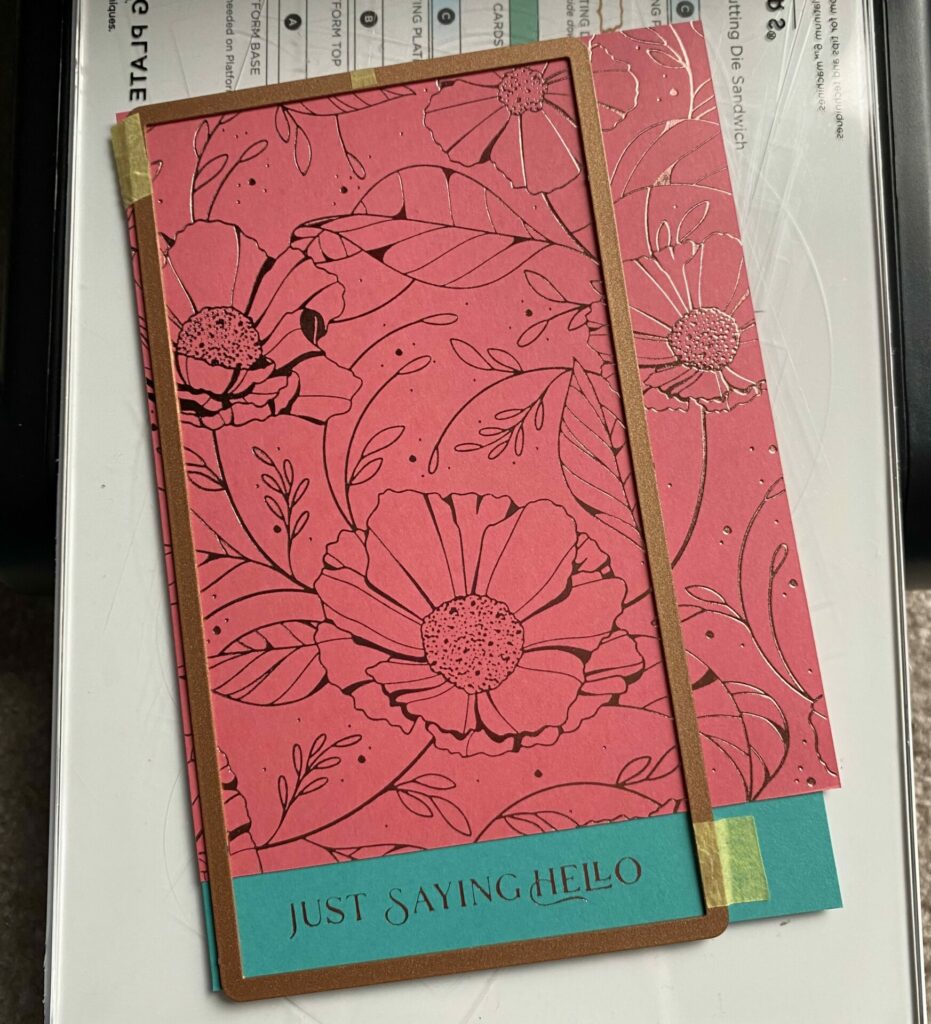
Glimmer Foiling
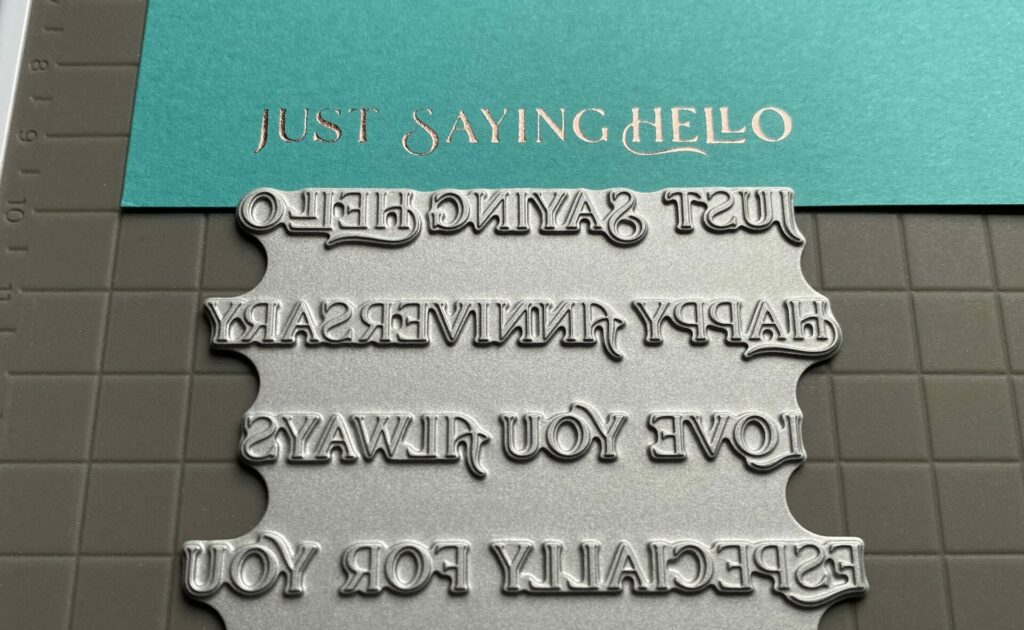
Foil the Cosmos Backdrop BetterPress plate onto Dahlia cardstock using Rose Gold foil. Then, foil just the “Just Saying Hello” sentiment from the Fancy Sentiment Strips BetterPress plate onto Teal Topaz cardstock with the same Rose Gold foil.
Background
Adhere the foiled sentiment strip behind the bottom edge of the foiled cosmos panel. Then die cut the entire piece using the largest die from the Precision Layering Mini Slimline A die set.
Flower
Die cut the flower from the Cosmos die set using Bellini cardstock. Add soft shading with a light peach alcohol marker. Cut the leaves from Waterfall and Teal Topaz cardstock. For added texture, include extra leaves using the Azalea & Garden Pot die set, cut from Classic White cardstock.
See this Video Tutorial for Cosmos assembly and shaping instructions.
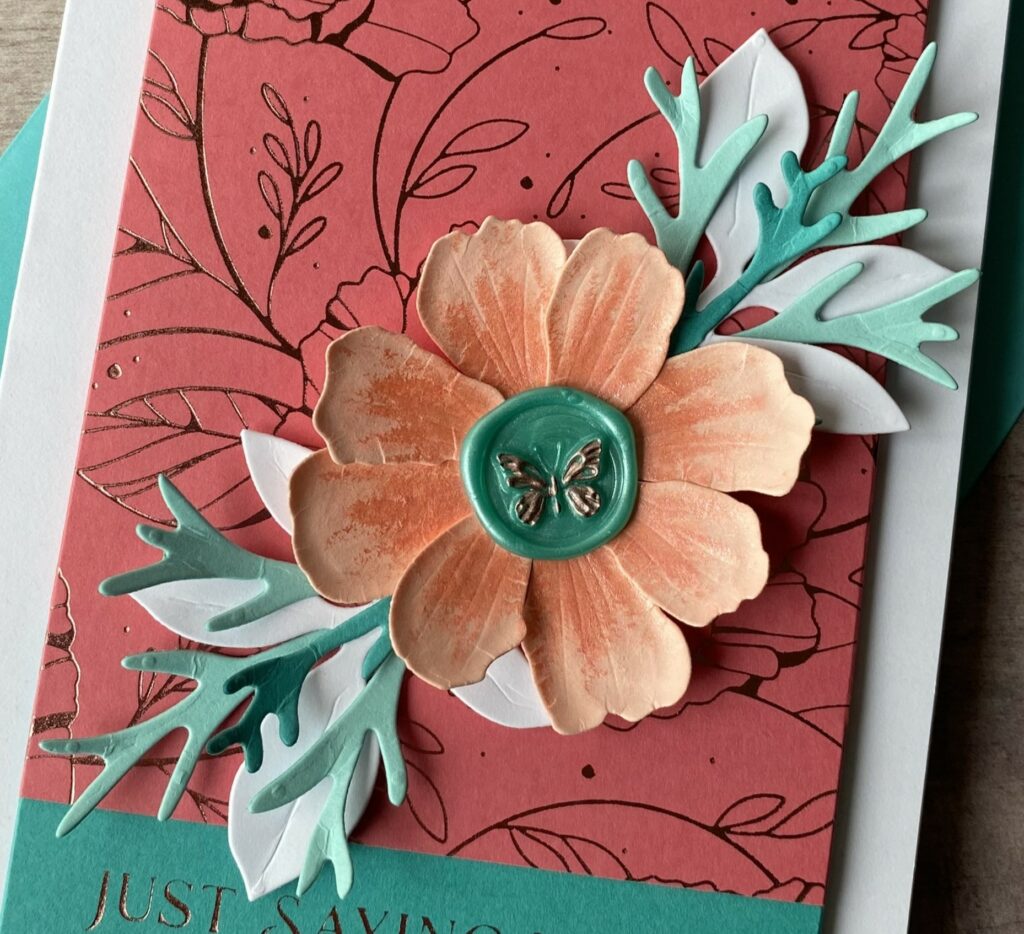
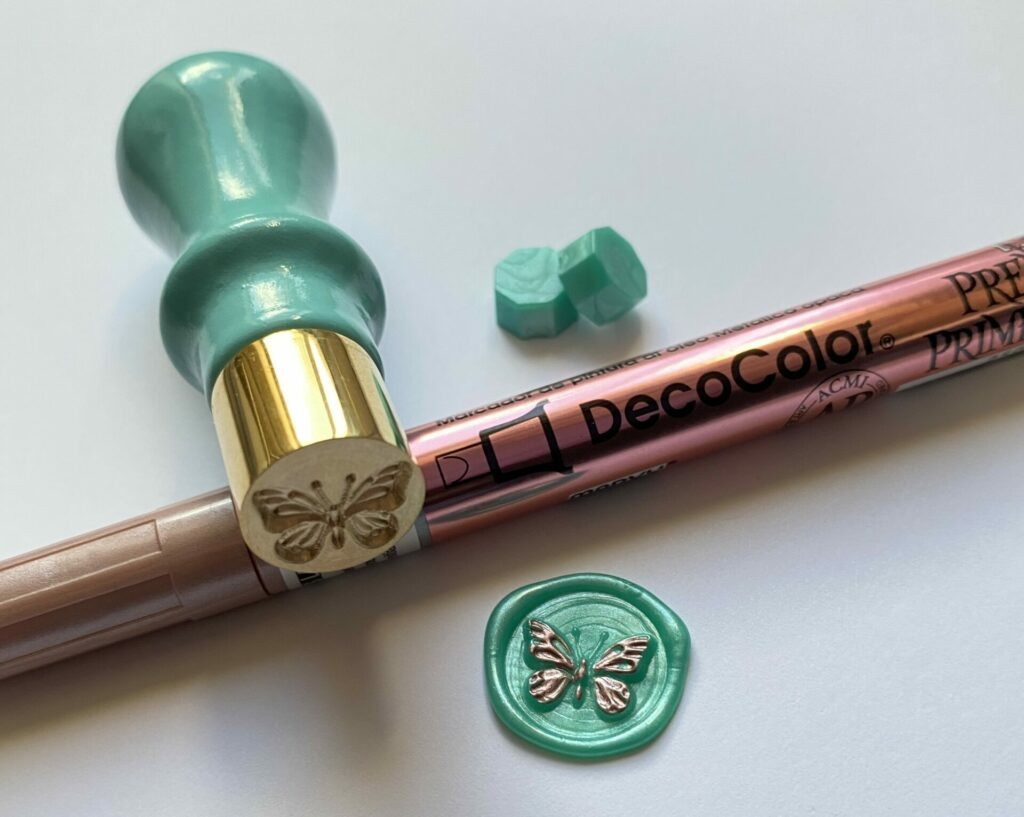
Wax Seal
Create a wax seal using the Butterfly mini 3D stamp and Laguna wax beads. Once cooled, accent the butterfly with a Rose Gold DecoColor metallic marker.
View the full list of supplies used for the cosmos card here
Let Your Creativity Bloom
Whether you’re creating a card for a birthday, thinking of you, or simply celebrating the beauty of blooms, the Summer Solstice Garden Collection brings elegance and natural charm to every handmade project. From three dimensional florals and BetterPress sentiments to embossed textures and soft foiled details, each card showcases the creative possibilities of die cutting and flower shaping.
I hope these ideas have inspired you to dig into your stash and craft something blooming with beauty. If you do, I’d love to see it—be sure to tag me (@silversgrove or @grovecrafted) on Instagram or at Grove Crafted on Facebook. Until next time, happy crafting!
If you’re feeling inspired, be sure to explore the full Summer Solstice Garden Collection here and discover even more elegant and nature-inspired ways to bring floral beauty to your next handmade project.
Supplies Used For All Cards
Disclosure: I received these products to try out and share my honest thoughts with you. This post also includes affiliate links*—if you decide to shop through them, I may earn a small commission (at no extra cost to you). Money earned via affiliate links helps pay the fees to keep this blog up and running. Thanks so much for supporting GroveCrafted and helping me keep the crafty inspiration coming!
Anemone
- Spellbinders Cutting Dies – Anemone #S2-440 | Spellbinders | Scrapbook.com |
- Spellbinders Cutting Dies – Essential Stylish Ovals #S5-562 | Spellbinders | Scrapbook.com |
- Spellbinders BetterPress Plate – Floral H & Sentiment #BP-131 | Spellbinders | Scrapbook.com |
- Spellbinders ColorWheel Cardstock
- Oceanside | Spellbinders | Scrapbook.com |
- Classic White | Spellbinders | Scrapbook.com |
- Spellbinders Specialty Cardstock – Susan’s Garden #SCS-122 | Spellbinders | Scrapbook.com |
- Spellbinders Mirror Cardstock – Gold #SCS-118 | Spellbinders | Scrapbook.com |
- Spellbinders Glimmer Hot Foil – Gold #GLF-014 | Spellbinders | Scrapbook.com |
- Lisa Horton Interference Ink – Teal Twist Shimmer | Spellbinders | Scrapbook.com |
- Alcohol Markers – Pink and Green Shades
Echinacea
- Spellbinders Cutting Dies – Echinacea (Coneflower) #S4-1437 | Spellbinders | Scrapbook.com |
- Spellbinders Cutting Dies – 5×7 Matting Basics A #S6-001 | Spellbinders |
- Spellbinders 3D Embossing Folder – Nature’s Botanical Wreath #E3D-094 | Spellbinders | Scrapbook.com |
- Spellbinders BetterPress Plate – Nature’s Botanical Garden Sentiments #BP-190 | Spellbinders | Scrapbook.com |
- Spellbinders ColorWheel Cardstock
- Indigo | Spellbinders | Scrapbook.com |
- Truffle | Spellbinders | Scrapbook.com |
- Spellbinders Specialty Cardstock – Susan’s Garden #SCS-122 | Spellbinders | Scrapbook.com |
- Lisa Horton Cloud 9 Metallic Ink – Coastline | Spellbinders | Scrapbook.com |
- Spellbinders Glimmer Hot Foil – Silver #GLF-003 | Spellbinders | Scrapbook.com |
- Alcohol Markers – Orange and Green Shades
Petunia & Hummingbird
- Spellbinders Cutting Dies – Petunia & Hummingbird #S4-1434 | Spellbinders | Scrapbook.com |
- Spellbinders Cutting Dies – Mirrored Arch Labels #S5-613 | Spellbinders | Scrapbook.com |
- Spellbinders 3D Embossing Folder – Petunia Cascade #E3D-129 | Spellbinders | Scrapbook.com |
- Spellbinders BetterPress Plate – Nature’s Botanical Garden Sentiments #BP-190 | Spellbinders | Scrapbook.com |
- Spellbinders Essentials Cardstock – Plum
- Spellbinders ColorWheel Cardstock – Classic White | Spellbinders | Scrapbook.com |
- Spellbinders Specialty Cardstock – Susan’s Garden #SCS-122 | Spellbinders | Scrapbook.com |
- Spellbinders Mirror Cardstock – Silver #SCS-124 | Spellbinders |
- Spellbinders Glimmer Hot Foil – Silver #GLF-003 | Spellbinders | Scrapbook.com |
- Distress Spritz:
- Picked Raspberry | Scrapbook.com |
- Twisted Citron | Scrapbook.com |
- Wilted Violet | Scrapbook.com |
- Alcohol Markers – Pink, Green, Blue, Purple Shades & Black
Begonia
- Spellbinders Cutting Dies – Begonia & Ladybugs #S4-1435 | Spellbinders | Scrapbook.com |
- Spellbinders Cutting Dies – Fresh Picked Labels & Tag #S5-623 | Spellbinders | Scrapbook.com |
- Spellbinders Cutting Dies – Ribbon Box #S6-240 | Spellbinders | Scrapbook.com |
- Spellbinders 3D Embossing Folder – Petunia Cascade #E3D-129 | Spellbinders | Scrapbook.com |
- Spellbinders ColorWheel Cardstock
- Waterfall | Spellbinders | Scrapbook.com |
- Teal Topaz | Spellbinders | Scrapbook.com |
- Classic White | Spellbinders | Scrapbook.com |
- Spellbinders Specialty Cardstock – Susan’s Garden #SCS-122 | Spellbinders | Scrapbook.com |
Cosmos
- Spellbinders Cutting Dies – Cosmos #S4-1436 | Spellbinders | Scrapbook.com |
- Spellbinders Cutting Dies – Azalea & Garden Pot with Ladybugs #S5-636 | Scrapbook.com |
- Spellbinders BetterPress Plate – Cosmos Backdrop #BP-105 | Spellbinders | Scrapbook.com |
- Spellbinders BetterPress Plate – Fancy Sentiments Strips #BP-091 | Spellbinders | Scrapbook.com |
- Spellbinders Cutting Dies – Percision Layering Mini Slimline A #S4-1158 | Amazon |
- Spellbinders ColorWheel Cardstock
- Dahlia | Spellbinders | Scrapbook.com |
- Bellini | Spellbinders | Scrapbook.com |
- Waterfall | Spellbinders | Scrapbook.com |
- Teal Topaz | Spellbinders | Scrapbook.com |
- Classic White | Spellbinders | Scrapbook.com |
- Spellbinders Glimmer Hot Foil – Rose Gold #GLF-004 | Spellbinders | Scrapbook.com |
- Spellbinders Wax Seal Starter Kit | Spellbinders | Scrapbook.com |
- Spellbinders Mini 3D Wax Seal Stamp – Butterfly #WSM-005 | Spellbinders | Scrapbook.com |
- Spellbinders Wax Beads – Teal Mix #WS-118 | Spellbinders | Scrapbook.com |
- DecoColor Premium Metallic Marker – Rose Gold | Spellbinders | Scrapbook.com |
Tools Used For All Cards
- Spellbinders Platinum Six | Spellbinders | Scrapbook.com |
- Spellbinders Glimmer Hot Foil System | Spellbinders | Scrapbook.com |
- Tim Holtz Paper Trimmer | Scrapbook.com | Amazon |
- Scoring Board | Amazon |
- Bearly Art Glue | Spellbinders | Scrapbook.com |
- Best Ever Craft Tape – 5/8 in | Spellbinders | Scrapbook.com |
- Foam Squares – White | Simon |
- SSS Embellishment Wand | Simon |
- Tim Holtz – Shaping Kit #665304 | Scrapbook.com |
- Tiny Blending Tool | Scrapbook.com |
- Die Pick
- T-Square
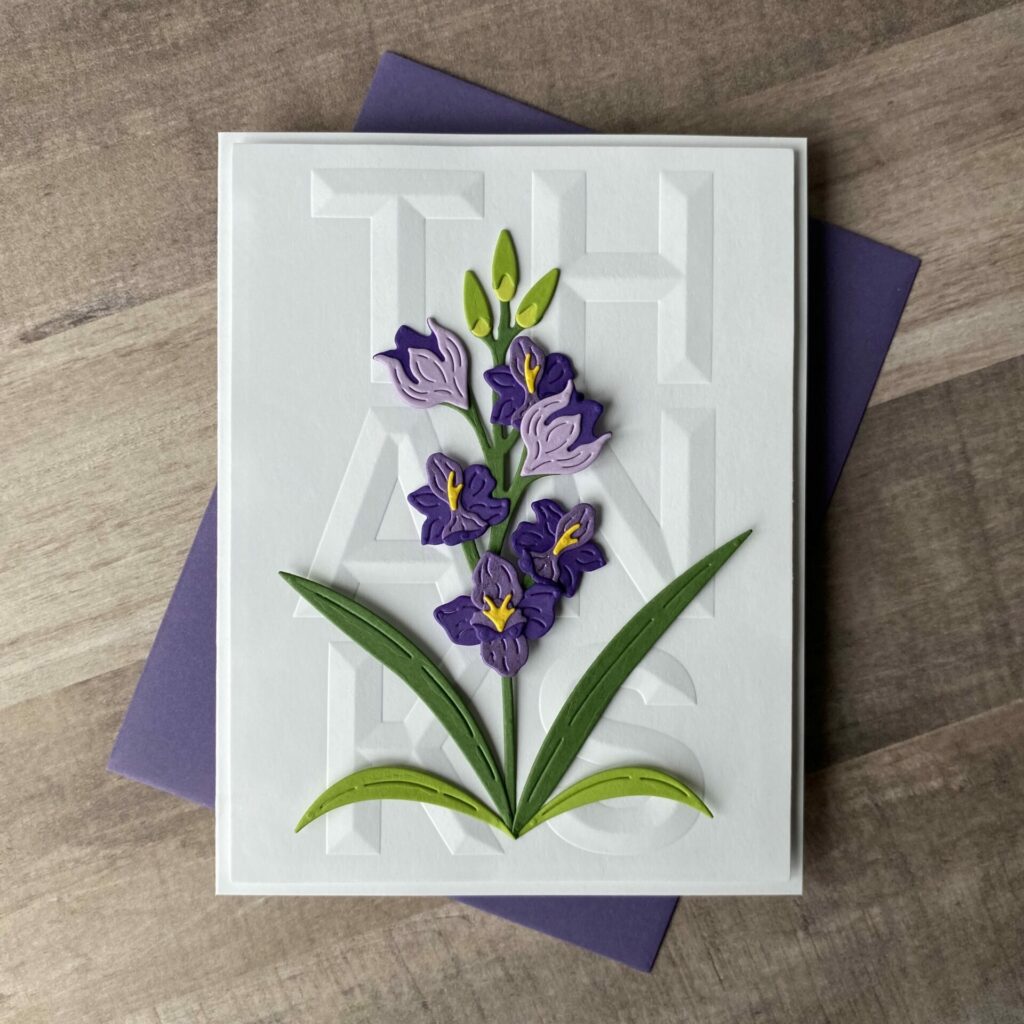
If you enjoyed these Summer Solstice Garden Cards, be sure to check out my Blooming With Thanks Card tutorial—it’s a fun and floral-filled project you won’t want to miss!