Aloha Greetings Card Ideas
Spellbinders Clubs | June 2026
Hello, crafty friends!
Today I’m sharing the June Spellbinders Clubs. They bring all the tropical vibes with a beautiful Aloha Greetings theme! Filled with lush florals, island-inspired textures, tropical wildlife, and cheerful sentiments, this month’s clubs make it easy to create cards that feel like a mini getaway. I had so much fun mixing and matching products from several of the club kits to create these unique cards, each showcasing a different side of this vibrant collection.
Before we dive in, here’s a quick look at what makes the June Spellbinders Clubs so vibrant, tropical, and full of island charm!
Disclosure
This post includes gifted products and affiliate links—if you decide to shop through them, I may earn a small commission (at no extra cost to you). Money earned via affiliate links helps pay the fees to keep this blog up and running. Thanks so much for supporting GroveCrafted and helping me keep the crafty inspiration coming!
Spellbinders June Clubs
The Aloha Greetings theme for the June Spellbinders Clubs brings a bright tropical escape to cardmaking. The collection is inspired by island vibes, featuring lush tropical florals, under the sea elements, and cheerful Hawaiian greetings that work beautifully together across the different club kits. From bold “Aloha” sentiments and leafy foliage to playful beach scenes and tropical tiki textures, the theme is designed to create warm, joyful projects that feel like a mini vacation in paper form.
The Clubs I Used To Make My Cards
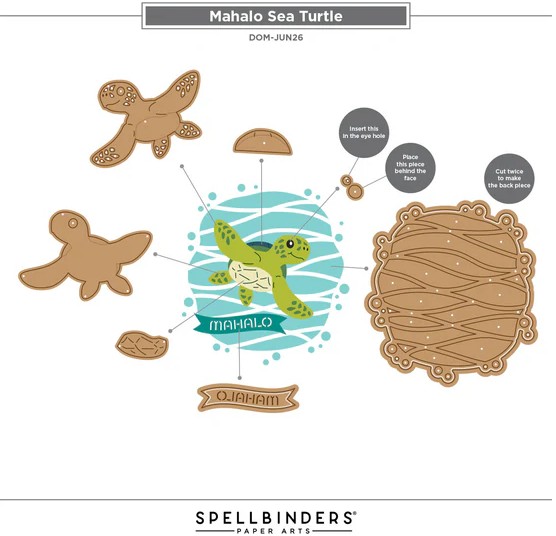
- Small Die of the Month – Mahalo Sea Turtle
- Large Die of the Month – Tropical Blooms
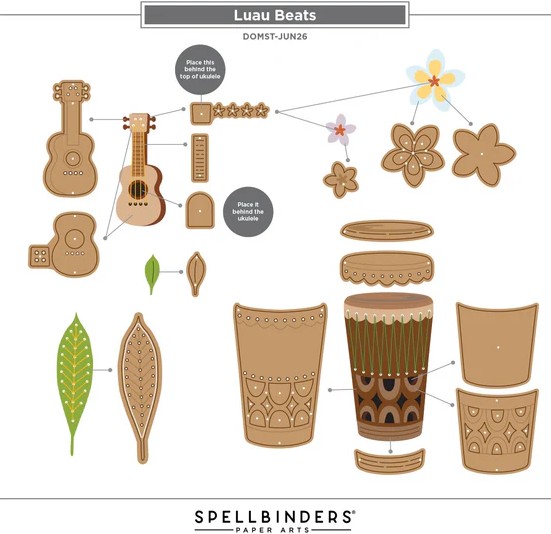
- Stitching Die of the Month – Luau Beats
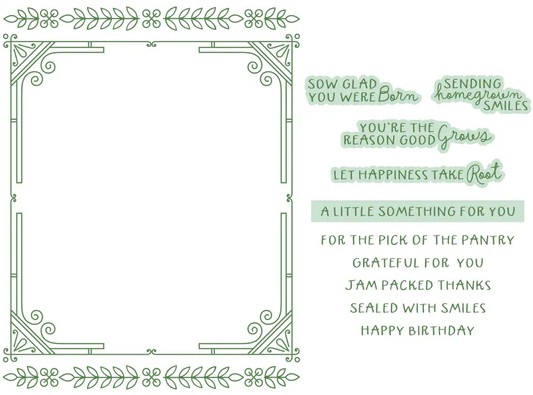
- Press & Foil of the Month – Hibiscus Bloom
- 3D Embossing Folder of the Month – Island Style
Before we dive into the June cards, here’s a quick overview of how the Spellbinders Clubs work.
About Spellbinders Clubs
If you’re new to Spellbinders Clubs, they’re monthly subscriptions that deliver exclusive crafting goodies right to your doorstep. From dies and stitching to embossing, stamping, hot foiling, and more, there’s truly something for everyone. It’s such a fun way to keep your creativity flowing while building a collection of unique products you won’t find anywhere else. You can explore all the Spellbinders club options here, or jump straight to the individual clubs that interest you below:
- Small Die of the Month | USA | UK | A compact set of versatile dies for layering, accenting, and detailed die cutting.
- Large Die of the Month | USA | UK | Larger-scale die sets perfect for focal points and dramatic cut-outs.
- Stitching Die of the Month | USA | UK | Dies designed for faux stitching or real thread work to add texture and handcrafted flair.
- Press & Foil of the Month | USA | UK | A combined BetterPress and hot foil club delivering plates and foil for elegant pressed and foiled card elements.
- Stencil of the Month | USA | UK | Detailed stencils for layering ink, creating backgrounds, and adding dimensional design.
- Clear Stamp & Die of the Month | USA | UK | Coordinating clear stamps with dies to create stamped images and precisely cut elements.
- 3D Embossing Folder of the Month | USA | UK | Deep-textured folder for rich, dimensional embossing effects.
- Embossing Folder of the Month | USA | UK | Embossing folder that add textured designs to panels and backgrounds.
And if you happen to love all the clubs in a given month, you may want to check out the All Clubs Crate.
All Clubs Crate
- All Clubs Crate | USA | UK |
- Includes all eight club products
- Two exclusive bonus item—only available in this bundle.
- 10 – 8.5 x 11 sheets of ColorWheel Cardstock that coordinates
- 15% off select Spellbinders products everyday!
- 1 Free Shipping Coupon to use every month.
It’s also a fantastic value! You’ll save 58% compared to purchasing all the clubs separately.
How It Works
- The sign-up window is open from the 6th–27th of each month.
- Your first kit will charge immediately, and future kits will bill on the 5th of each month.
- Kits ship by the end of each month.
- You can cancel anytime!
If you have questions, be sure to check out the Club FAQ’s page for full details, terms, and conditions.
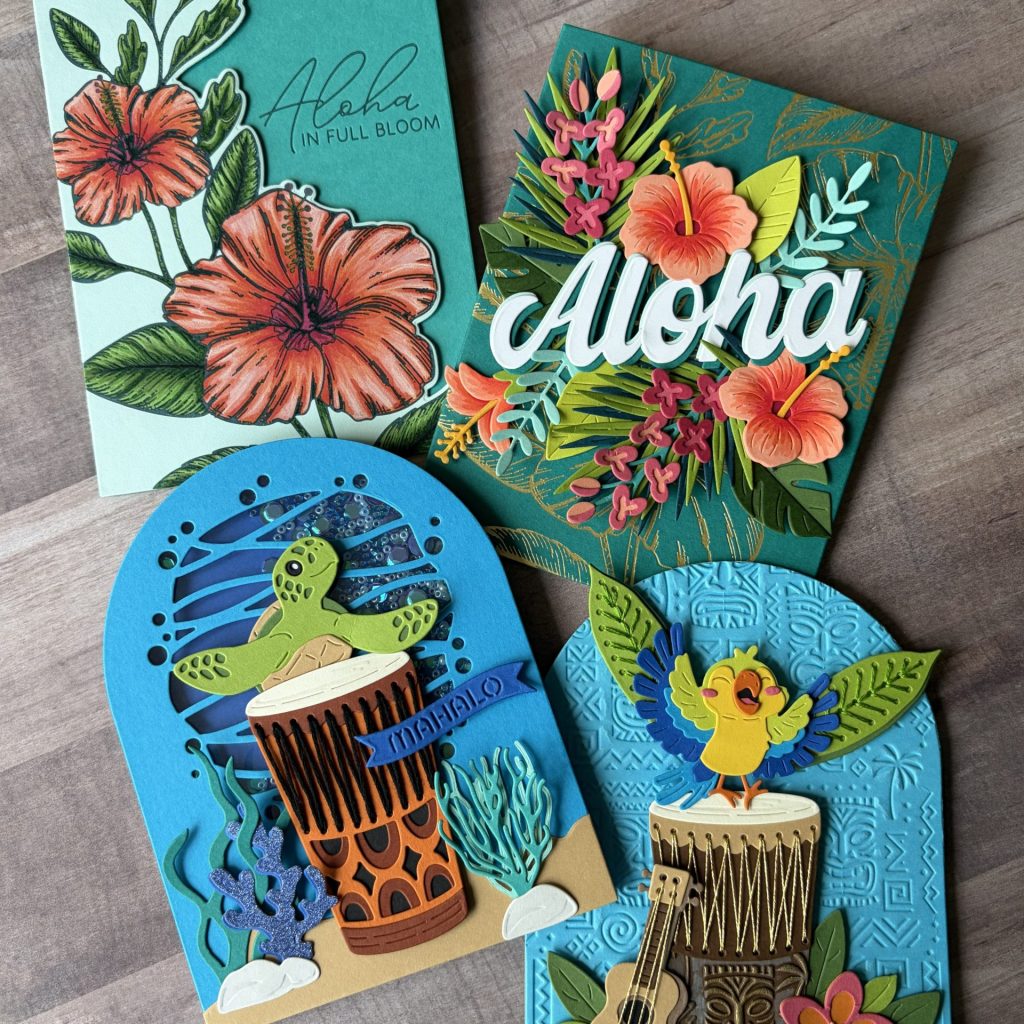
Jump to Your Favorite Design
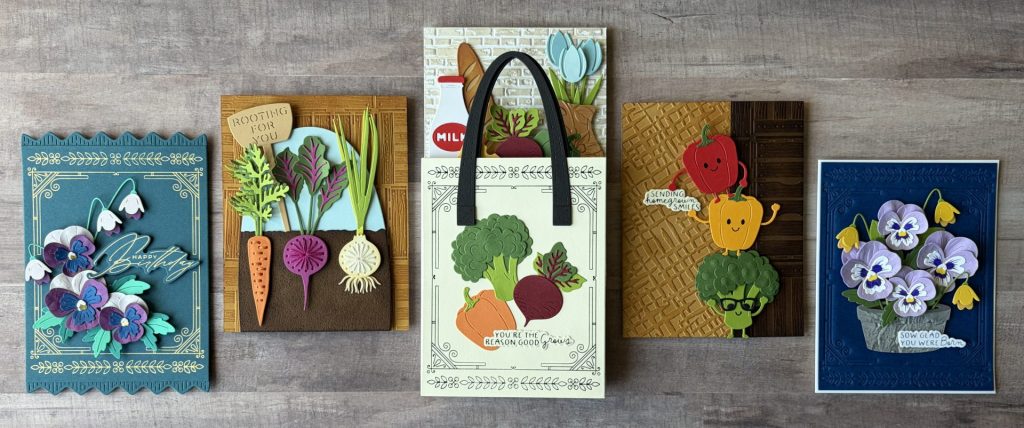
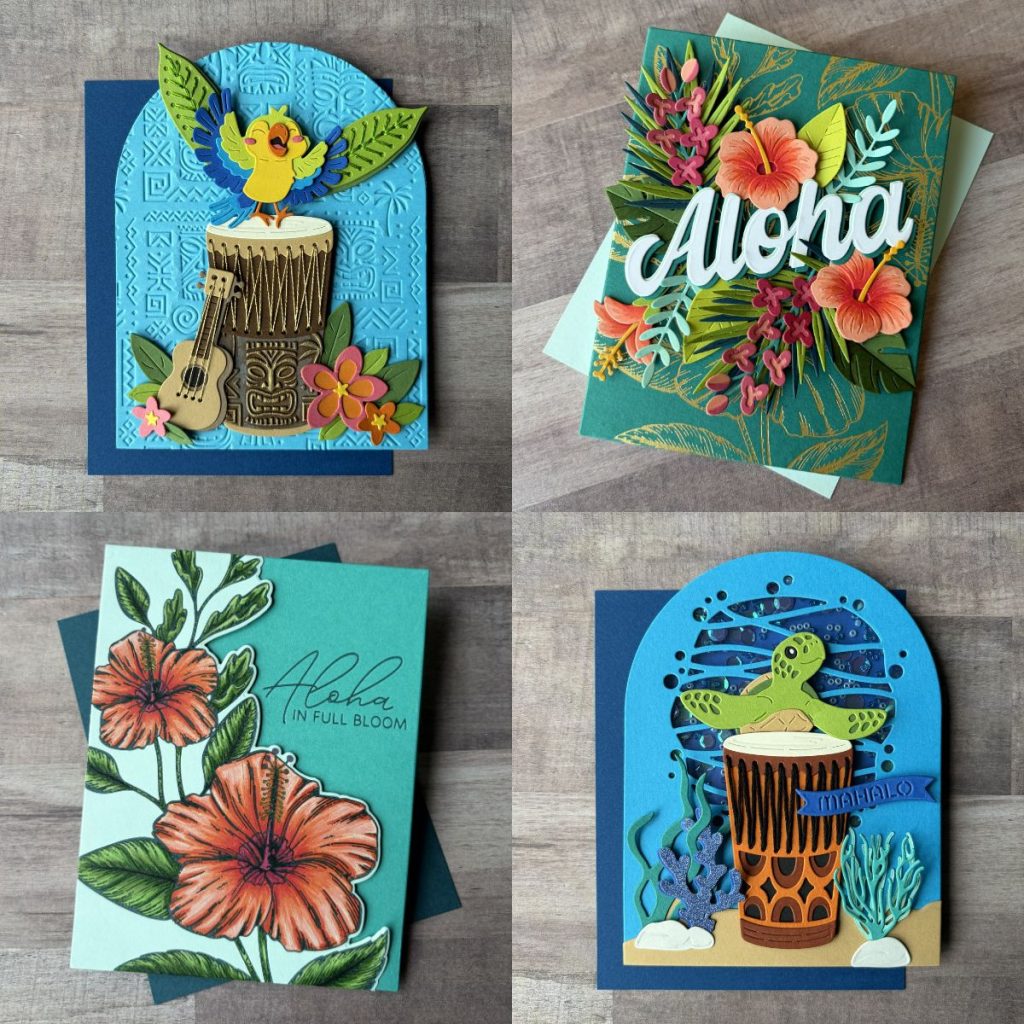
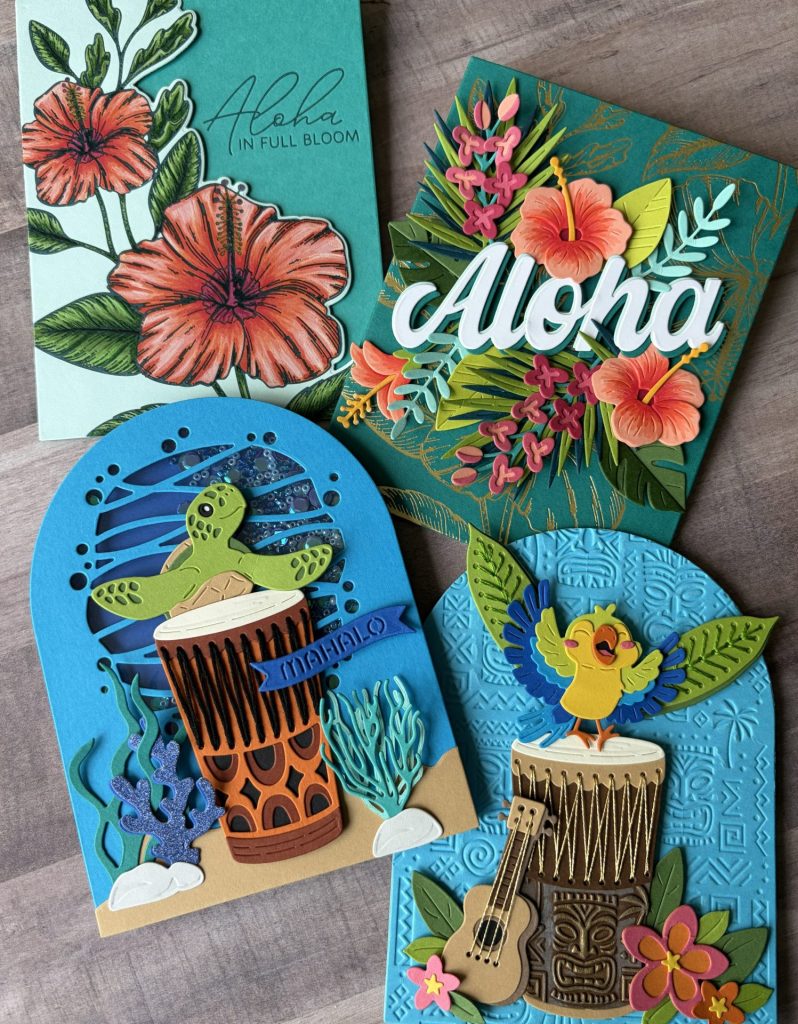
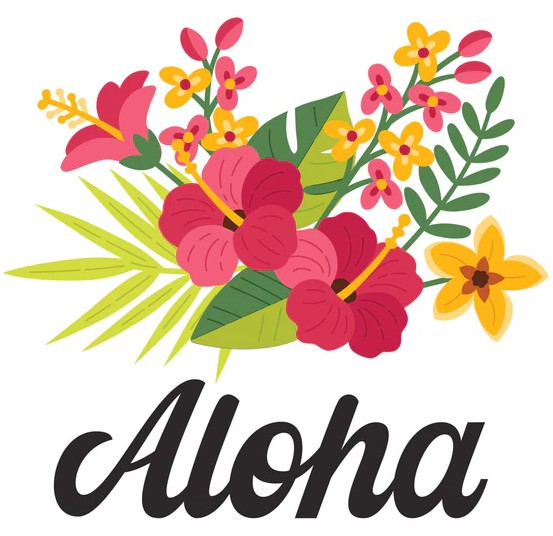
- Tropical Blooms Aloha Card (Left)
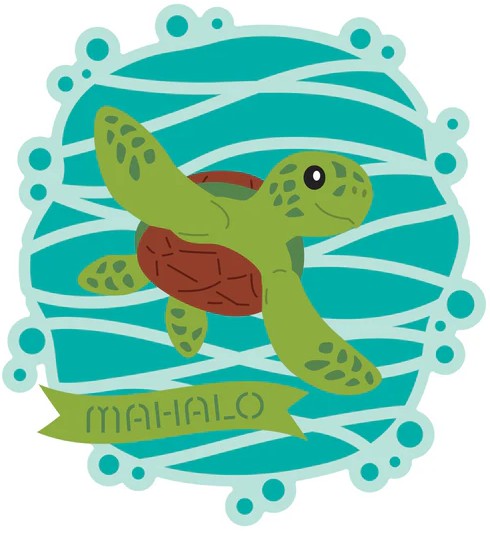
- Mahalo Sea Turtle Shaker Card (Middle Left)
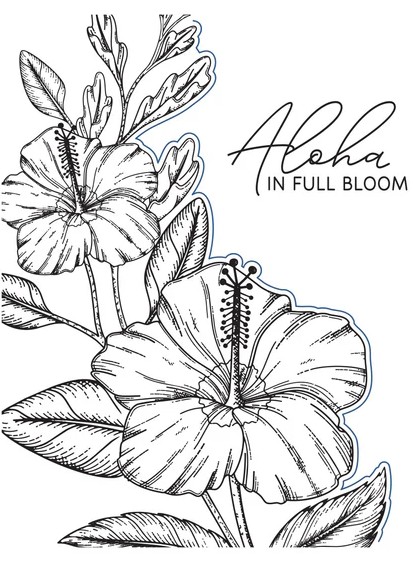
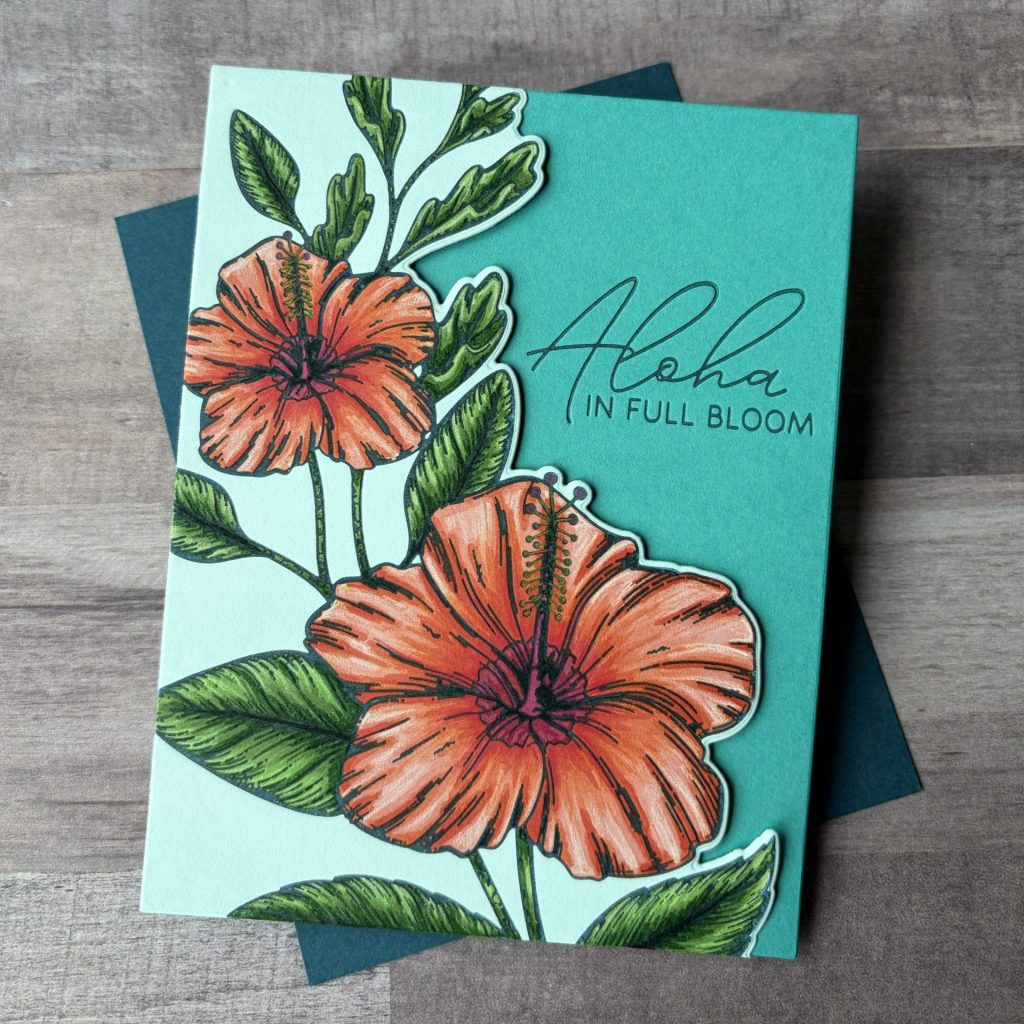
- Hibiscus in Full Bloom Card (Middle Right)
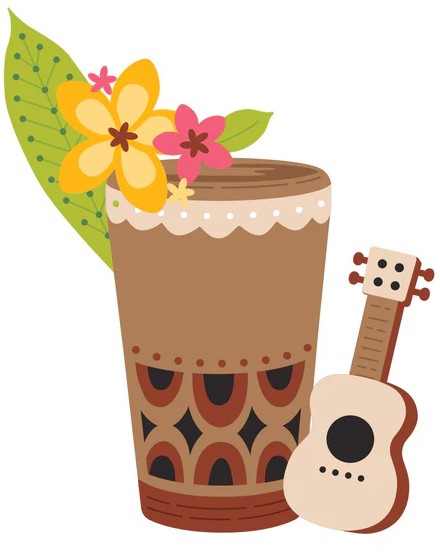
- Island Style Beats Card (Right)
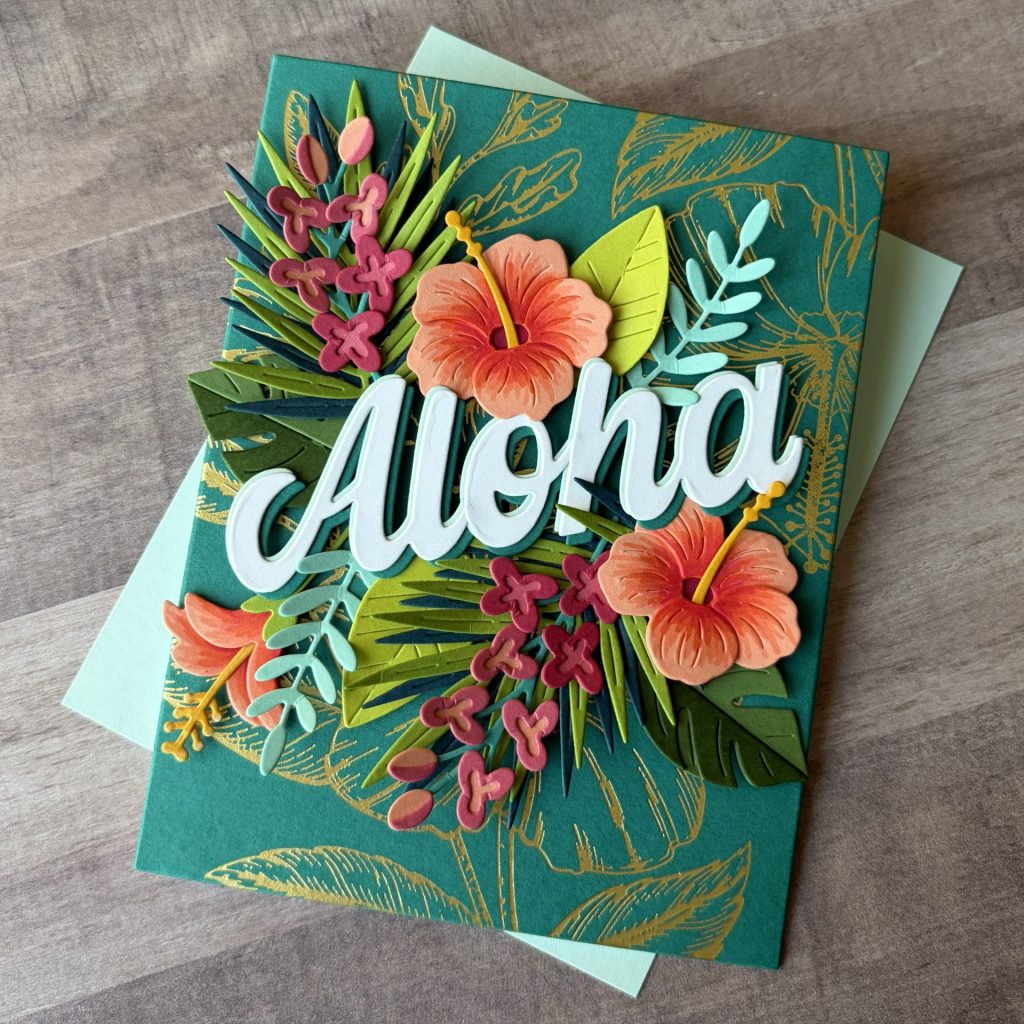
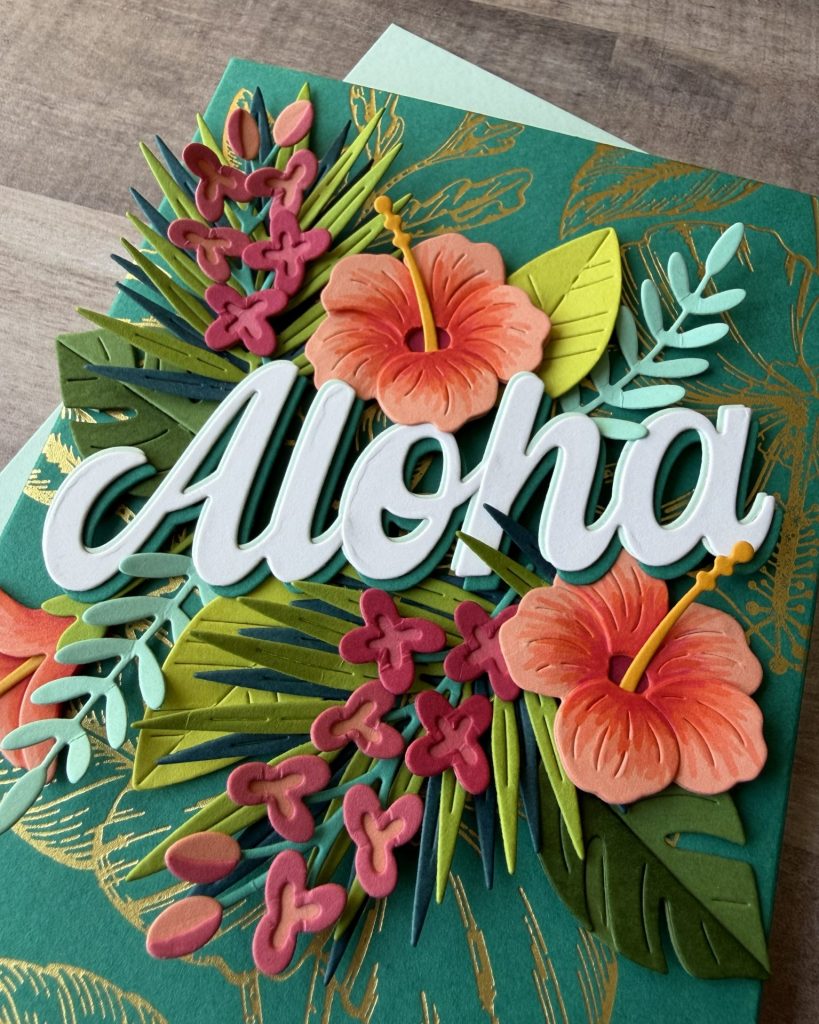
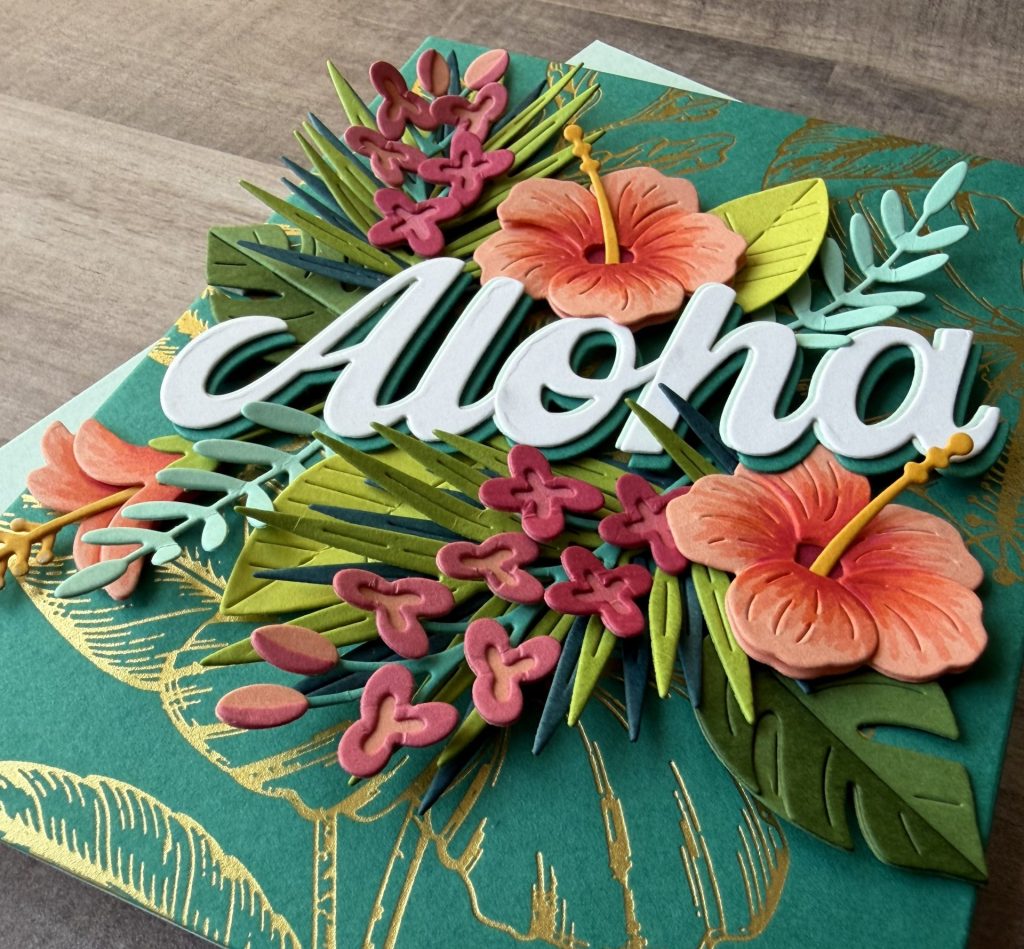
Tropical Blooms Aloha Card
Large Die Club
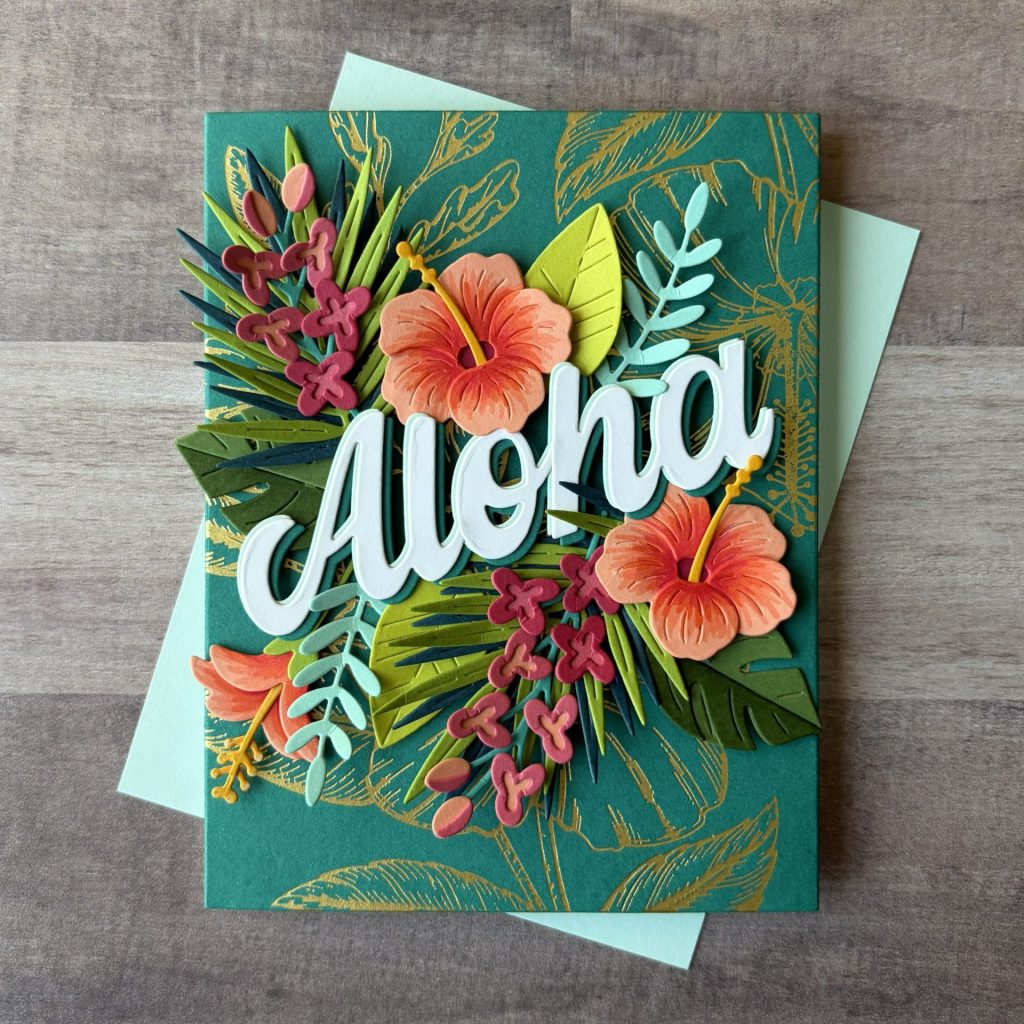
For my first card using the June Spellbinders Clubs, nothing says aloha quite like bold tropical flowers! This card features the Large Die of the Month, Tropical Blooms, layered over a background created with the Press & Foil of the Month, Hibiscus Bloom, foiled with beautiful matte gold foil. The foiled hibiscus pattern adds a luxurious touch while still allowing the colorful floral arrangement to take center stage. The large “Aloha” sentiment nestled among the tropical leaves and hibiscus flowers creates a warm greeting that would be perfect for birthdays, hello cards, or simply sending a little sunshine through the mail.
Card Details
Clubs Used
- Large Die of the Month
- Press & Foil of the Month
Card Base
- A2 Size: 4¼” x 5½”
- Cardstock: Blue Spruce
Foiled Hibiscus
- Press Plate: Hibiscus Bloom
- Cardstock: Blue Spruce – 4½” x 5¾”
- Foil: Matte Gold
- Die Set: Percision Layering A2 A – largest die
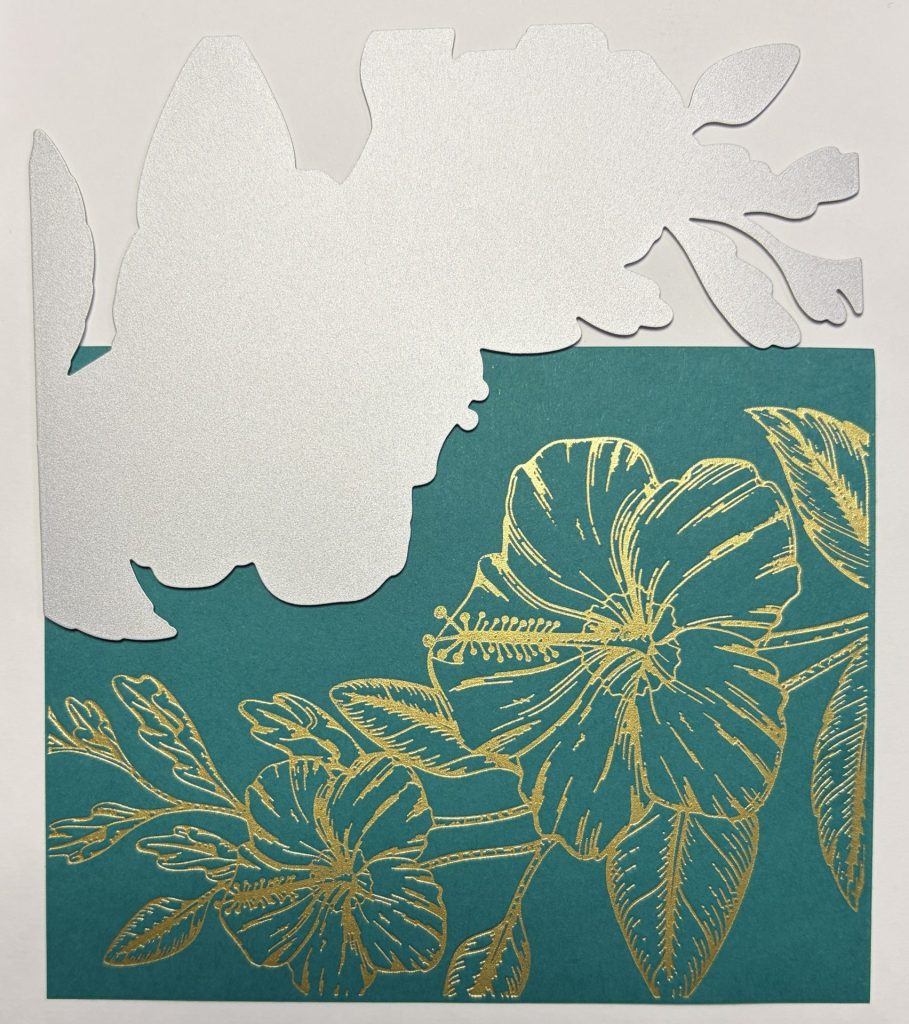
- Foil the hibiscus twice on the blue spruce panel.
- Then, die cut the A2 rectangle and glue it to the card base.
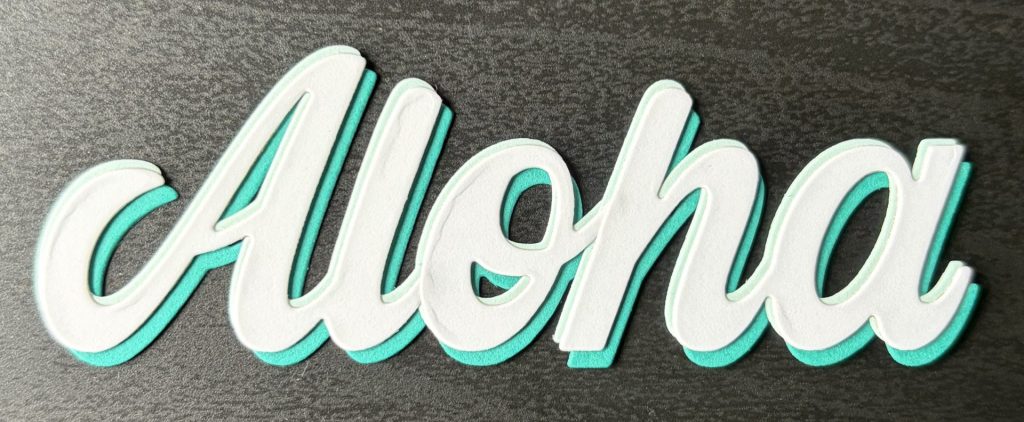
Aloha Sentiment
- Die Set: Tropical Blooms
- Cardstock Colors:
- Seaside – “Aloha”
- Blue Spruce – “Aloha”
- White – “Aloha”
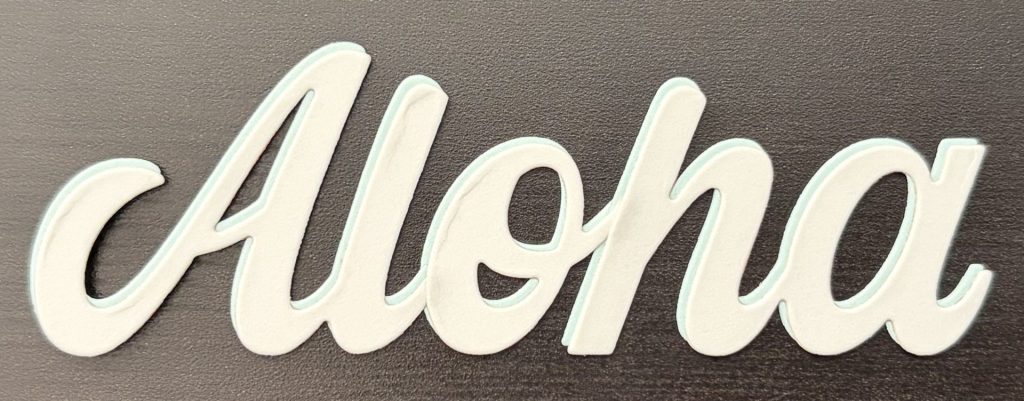
- Assemble the three “Aloha” die-cut layers with liquid glue.
- Start by gluing the Seaside layer behind the white “Aloha” die-cut, slightly offset up and to the left.
- Next, glue the Blue Spruce layer behind both layers, slightly offset down and to the right to create a drop-shadow effect.
- Add 3mm foam strips to the back of the assembled sentiment.
- Adhere the finished “Aloha” sentiment to the card front.
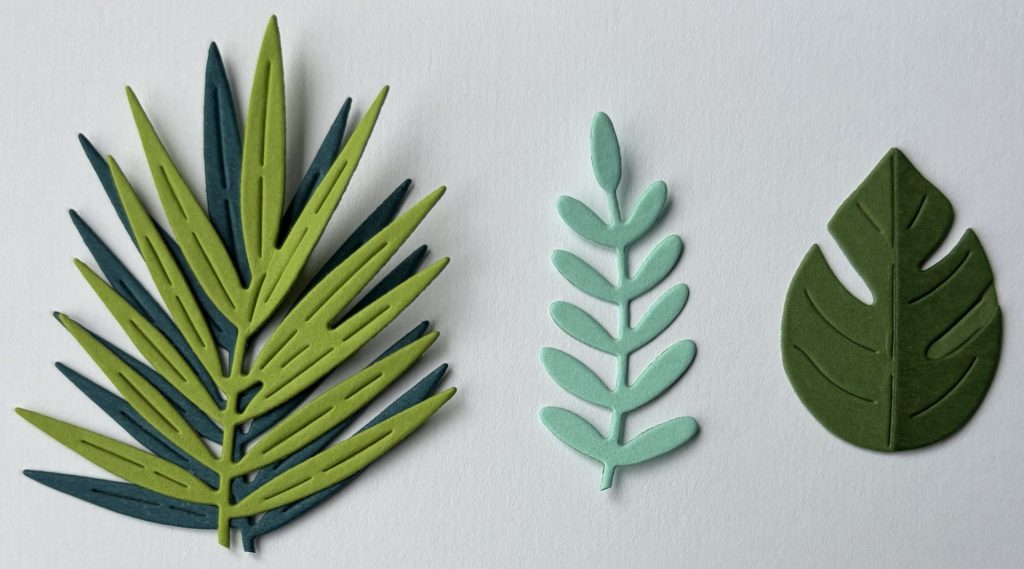
Leaves & Foliage
- Die Set: Tropical Blooms
- Cardstock Colors:
- Peridot – medium leaf (x2)
- Rainforest – palm leaves (x2)
- Fern – monstera leaf & shadow (x2)
- Waterfall – small leaf branch (x2)
- Oceanside – palm leaves (x2)
- Add shading to the monstera leaf shadow with a green marker.
- Assemble die-cuts with glue.
- Adhere to card with glue, 1mm, & 2mm foam squares.
Hibiscus Flowers
- Die Set: Tropical Blooms
- Cardstock Colors:
- Wildberry – behind flower centers
- Coral – base flowers & petals
- Saffron – flower centers
- Rainforest – flower stem
- Prismacolor Marker:
- Peach #PM-170
- Pale Vermillion #PM-14
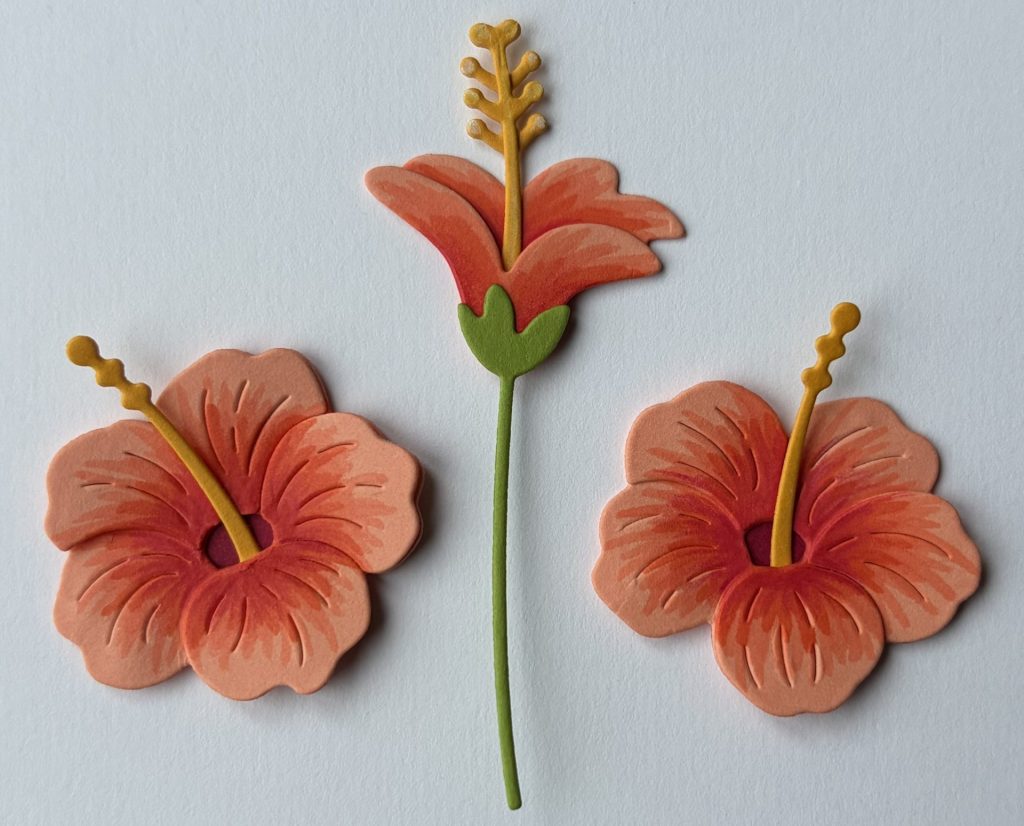
- Add shading to the hibiscus flower petals with a peach and orange marker.
- Assemble die-cuts with glue and 1mm foam squares for the flower petals.
- Adhere to card with glue and 1mm foam squares.
Refer to the guide below for the Tropical Blooms assembly instructions.

Small Flowers
- Die Set: Tropical Blooms
- Cardstock Colors:
- Dahlia – 3-petal flower (top), 4-petal flower (solid), & flower bud shadow
- Wildberry – 4-petal flower (top)
- Coral – 3-petal flower (solid), & flower buds
- Teal Topaz – flower branch
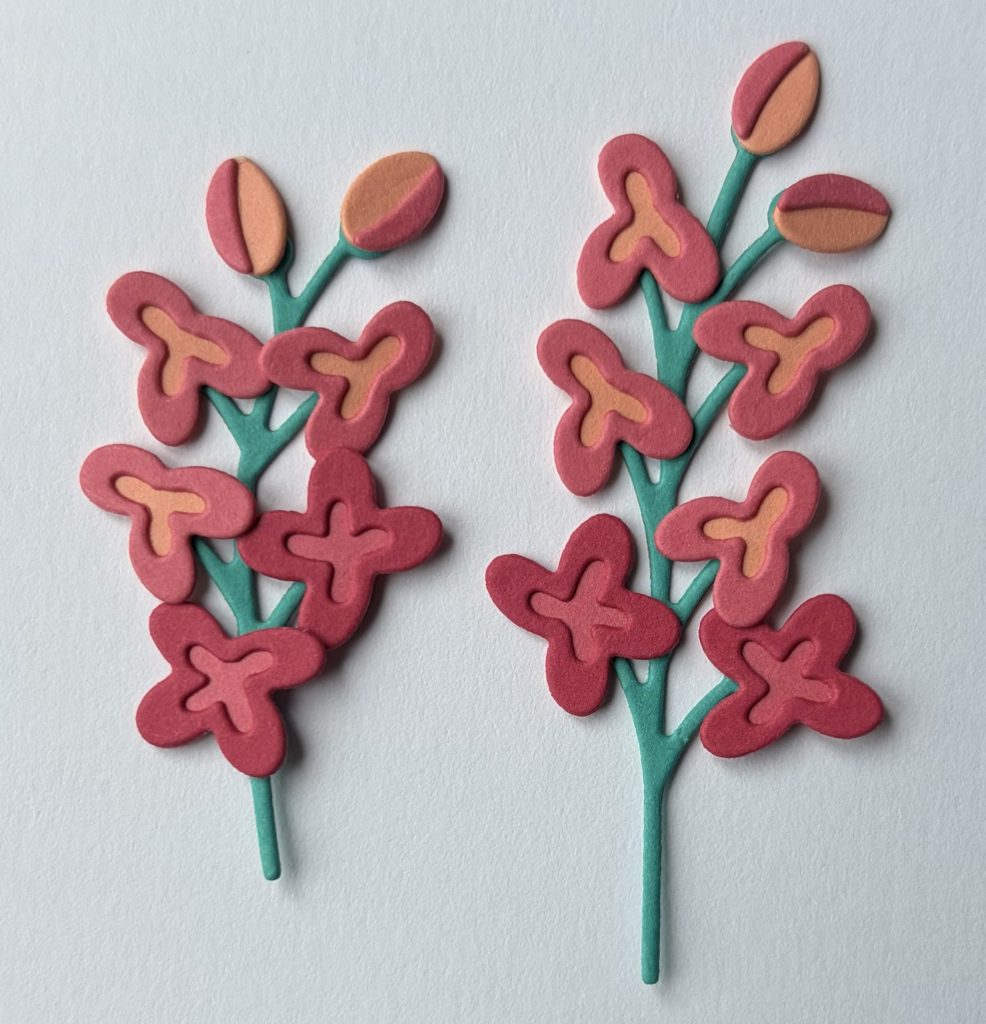
- Assemble die-cuts with glue.
- Adhere to card with glue and 1mm foam squares.
Supplies Used – Tropical Blooms Aloha Card
- Spellbinders Large Die of the Month – Tropical Blooms #DOML-JUN26 | SB | SB-UK |
- Spellbinders Press & Foil of the Month – Hibiscus Bloom #BPOM-JUN26 | SB | SB-UK |
- Spellbinders Cutting Dies – Percision Layering A2 A #S5-487 | SB | SB-UK | Sb.com |
- Spellbinders ColorWheel Cardstock:
- Dahlia | SB | SB-UK | Sb.com |
- Wild Berry | SB | SB-UK | Sb.com |
- Coral | SB | SB-UK | Sb.com |
- Saffron | SB | SB-UK | Sb.com |
- Peridot | SB | SB-UK | Sb.com |
- Rainforest | SB | SB-UK | Sb.com |
- Fern | SB | SB-UK | Sb.com |
- Seaside | SB | SB-UK | Sb.com |
- Waterfall | SB | SB-UK | Sb.com |
- Teal Topaz | SB | SB-UK | Sb.com |
- Blue Spruce | SB | SB-UK | Sb.com |
- Oceanside | SB | SB-UK | Sb.com |
- Classic White | SB | SB-UK | Sb.com |
- Spellbinders Glimmer Hot Foil – Matte Gold #GLF-002 | SB | SB-UK | Sb.com |
- Ohuhu Marker – Artichoke Green #YG312
- Prismacolor Markers – Peach #PM-170 & Pale Vermillion #PM-14 | Blick |
Tools Used
- Spellbinders Platinum Six | SB | SB-UK | Sb.com |
- Spellbinders Glimmer Hot Foil System | SB | SB-UK | Sb.com |
- Tim Holtz Paper Trimmer | Sb.com |
- Handy Craft Tool Set | SB | SB-UK | Sb.com |
- Bearly Art Glue | SB | Sb.com |
- Best Ever Craft Tape – 5/8 in | SB | Sb.com |
- Foam Squares 1mm – White | SB | Sb.com |
- Foam Squares 2mm – White | Sb.com |
- Foam Strips 3mm – Black | Sb.com |
- Scissors
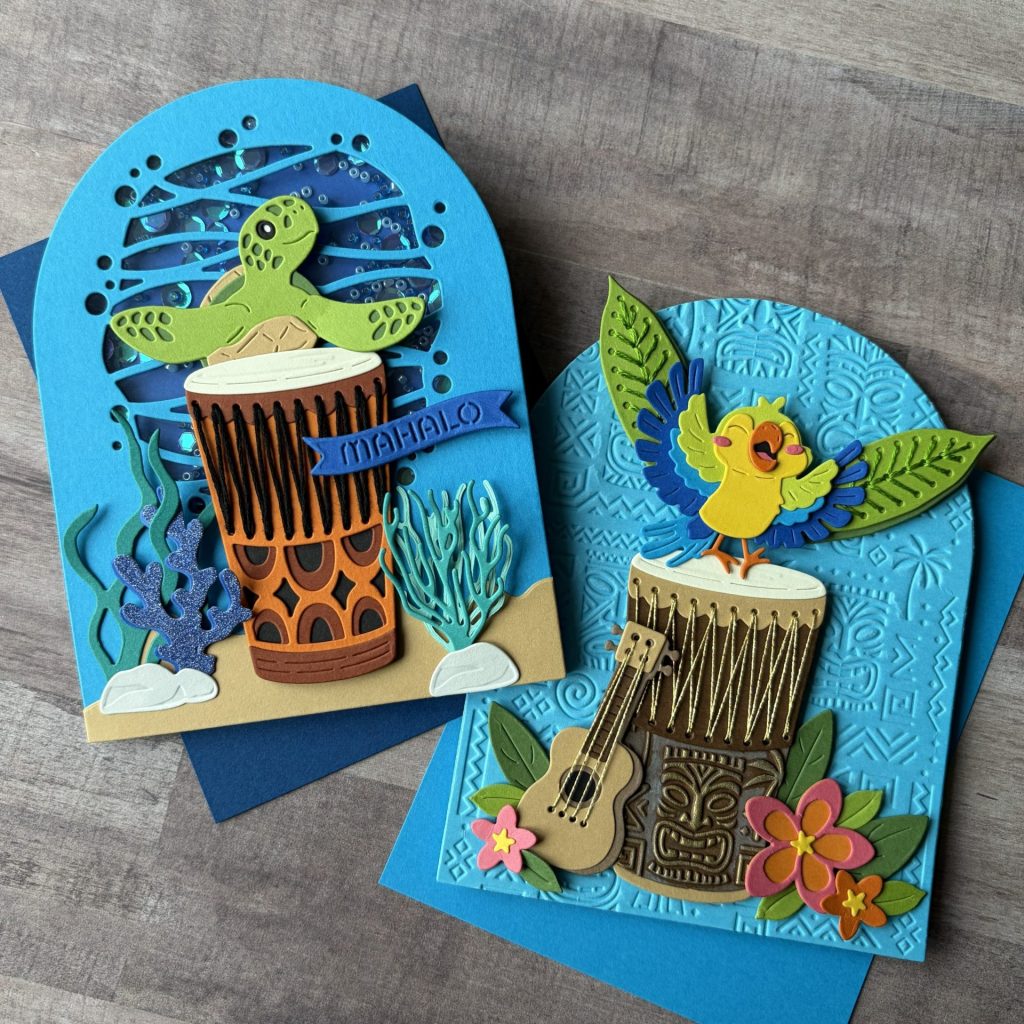
Mahalo Sea Turtle Shaker Card
Stitching Die Club
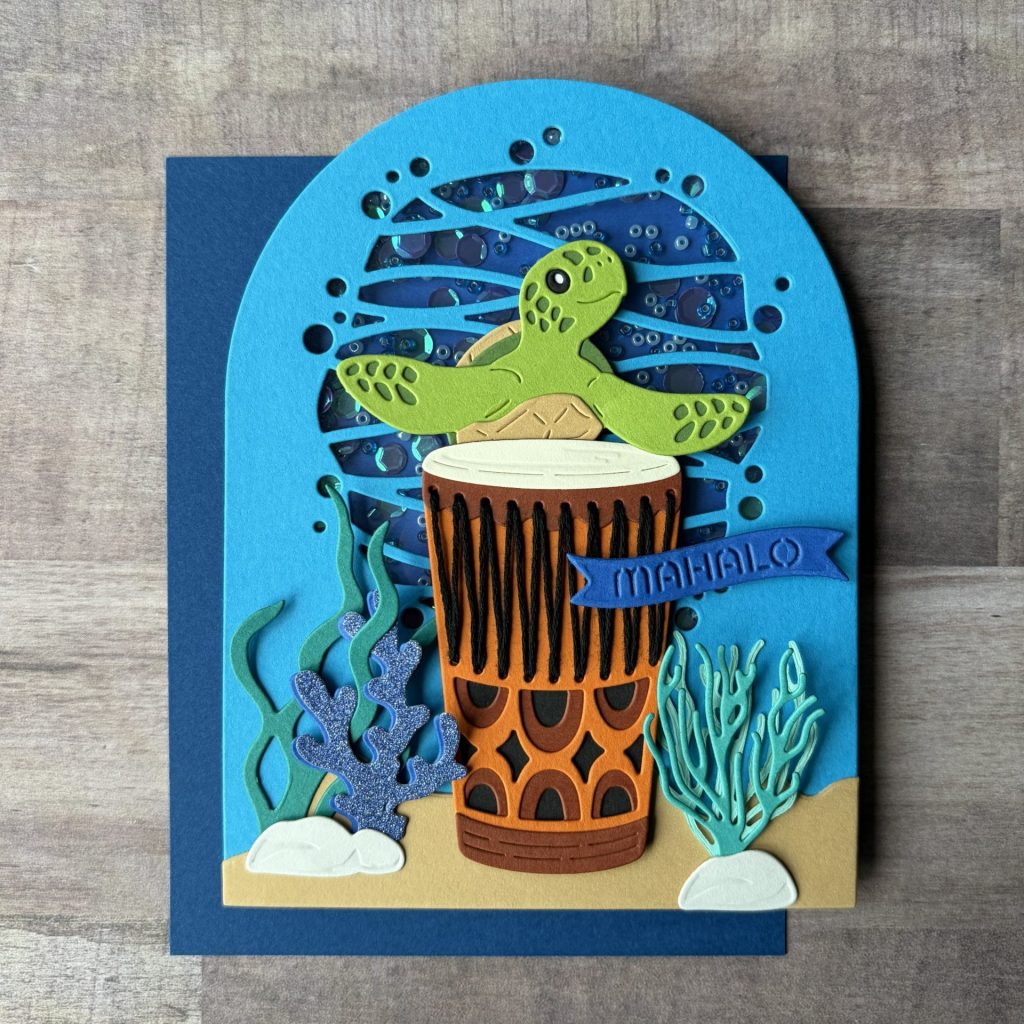
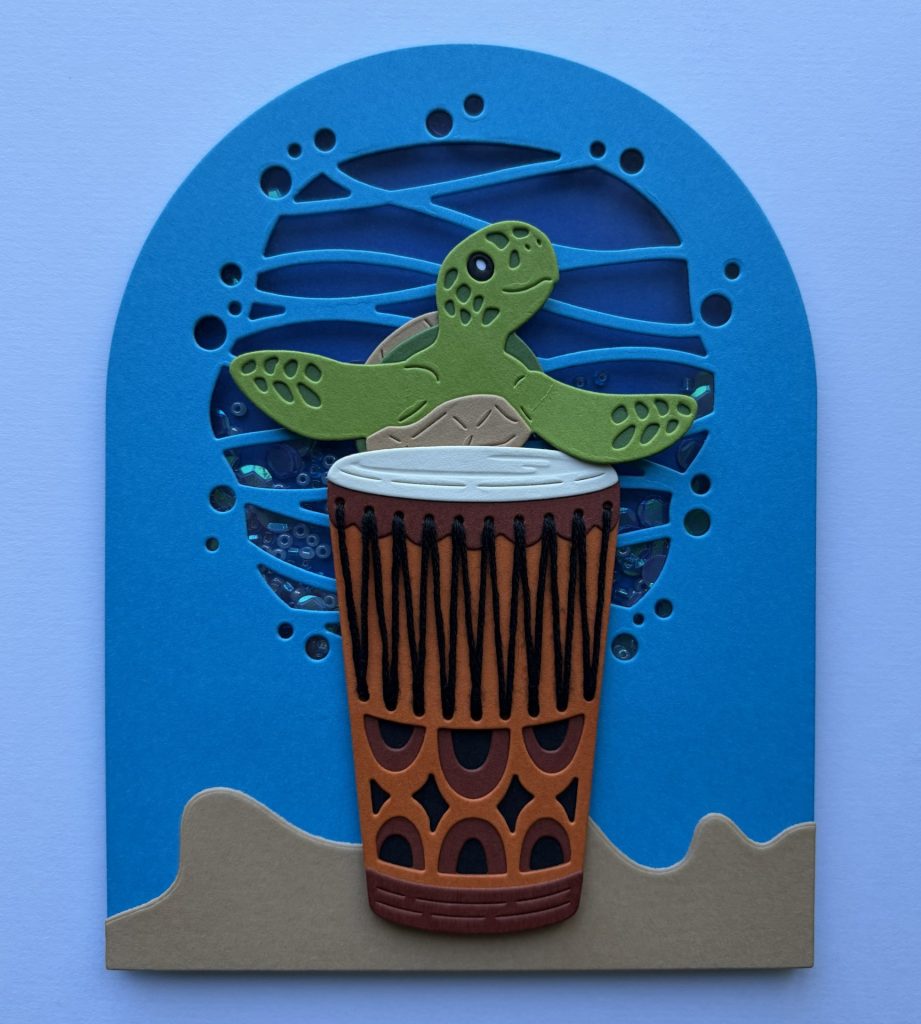
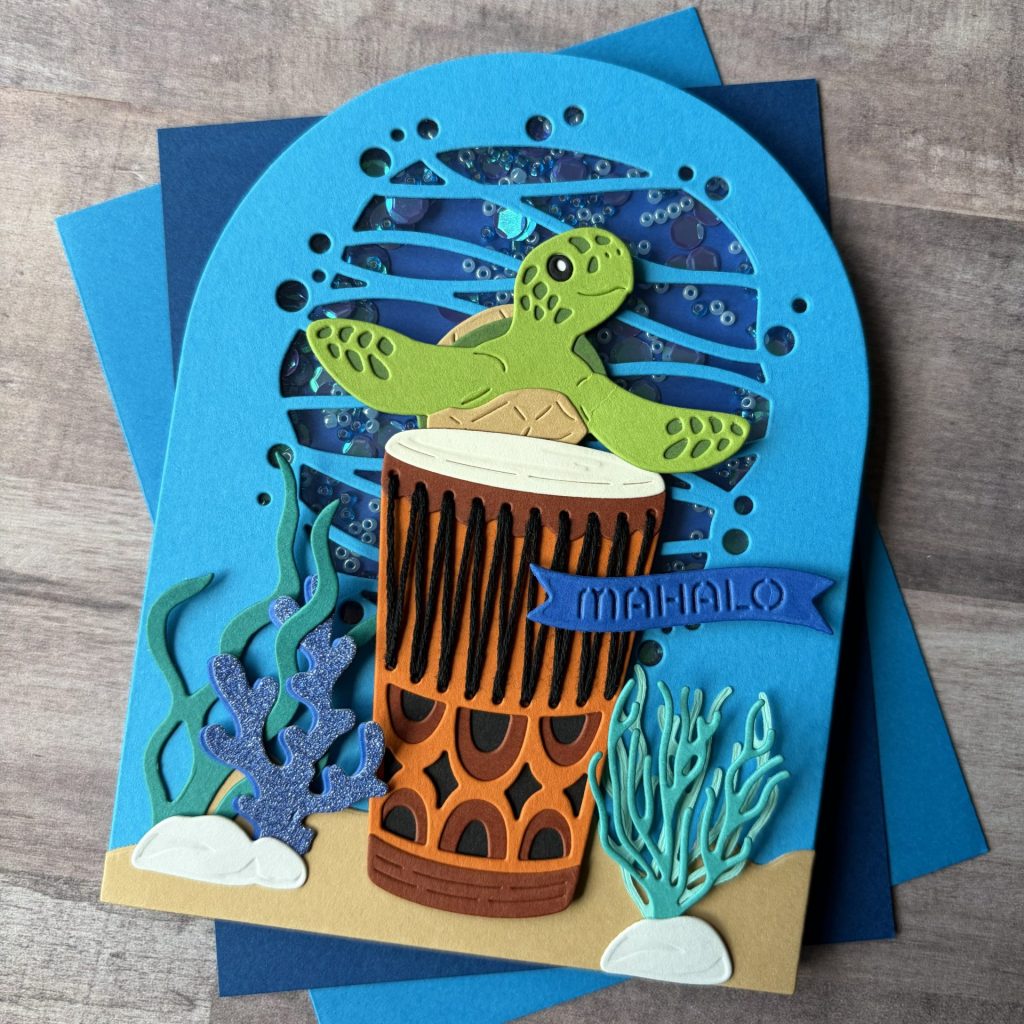
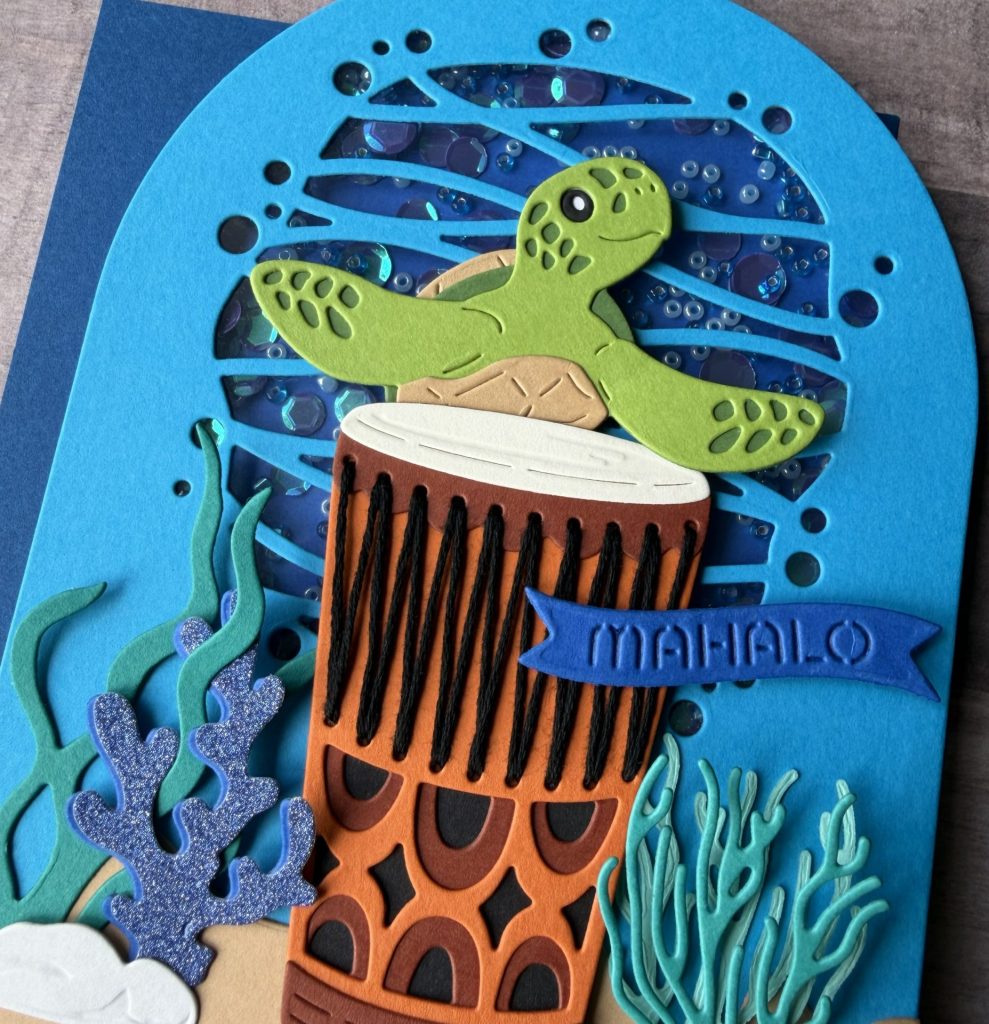
This card combines the Stitching Die of the Month, Luau Beats, with the Small Die of the Month, Mahalo Sea Turtle to create a fun tropical shaker card. I used an arched window filled with sparkling sequins and beads to create an underwater scene, then added the adorable sea turtle perched above the stitched drum. Coral, seaweed, and sandy accents help complete the ocean-inspired setting. The shaker element adds lots of movement and sparkle, making this card especially fun for kids birthdays, celebrations, and special occasions.
Card Details
Clubs Used
- Stitching Die of the Month
- Small Die of the Month
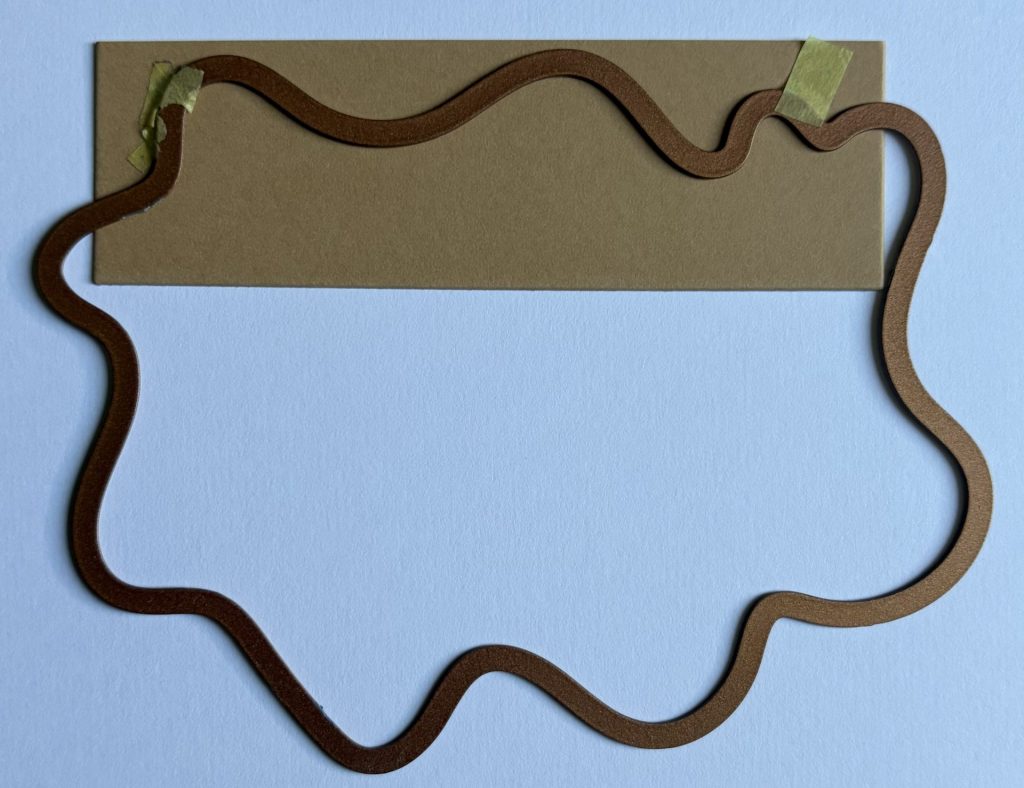
Shaped Card Base
- A2 Size: 4¼” x 5½” – top folding
- Cardstock: Splash
- Die Set: Essential Arches – largest arch
Shaker Window
- Die Set: Essential Arches – largest arch
- Die Set: Mahalo Sea Turtle – wave window
- Cardstock: Splash

- Die Set: Essential Arches – second largest arch
- Cardstock: Clear Acetate & Ultramarine
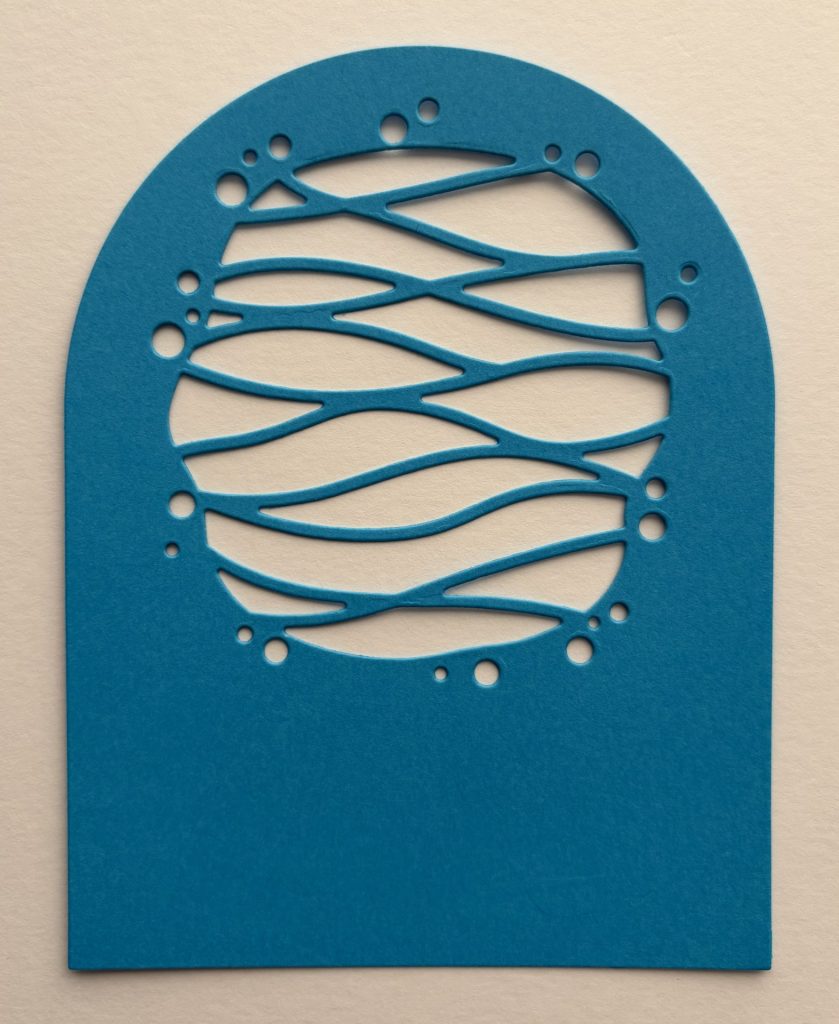
- Adhere clear acetate arch behind the shaker window.
- Adhere ultramarine arch to the card base.
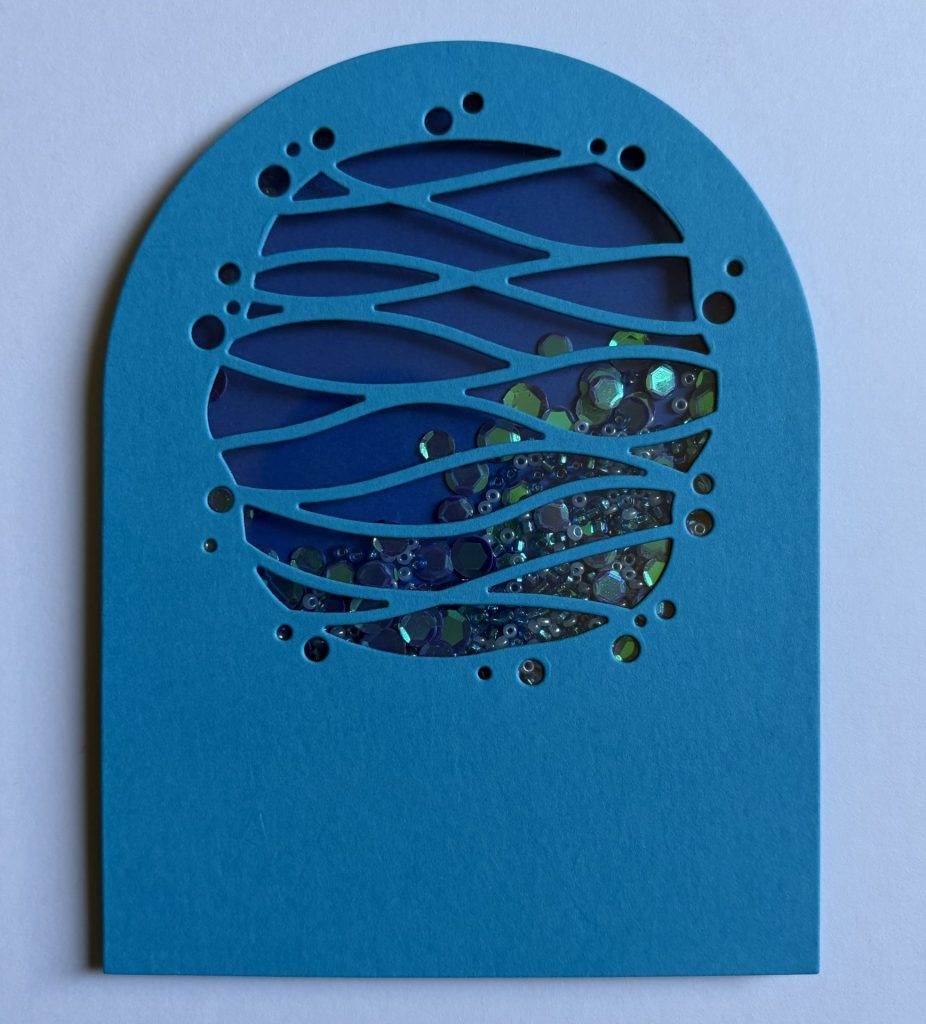
Add Shaker Bits
- Sequins: Dark Blue Iridescent – from the 2024 Spellbinders Crafty Advent Calendar
- Seed Beads: Two Shades of Blue – from my stash
- Add foam strips to the back of the shaker window, placing them around the die-cut circle opening.
- Make sure the foam strips form a complete seal with no gaps so the shaker pieces cannot escape.
- Add additional foam strips below the shaker window to support the lower portion of the arched panel and keep it level.
- Place your shaker bits inside the window area.
- Remove the release paper from all of the foam strips.
- Carefully align and adhere the card front to the card base, trapping the shaker bits inside.
Stitched Drum
- Die Set: Luau Beats
- Cardstock Colors:
- Tangerine – drum stitching layer
- Cinnamon – drum middle layer, top & bottom trim
- Alabaster – drum top
- Raven – solid back layer
- Stitching Thread: Black
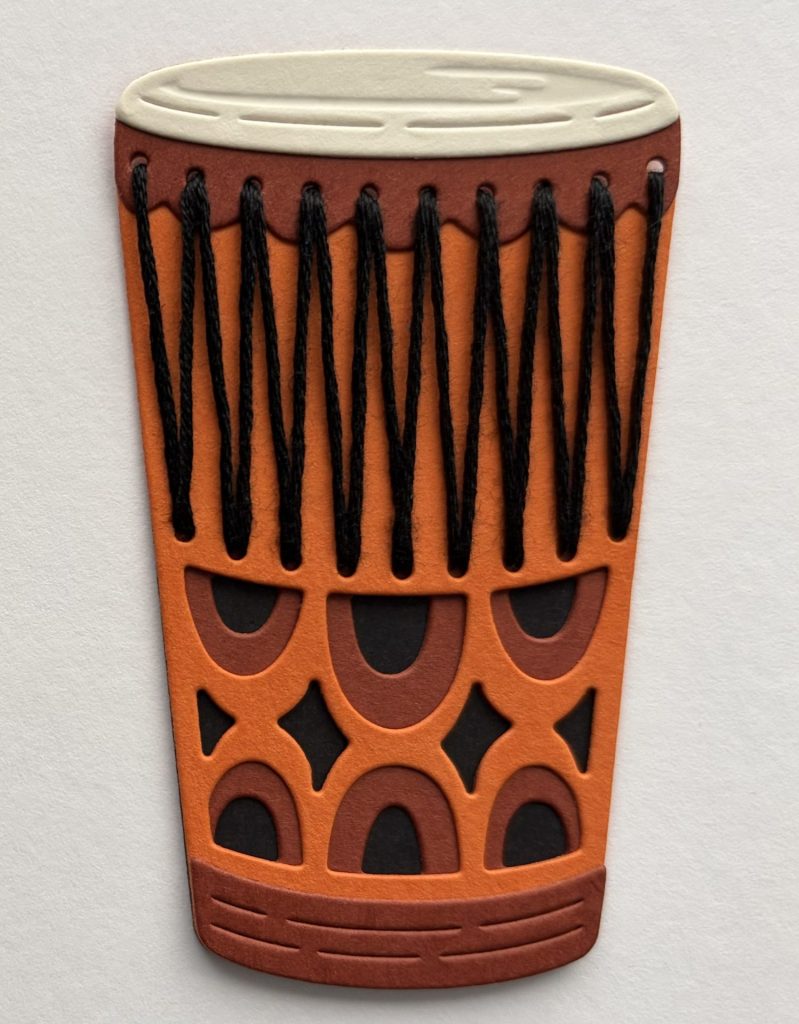
- Assemble die-cuts with glue.
Refer to the guide below for the Luau Beats assembly instructions.
Sea Turtle
- Die Set: Mahalo Sea Turtle
- Cardstock Colors:
- Rainforest – detailed sea turtle
- Fern – solid sea turtle
- Fawn – shell
- Raven – eye
- White – solid eye
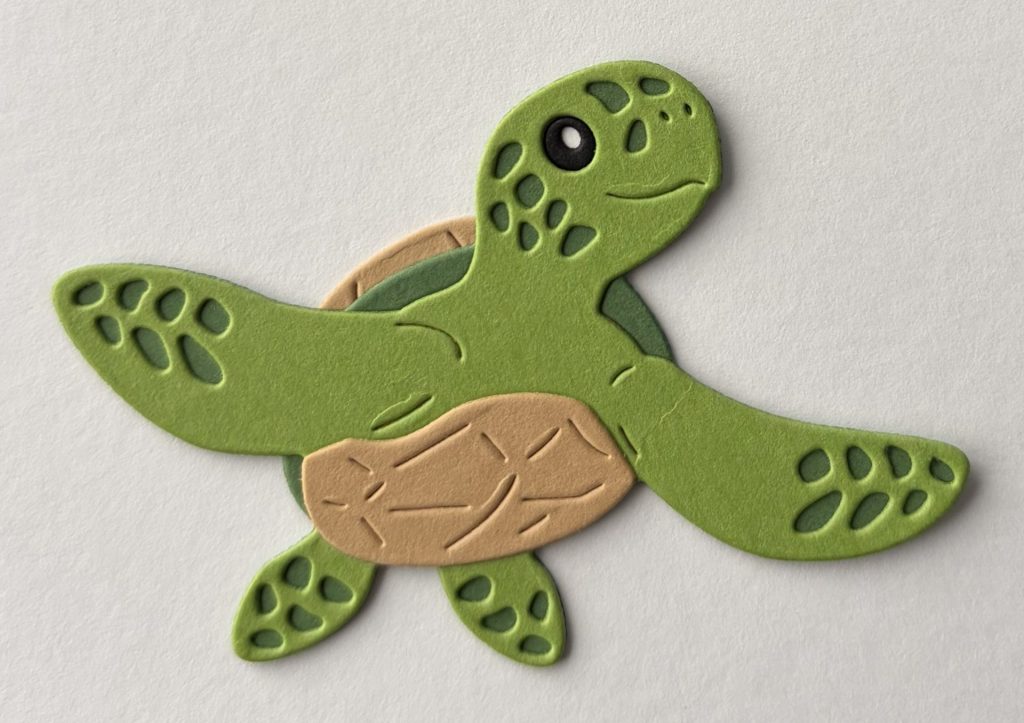
- Assemble die-cuts with glue.
Refer to the guide below for the Mahalo Sea Turtle assembly instructions.
Sandy Ground
- Die Set: Essential Arches – largest arch
- Die Set: Underwater Tunnel
- Cardstock: Fawn
- Adhere the sand to the bottom with glue.
- Adhere the sea turtle and drum with 1mm and 2mm foam squares.
Coral & Rocks
- Die Set: Underwater Tunnel
- Cardstock Colors:
- Waterfall – thin coral
- Teal Topaz – thin coral
- Blue Spruce – seaweed
- Blue Glitz – chunky coral
- Ultramarine – chunky coral
- Fog – rocks
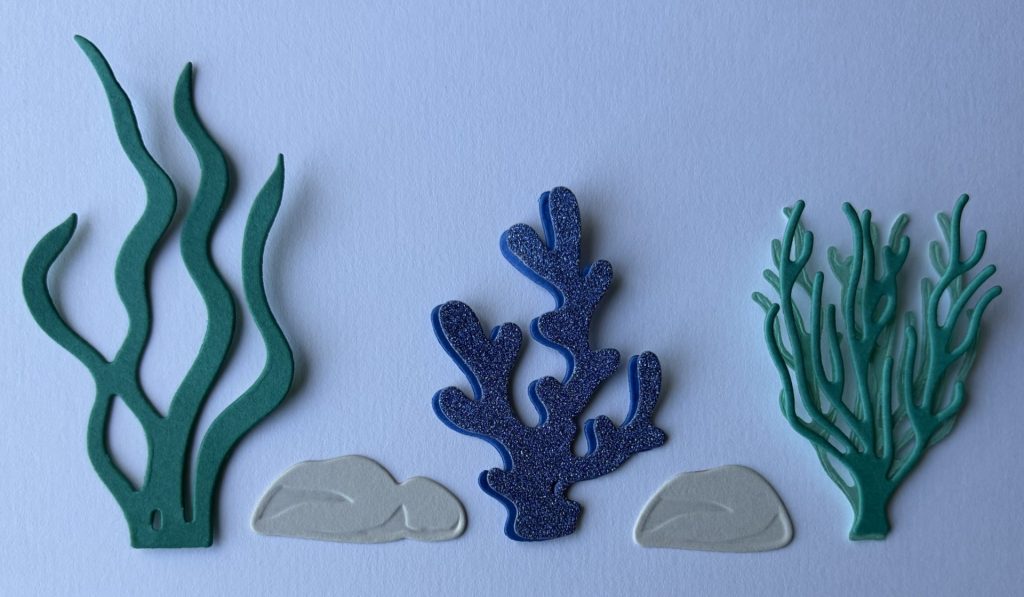
- Assemble die-cuts with glue.
- Adhere with glue and 1mm foam squares.
Sentiment Banner
- Die Set: Mahalo Sea Turtle
- Cardstock Color: Ultramarine – “MAHALO”
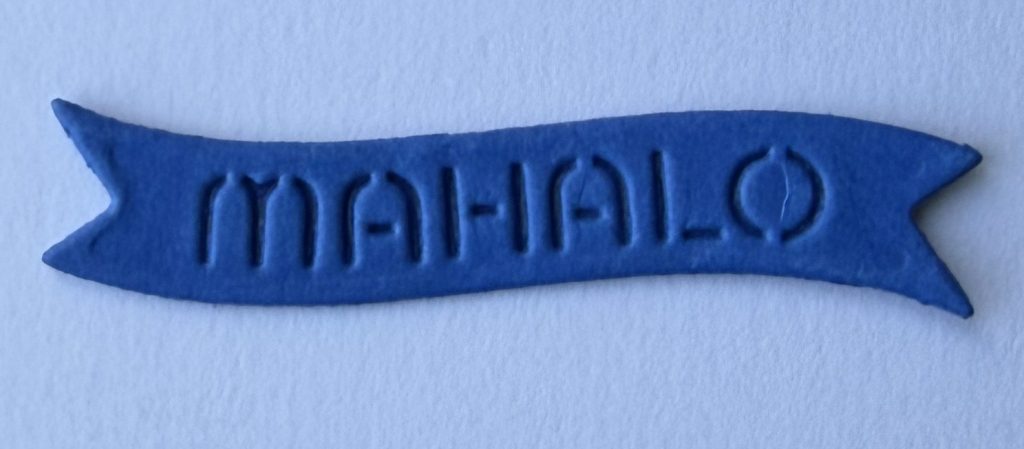
- Cut a solid sentiment from ultramarine cardstock and glue it behind for stability.
- Adhere sentiment with 2mm foam squares.
Supplies Used – Mahalo Sea Turtle Shaker Card
- Spellbinders Small Die of the Month – Mahalo Sea Turtle #DOM-JUN26 | SB | SB-UK |
- Spellbinders Stitching Die of the Month – Luau Beats #DOMST-JUN26 | SB | SB-UK |
- Spellbinders Cutting Dies – Essential Arches #S5-526 | SB | SB-UK | Sb.com |
- Spellbinders Cutting Dies – Underwater Tunnel #S6-235 | SB | SB-UK | Sb.com |
- Spellbinders ColorWheel Cardstock:
- Cinnamon | SB | SB-UK | Sb.com |
- Rainforest | SB | SB-UK | Sb.com |
- Fern | SB | SB-UK | Sb.com |
- Waterfall | SB | SB-UK | Sb.com |
- Teal Topaz | SB | SB-UK | Sb.com |
- Blue Spruce | SB | SB-UK | Sb.com |
- Alabaster | SB | SB-UK | Sb.com |
- Fawn | SB | SB-UK | Sb.com |
- Fog | SB | SB-UK | Sb.com |
- Raven | SB | SB-UK | Sb.com |
- Classic White | SB | SB-UK | Sb.com |
- Spellbinders Essentials Cardstock – Splash
- Altenew Crafty Necessities Cardstock – Ultramarine | Sb.com |
- Acetate – Clear #SCS-119 | SB | SB-UK |
- Smooth Glitter Cardstock – Blue
- Shaker Sequins – Iridescent Dk Blue -2024 Crafty Advent Calendar
- Seed Beads – Turquoise & Lt Blue
- DMC 6 Strand Floss – Black #310
Tools Used
- Spellbinders Platinum Six | SB | SB-UK | Sb.com |
- Tim Holtz Paper Trimmer | Sb.com |
- Handy Craft Tool Set | SB | SB-UK | Sb.com |
- Bearly Art Glue | SB | Sb.com |
- Best Ever Craft Tape – 5/8 in | SB | Sb.com |
- Foam Strips 3mm – Black | Sb.com |
- Foam Squares 1mm – Black | SB |
- Foam Squares 2mm – Black | SB |
- Stitching Needle #22
- Scissors
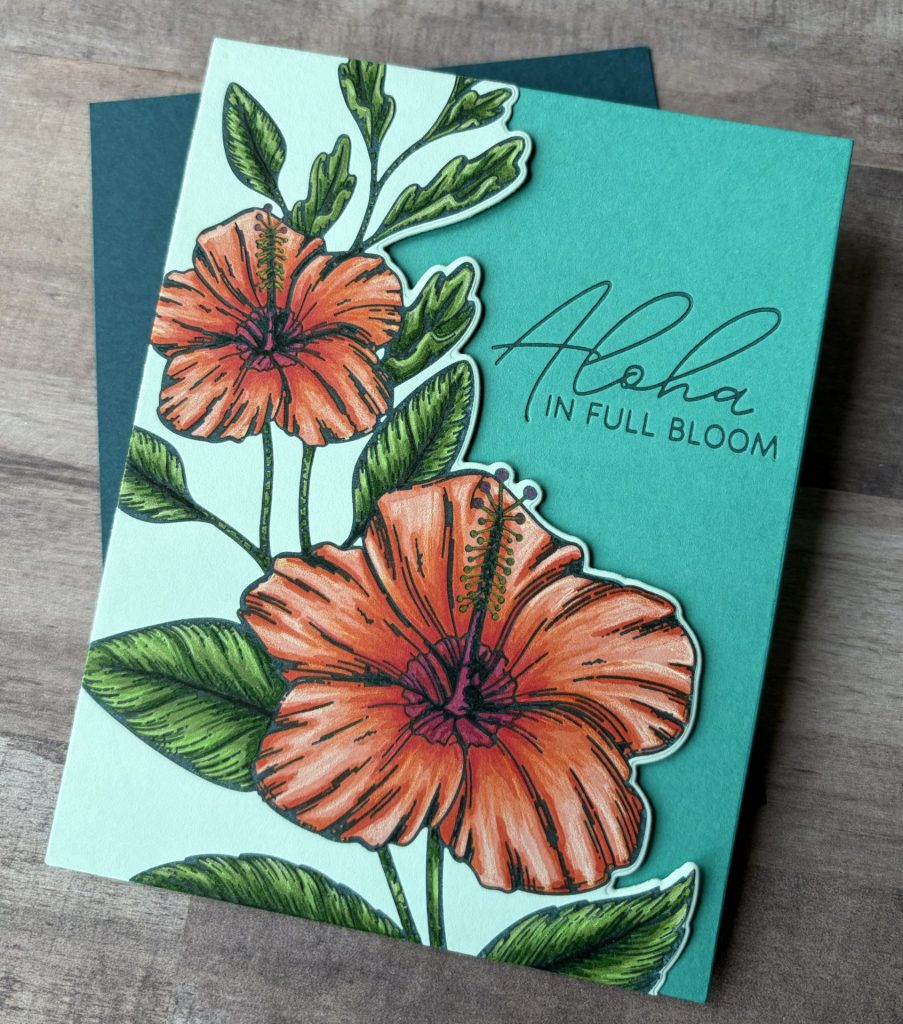
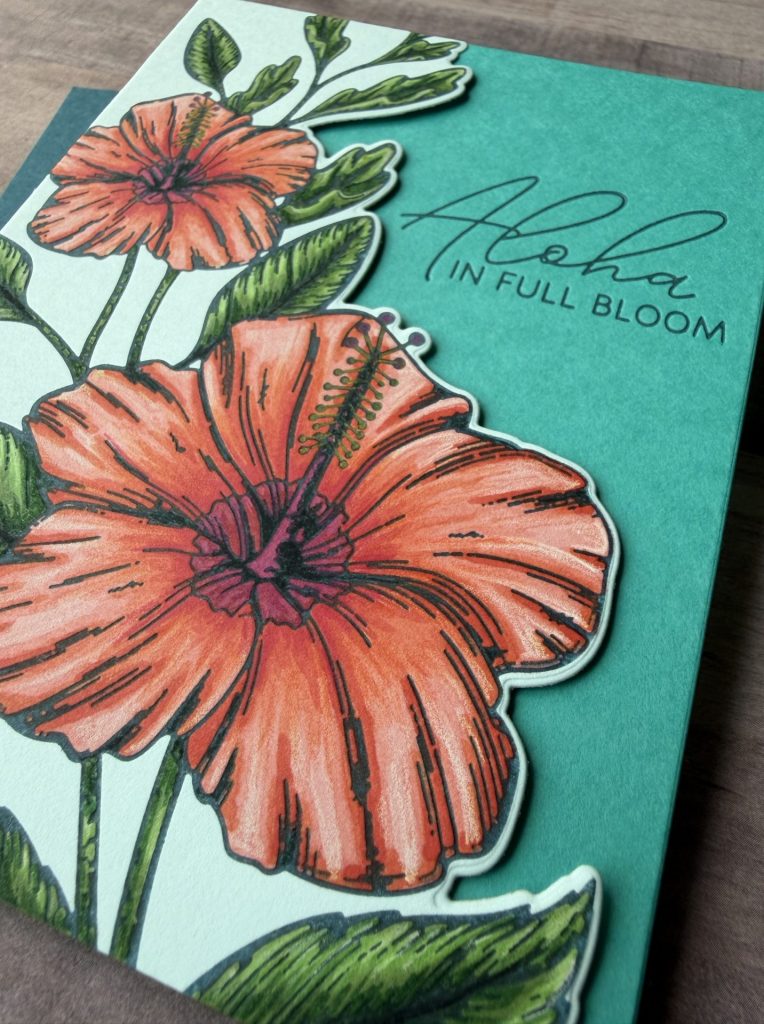
Hibiscus in Full Bloom Card
Press & Foil Club
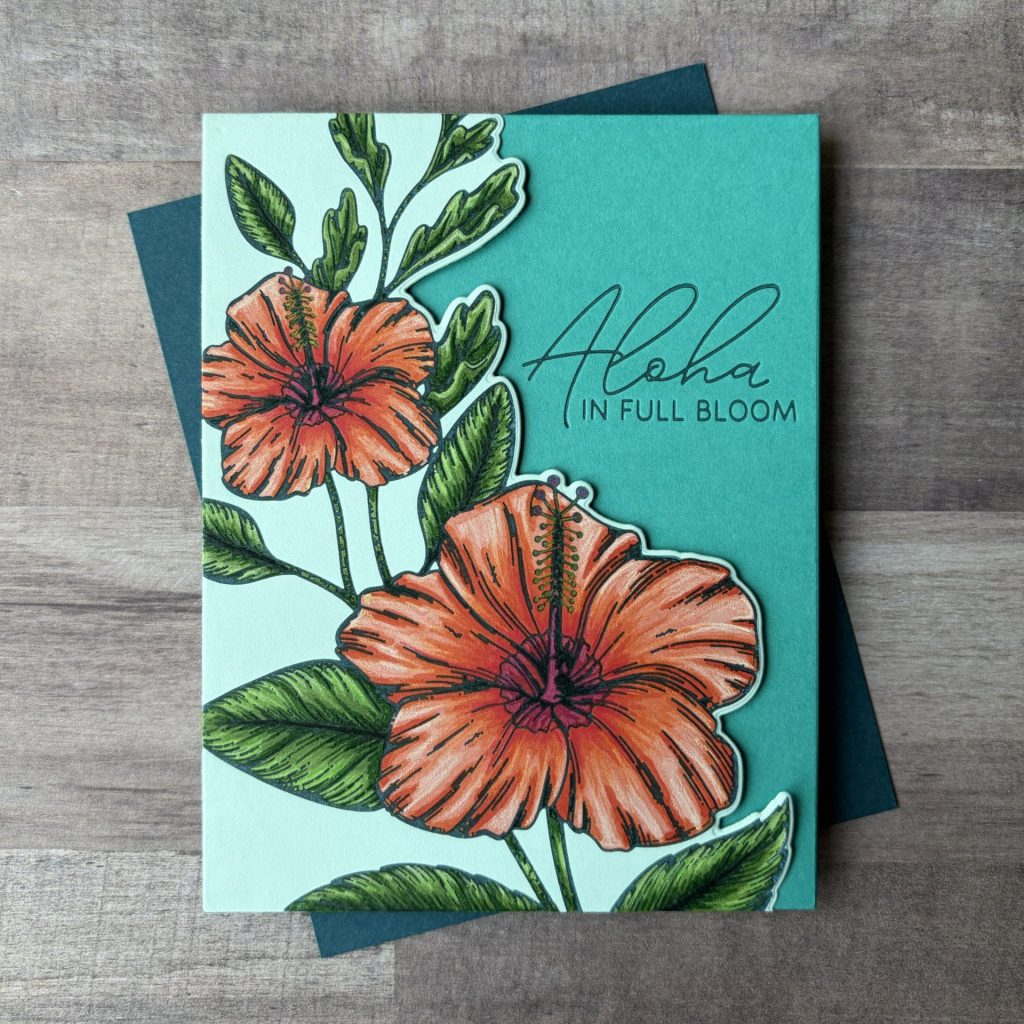
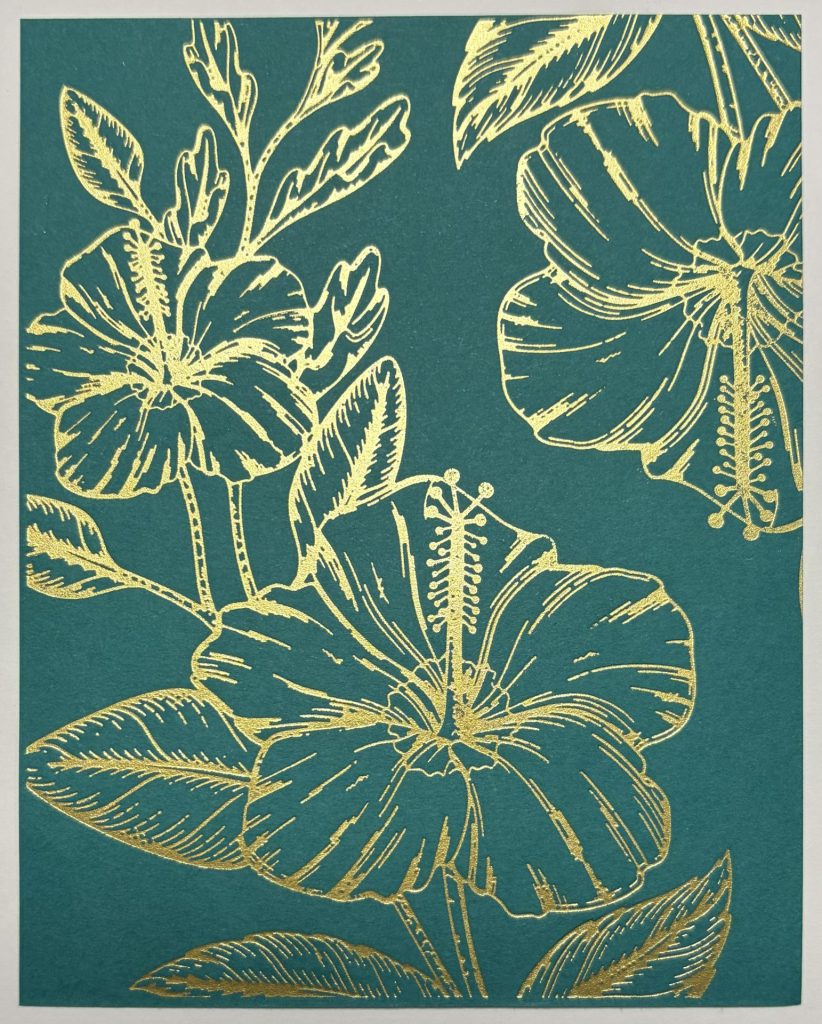
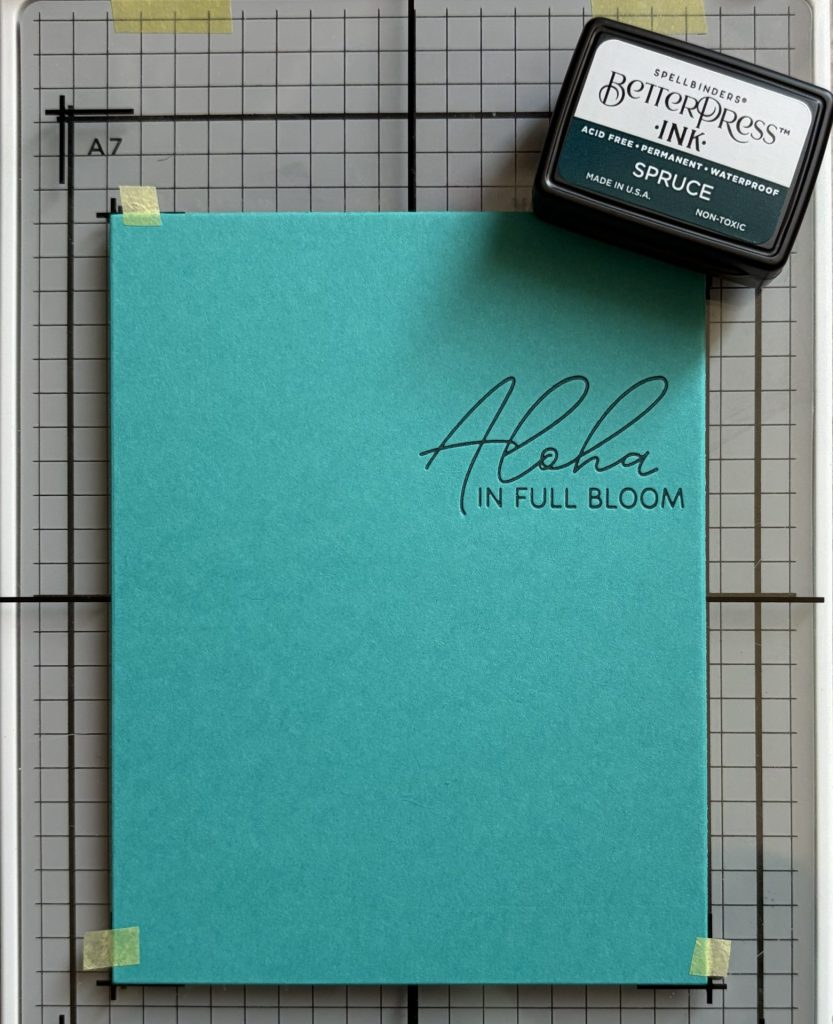
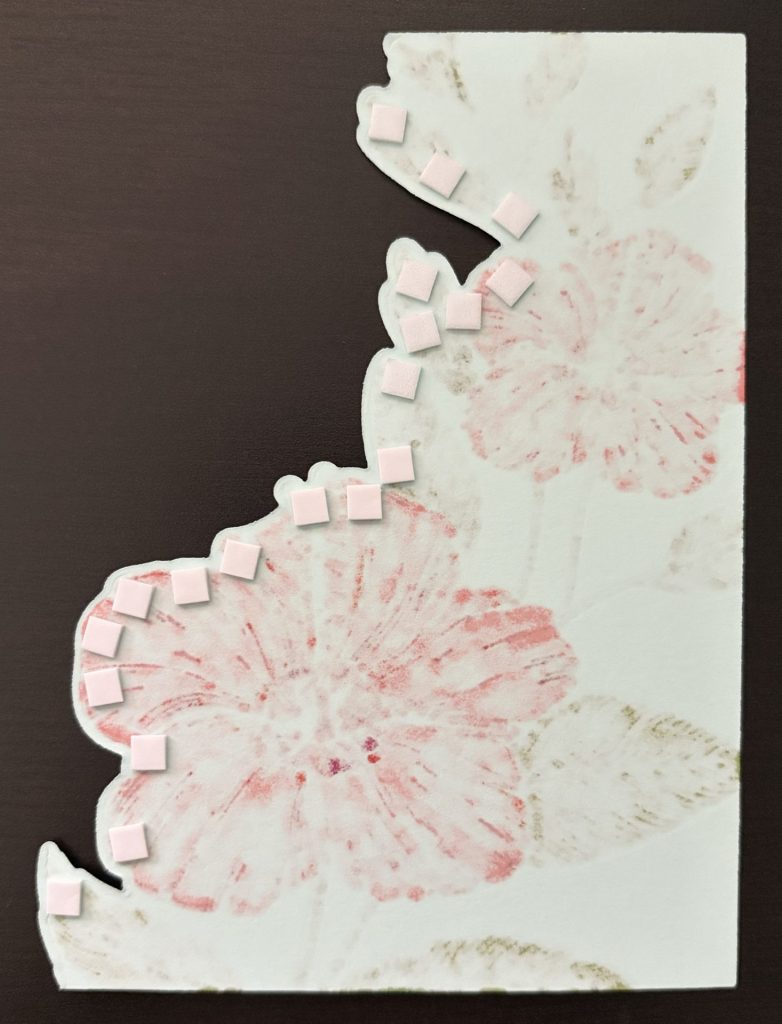
For this clean and elegant design, I used the Press & Foil of the Month, Hibiscus Bloom as a BetterPress plate. I pressed the floral image using spruce ink and then colored the blooms with markers and colored pencils for added depth and detail. The soft teal card base provides a beautiful contrast to the vibrant hibiscus flowers, while the simple sentiment keeps the focus on the coloring. This card is a wonderful example of how versatile the Press & Foil Club can be, giving you gorgeous results whether you foil or press the designs.
Card Details
Clubs Used
- Press & Foil of the Month
Card Base
- A2 Size: 4¼” x 5½”
- Cardstock: Teal Topaz
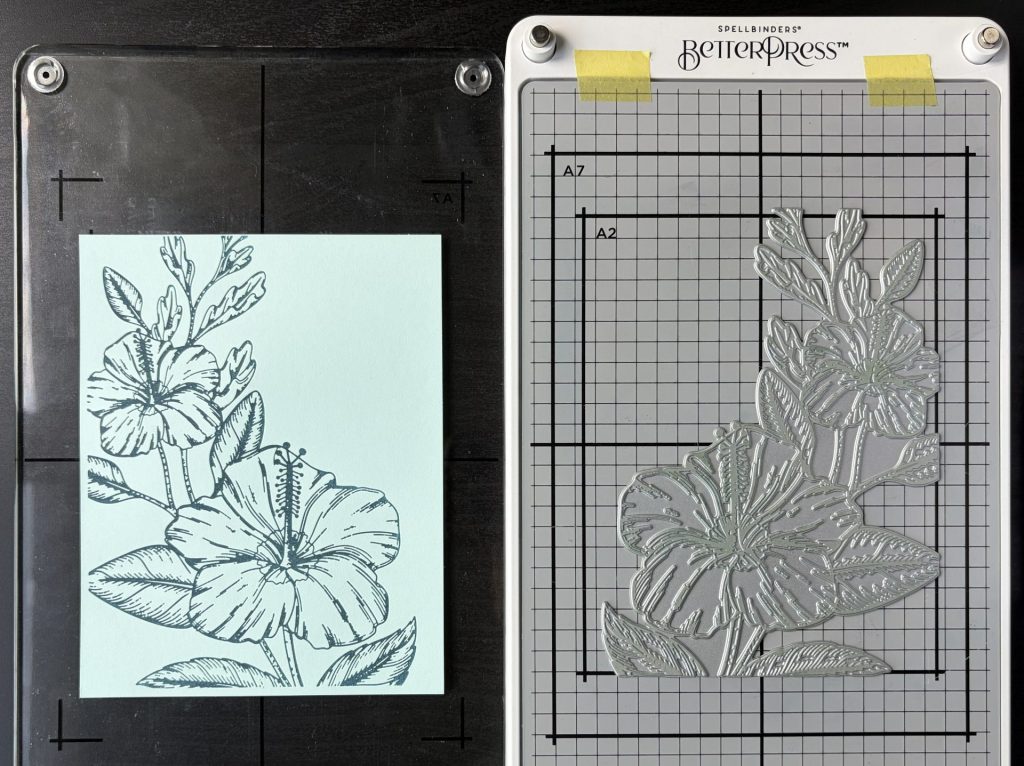
Pressed Hibiscus
- Press Plate: Hibiscus Bloom
- Cardstock: Seaside
- Ink: Spruce
- Die Set: Precision Layering A2 A – largest die
- Die cut A2 rectangle then press with spruce BetterPress ink.
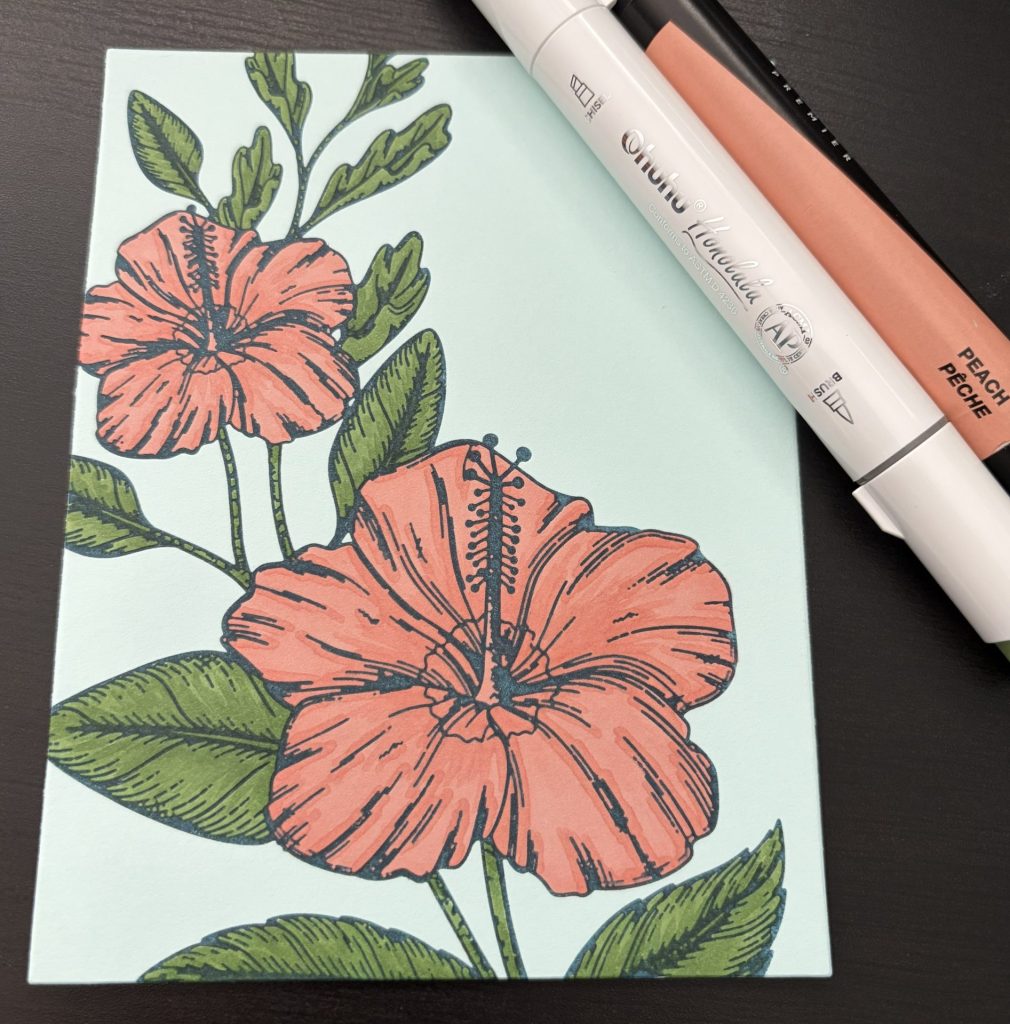
Coloring the Flower
- Ohuhu Marker: Artichoke Green #YG312
- Prismacolor Marker:
- Peach #PM-170
- Pale Vermillion #PM-14
- Poppy Red #PM-13
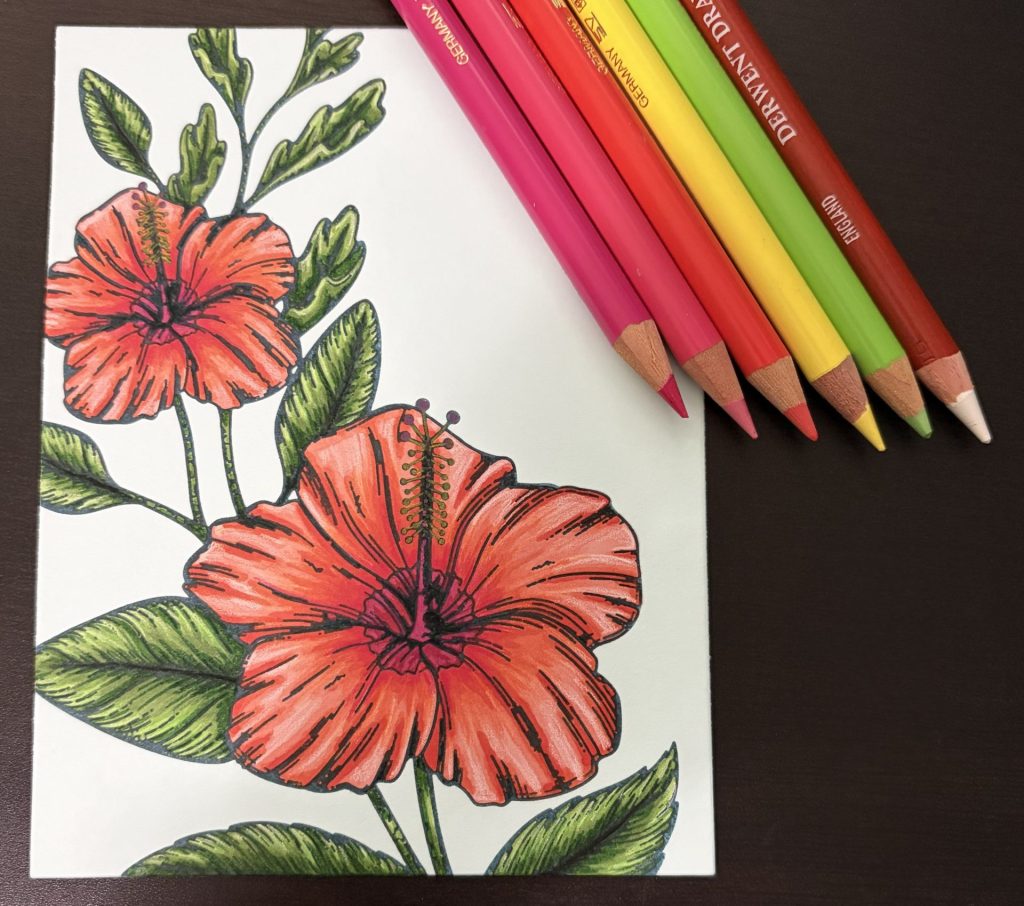
- OLO Marker: Lily Magnolia #RV1.7
- Faber-Castell Polychromos Pencils: Various shades of green, red-orange, yellow, and fuchsia.
- Derwent Drawing Pencil: Chinese White #7200
Pressed Sentiment
- Press Plate: Hibiscus Bloom
- Cardstock: Card base front
- Ink: Spruce
Assembly
- Adhere with glue and 1mm foam squares.
- Apply the glue along the straight edges and foam squares along the die-cut flower edge.
Supplies Used – Hibiscus in Full Bloom Card
- Spellbinders Press & Foil of the Month – Hibiscus Bloom #BPOM-JUN26 | SB | SB-UK |
- Spellbinders Cutting Dies – Percision Layering A2 A #S5-487 | SB | SB-UK | Sb.com |
- Spellbinders ColorWheel Cardstock:
- BetterPress Ink – Spruce #BPI-024 | SB | SB-UK |
- Ohuhu Marker – Artichoke Green #YG312
- OLO Marker – Lily Magnolia #RV1.7 | Blick |
- Prismacolor Markers | Blick |
- Faber-Castell Polychromos Pencils | Blick |
- Derwent Drawing Pencil – Chinese White #7200 | Blick |
Tools Used
- Spellbinders Platinum Six | SB | SB-UK | Sb.com |
- Spellbinders BetterPress Letterpress System | SB | SB-UK | Sb.com |
- Tim Holtz Paper Trimmer | Sb.com |
- Bearly Art Glue | SB | Sb.com |
- Best Ever Craft Tape – 5/8 in | SB | Sb.com |
- Foam Squares 1mm – White | SB | Sb.com |
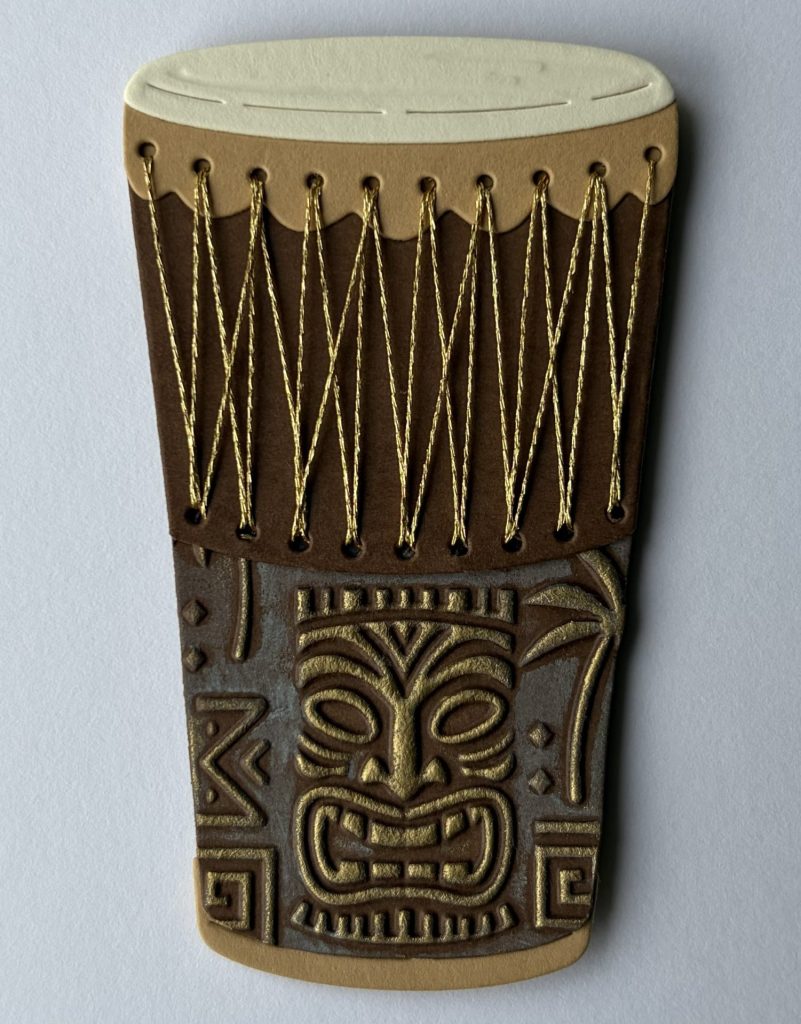
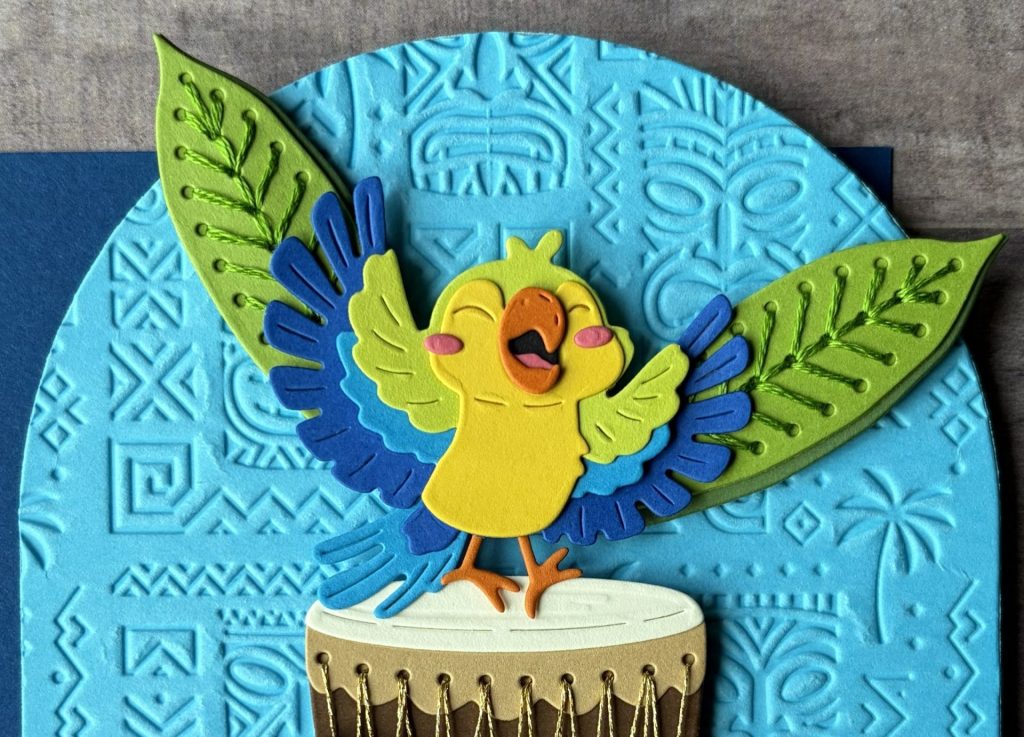
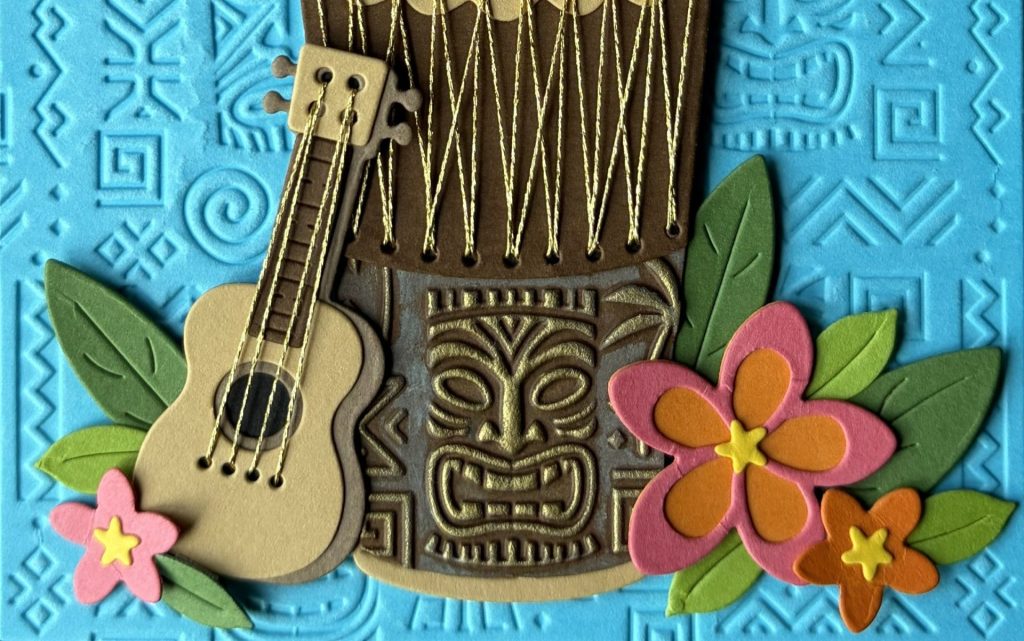
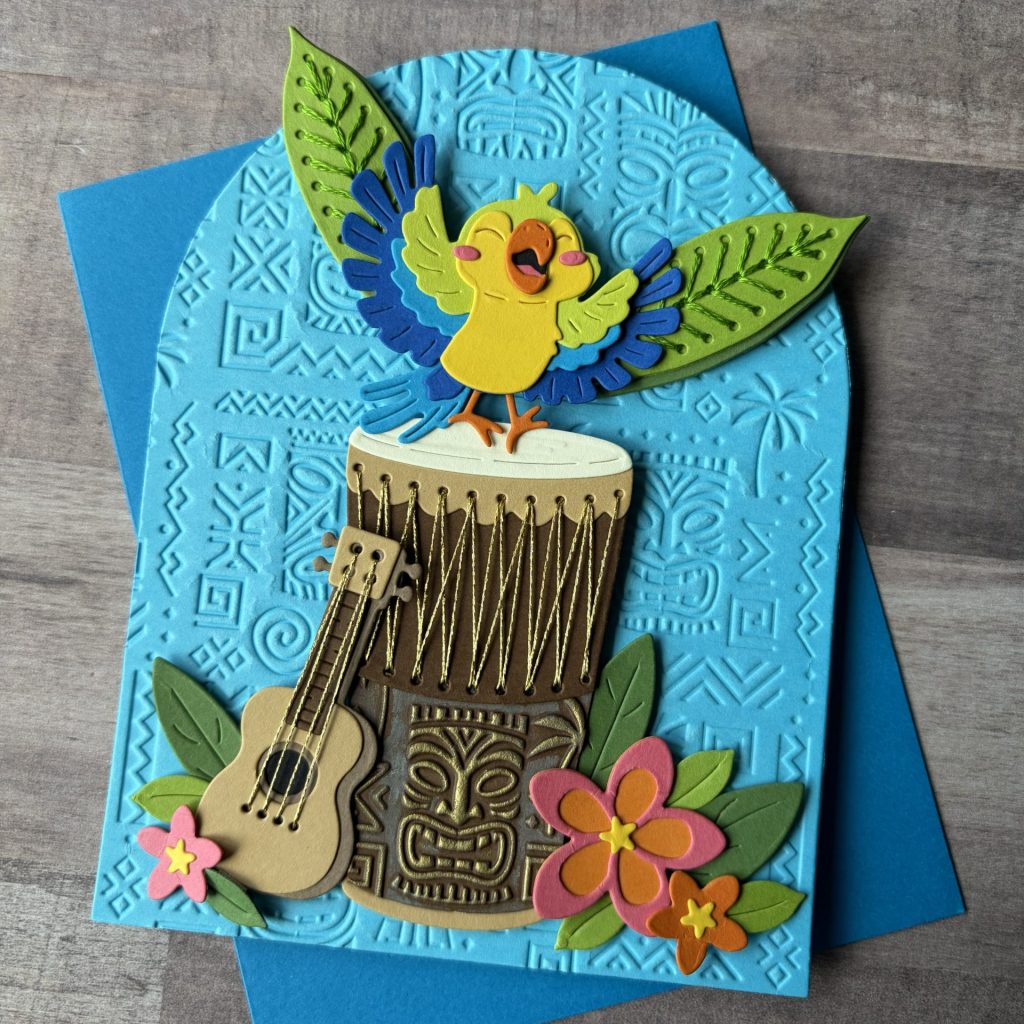
Island Style Beats Card
3D Embossing Folder Club

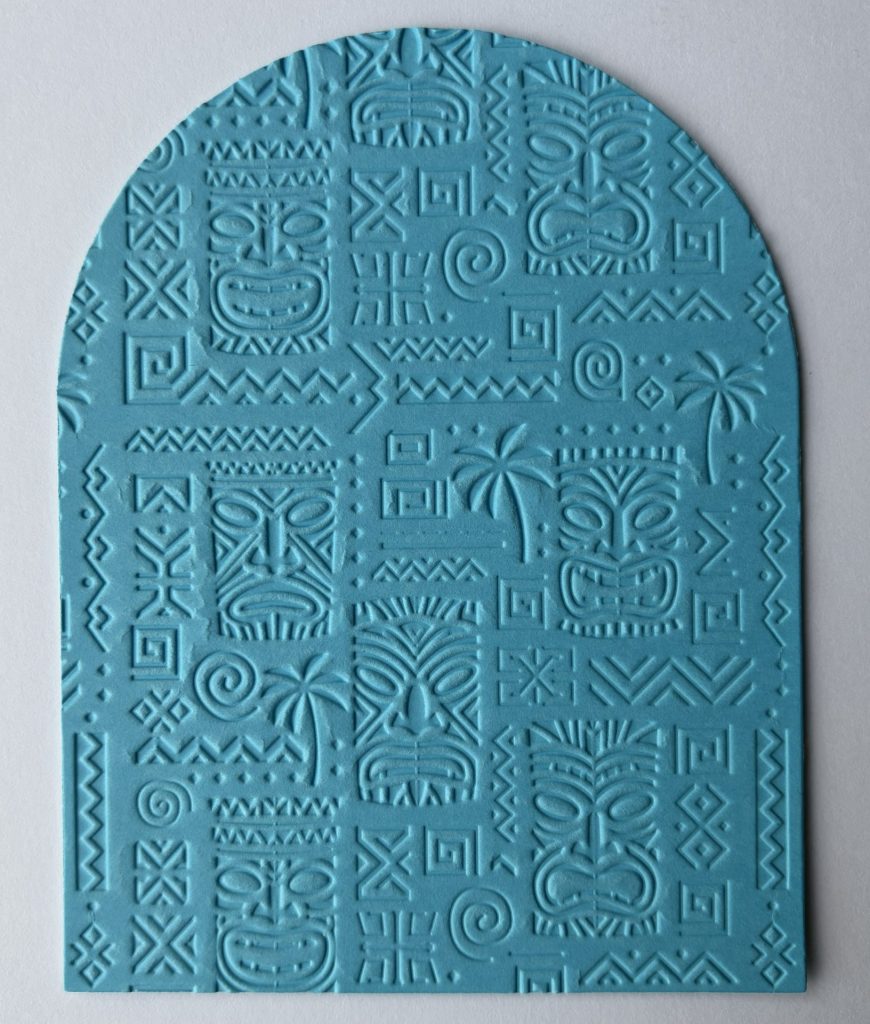
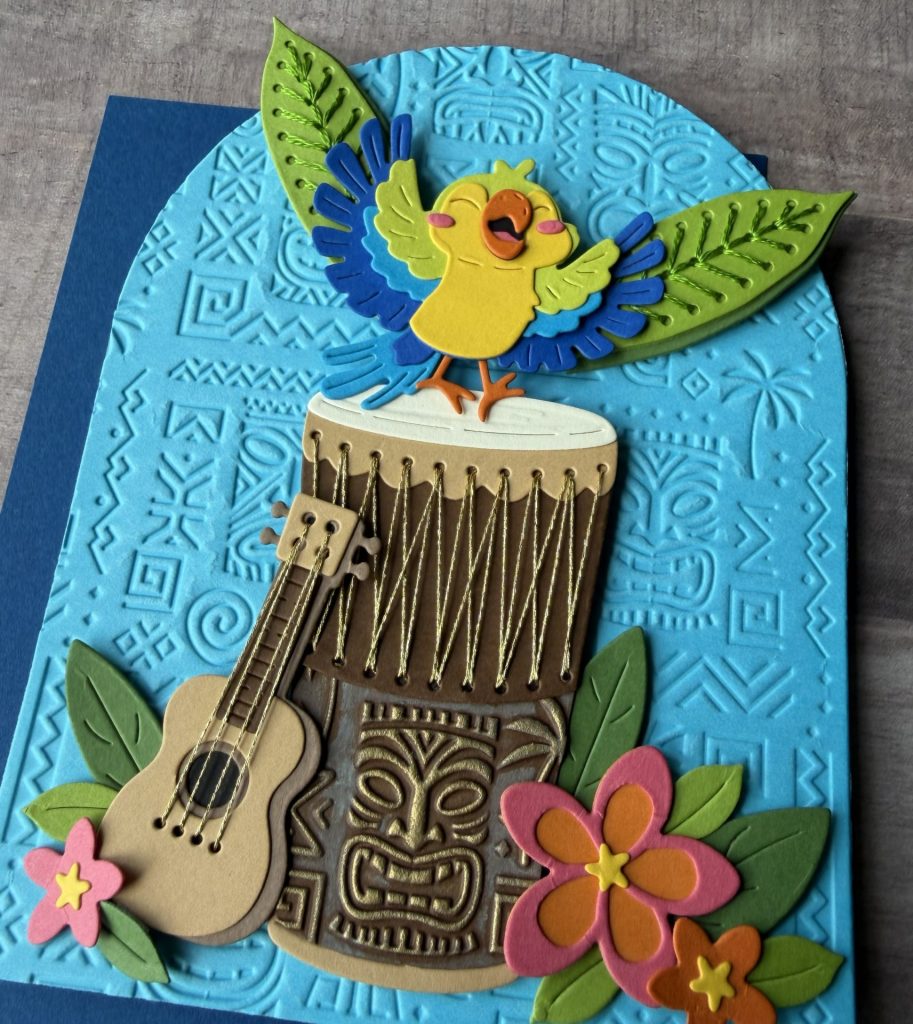
For my final card using the June Spellbinders Clubs, it combines the 3D Embossing Folder of the Month, Island Style, with the Stitching Die of the Month, Luau Beats. The embossed background creates a wonderful tropical texture that instantly sets the island mood. I die cut the drum, ukulele, tropical flowers, and cheerful bird from colorful cardstock and arranged them on an arched panel for a playful focal point. I added stitching to the detailed die cuts which creates plenty of dimension, making this card feel lively and full of music.
Card Details
Clubs Used
- 3D Embossing Folder of the Month
- Stitching Die of the Month
Shaped Card Base
- A2 Size: 4¼” x 5½” – top folding
- Cardstock: Island Blue
- Die Set: Essential Arches – largest arch
Embossed Arch
- Die Set: Essential Arches – largest arch
- Cardstock: Island Blue
- Embossing Folder: Island Style – debossed side
- Adhere to the card base with glue.
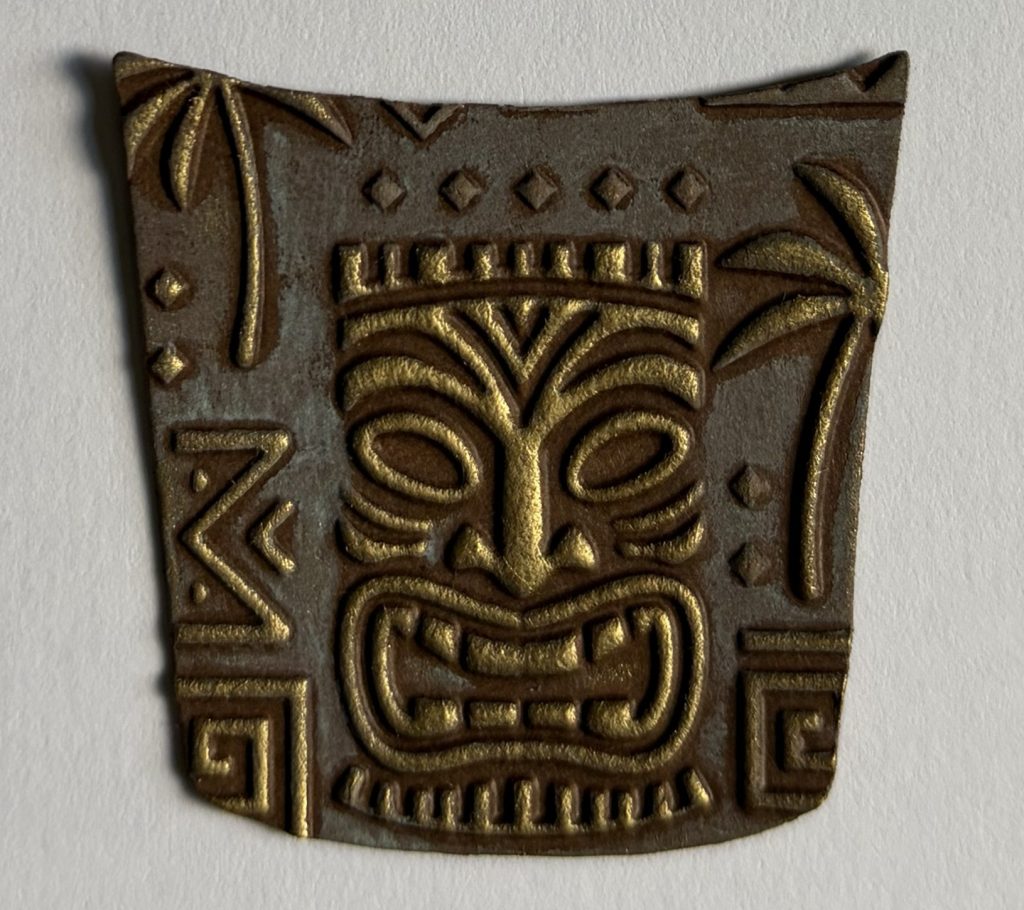
Embossed Drum Face
- Die Set: Luau Beats
- Cardstock Colors: Truffle – drum solid layer
- Embossing Folder: Island Style – embossed side
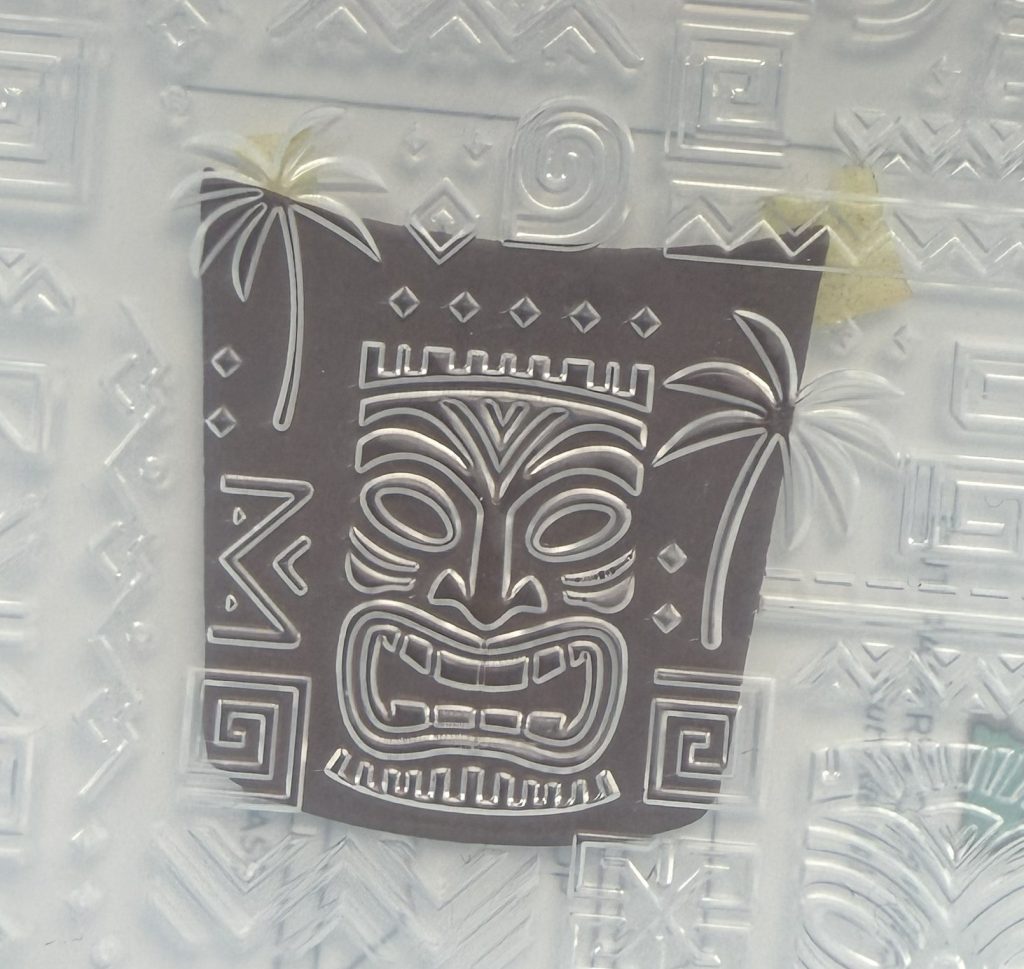
- Apply frayed burlap oxide ink with your finger.
- Then apply gold luster wax to the raised areas using your finger.
Stitched Drum
- Die Set: Luau Beats
- Cardstock Colors:
- Truffle – drum stitching layer
- Trim under the stitching holes with scissors.
- Fawn – top & bottom trim
- Alabaster – drum top
- Truffle – drum stitching layer
- Stitching Thread: Gold
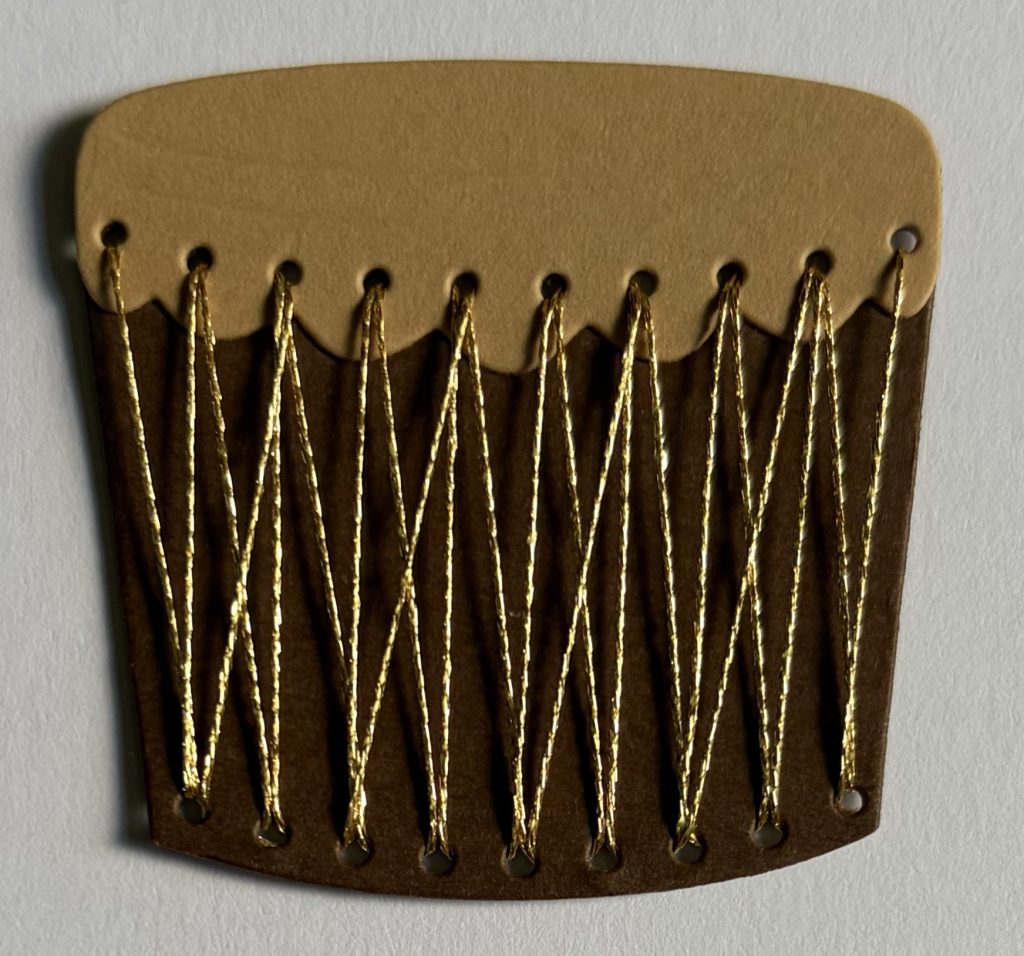
- Assemble die-cuts with glue.
- Adhere with 2mm foam squares.
Refer to the guide below for the Luau Beats assembly instructions.
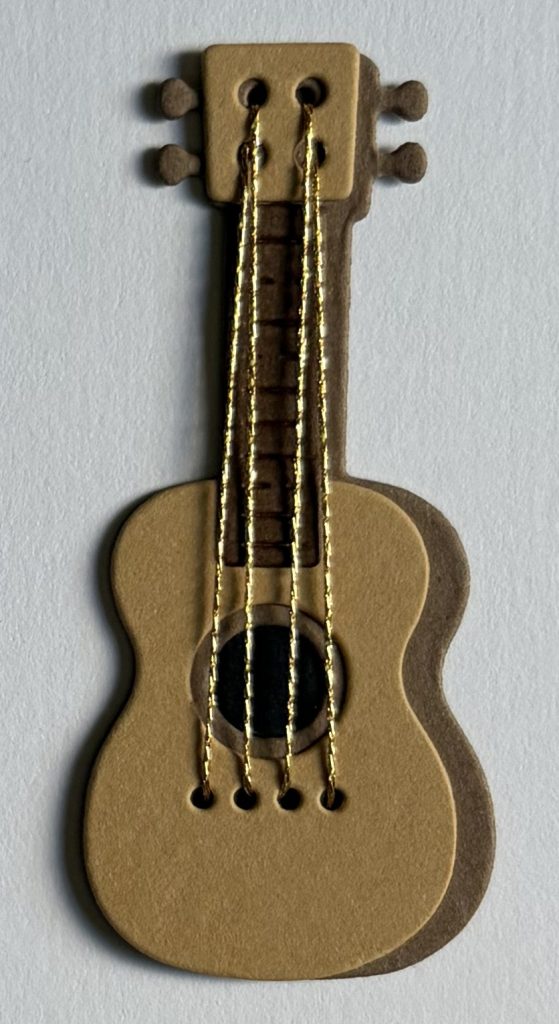
Stitched Ukulele
- Die Set: Luau Beats
- Cardstock Colors:
- Fawn – ukulele top stitching layer
- Acorn – ukulele back layer
- Truffle – fretboard
- Raven – sound hole
- Stitching Thread: Gold
- Assemble die-cuts with glue.
- Adhere with 1mm and 2mm foam squares.
Bird
- Die Set: Pop of Summer
- Cardstock Colors:
- Dahlia – cheeks & tongue
- Tangerine – beak & feet
- Sunkissed – body/face
- Peridot – wings top layer
- Splash – wings middle layer & tail feathers
- Ultramarine – wings back layer & tail feathers top layer
- Raven – mouth
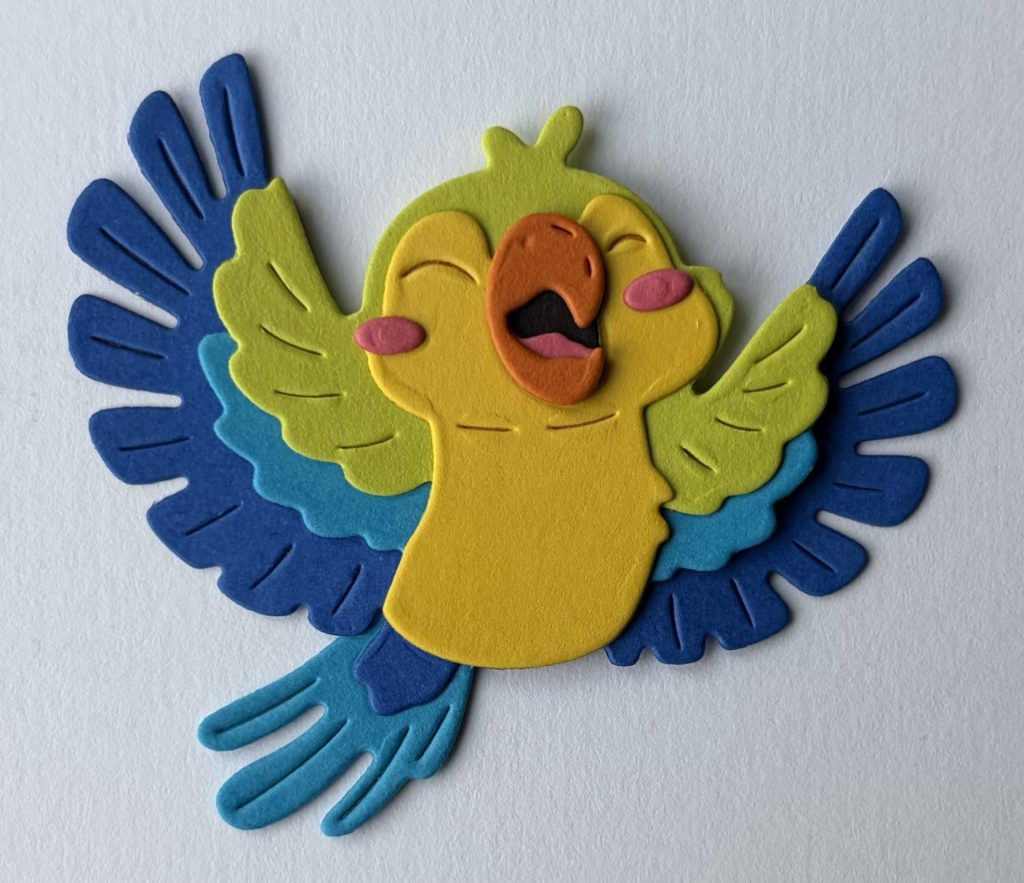
- Assemble die-cuts with 1mm foam squares(wings) and glue.
- Adhere the bird above the drum with stacked 2mm foam squares. Leave room to tuck in the stitched leaves.
Stitched Leaves
- Die Set: Luau Beats
- Cardstock Colors:
- Rainforest – stitched leaf
- Fern – solid leaf
- Stitching Thread: Green Shade – #Unknown
- Stitching Needle: #22
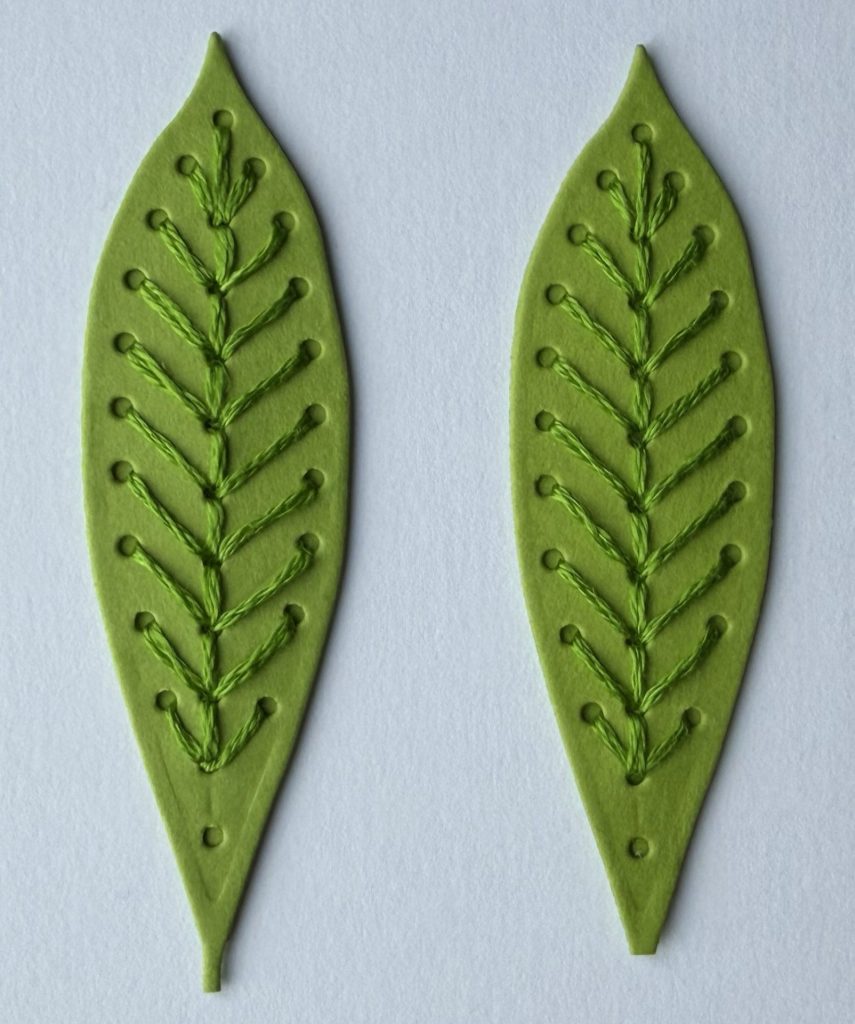
- Adhere with 2mm foam squares behind the bird wings.
Flowers & Leaves
- Die Set: Luau Beats
- Cardstock Colors:
- Dahlia – large detail flower & small flower
- Tangerine – large solid flower & small flower
- Sunkissed – flower centers
- Rainforest – small leaf (x4)
- Fern – small leaf
- Die Set: Pop of Summer
- Cardstock Colors: Fern – big leaf
- Assemble flowers with glue.
- Adhere with 1mm and 2mm foam squares.
Supplies Used – Island Style Beats Card
- Spellbinders Stitching Die of the Month – Luau Beats #DOMST-JUN26 | SB | SB-UK |
- Spellbinders 3D Embossing Folder of the Month – Island Style #3EOM-JUN26 | SB | SB-UK |
- Spellbinders Cutting Dies – Essential Arches #S5-526 | SB | SB-UK | Sb.com |
- Spellbinders Large Die of the Month – Pop of Summer #DOML-MAY26 | SB | SB-UK |
- Spellbinders ColorWheel Cardstock:
- Spellbinders Essentials Cardstock: Tangerine, Sunkissed, Island Blue, Splash
- Altenew Crafty Necessities Cardstock – Ultramarine | Sb.com | AN |
- Sizzix Luster Wax – Gold | Sb.com |
- Distress Oxide – Frayed Burlap | Sb.com |
- DMC Diamant Metallic Thread – Light Gold
- DMC 6 Strand Floss – Green
Tools Used
- Spellbinders Platinum Six | SB | SB-UK | Sb.com |
- Tim Holtz Paper Trimmer | Sb.com |
- Handy Craft Tool Set | SB | SB-UK | Sb.com |
- Bearly Art Glue | SB | Sb.com |
- Best Ever Craft Tape – 5/8 in | SB | Sb.com |
- Foam Squares 1mm – White | SB | Sb.com |
- Foam Squares 2mm – White | Sb.com |
- Stitching Needle #22
- Scissors
This Is My Kind of Clubbing
I had so much fun creating with the June Spellbinders Clubs, and I love how well all of the club products coordinate with one another. Whether you’re drawn to tropical florals, island music, ocean creatures, or detailed textures, the Aloha Greetings theme offers endless possibilities for creating bright and cheerful handmade cards. If you enjoy stitching, foiling, die cutting, or embossing, this month’s clubs are bursting with tropical inspiration and island-inspired creativity.
These projects only scratch the surface of what can be created by mixing products across the Spellbinders June clubs, and I can’t wait to see what everyone else creates with this month’s release! Be sure to tag me (@silversgrove or @grovecrafted) on Instagram or at Grove Crafted on Facebook.
Sea you next time…
Just keep crafting,
just keep crafting,
just keep crafting, stitching, foiling,
what do we do? We craft, craft, craft!Ha ha ha ha ha ha,
I love new club kits when,
when they arrive,
just craft, craft, craft! 🎶
Mahalo for stopping by! Happy Crafting!
If you enjoyed these June Spellbinders Club projects, be sure to check out my previous blog posts featuring Spellbinders Clubs where I share more card inspiration and ideas using the monthly club kits. It’s a great way to see even more ways to mix, match, and stretch your supplies.