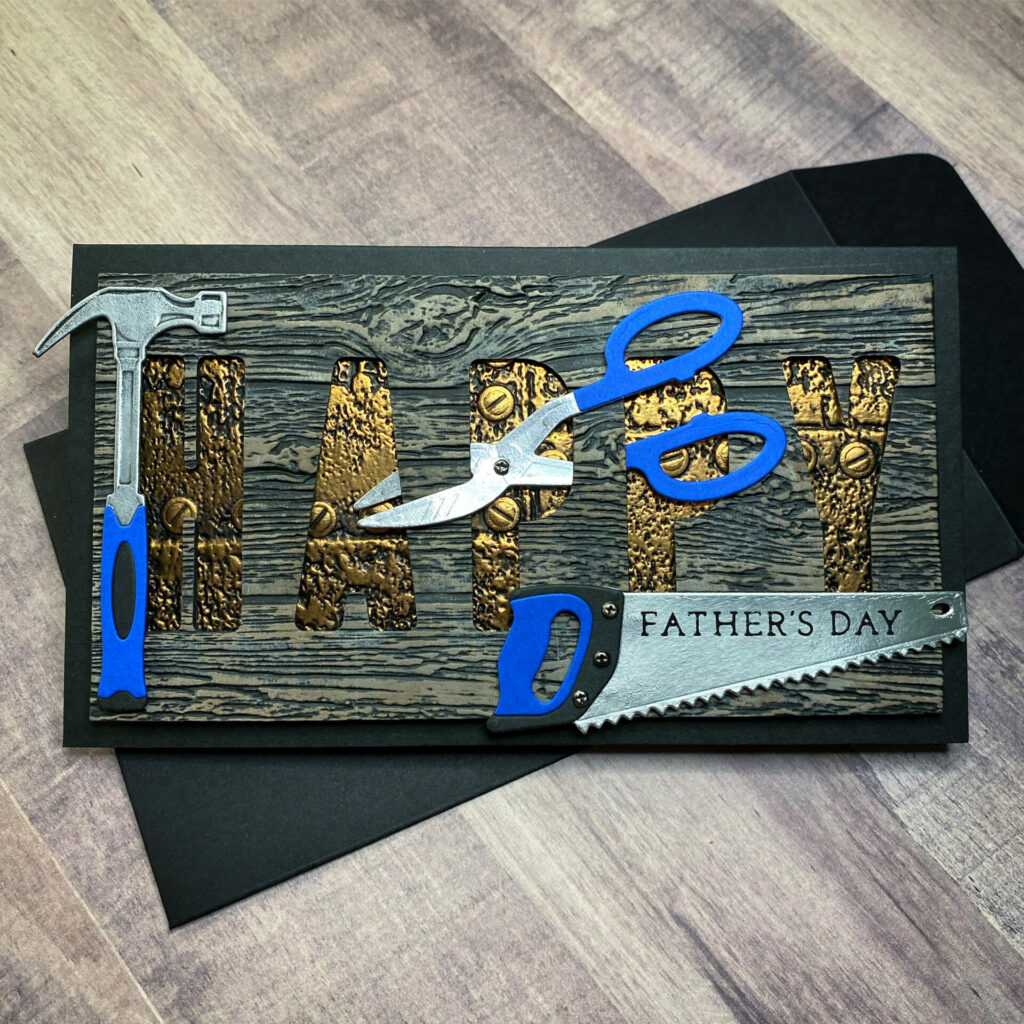
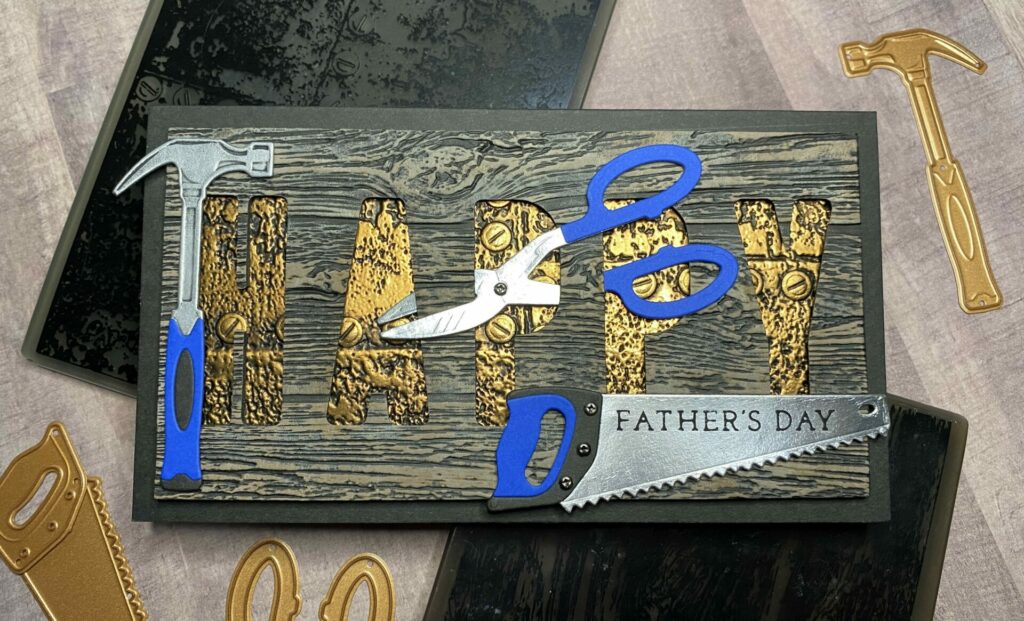
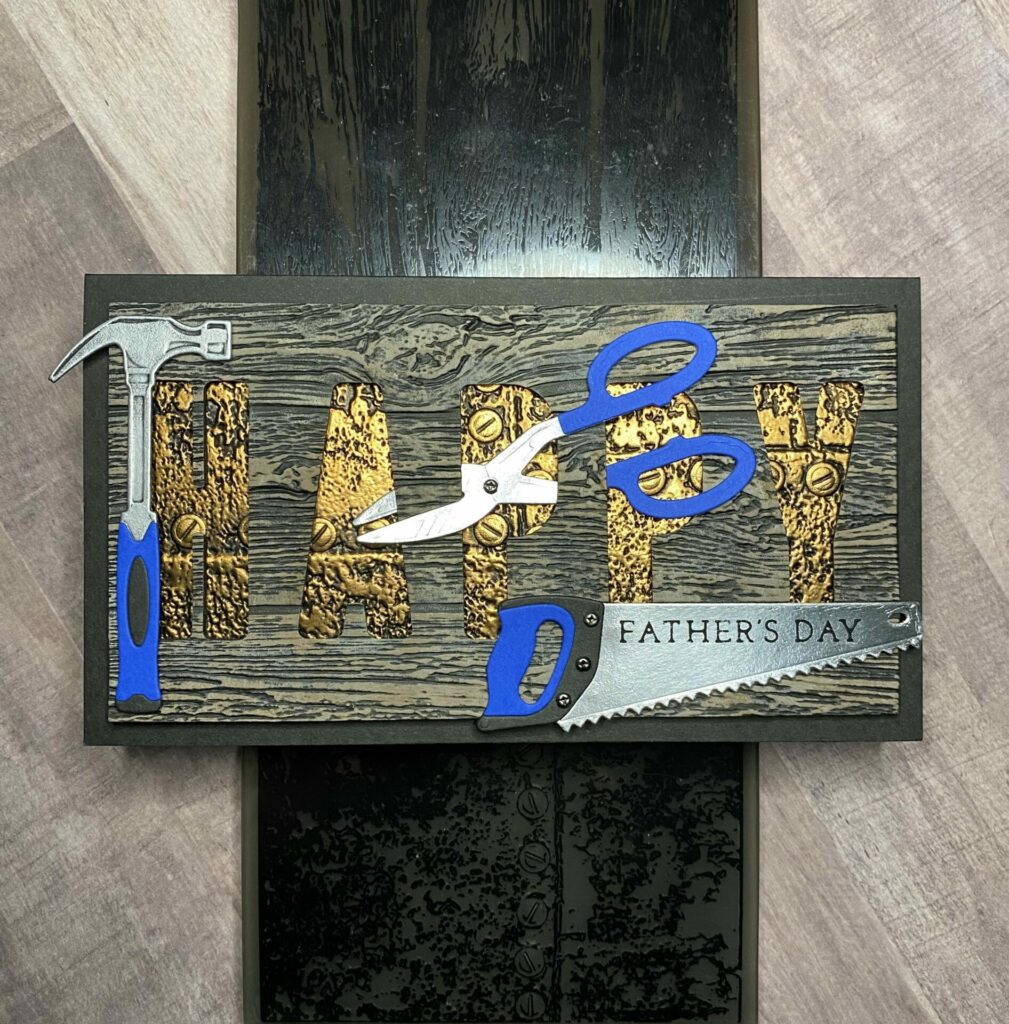
Happy Craftsman Card
With Father’s Day approaching, why not show your love for Dad with a special handmade card? This happy craftsman card features faux metal tool die cuts, along with lots of 3D embossed texture. This year, take your creativity up a notch by incorporating some tool-themed elements into your design.Whether your dad is a DIY enthusiast, a handyman, or simply someone who appreciates a thoughtful gesture, a custom card featuring his favorite tools is sure to make him smile. In this tutorial, I’ll walk you through the steps to create a unique and personalized Father’s Day card using a variety of craft tools and materials. Get ready to hammer out a masterpiece that Dad will cherish forever!
Link Abbreviations
- AMZ – Amazon*
- SSS – Simon Says Stamp
- Sb.com – Scrapbook.com*
- SB – Spellbinders*
- SIZ – Sizzix*
- RI – Ranger Ink*
Full Disclosure: This post contains affiliate links which are indicated with an (*). If you click on an affiliate link and later make a purchase, I may receive a small commission. Clicking on an affiliate link which earns a commission does NOT result in additional charges to you or cost you anything extra. Money earned via affiliate links helps pay the fees to keep this blog up and running. Thank you so much for shopping through my links to show your support for the brands that we love and the products that I share!
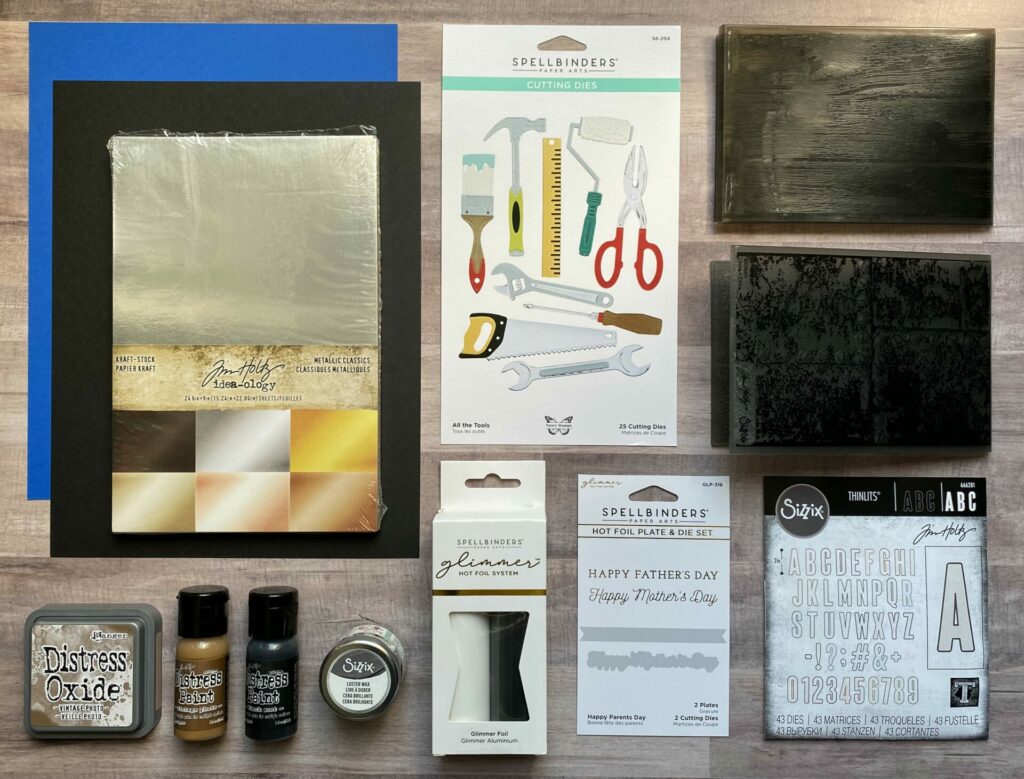
Supplies Used / Substitutions:
- Spellbinders Etched Dies – All The Tools #S6-204 | Sb.com | SB | AMZ |
- Tim Holtz Sizzix Thinlits Dies – Alphanumeric Bulletin #666281 | Sb.com | SIZ | AMZ | SSS | Any bold alphanumeric dies
- Sizzix Tim Holtz 3D Embossing Folder – Lumber #662718 | Sb.com | SIZ | AMZ / Any embossing folder
- Sizzix Tim Holtz 3D Embossing Folder – Industrious #665754 | Sb.com | SIZ | AMZ | SSS / Any embossing folder
- Spellbinders Hot Foil Plate – Happy Parents Day #GLP-316 | Sb.com / Any sentiment
- Black Heavyweight Cardstock / Any color heavyweight cardstock
- Blue Cardstock / Any color cardstock
- Tim Holtz idea-ology Metallic Kraft Stock – Silver & Copper | Sb.com | SSS / Any metallic cardstock
- Spellbinders Glimmer Hot Foil – Opaque Black #GLF-049 | Sb.com | SB / Any color glimmer hot foil
- Sizzix Luster Wax – Silver | Sb.com | SIZ | AMZ / Optional
- Distress Oxide – Vintage Photo | Sb.com | RI | SSS | Any brown pigment ink
- Distress Paint
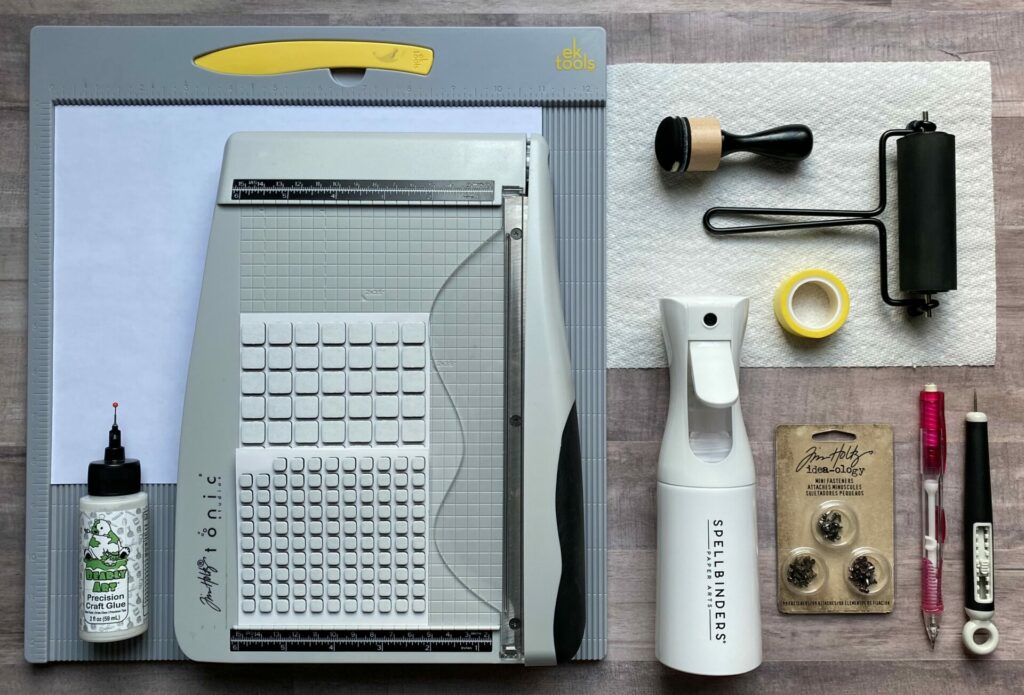
Tools Used / Substitutions:
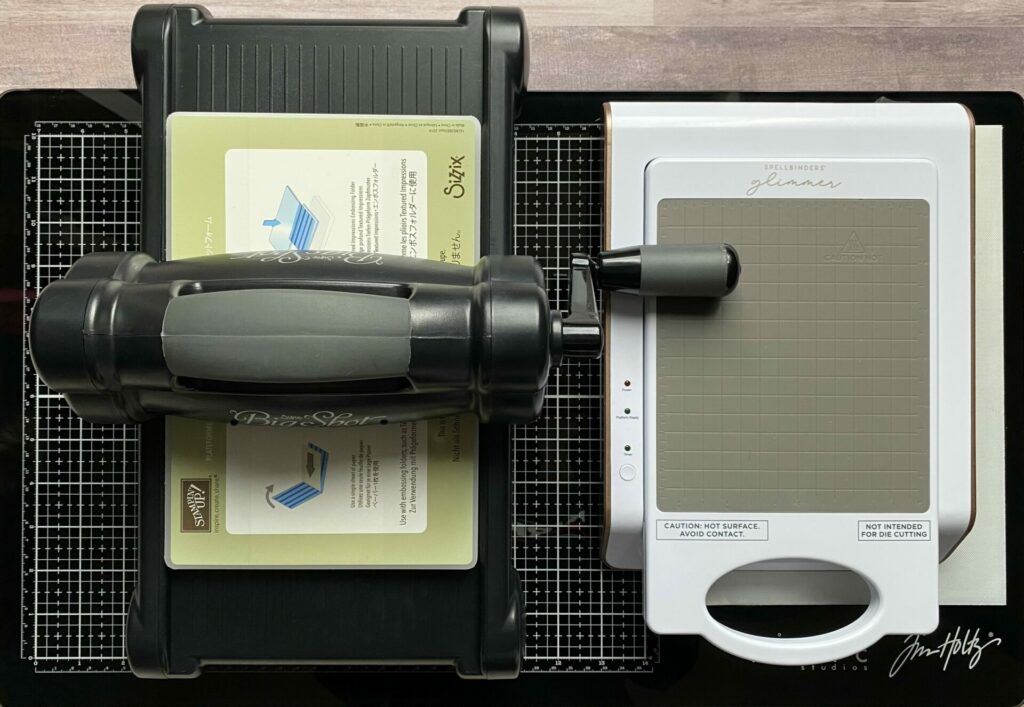
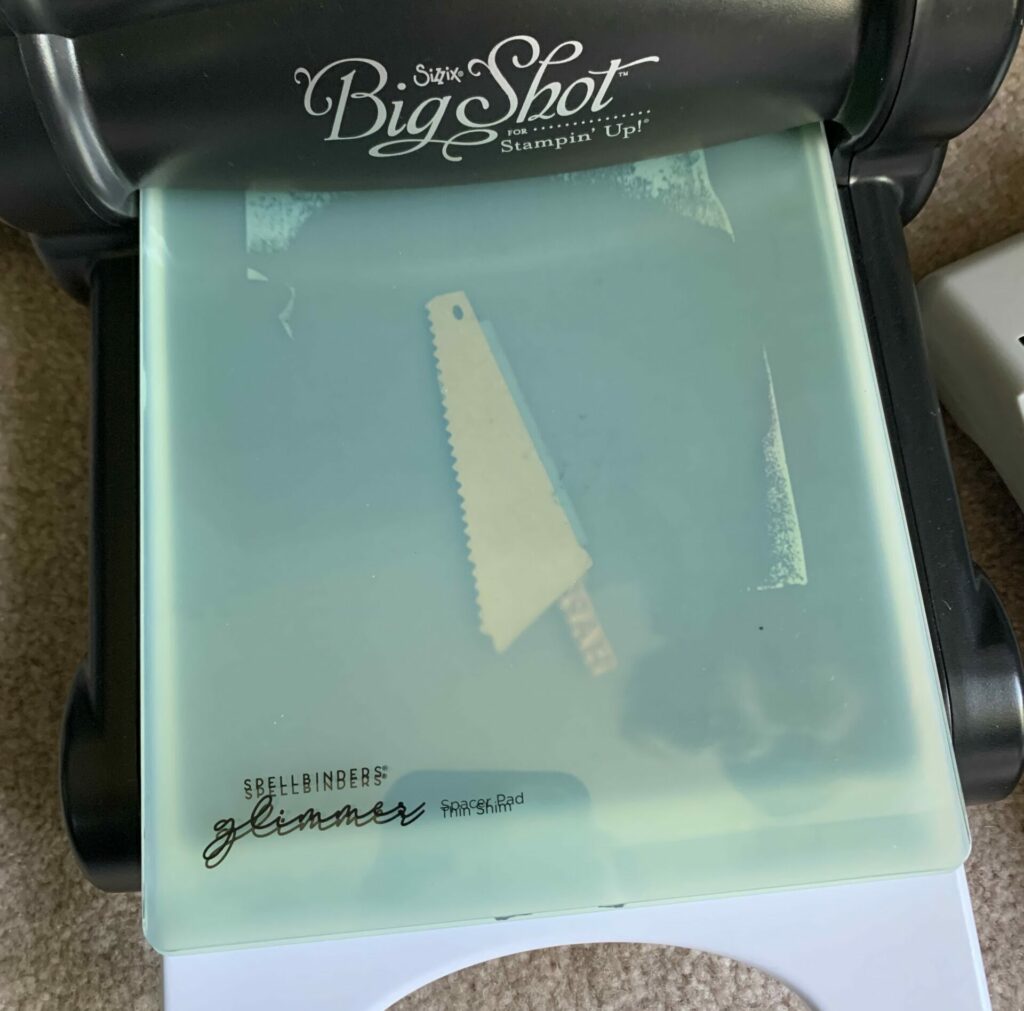
- Sizzix Big Shot | SIZ / Spellbinders Platinum Six | Sb.com | SB / Any die cutting machine
- Spellbinders Glimmer Hot Foil System | Sb.com | SB |
- Tim Holtz Comfort Paper Trimmer | Sb.com | AMZ | RI | SSS / Any paper trimmer
- Tim Holtz Glass Media Mat | Sb.com | AMZ | SSS / Optional
- EK Scoring Board | AMZ | SSS / Any scoring board
- Bearly Art Glue | Sb.com | SB | AMZ | SSS / Any liquid adhesive
- Spray Bottle with water | Sb.com | SB | AMZ / Any spray bottle
- Tim Holtz Medium Distress Brayer – tda75554 | Sb.com | RI | SSS / Any brayer
- Tim Holtz Retractable Craft Pick | Sb.com | SSS | AMZ / Any die pick
- Tim Holtz Distress Tiny Blending Tool Sponge – tda84990 | Sb.com | RI | SSS |
- Tim Holtz Idea-ology Mini Fasteners Brads TH92790 – Silver | Sb.com | AMZ | SSS / Optional
- Foam Squares – Black | SSS / Optional
- Mechanical Pencil | AMZ / Any pencil
- Best Ever Craft Tape – 5/8 in | Sb.com | SB / Any low tack tape
- Copy Paper – 1 sheet / Any scrap paper
Making the Card Base
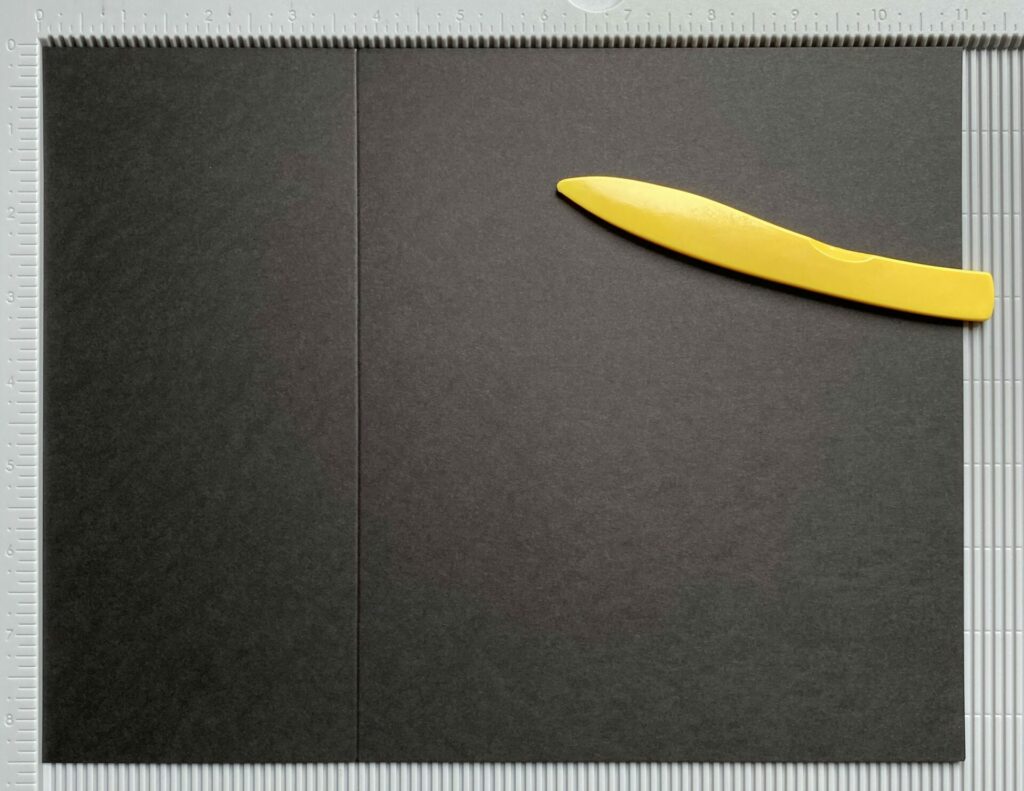
- Firstly, score the black heavweight cardstock at the 3¾ inch line.
- Then, fold along the score line and reinforce the fold with a bone folder.
- Finally, trim the card to size using a paper trimmer.
Your happy craftsman card base will now be 3¾ x 6¾ inches in size.
Making the Industrious Panel
Embossing
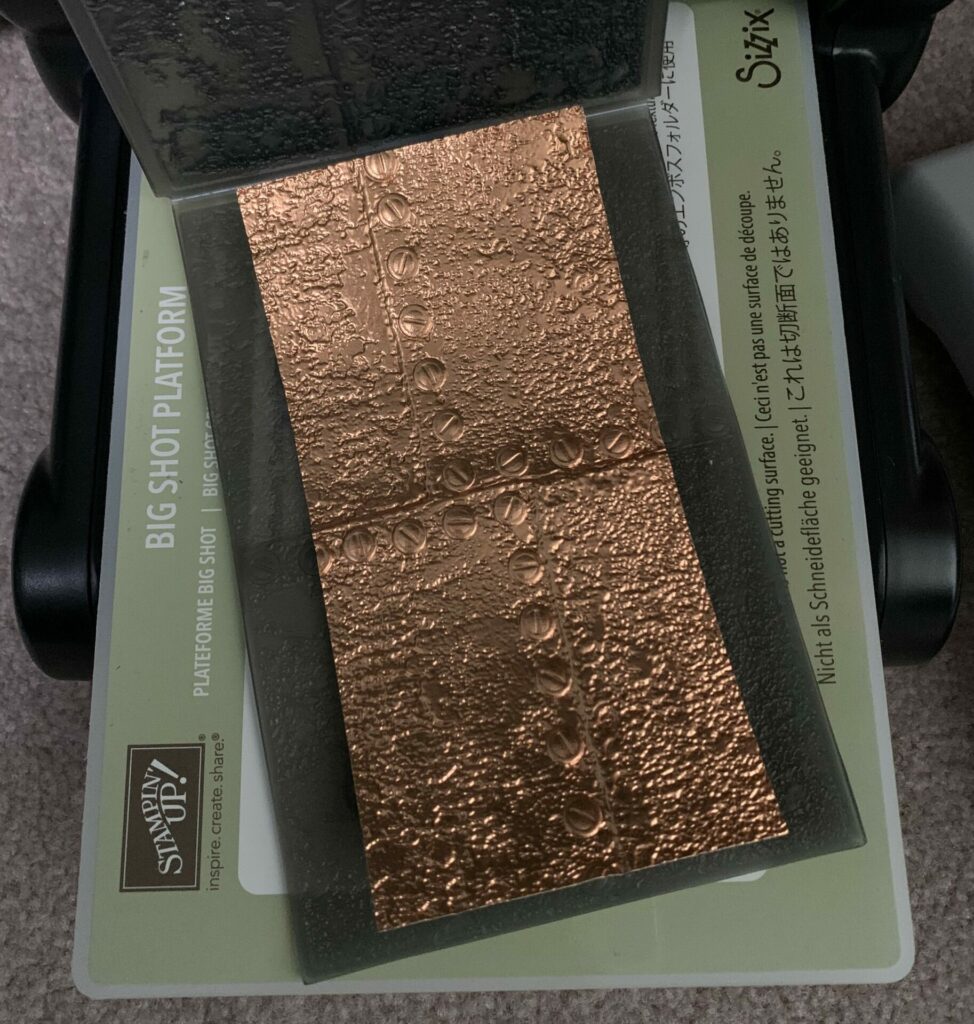
- Cut the metallic copper kraft stock paper to a size of 3 x 6 inches.
- Lightly spritz back side of the paper with water.
- Then, place it in the Sizzix Industrious 3D embossing folder.
- After that, run it through your die cutting machine.
- Remove the paper from the embossing folder and let it dry.
Distressing
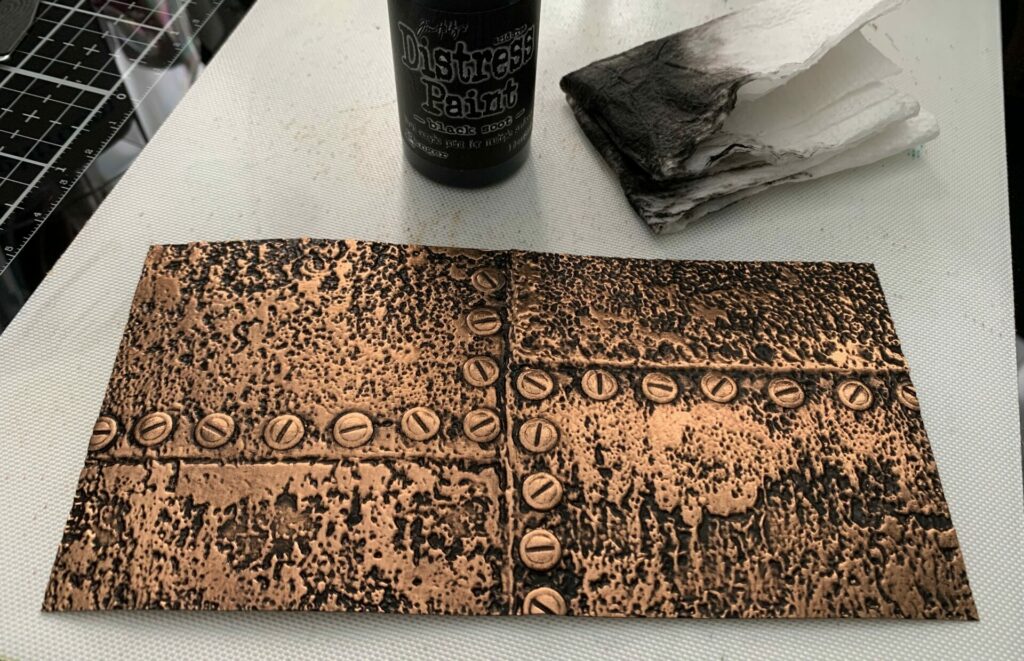
- Apply black soot distress paint onto your craft mat and pick it up with a small blending tool and foam.
- Spread the paint over the metallic embossed panel, making sure to work it into all the lines and crevices using a pouncing motion.

- Gently rub a damp paper towel over the panel to remove the paint from the raised areas.
- Then, set it aside to dry.
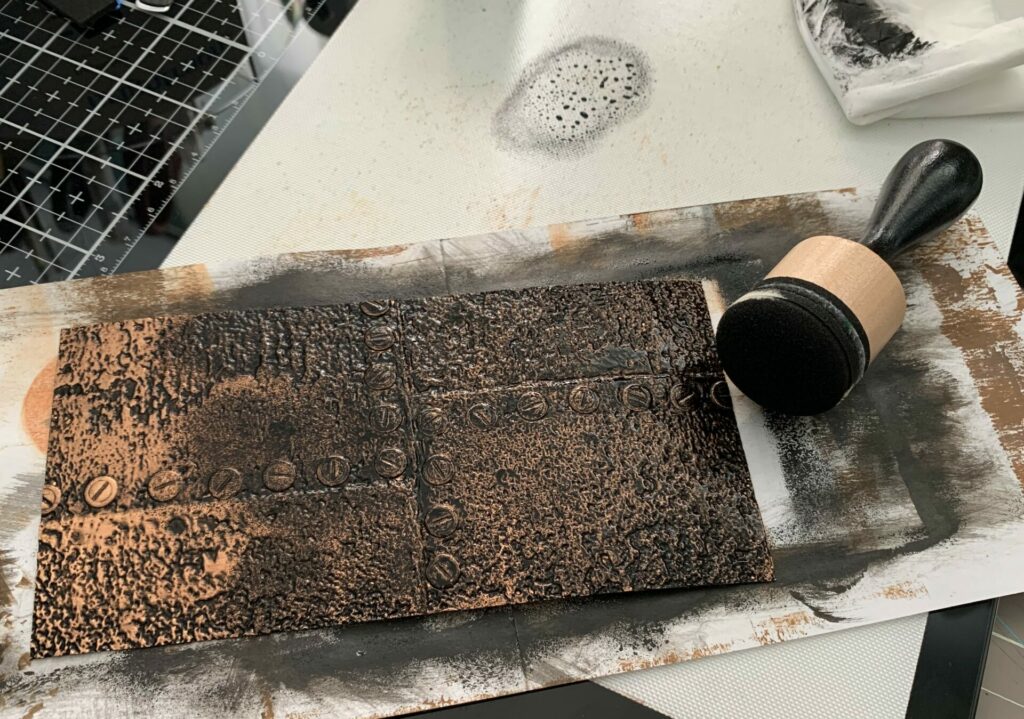
Tips: The wet paper towel removes the paint from all the high points of the paper. Please avoid rubbing too hard as it may cause the colored metallic layer to come off the paper. Be sure to act quickly before the paint dries and becomes difficult to remove. Be sure to switch to a clean section of the towel as it gets dirty. If you accidentally remove too much paint, simply reapply and repeat the process.
Gluing
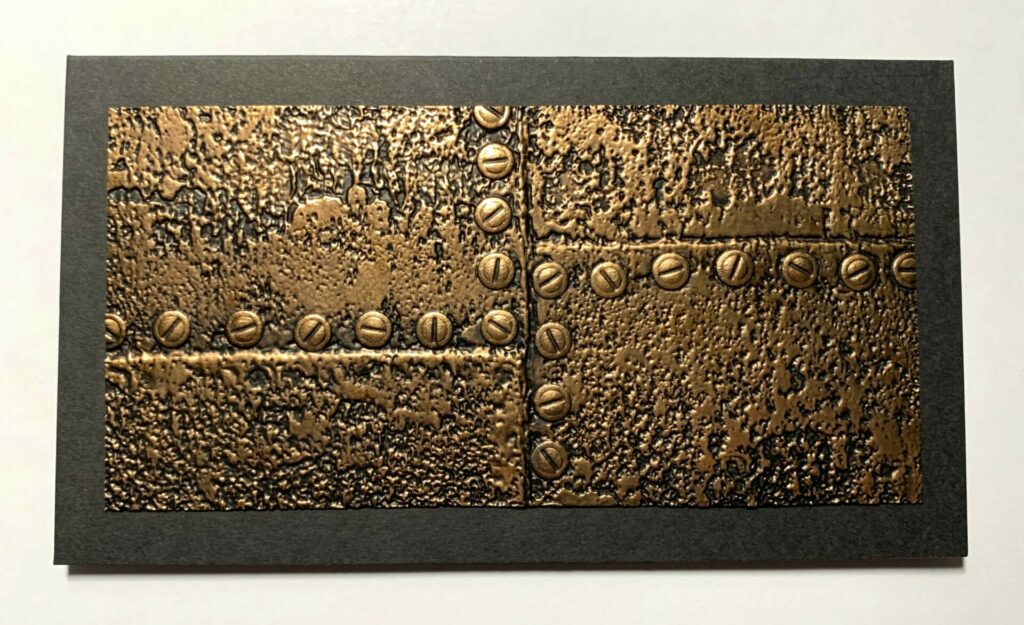
- Attach the industrious panel to the front of the card base using glue, making sure it is perfectly centered on all sides.
- Then, place something heavy on top of it while the glue dries.
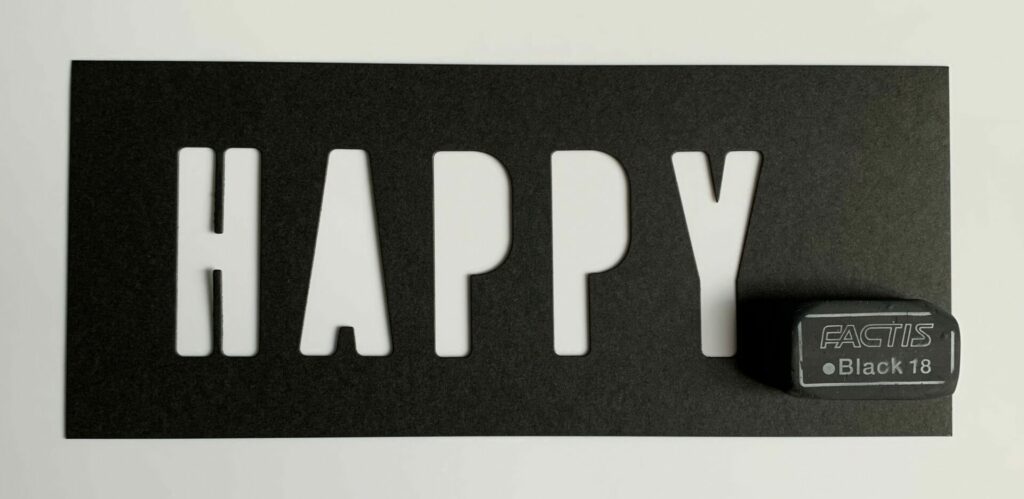
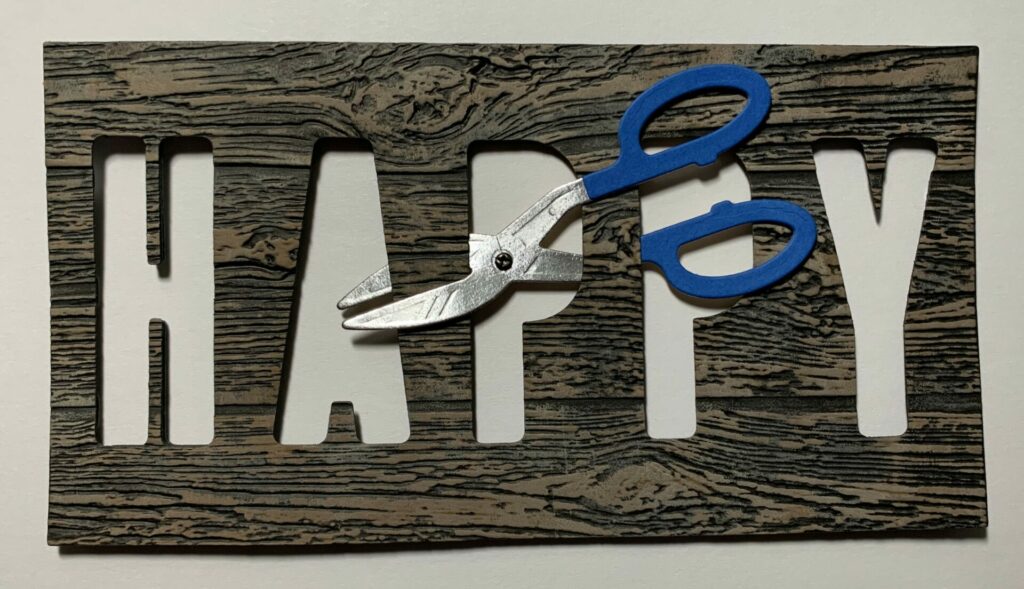
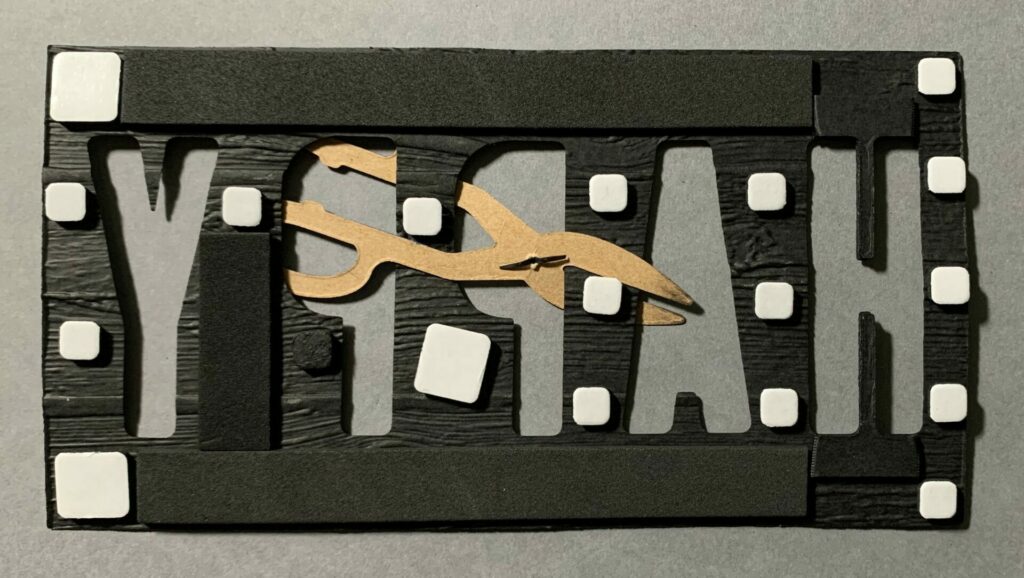
Cutting the “HAPPY” Panel
Helpful Tips:
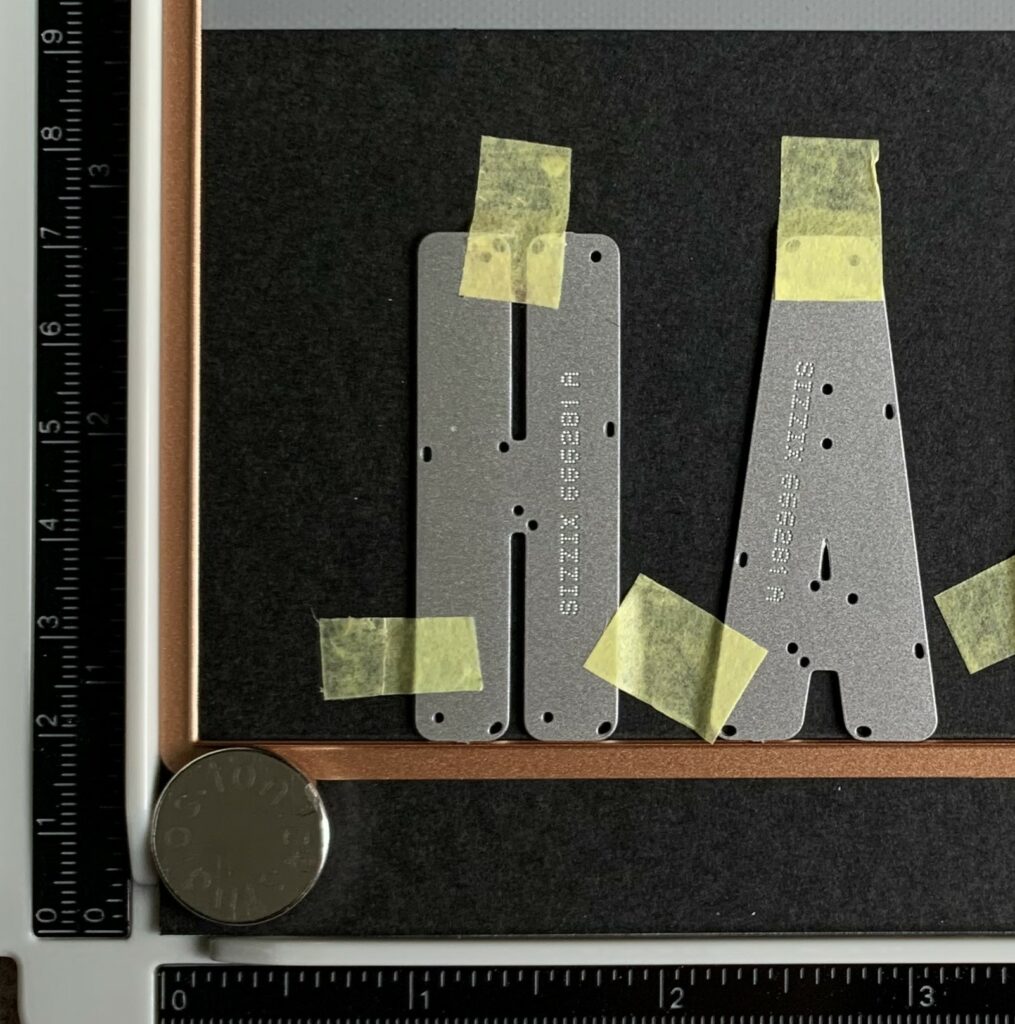
- Use the corner of a stamping tool and a frame die to align the dies.
- Maintain consistent spacing between letters by using the “I” die.
- Secure the dies in place with tape.
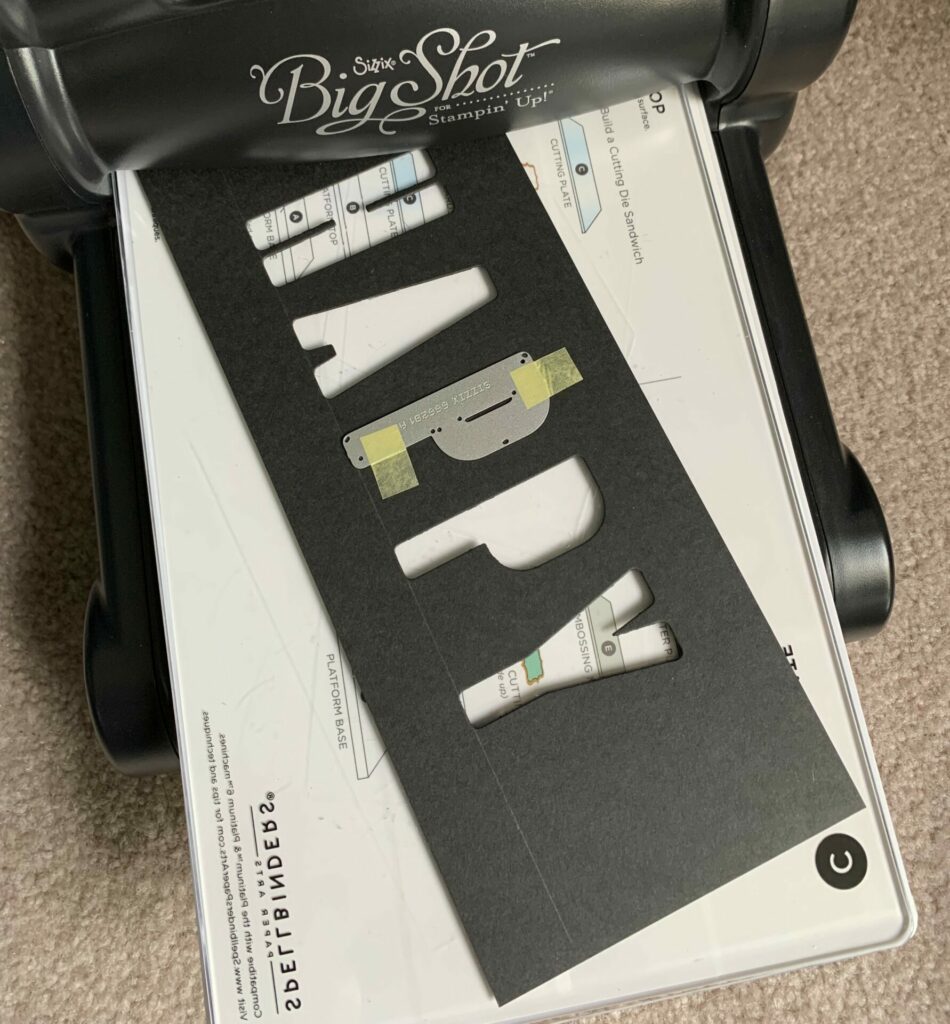
Positioning The Letters
- Use the excess cardstock from the card base and draw a line ¾ inch up from the bottom with pencil.
- Place the letter “H” die on the line one inch from the edge and secure it in place using tape.
- After that, position the letter “A” die to the right of the letter “H” die and tape it down. (Use the letter “I” for the spacing between letters.)
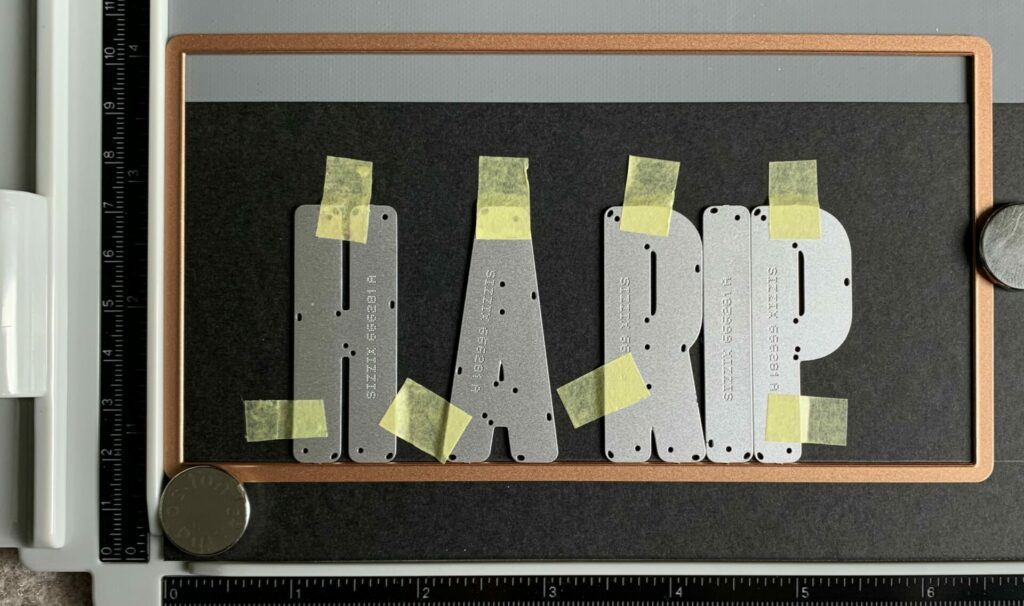
- Then, position the letter “R” die to the right of the letter “A” die and tape it in place. (Yes I said “R”, trust the process!)
- Continue with the same process using the letter “P” and then “Y”.
- Remove the letter “R” die.
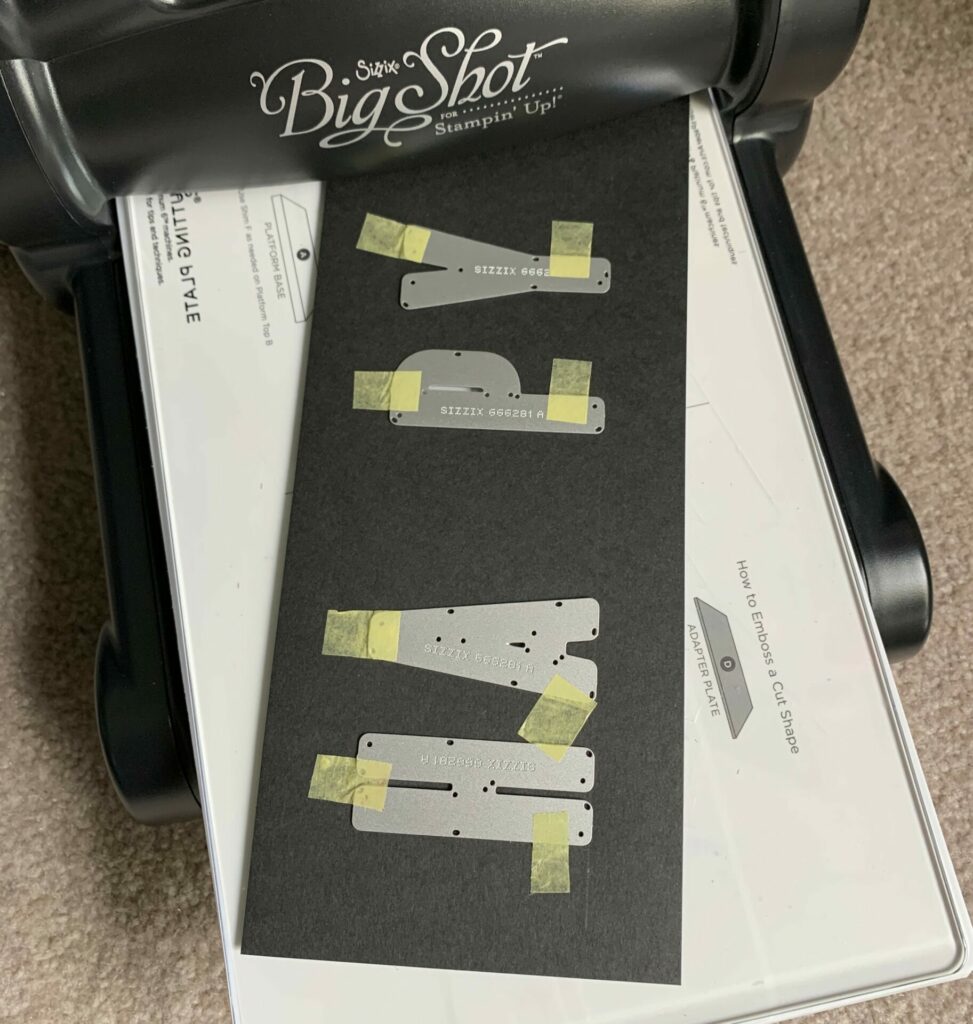
- Run it through the die cutting machine.
- Remove the letter “P” die and position it between the letter “A” and “P”. Use tape to secure it in place.
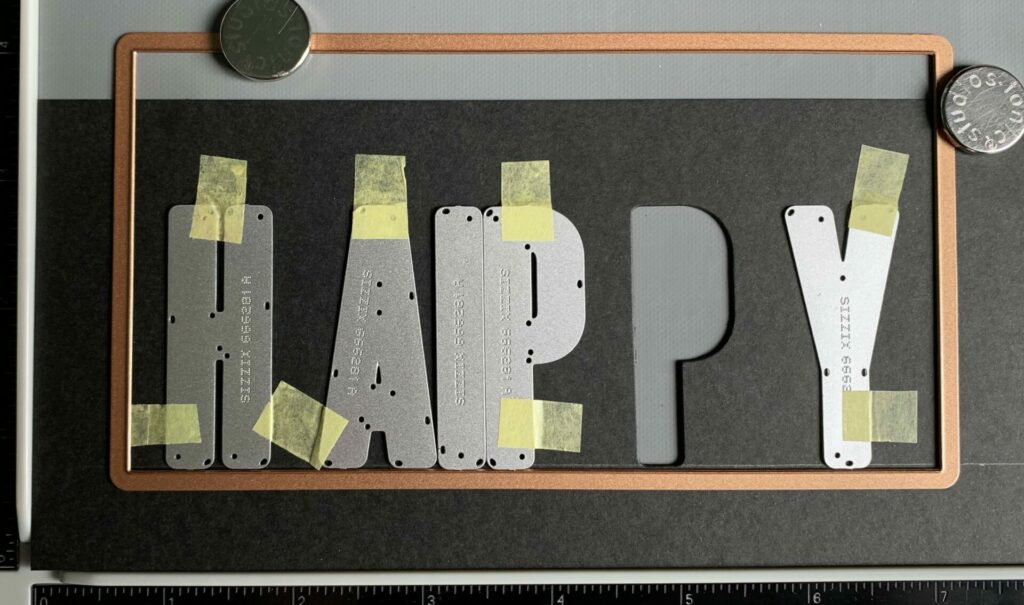
- Then, remove the letter “H”, “A”, and “Y” dies and pop out the letters.
- Run it through the die cutting machine and pop out the die cut letter.
- Lastly, erase the pencil line.
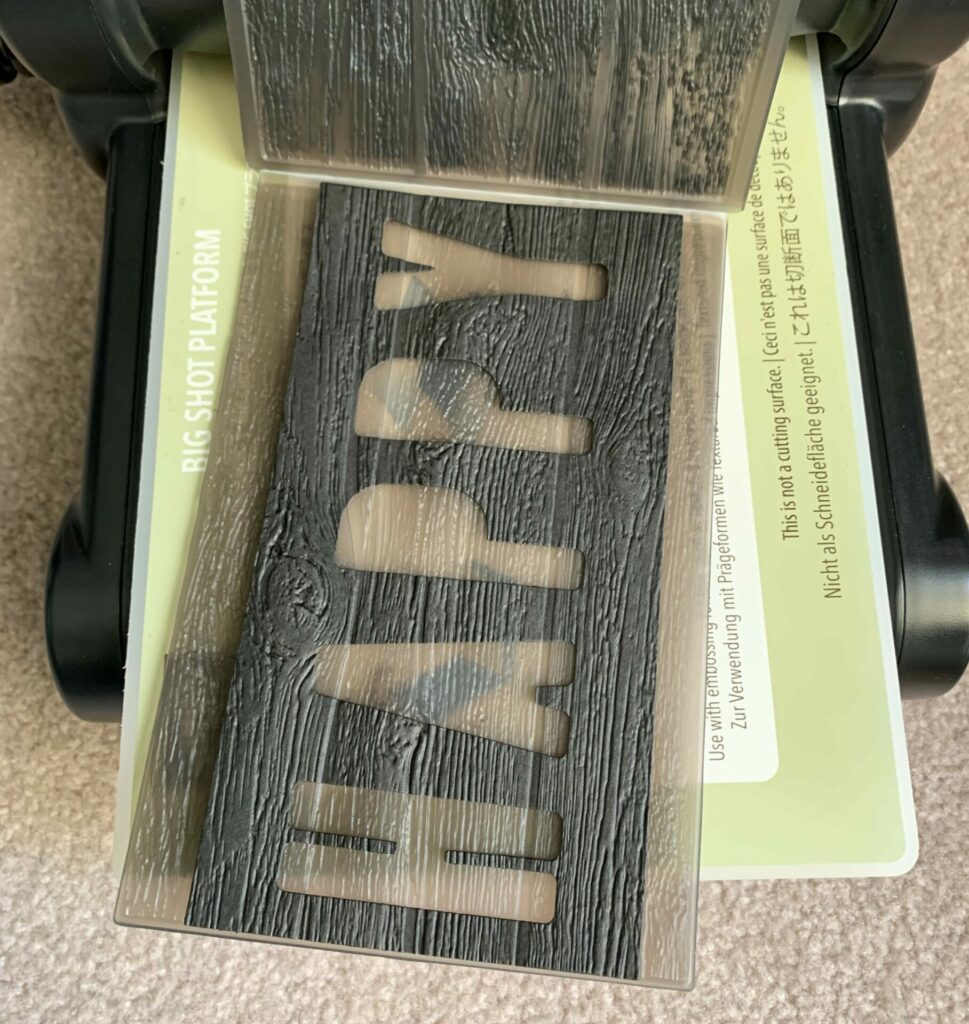
Embossing the Lumber
- Firstly, trim down the “HAPPY” panel to a size of 3¼ x 6¼ inches with your paper trimmer.
- Then, lightly spray both sides of the cardstock with water.
- Place it in the Lumber 3D embossing folder.
- Run it through your die cutting machine.
- Remove the embossed panel from the folder and let it dry under a flat cutting pad.
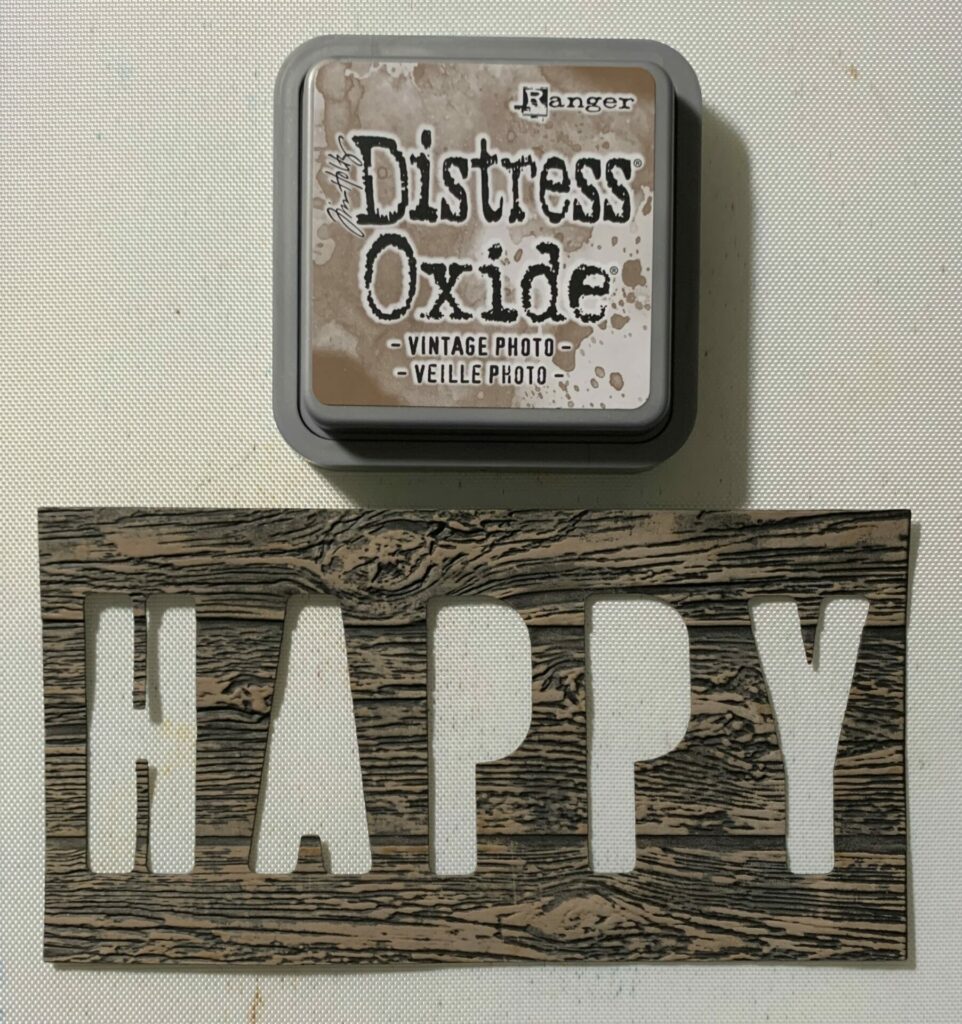
Distressing the Lumber
Painting
- Drip some vintage photo distress paint onto your craft mat.
- Use a brayer to pick up the paint by rolling it back and forth. Lift the brayer in between each roll to avoid pushing the paint around.
- Once the brayer is evenly coated, lightly roll it over the embossed “HAPPY” panel.
- Then, allow it to dry.

Inking
- Apply vintage photo oxide ink to the raised areas of the embossing using your finger.
- Then, allow it to dry.
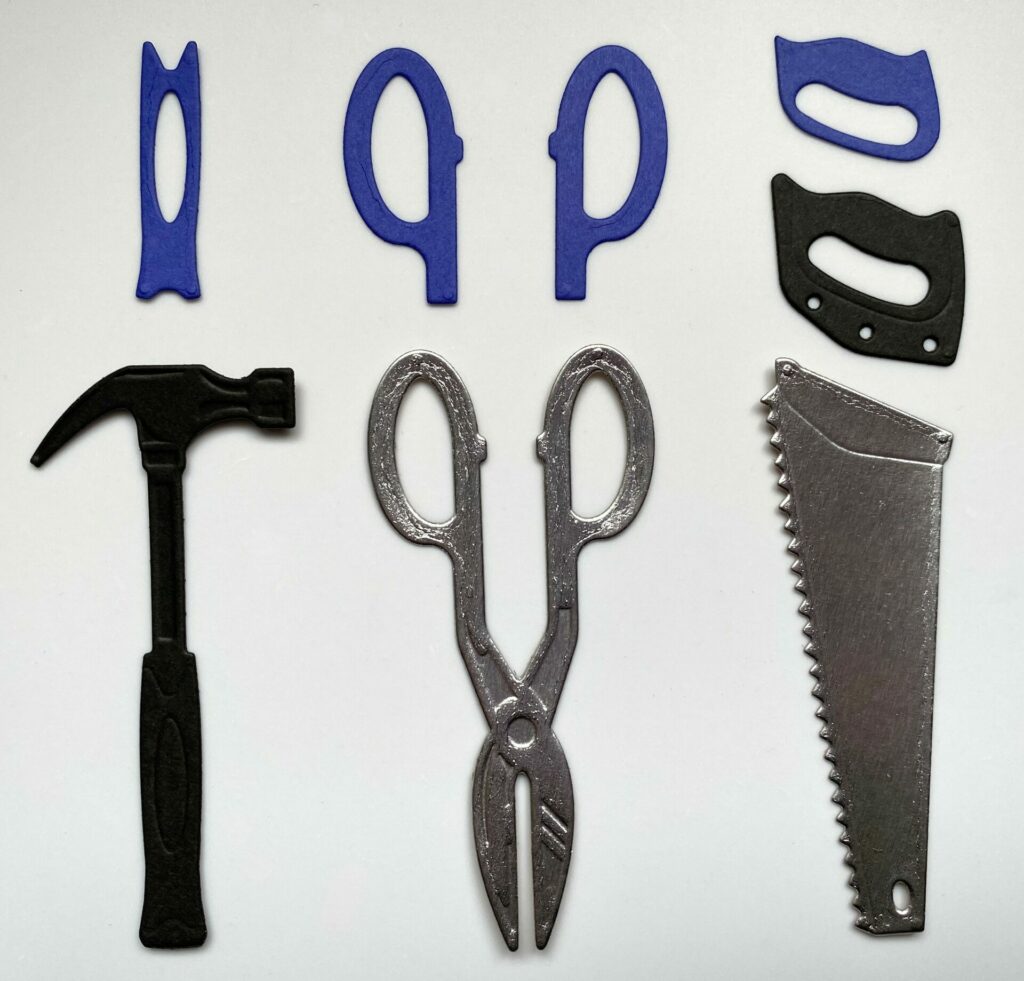
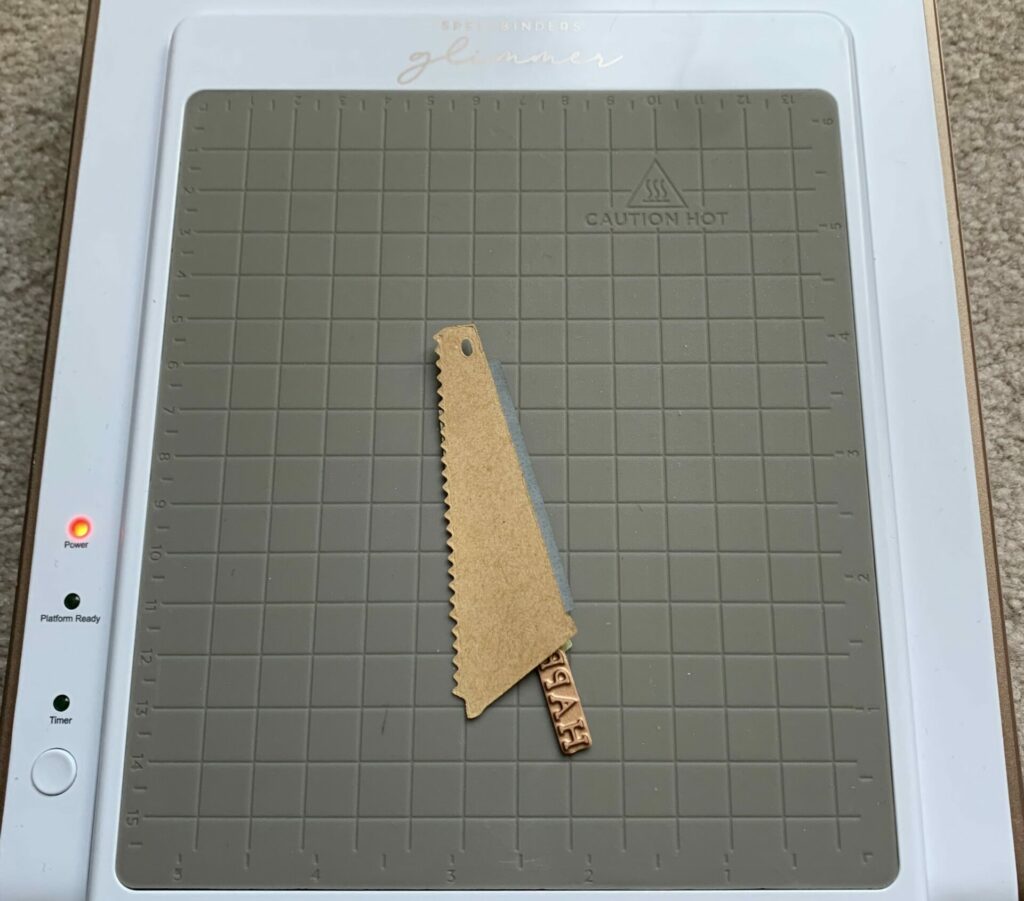
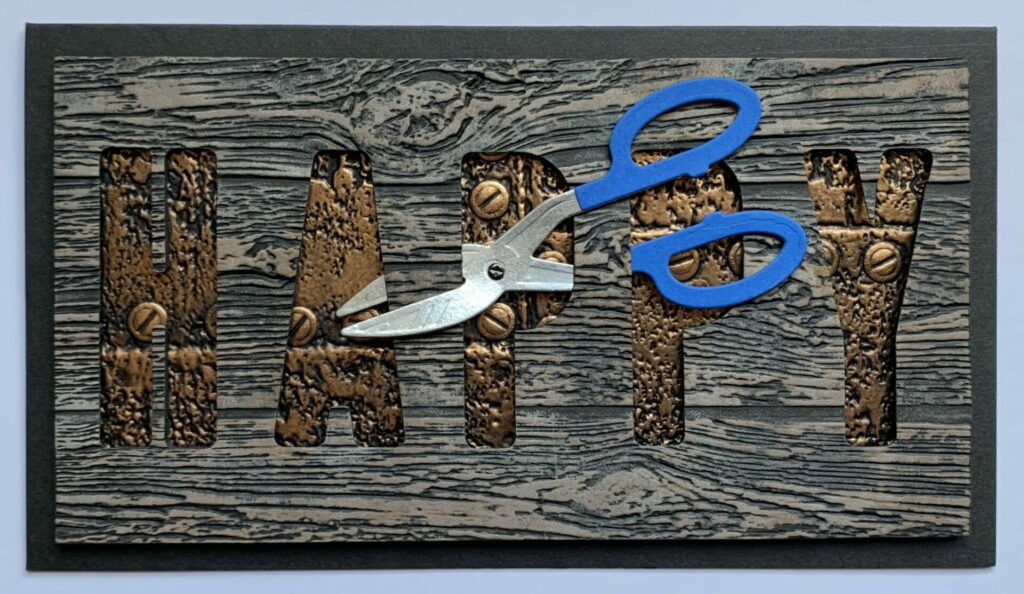
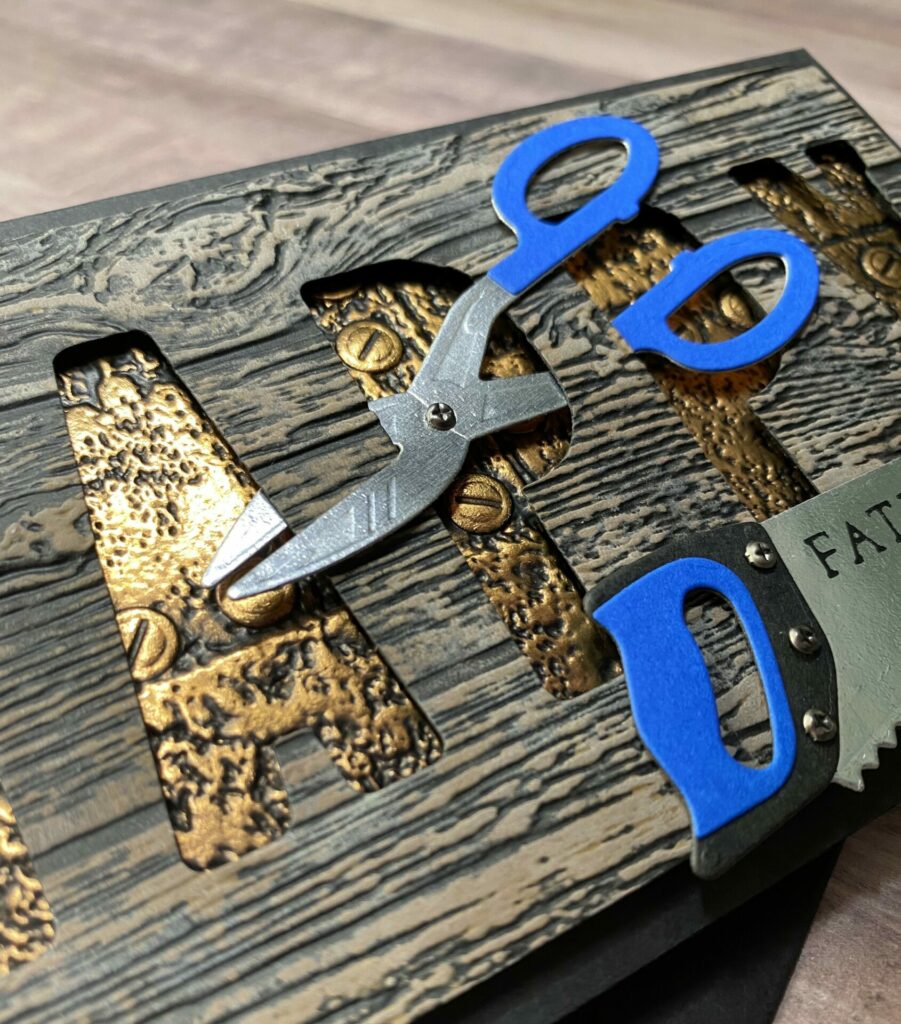
Die Cutting the Tools
- Black Heavweight Cardstock – Cut the hammer and saw handle
- Blue Cardstock – Cut the hammer handle layer, snips handles (right & left), and saw handle layer.
- Metallic Silver Cardstock – Cut the snips and saw blade.
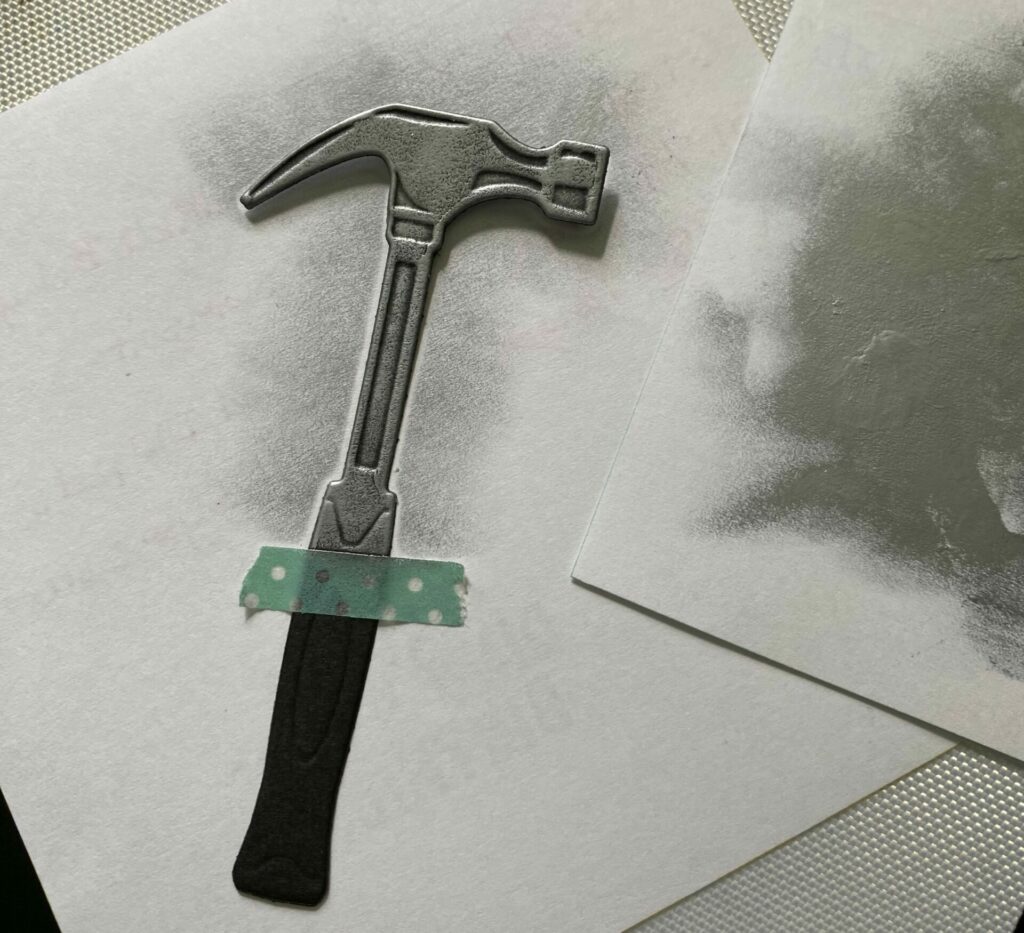
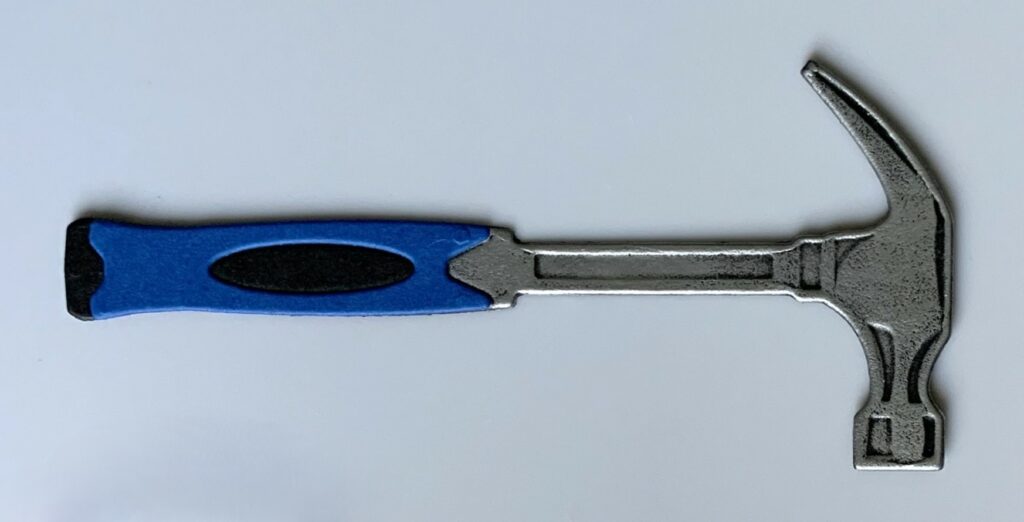
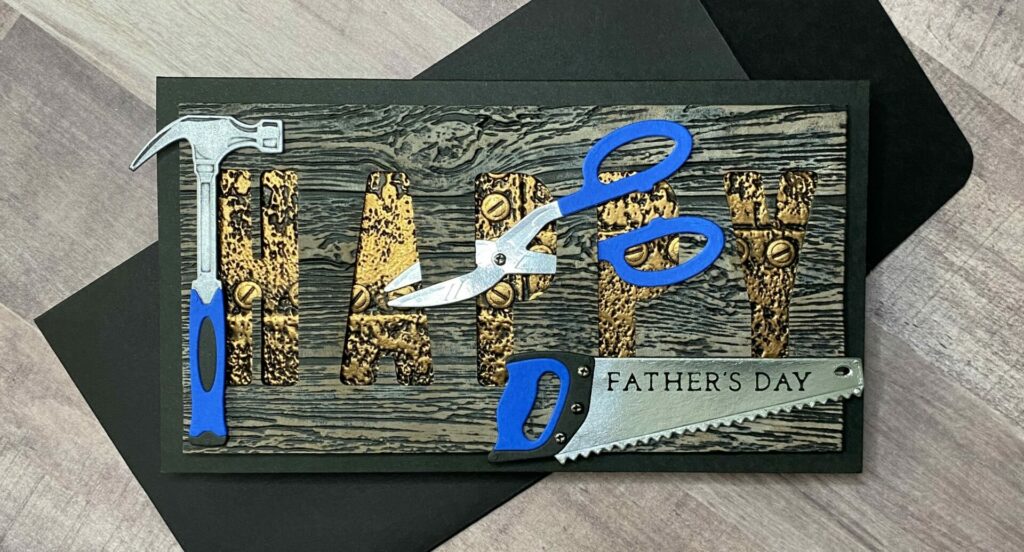
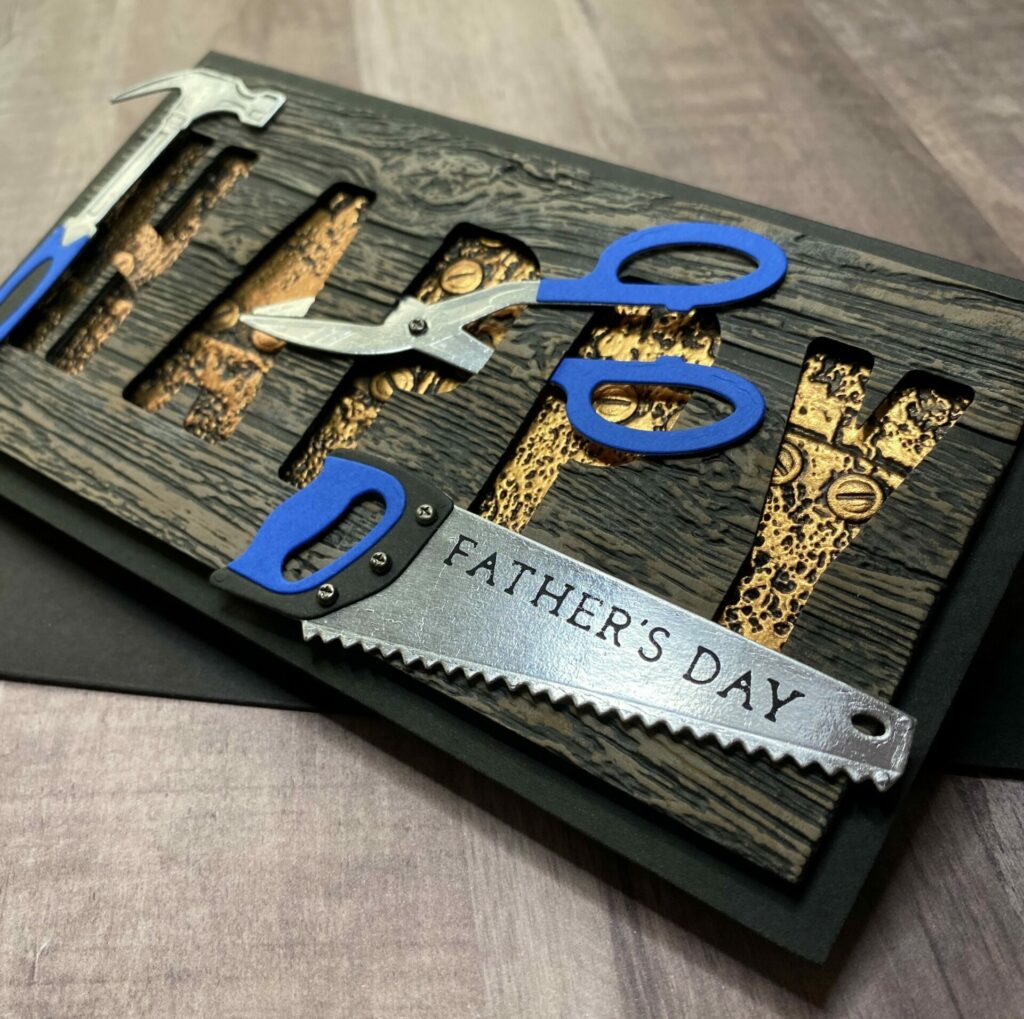
Making the Hammer
Luster Wax Tips
Firstly, you’ll want to take a little bit of luster wax out of the jar with your finger tip and rub it onto the post-it note or scrap piece of paper. This removes some of the excess wax globs and will save you from ruining your project with hot spots of wax all in one area. It also makes for an even application of the luster wax. Then, rub the wax onto the high points of the embossing. Here you’ll want to use a light touch and take your time. Continue this process until all the panel is covered to your liking. When finished, wash the luster wax off your hands with soap and water.
- Mask off the oval handle with tape or a post-it note.
- Apply silver luster wax to the upper portion of the hammer.
- Remove the mask and attach the blue handle layer with glue.
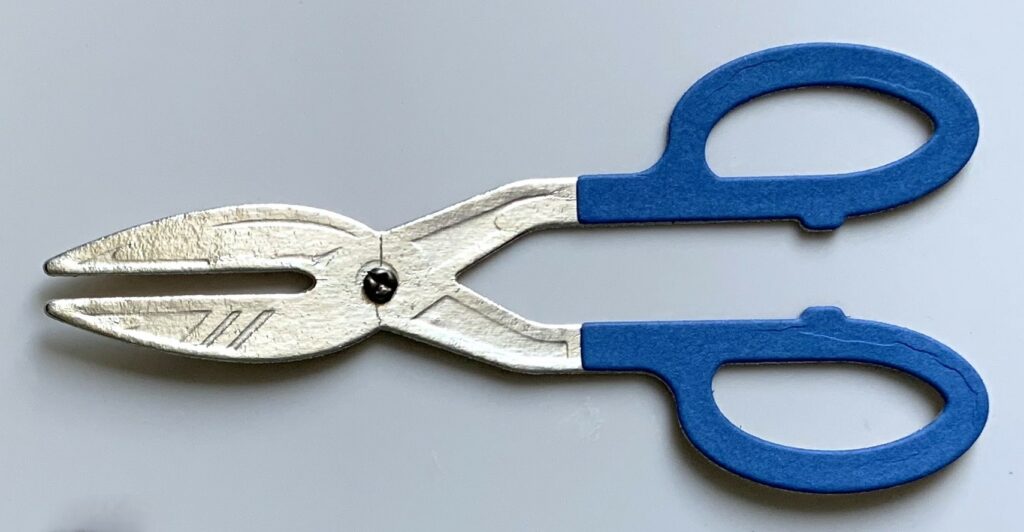
Making the Snips
- Glue the left and right blue snips handles on top of the silver snips layer.
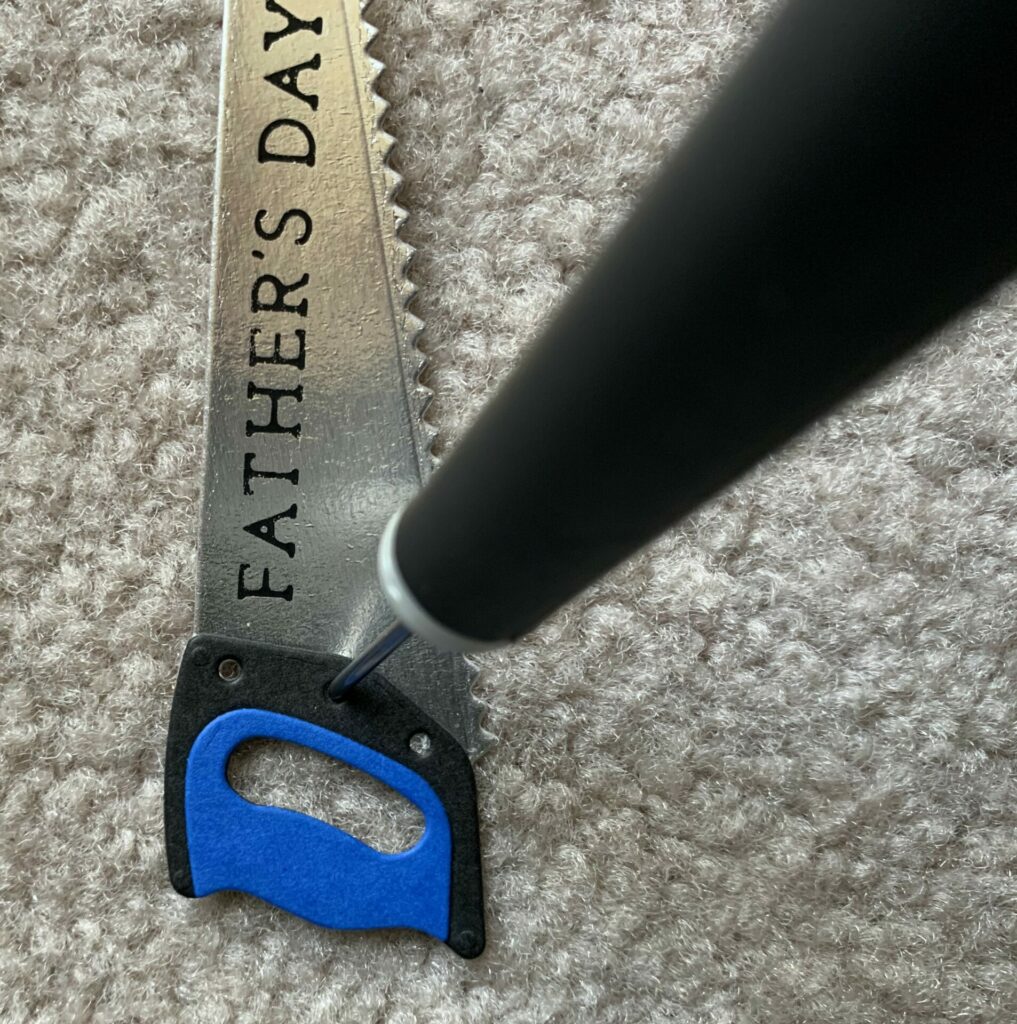
- Using the retractable craft pick, create a hole in the center circle of the snips.
- Place a silver brad into the hole and secure it by flattening the prongs on the back.
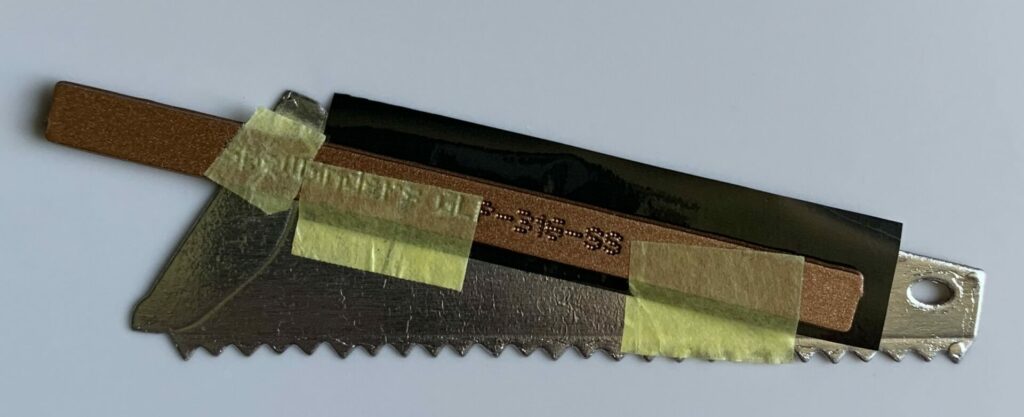
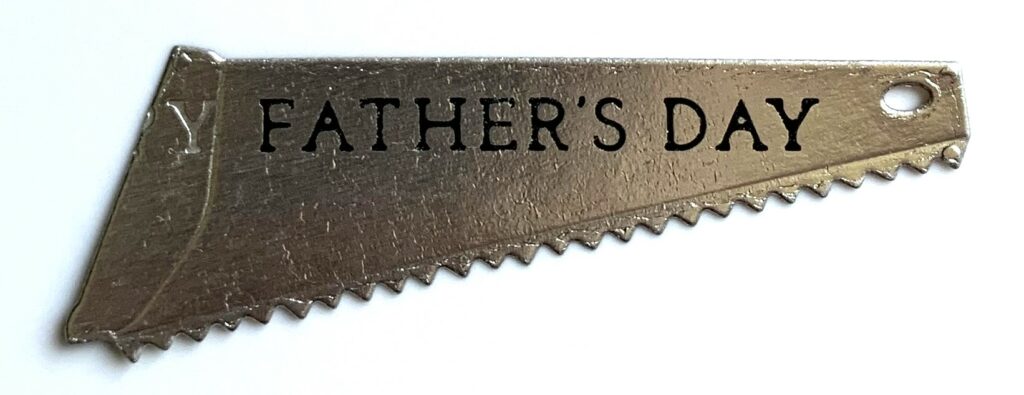
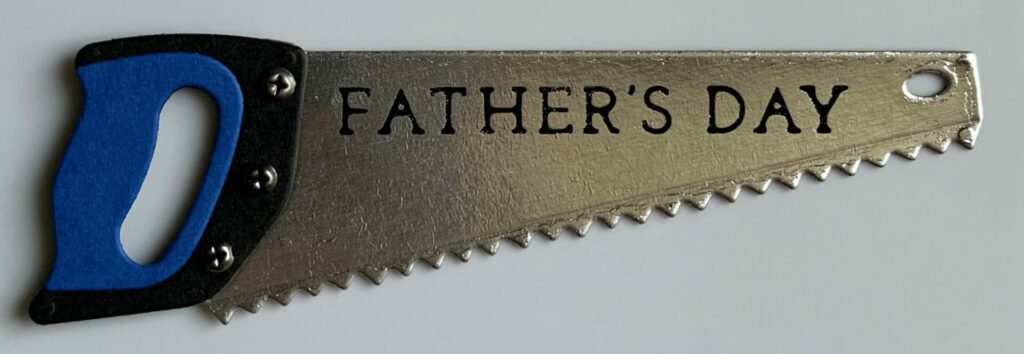
Making the Saw
Glimmering
- Place the “Father’s Day” portion of the sentiment plate face down onto the silver saw die cut.
- Align it with the top straight edge of the saw. Position the plate so that the “Y” from “HAPPY” is to the left of the line where the handle will be attached.
- Place two pieces of tape on the plate to create a hinge.
- Lift up the plate and insert a strip of black foil (with the black side facing up) underneath.
- Flip it over and place it vertically on the heated Glimmer platform. Make sure the plate is against the platform and the die cut saw is on top.
- Glimmer the sentiment and slowly roll it through your die cutting machine.
- When cooled remove the tape and peel away the foil to reveal the foiled sentiment.
Assembly
- Glue the black and blue handle layers to the saw. Then, allow the glue to dry.
- Using the retractable craft pick, carefully create a hole in each of the three circles on the saw handle.
- Place a silver brad into each hole and secure it by flattening the prongs on the back.
Adding Dimension
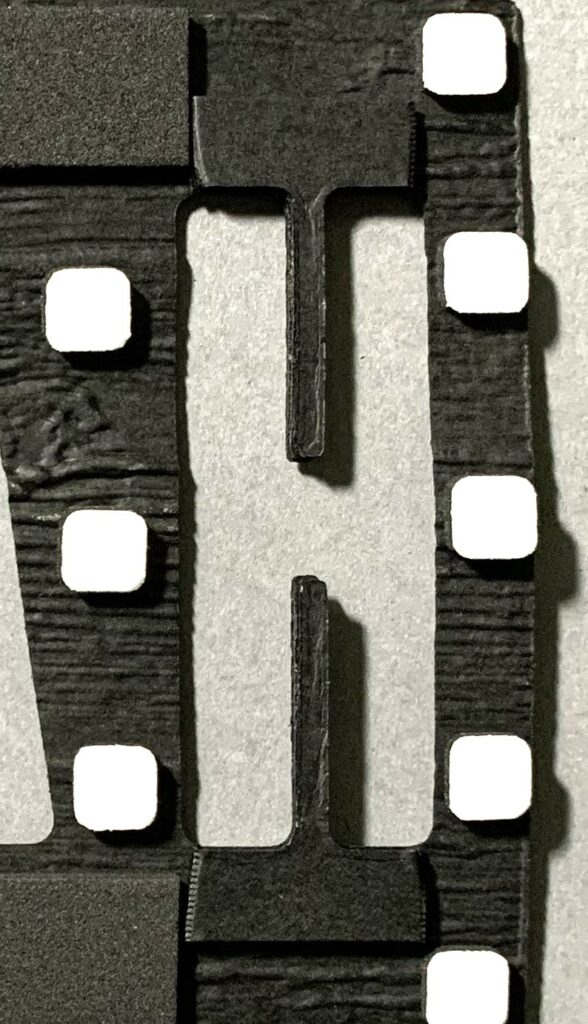
- Firstly, cut the letter “H” from black heavyweight cardstock four times. (Keep the outside of the die cut, not the letter itself.)
- Glue all four pieces on top of each other and place something heavy on top of them while they dry.
- Trim off the sides of the “H” and a quarter inch from the top.
- Glue it behind the letter “H” on the embossed “HAPPY” panel and place something heavy on top of it while it dries.

Adding the Tools
- Weave the snips tool in between the “APP” letters. Add thin foam squares behind the tool for dimension.
- Adhere black foam squares/fun foam to the back of the “HAPPY” panel.
- Peel off the release paper from the foam squares. (I recommend applying some glue to the foam squares. This allows for flexibility in adjusting its placement on the card.)
- Adhere it to the front of the card base, centering it equally on all sides. (If you used glue, set something heavy on it while it dries.)
- Then, add some thin foam squares to the back of the hammer and saw.
- Adhere the hammer to the left of the letter”H” and the saw to the bottom right of the card.

Happy Craftsman Card Complete!
Hey, congrats! You’ve finished making your happy craftsman Father’s Day card! I really hope you had a blast following this tutorial, just like I did. If you decide to give it a go, don’t forget to tag me (@silversgrove or @grovecrafted) on Instagram. I’m super excited to see what you’ve come up with! Thanks for checking this out, and I hope it sparked some fresh ideas for your own creations. Have a great time crafting!
If you enjoyed making this happy craftsman card check out my other Father’s Day Card Tutorials for additional inspiration and ideas.

Looking for more handmade masculine card options? Click here to see more.