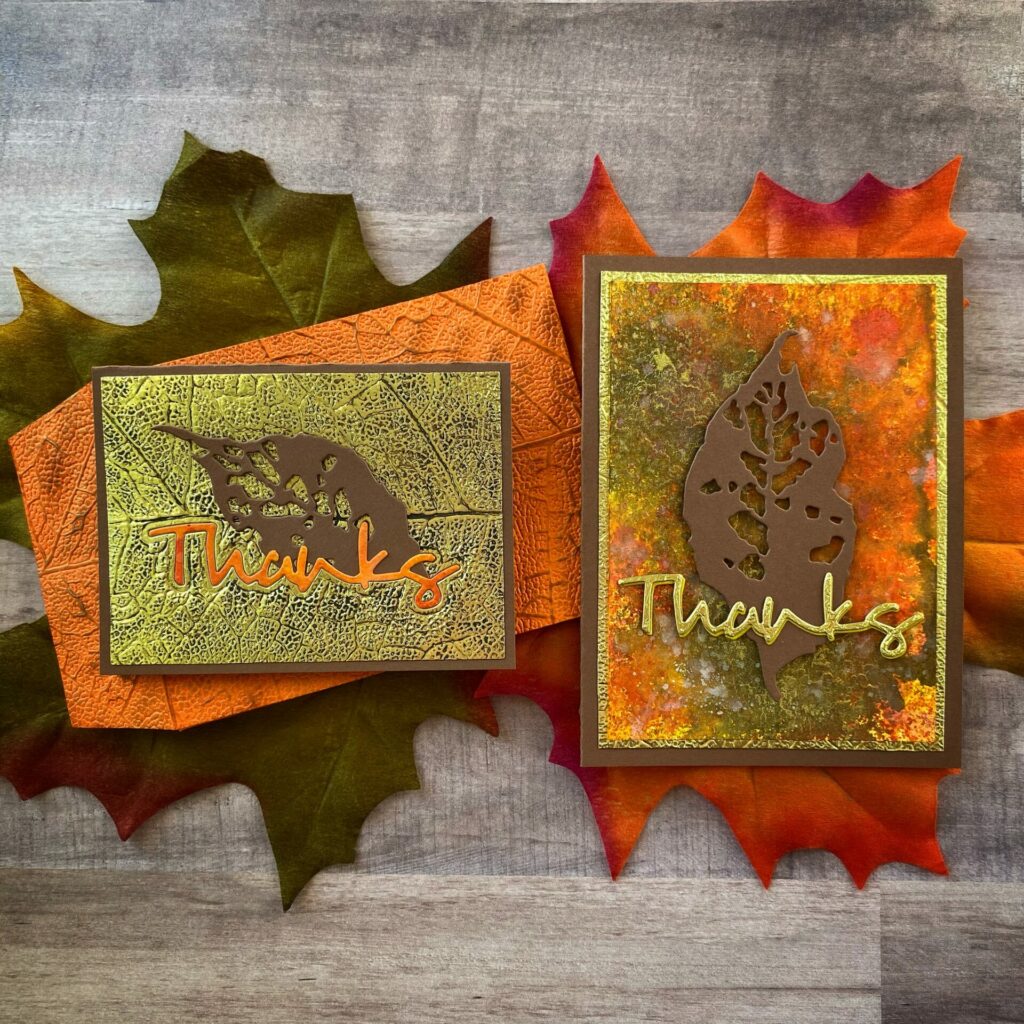
Leaf Thanks Cards
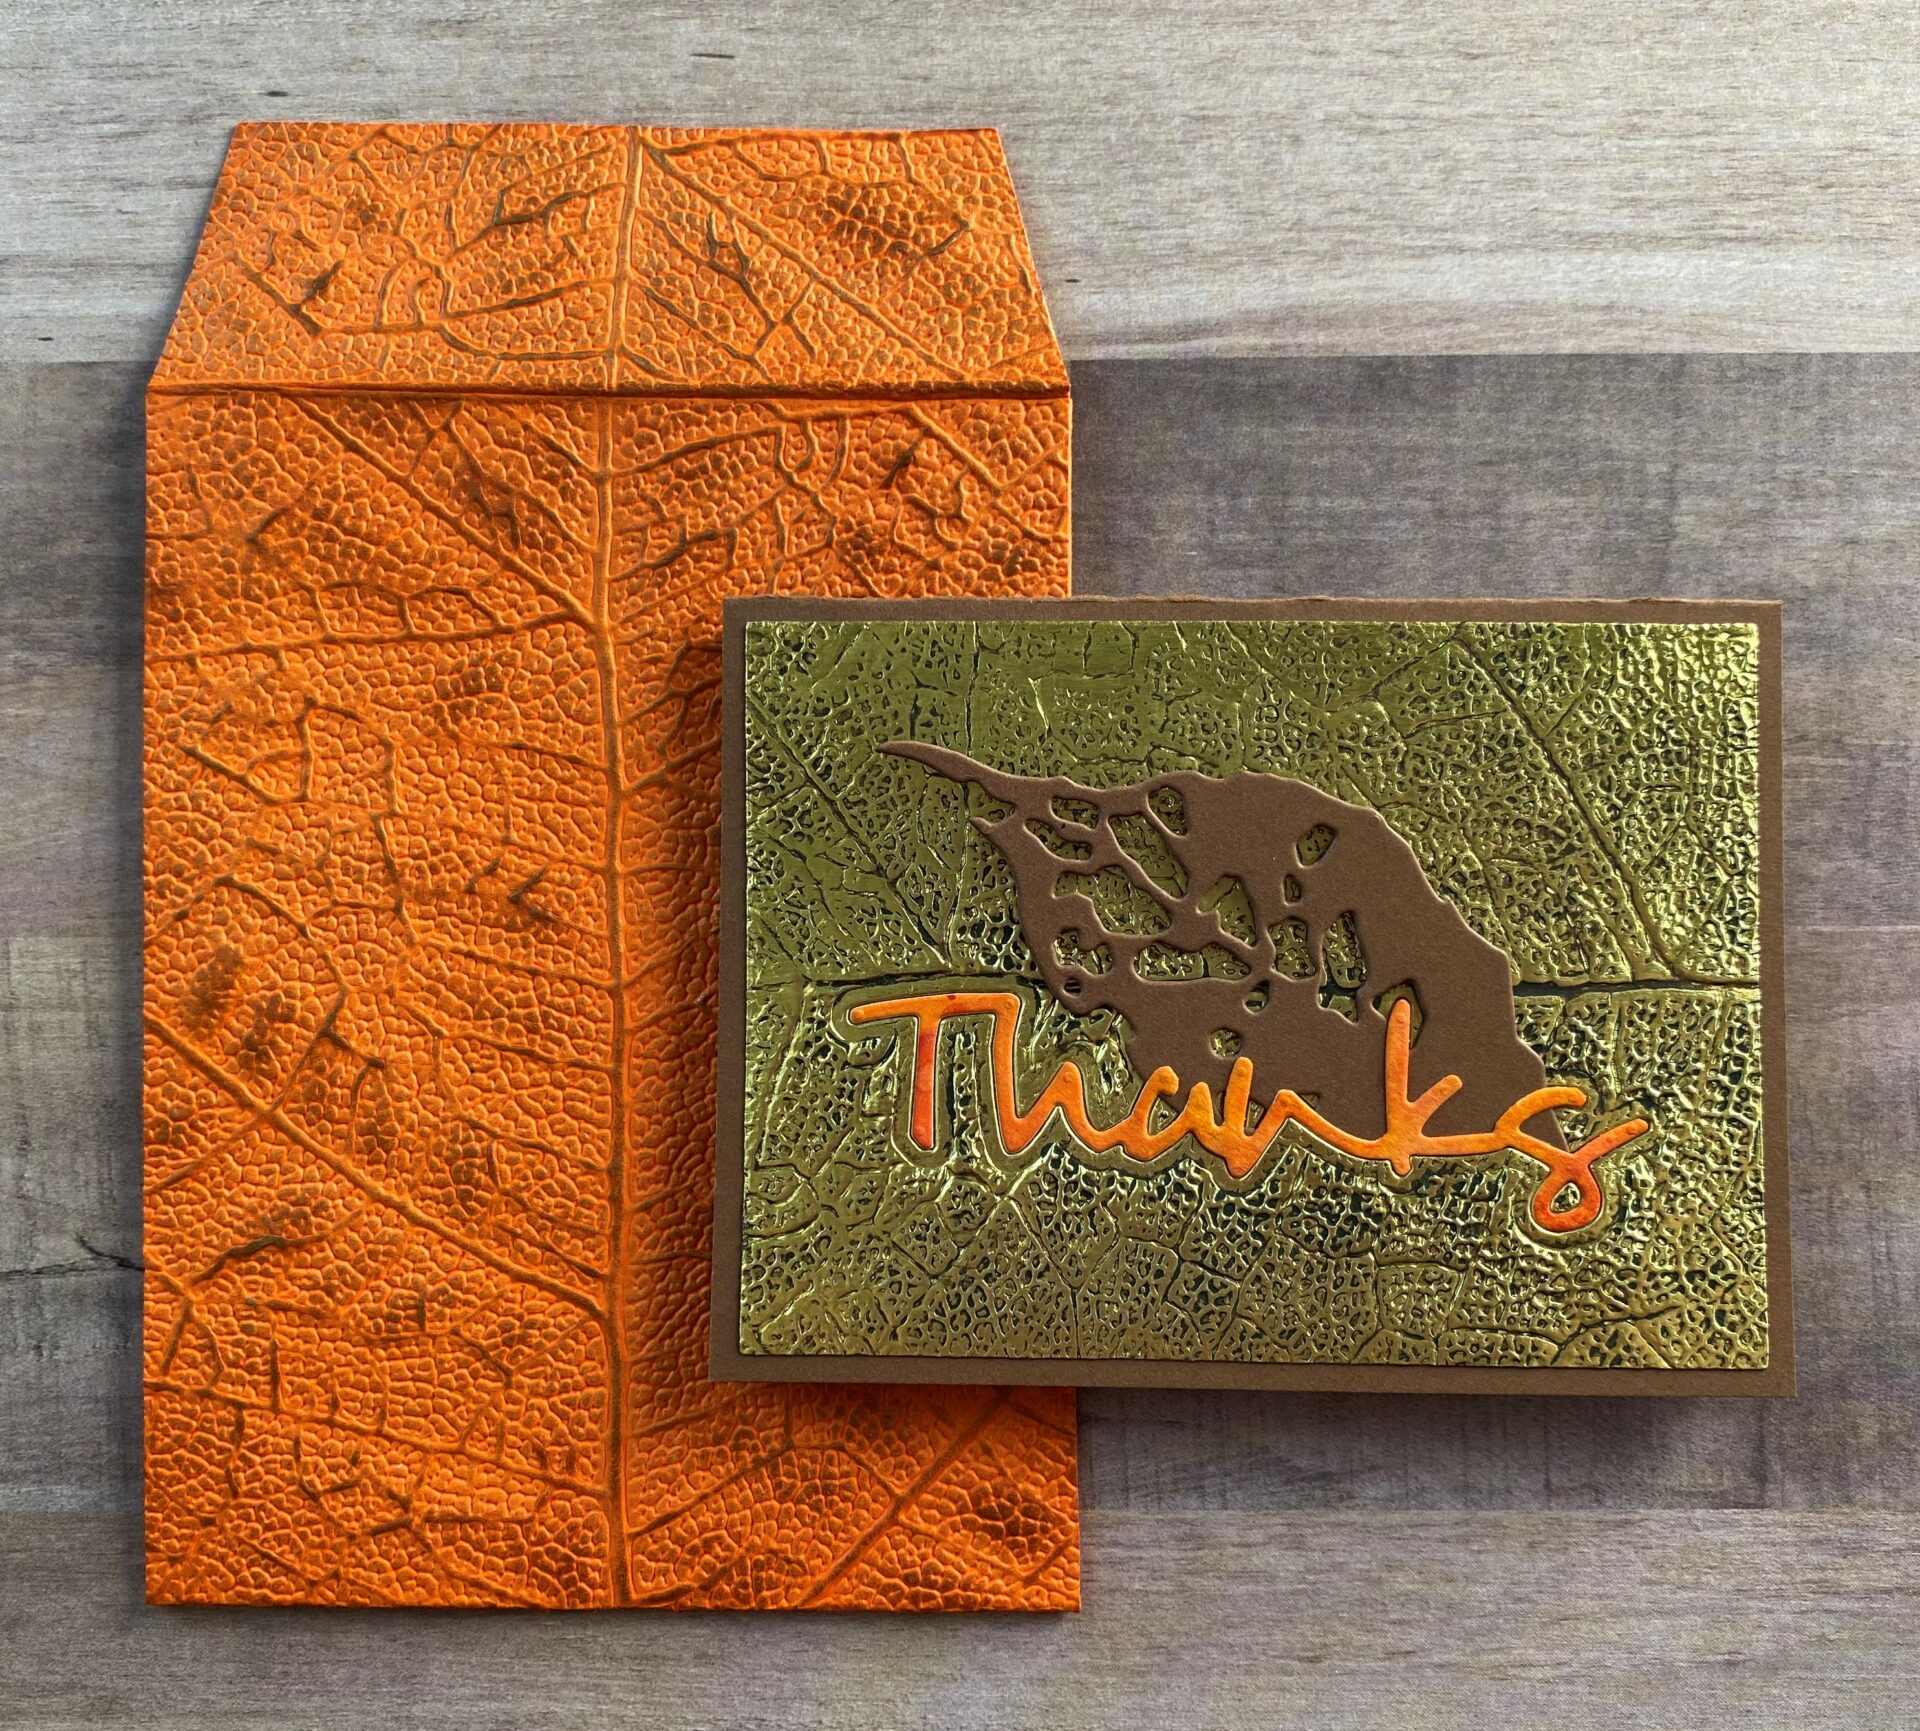
Hello my fellow card makers! HAPPY FALL! Who’s ready for some autumn inspiration? I know it’s technically not fall yet, but for me fall starts September 1st. So to kick off the autumn season, I’m sharing how I made these leaf thanks cards. They feature an inked background full of mica goodness. In the process of making this card, I realized I could get a bonus card out of it. Gotta love a two for one deal! So it’s your lucky day, you get inspiration for two different cards out of one post.
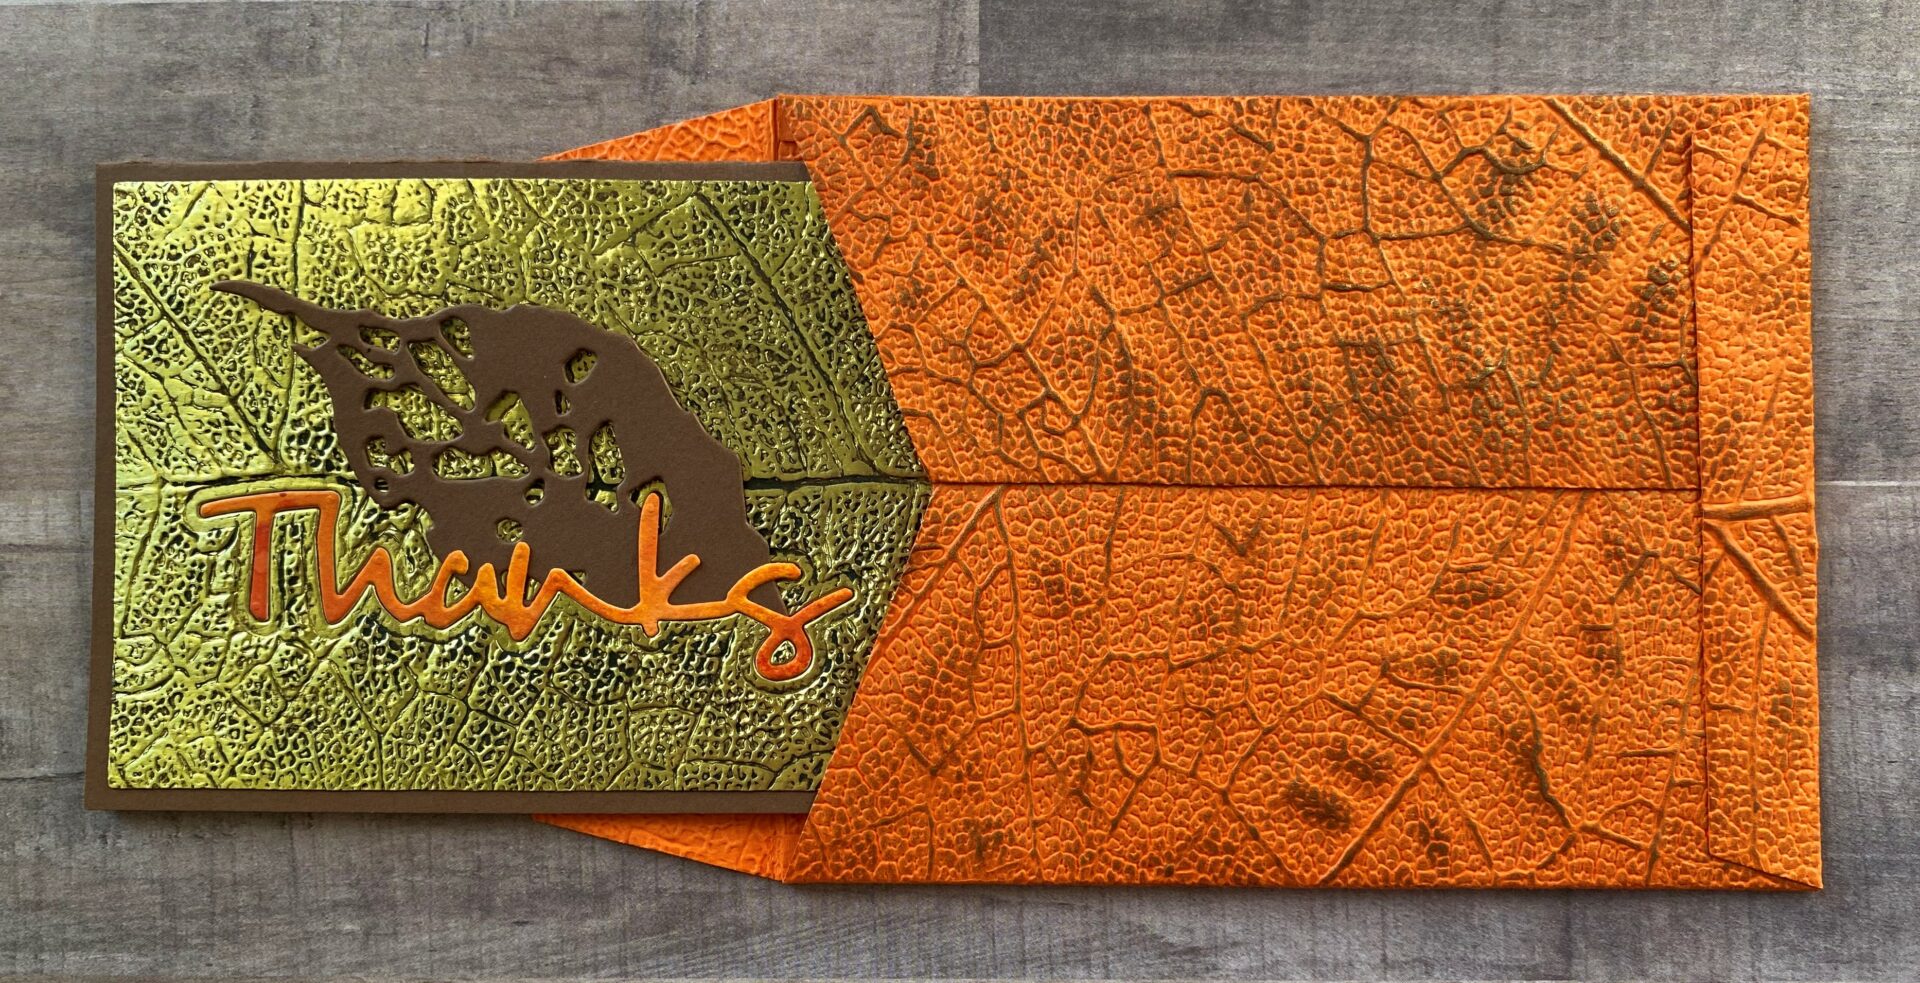
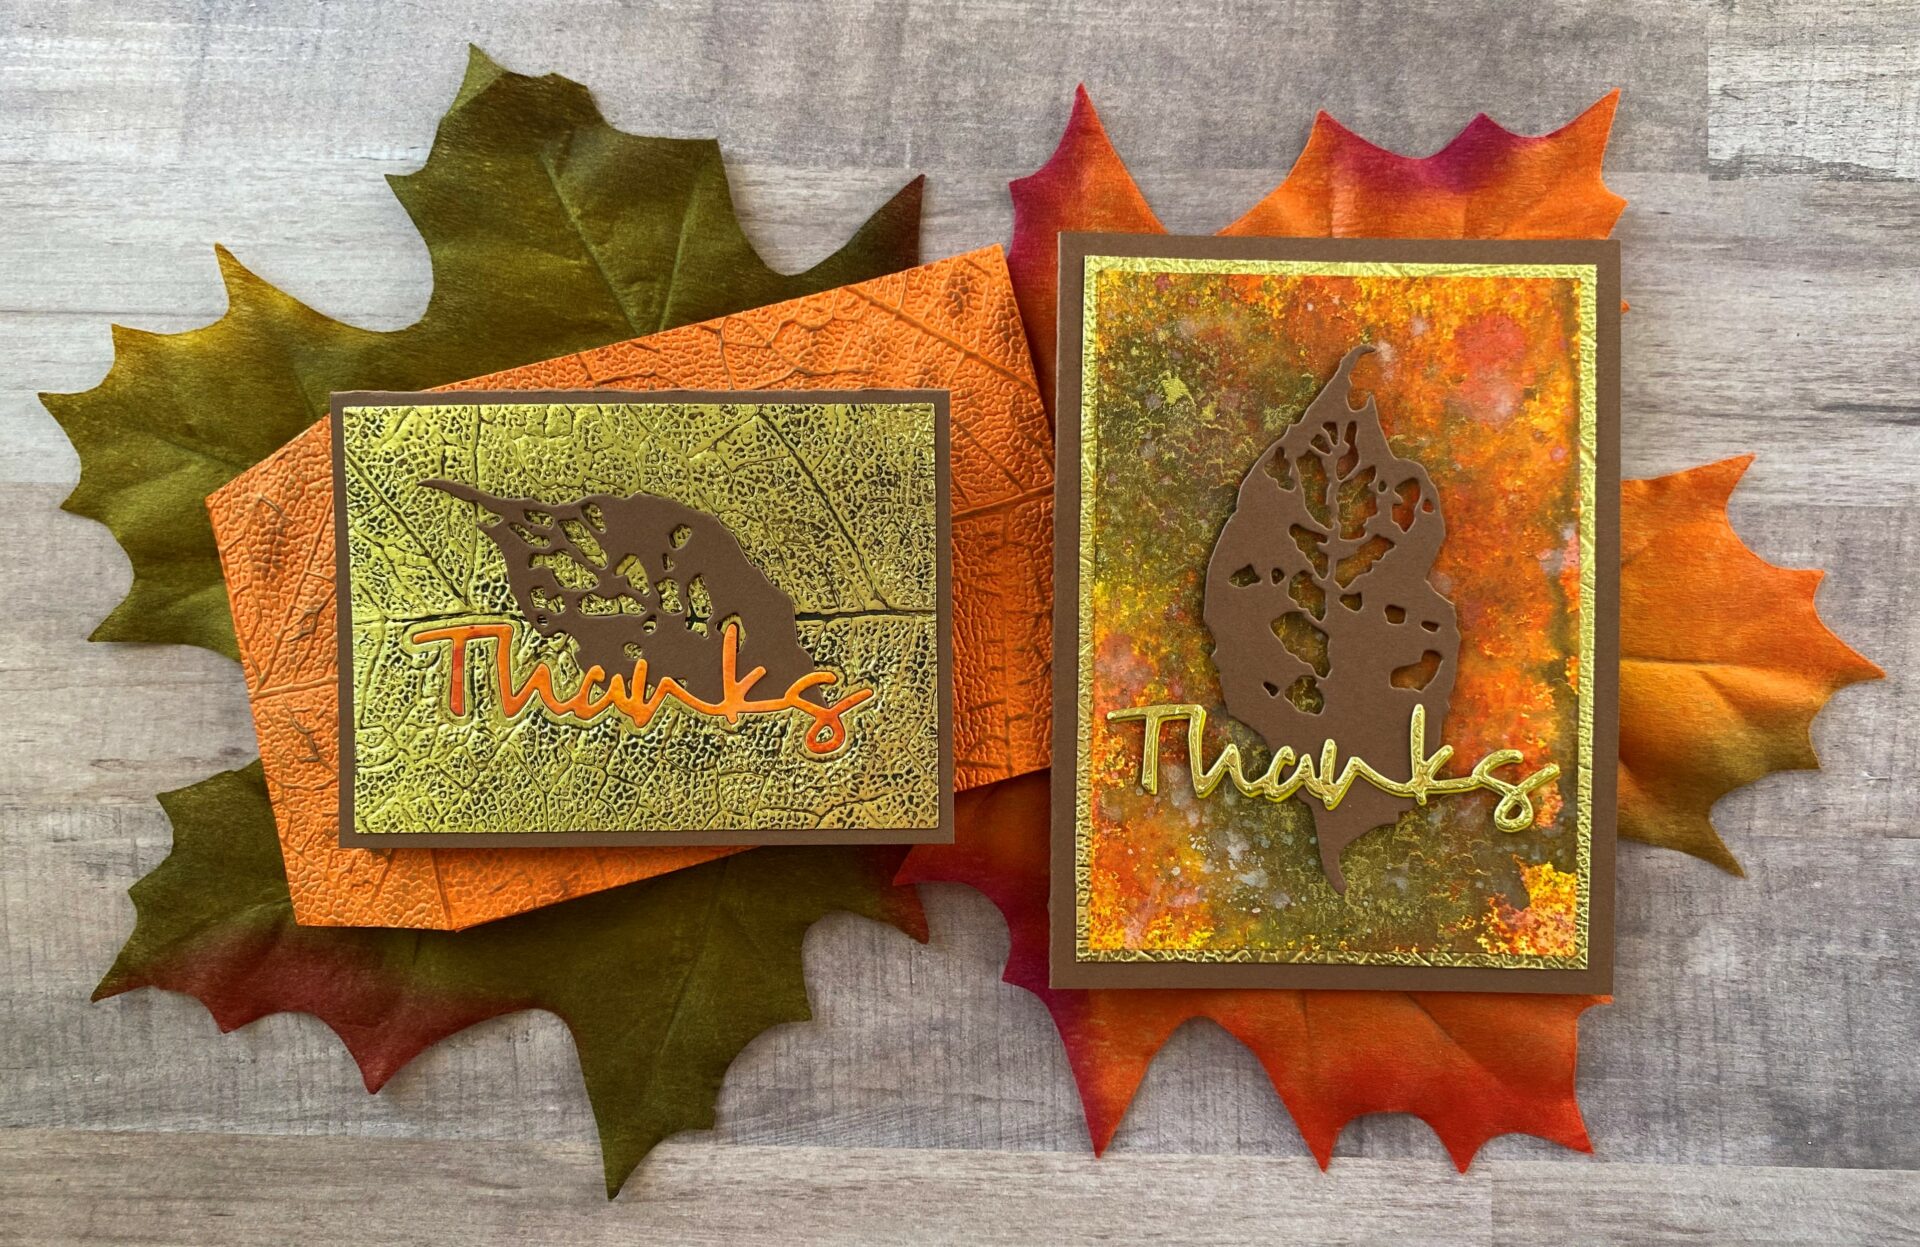
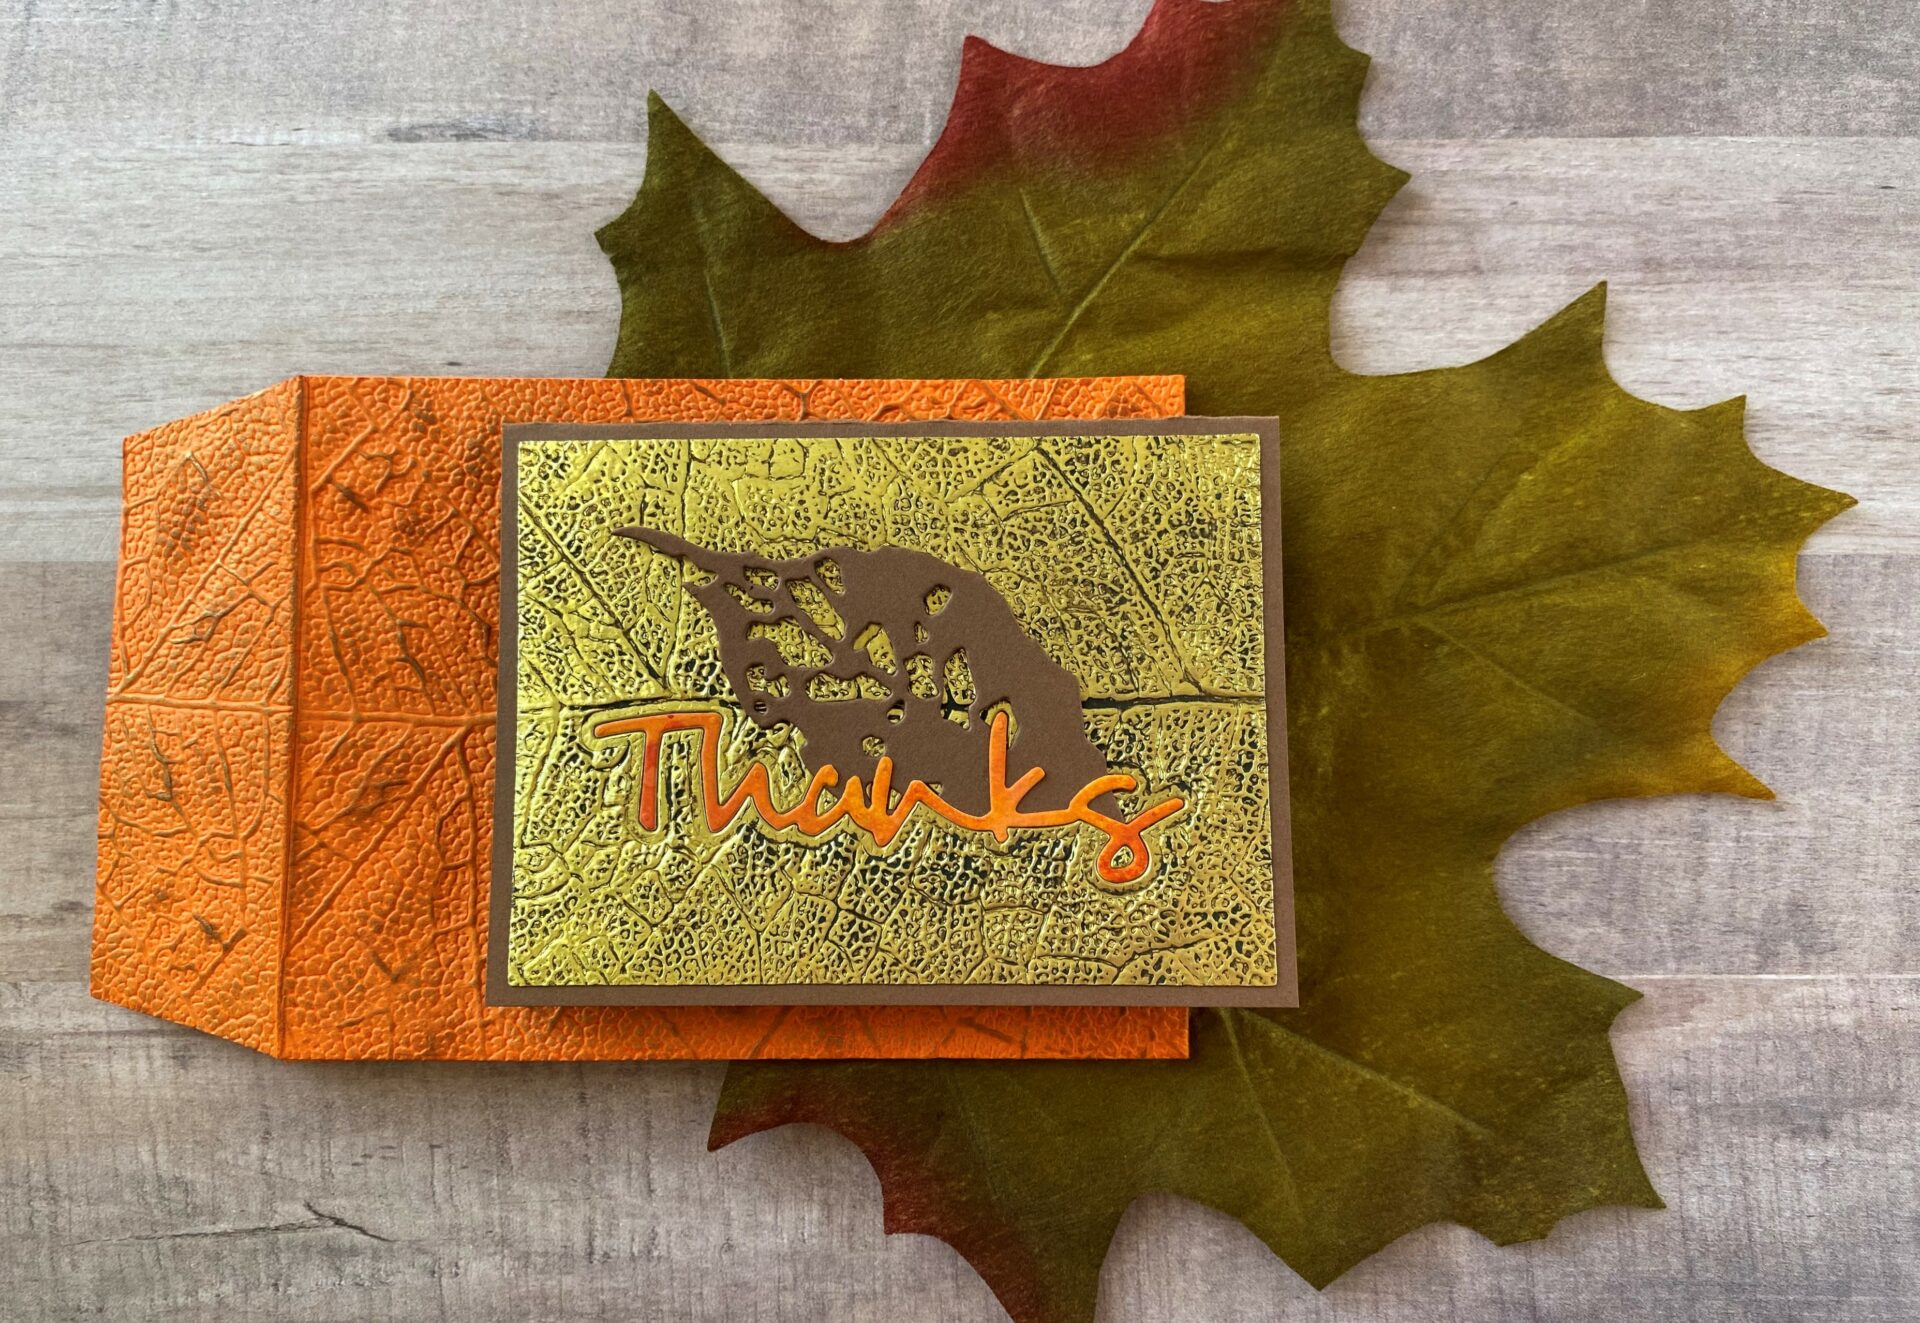
If you want to make the card on the left (pictured below), I will be referring to it as Card A, and if you want to make the card on the right (pictured below), I will be referring to it as Card B. And if you want to make both cards just follow the tutorials for both Card A & B. Also, please note that the envelope is 4BAR and is sized to only fit Card B.
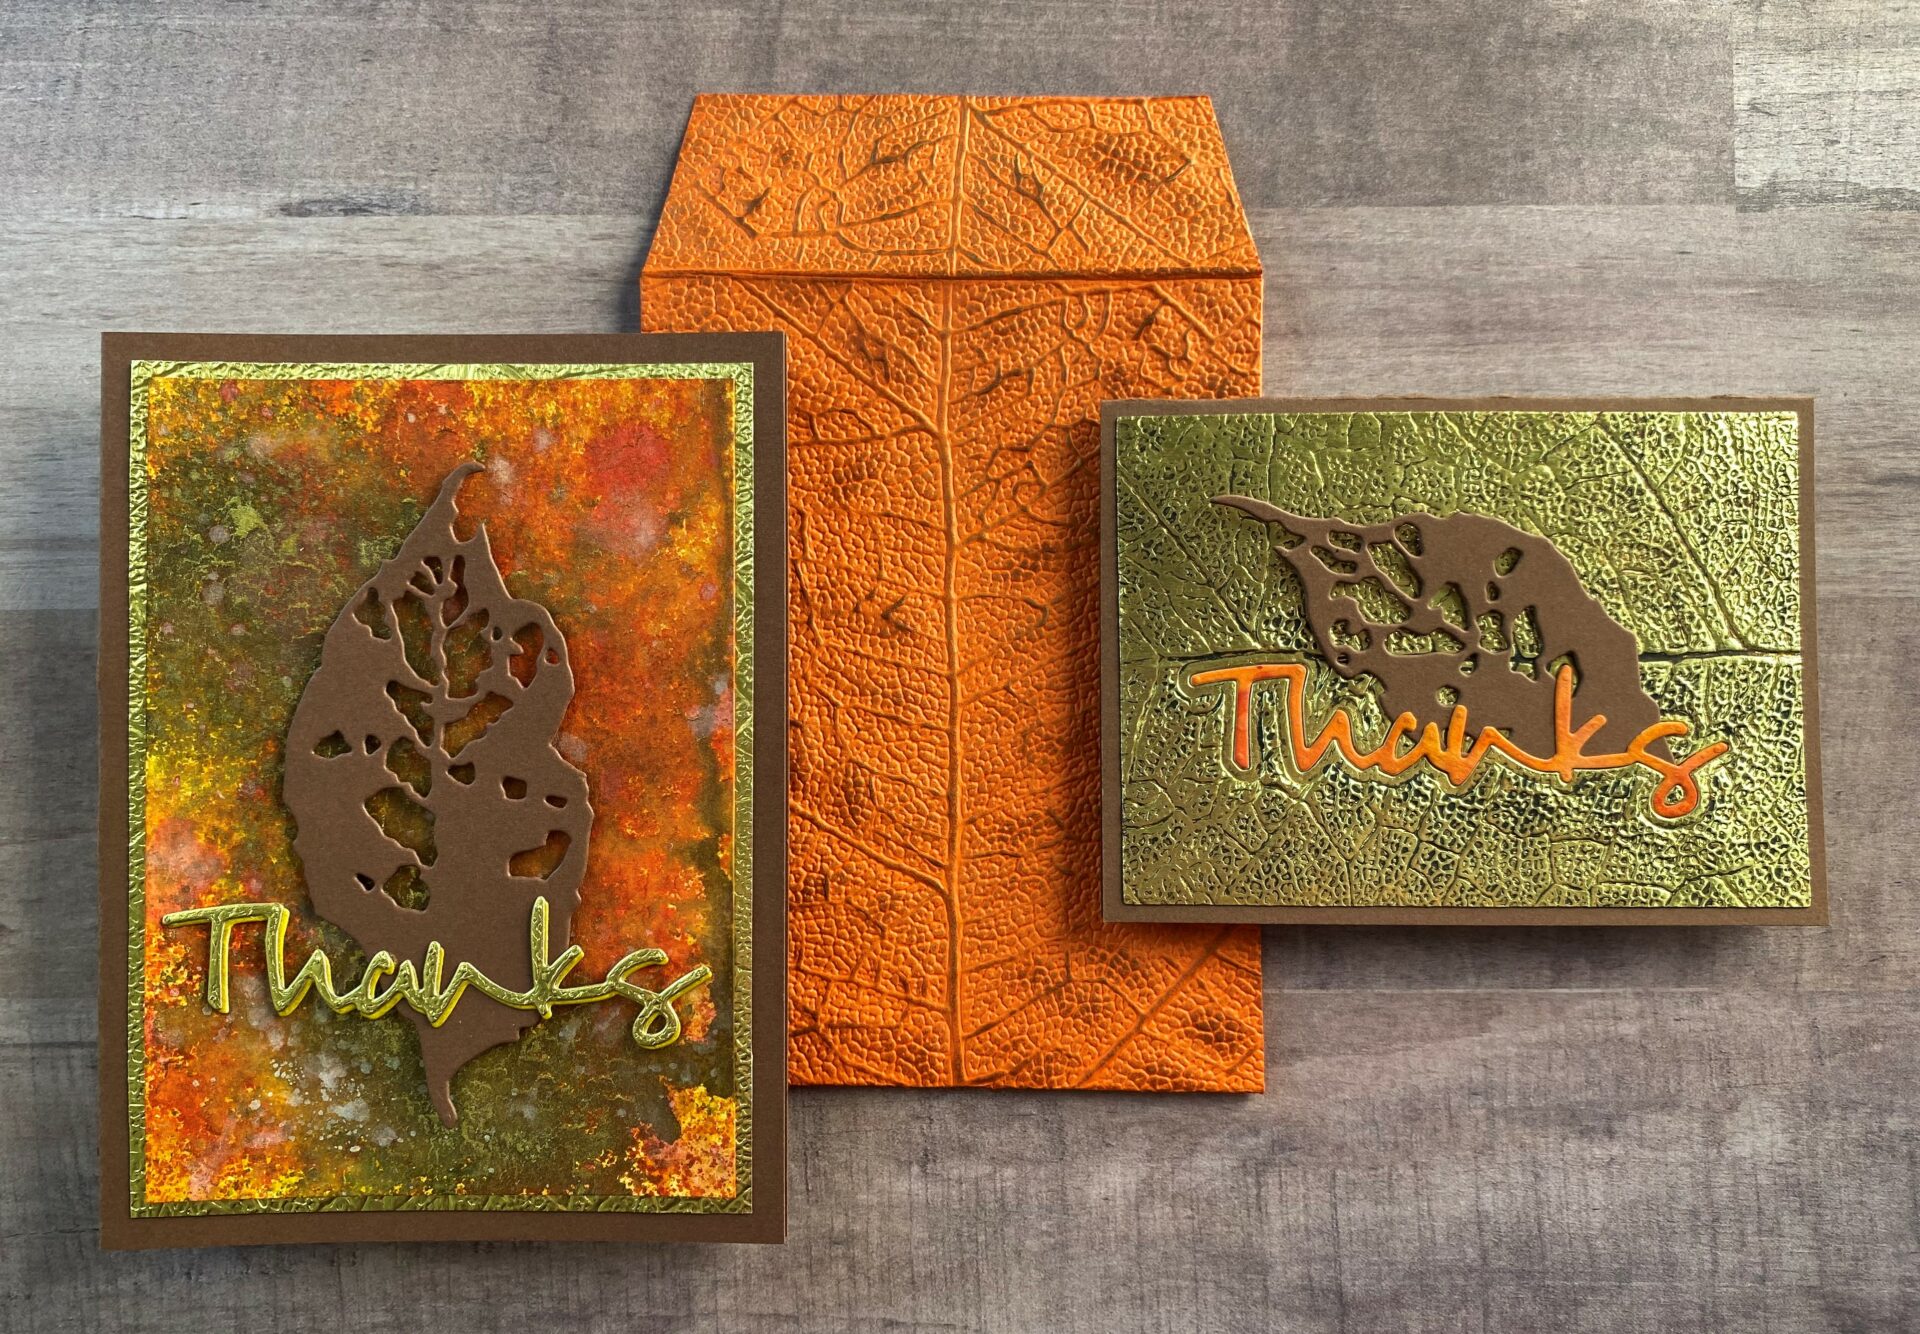
I also made a coordinating envelope for the bonus card (Card B). It features an embossed textured look and feel. If you want to learn how I achieved that, then check out my Leaf Embossed Envelope tutorial. I decided to make mine thanks cards. With it being autumn, I thought it fit perfectly with the theme and fall color pallet. However, you could change the colors and this card would be perfect for almost any occasion. Also, the sentiment could easily be changed to fit your specific need. These could also be birthday, hello, sympathy, or thinking of you cards. So if you want to learn how I made these leaf thanks cards, then just keep reading.
Link Abbreviations
- AMZ – Amazon*
- Sb.com – Scrapbook.com*
- SIZ – Sizzix*
- SSS – Simon Says Stamp
- RI – Ranger Ink*
- BA – Blick Art Materials*
Full Disclosure: This post contains affiliate links which are indicated with an (*). If you click on an affiliate link and later make a purchase, I may receive a small commission. Clicking on an affiliate link which earns a commission does NOT result in additional charges to you or cost you anything extra. Money earned via affiliate links helps pay the fees to keep this blog up and running. Thank you so much for shopping through my links to show your support for the brands that we love and the products that I share!
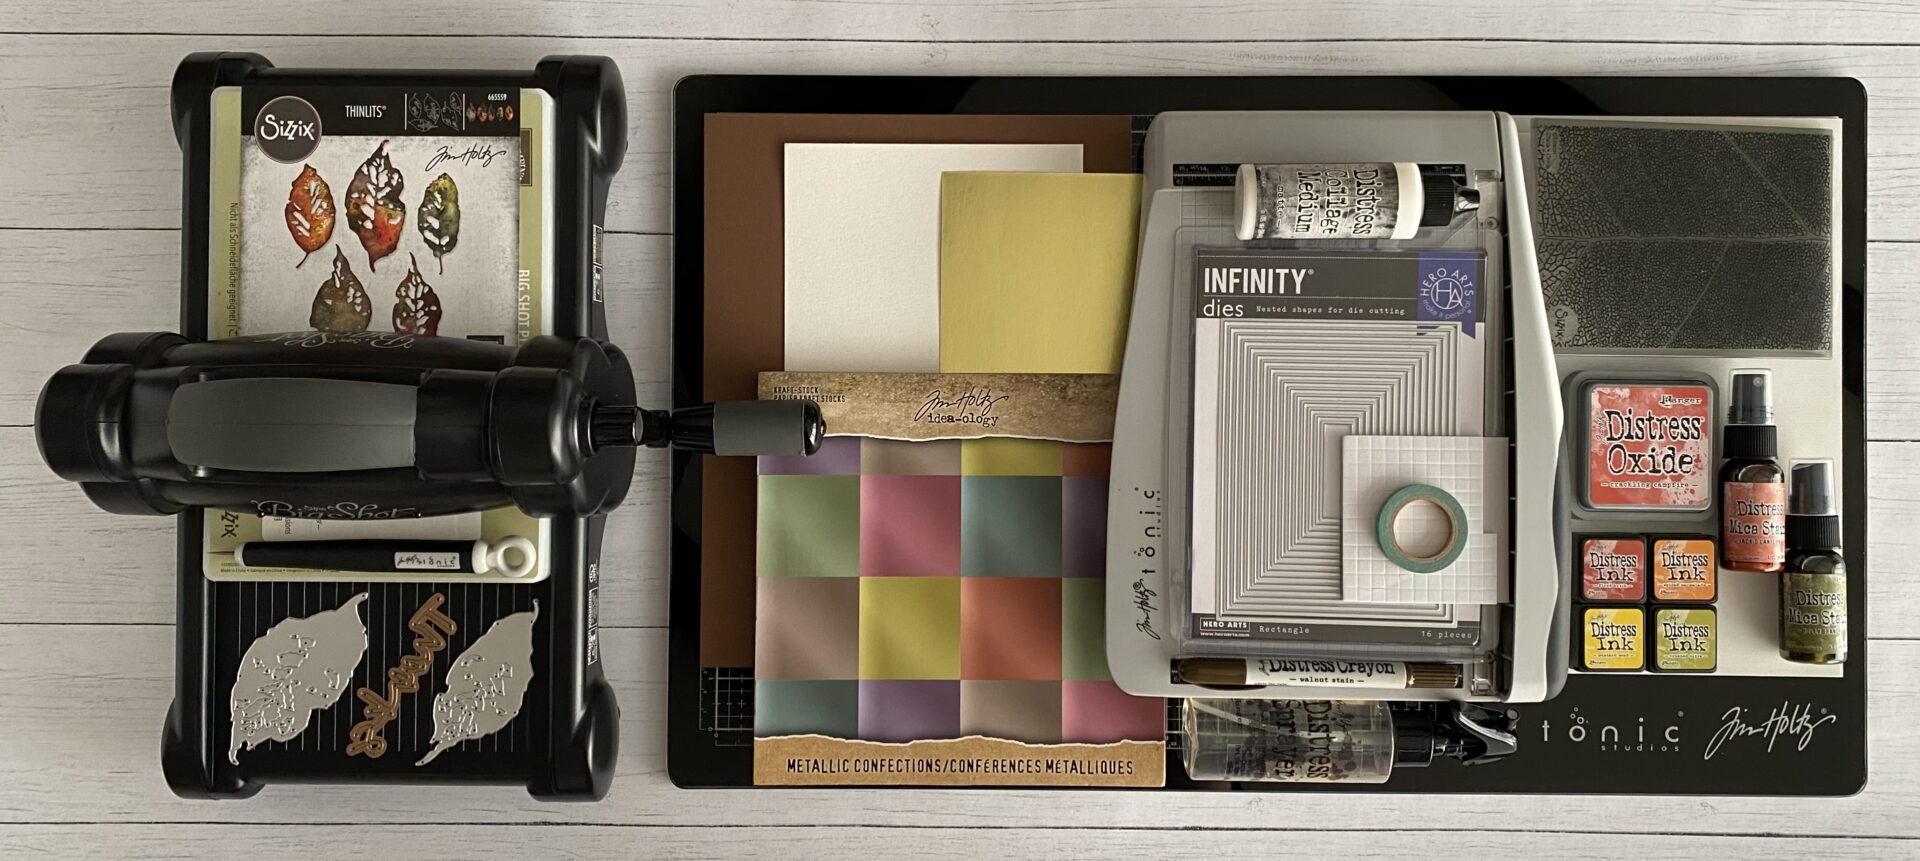
Supplies Used For Cards / Substitutions:
- Sizzix Big Shot | SIZ / Any die cutting machine
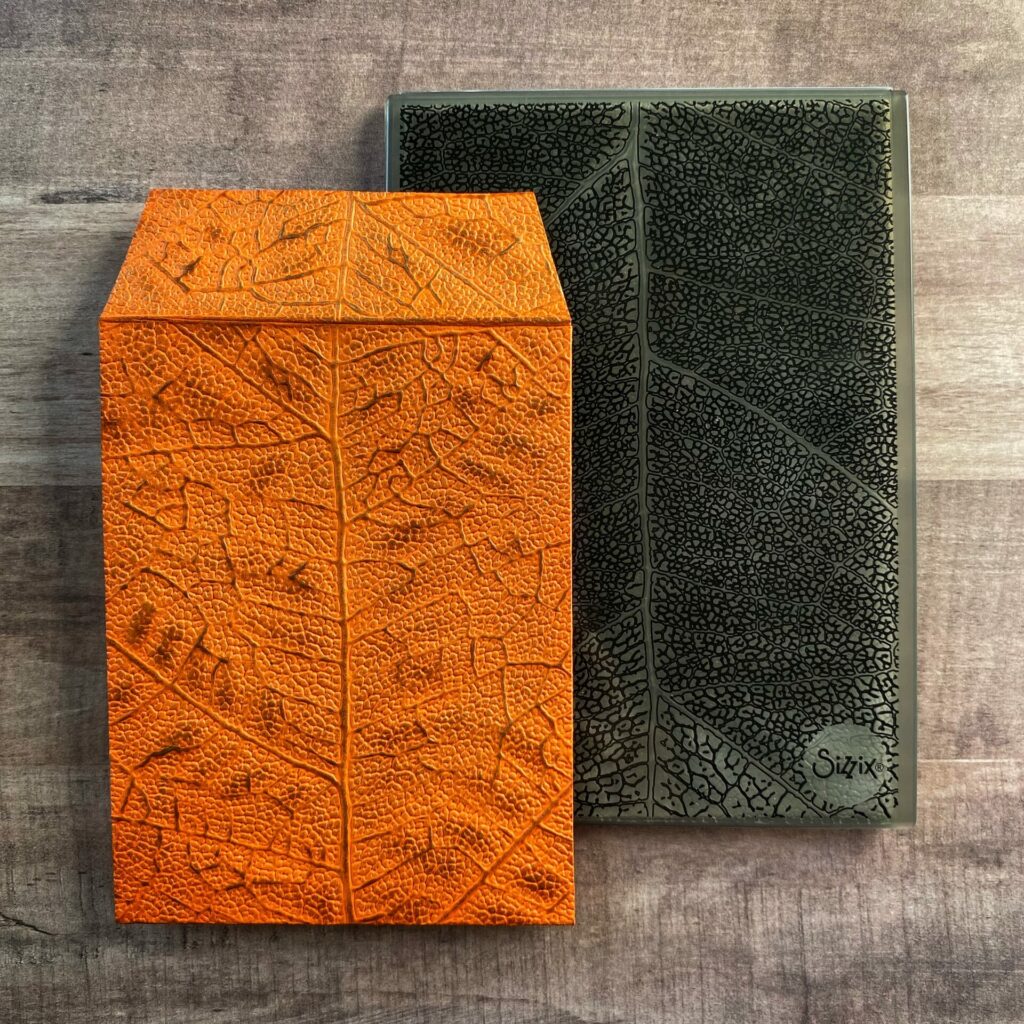
- Sizzix 3D Embossing Folder – Leaf Veins #664488 | Sb.com | SIZ | AMZ / Any embossing folder
- Spellbinders Shapeabilities Thanks Die – Phrase Set One S4-563 (discontinued) / Any thanks or sentiment die
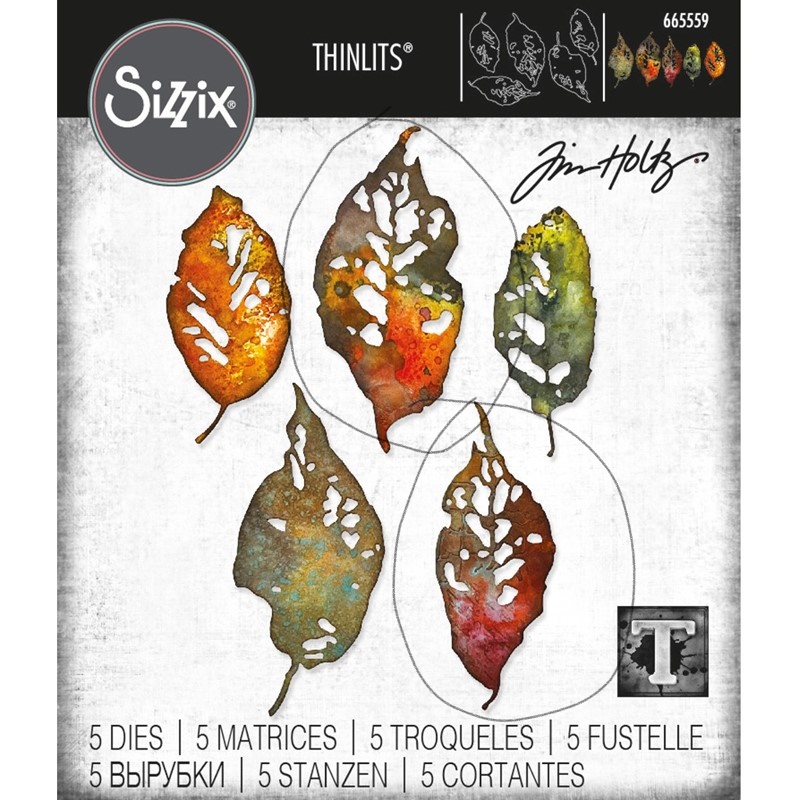
- Sizzix Tim Holtz Thinlits Dies – Leaf Fragments #665559 | SIZ / Any leaf die
- Hero Arts Nesting Rectangle Dies – Di198 | Sb.com | SSS / Any frame die
- Brown Cardstock – two 8½” x 11″ or one 12″ x 12″ / Any color cardstock
- Canson XL 140lb Watercolor Paper – Cold Press | BA | AMZ / Any watercolor paper
- Idea-ology Metallic Kraft Stock – Confections – Green Gold Shade | SSS / Any metallic cardstock
- Distress Crayon – Walnut Stain | SSS / Distress paint
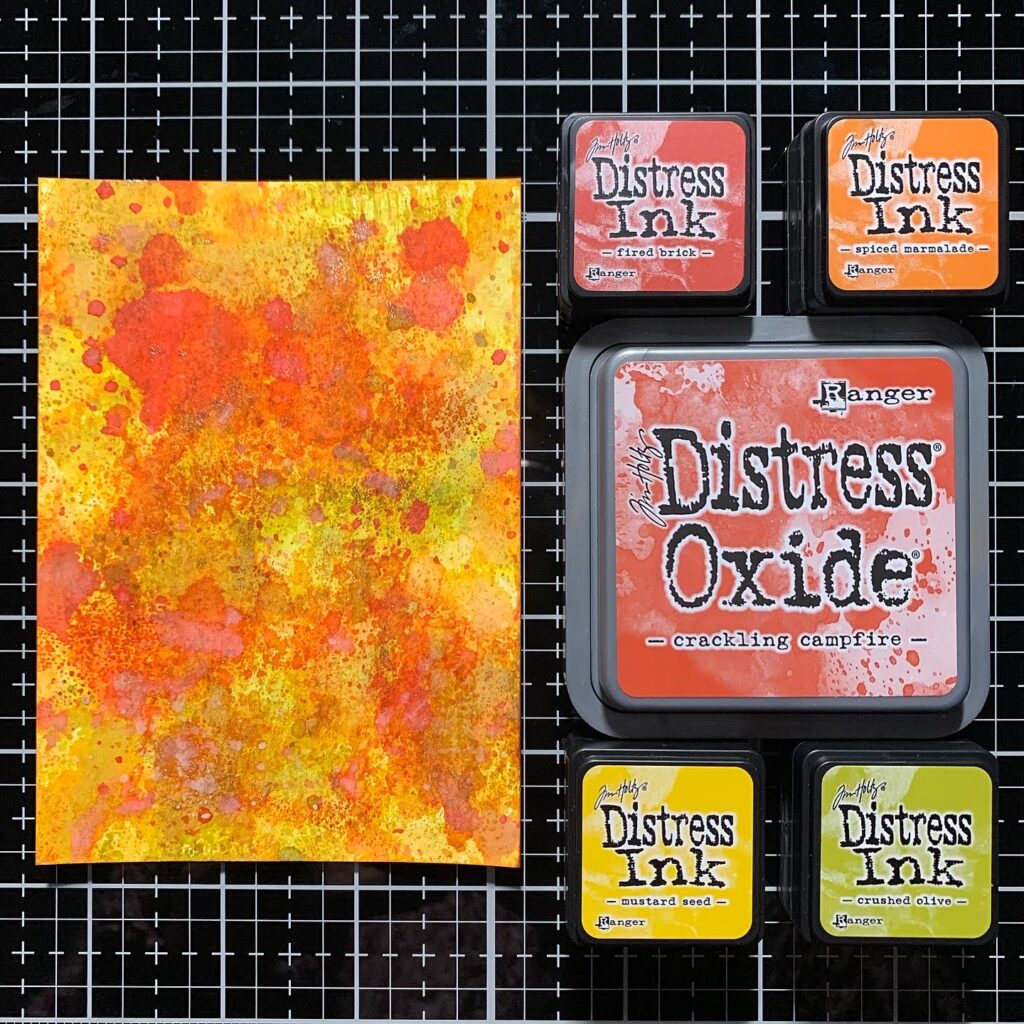
- Distress Oxide Ink – Crackling Campfire | Sb.com | RI | SSS / Optional
- Distress Ink – full size & mini ink pads linked below / Distress spray stains or any watercolors
- Distress Mica Stain / Any color mica stains or metallic watercolors
Tools Used For Cards / Substitutions:
- Tim Holtz Glass Media Mat | Sb.com | AMZ | SSS / Non-Stick Craft Sheet
- Tim Holtz Comfort Paper Trimmer | Sb.com | AMZ | SSS / Any paper trimmer
- Ranger Heat It Craft Tool – US | Sb.com | SSS / Optional
- Distress Collage Medium – Matte | Sb.com | RI / Any liquid adhesive
- Tim Holtz Splat Box | Sb.com | SSS / Optional
- Spray Bottle with water | Sb.com | AMZ / Any spray bottle with water
- Tim Holtz Retractable Craft Pick | Sb.com | SSS | AMZ | / Any die pick
- Foam Squares | SSS / Optional
- Washi Tape / Any low tact tape
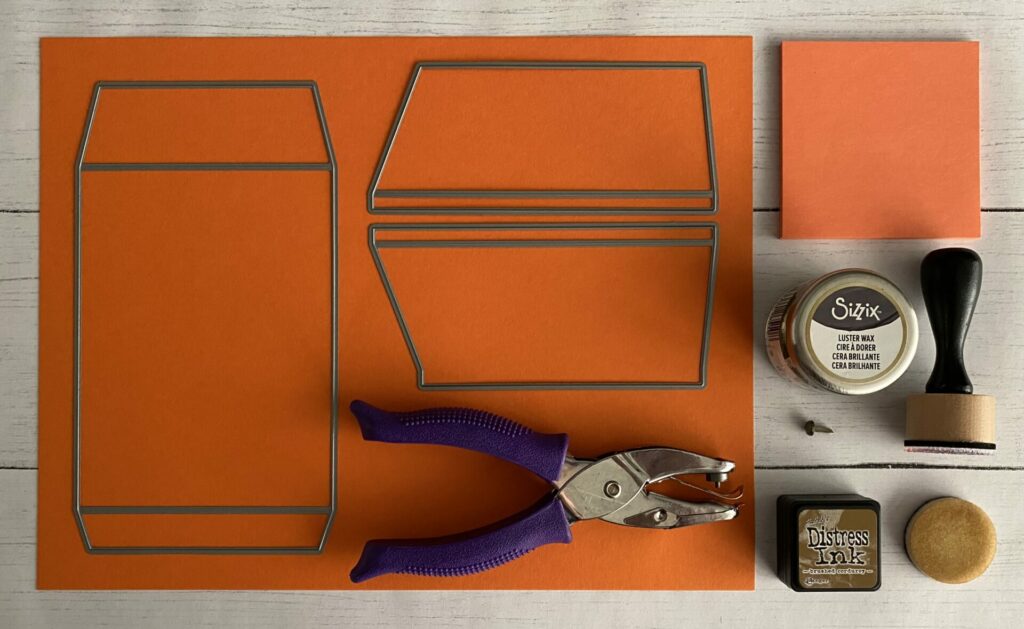
Extra Supplies Used For Envelope / Substitutions:
- Simon Says Stamp 4 Bar Square Flap Envelope Die – SSSD112115 | SSS |
- Sizzix Luster Wax – Gold | Sb.com | SIZ | AMZ / Die or pigment inks
- Simon Says Stamp Cardstock – Orange Peel | SSS / Any color
- Ranger Tim Holtz Distress Ink – Brushed Corduroy | Sb.com | RI | SSS |
- Ranger Mini Round Ink Blending Tool & Foam | Sb.com | RI | AMZ | SSS |
- Post-it note / Scrap piece of paper
- Circle Hole Punch – 1/8″ | HL | SSS / Any small hole punch
- Idea-ology Long Fasteners Brads – TH92703 | Sb.com | SSS / Optional
Click here for the step-by-step Leaf Embossed Envelope tutorial.
Making The Card Bases
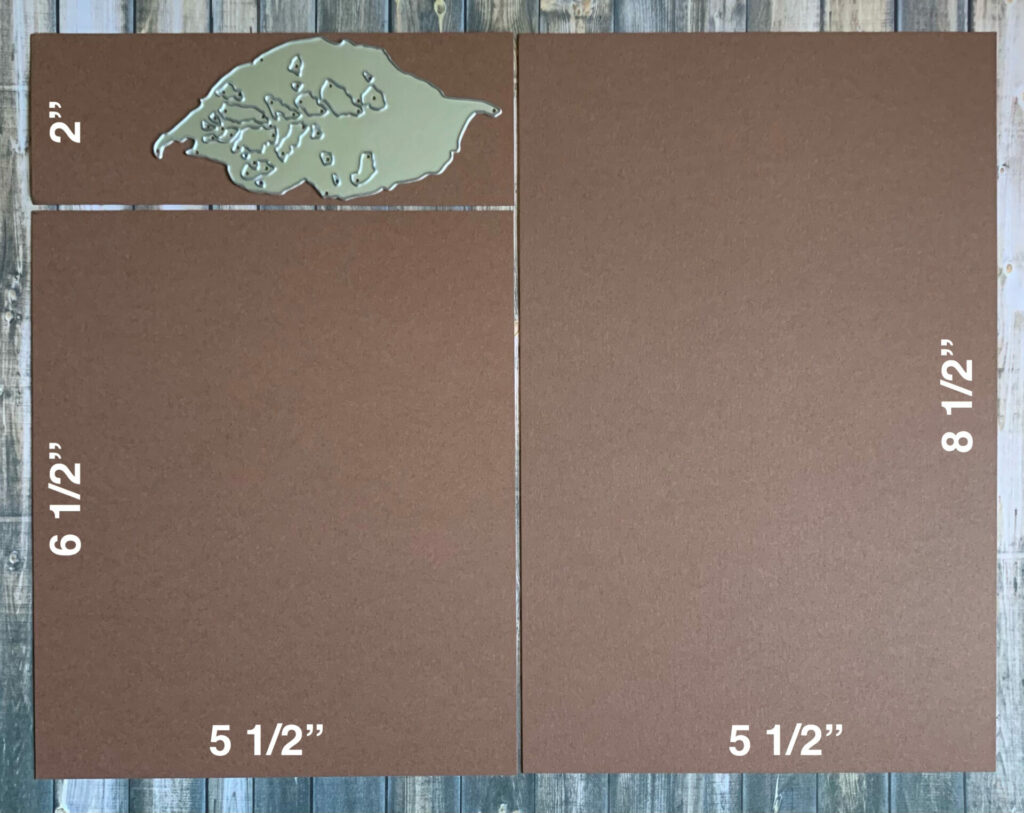
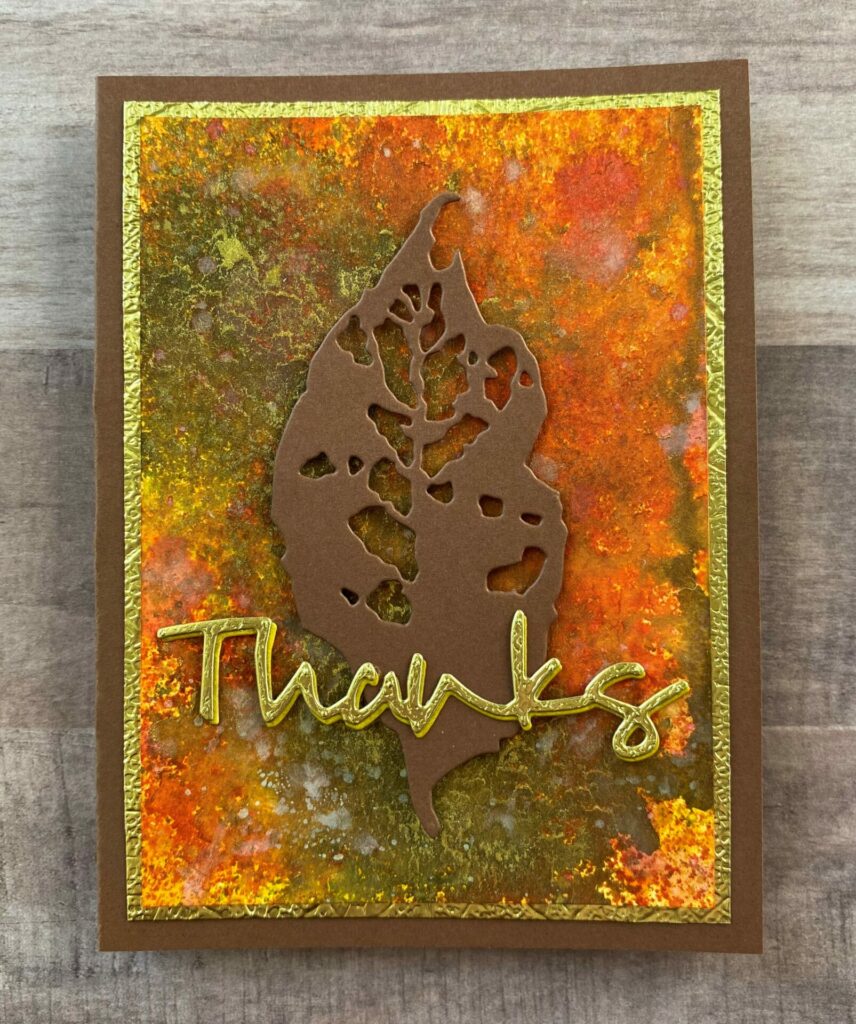
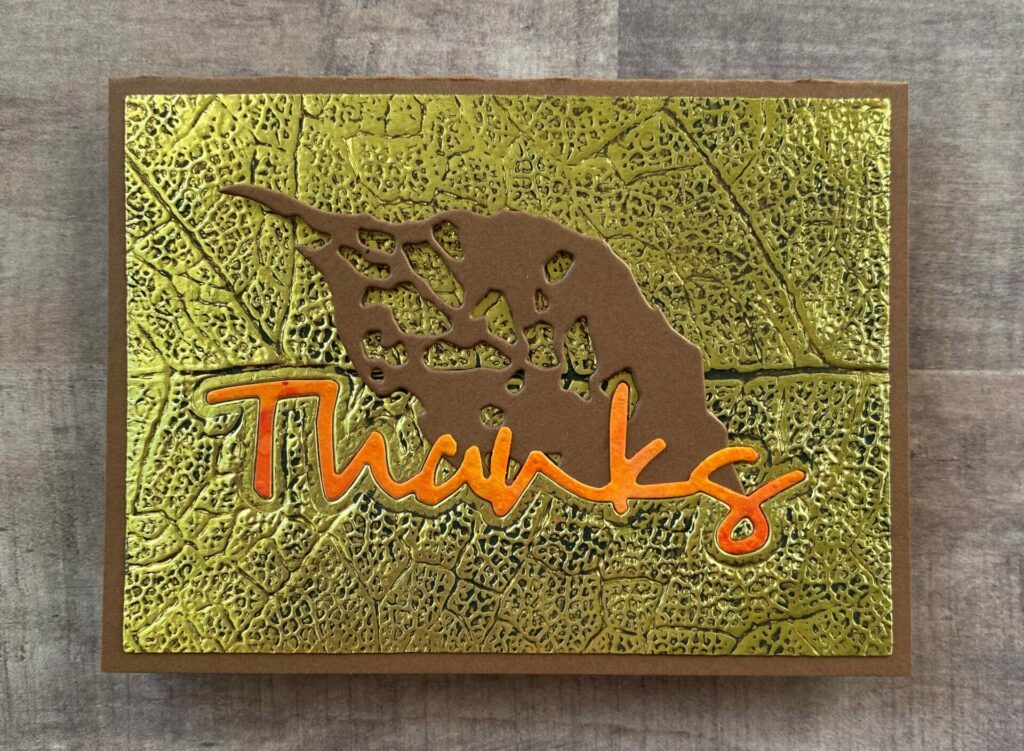
Card A – Firstly, I took an 8½” x 11″ piece of brown cardstock and cut it in half, giving me two 8½” x 5½”pieces. Then, I folded one of them in half, which gave me a standard A-2 card size of 4¼” x 5½”. This is the base of the main leaf thanks card. We’ll call this one card A.
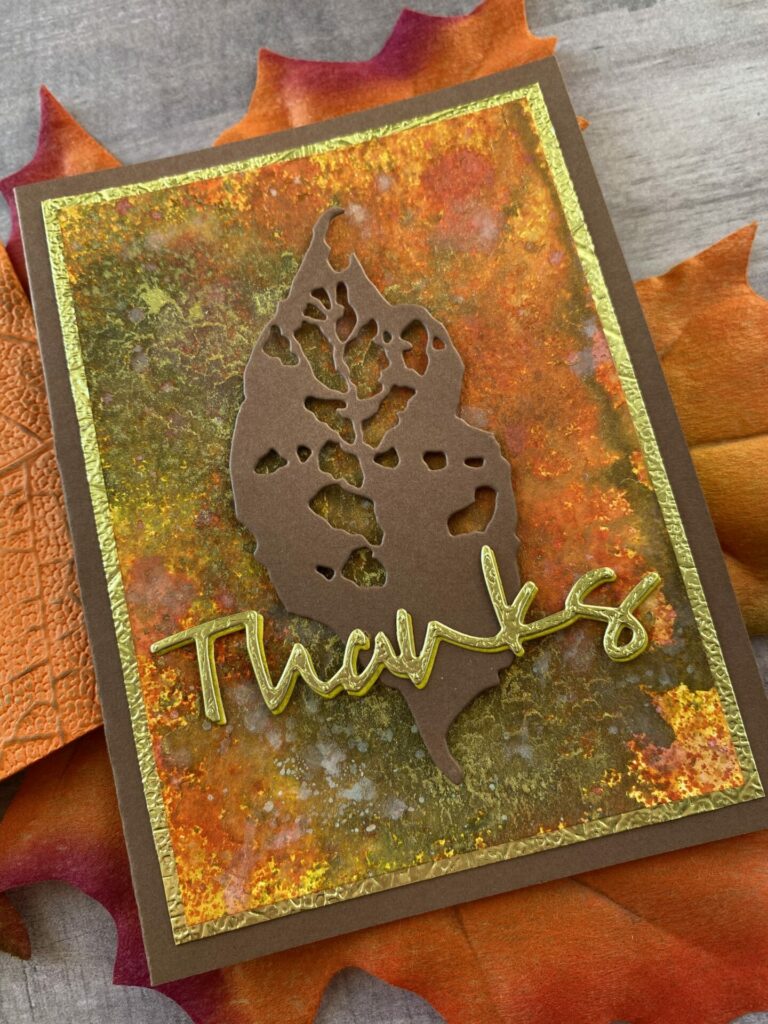
Card B – I cut a 2 inch strip off the other half of the cardstock. This strip will be used to die cut the leaf for card A. That left me with a 5½” x 6½” piece of cardstock to make the bonus card. Then, I folded it in half which gave me a card base of 3¼” x 5½”. This is the base of the mini leaf thanks card. This one we’ll call card B.
Inking The Background
Firstly, I trimmed the watercolor paper to 3½” x 6¼”. Next, I pressed the spiced marmalade and mustard seed distress ink pads onto my craft sheet. Then, I lightly misted the watercolor paper with water and made a print. After that, I dried the layer with my ranger heat tool. You can let it air dry if you don’t have a heat tool. Next, I pressed a little bit of fired brick and crushed olive distress ink onto the craft sheet. Then, I misted it with water and broke up the ink with my finger tips. This creates different size ink droplets and spreads the ink out on the craft sheet. I made my next print and dried it with the heat tool.
After that, I wiped the ink off the craft sheet with a paper towel. For the next layer I pressed a little bit of crackling campfire distress oxide onto the craft sheet. Misted it with water and broke up the ink with my fingers. Then, I made a print and dried that layer with the heat tool. For my last layer I cleaned the craft sheet again and pressed the spiced marmalade distress ink onto it. Then, I misted it with water, broke up the ink, made a print, and dried it.
Lastly, I trimmed off a 1¼” x 3½” strip and set it aside for later. This will be used to cut the sentiment for card B.
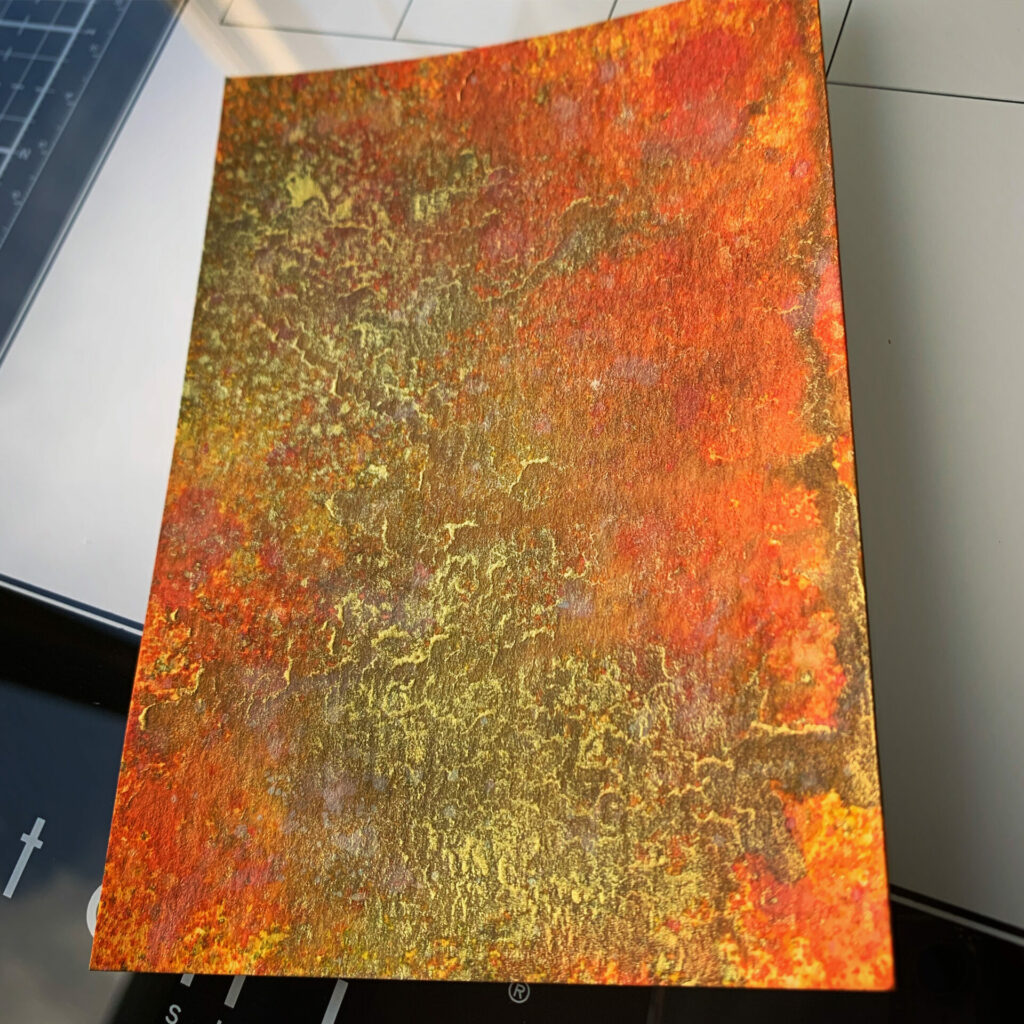
Adding The Mica Stain
Firstly, I took the 3½” x 5¼” inked panel and lightly misted it with water and set it in my splat box. If you don’t have a splat box, that’s totally fine. You can just set it in the middle of your glass media mat. Next, I sprayed the inked background with some jack-o-lantern and holly branch distress mica stain. Then, I tilted the paper around to get the mica to move and flow. After that, I set it vertically up against the back of the splat box and let it dry. I like to put a folded paper towel under it to absorb all the excess run off ink. Plus it keeps my splat box cleaner. You can repeat this process until you reach the desired amount of mica shimmery goodness. For mine I did two to three layers.
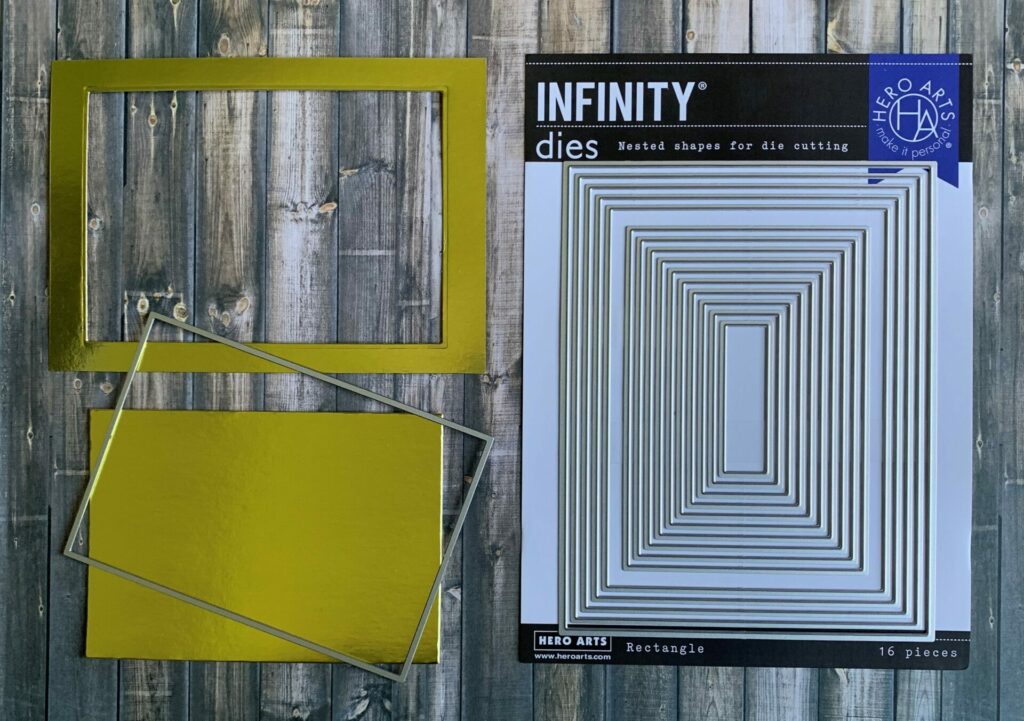
Cutting The Metallic Kraft Stock
I took the greenish gold shade from the Tim Holtz idea-ology metallic kraft stock and trimmed it to 4″ x 5½”. Then, I took the sixth from the largest rectangle die from Hero Arts and die cut it from the center of the kraft stock. The frame piece is for card A and the smaller solid rectangle is for card B. This is a great tip if you ever want to add a small boarder to a card. You get more out of your papers and no one will ever know.
Embossing The Metallic Kraft Stock
Card A – Firstly, I misted the back of the metallic kraft stock frame with water. Next, I placed it face down in the Sizzix leaf veins 3D embossing folder and ran it through the Sizzix Big Shot. Then, I set it aside to dry. Next, I flattened the frame in the big shot. I did this by placing the frame between the big shot platform and the thin die adapter with two cutting plates on top. Then, I ran it through the big shot. After doing this the frame might be a little skewed. It’s fine because we can trim and square it off after gluing it to the background later.
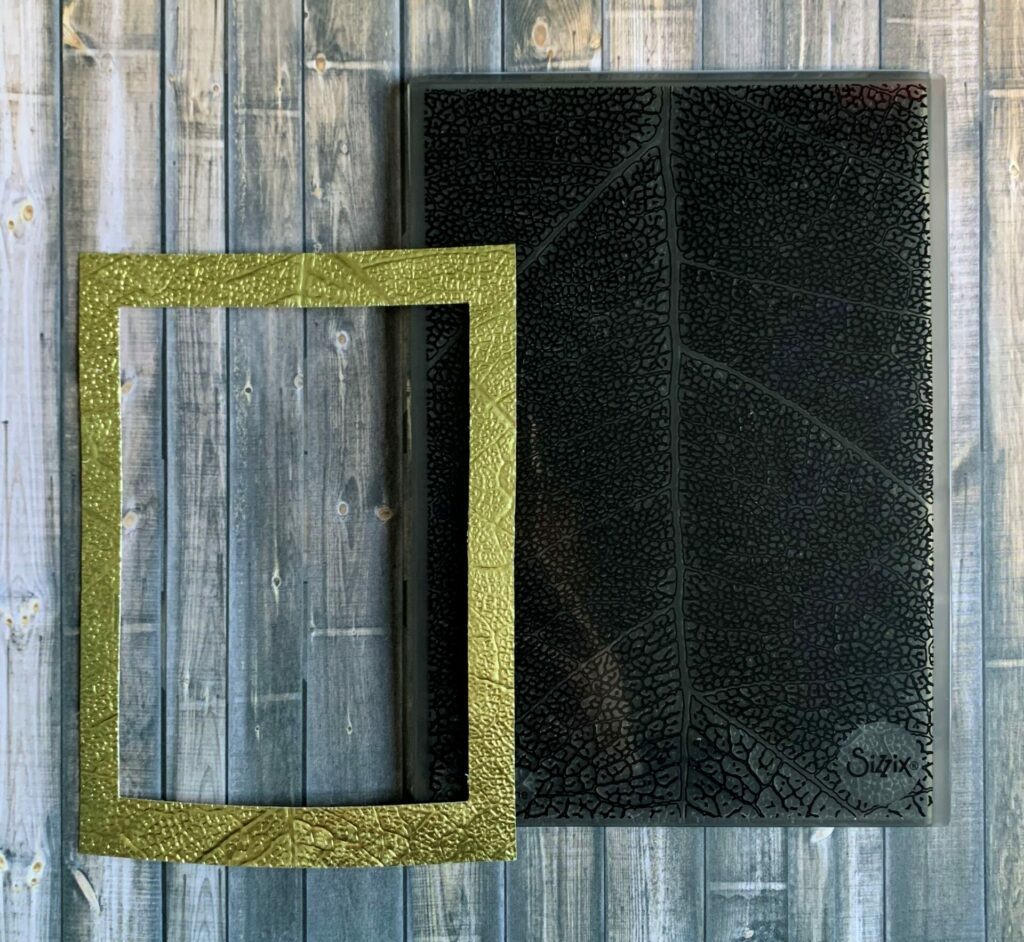
Card B – For the small rectangle metallic kraft stock I did the same thing. I misted the back of it with water and placed it face down, centering it in the Sizzix leaf veins 3D embossing folder. Then, I ran it through the Sizzix Big Shot. After that, I put my clear flat cutting pad on top of it and left it to dry. This keeps it from curling up and ensures that it dries flat.
Die Cutting The Sentiment
Card A – The sentiment for card A is cut from the center of Card B. I used the Spellbinders thanks die from a set called Phrase Set One. However, I believe it’s discontinued. But you can use any thanks die or any other sentiment die you like. Then, I cut another thanks from watercolor paper and inked it with crushed olive distress ink.
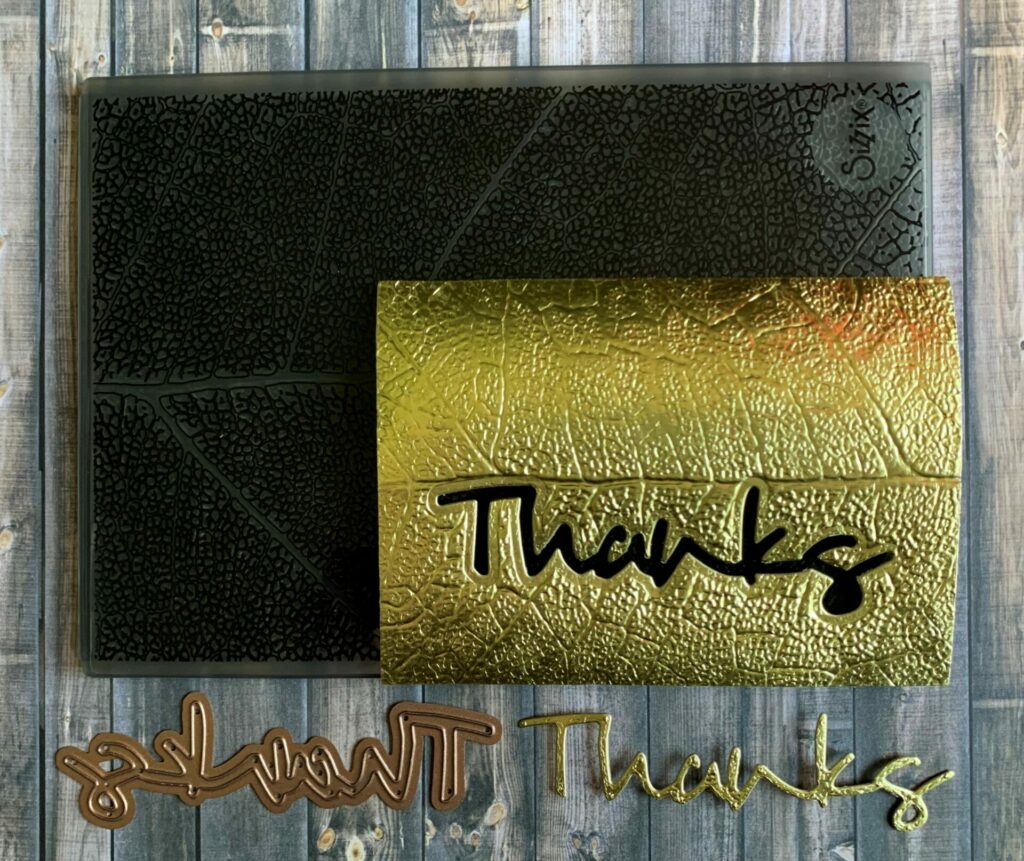
Card B – For this card I cut the thanks from the orange strip of watercolor paper that was inked earlier.
Applying The Crayon
Card A – No crayon used on this card.
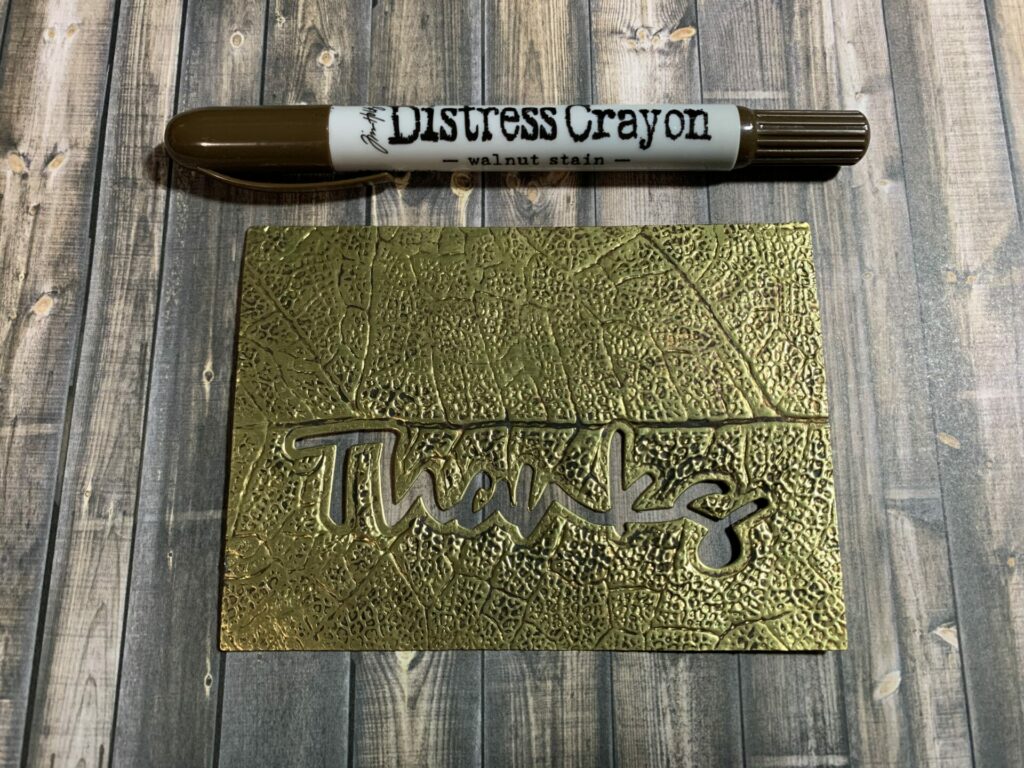
Card B – Firstly, I took the metallic embossed thanks panel and added distress crayon in the shade walnut stain on to it. Next, I scribbled some crayon onto a small area of the panel and rubbed it into the debossed veins in the paper. You’ll want to work in small sections because the crayon starts to dry, and then it’s harder to rub it in. Also be gentle when rubbing it into the paper, you don’t want it to rip. After the whole panel was covered with crayon I took a wet (wring out most of the water) paper towel and gently rubbed it over the panel. This is to remove the crayon from all the high points of the paper. If you end up rubbing off too much crayon, no big deal. Just add more crayon to that area and repeat the process.
Adding The Panel To The Card Base
Card A – Next, I took the metallic kraft stock frame and glued it behind the inked mica background panel. For this, my glue of choice is distress collage medium. Then, I trimmed and squared it off with the Tim Holtz Tonic guillotine. Next, I glued the panel to the front of the card base.


Card B – Firstly, I glued the debossed metallic panel to the front of the card base with collage medium. Keep in mind the leaf is going to slide in behind the bottom portion of the thanks cut out. So plan where you want the leaf to sit and don’t put glue in that area. This creates a sort of mini pocket for the leaf to slide into. I positioned the panel to have an eighth inch boarder around three sides of the card. Then, I trimmed off the extra eighth inch of the card base with my paper trimmer.
Die Cutting The Leaves
Card A – Next, I die cut the top middle leaf (pictured below) from the 2 inch strip of brown cardstock left over from cutting the card bases earlier.
Card B – Then, I die cut the bottom right leaf (pictured above) from a new sheet of the same brown cardstock used to make the card base.
Putting It All Together
Card A – Firstly, I applied some small adhesive squares to the back of the leaf and stuck it to the front center of the card. Next, I took the two thanks sentiments and glued them together with collage medium. I placed the metallic thanks die cut on top and the crushed olive inked thanks die cut on the bottom. While the glue was still slippery, I slid the bottom thanks die cut down and to the right. This gives the sentiment a drop shadow effect and a little more dimension. Then, I put something heavy (big shot platform) on the thanks die cut and let it dry.

When it was dry, I applied collage to the back of the thanks sentiment and glued it to the card. I centered it on the card towards the bottom portion of the leaf. Next, I placed something small and heavy on the “T” and the “S” of the thanks die cut to hold them down while it dried. I usually use spray stain bottles or luster wax jars.
Card B – Firstly, I placed a small adhesive square to the back upper part of the leaf. Then, I put some collage medium on the back of the bottom of the leaf and slid it into the pocket we created earlier. After that, I glued down any parts of the metallic kraft stock around the thanks cut out that weren’t secured down. Lastly, I took the orange inked thanks sentiment and applied collage medium to the back of it. I placed it into the thanks cut out and set something heavy (big shot platform) on it until it was dry.
Leaf Thanks Cards Complete!
Congratulations your leaf thanks cards are now complete! I hope you enjoyed this tutorial and have as much fun making it as I did. If you do make these cards use the #grovecrafted on Instagram. I’d love to see it! Thanks for stopping by and I hope you found some new inspiration to create.
If your interested in making the matching envelope, you might want to check out my Leaf Embossed Envelope tutorial. It coordinates perfectly with card B that you just made.
If you enjoyed making these leaf thanks cards, you might want to check out my other Fall Tutorials.