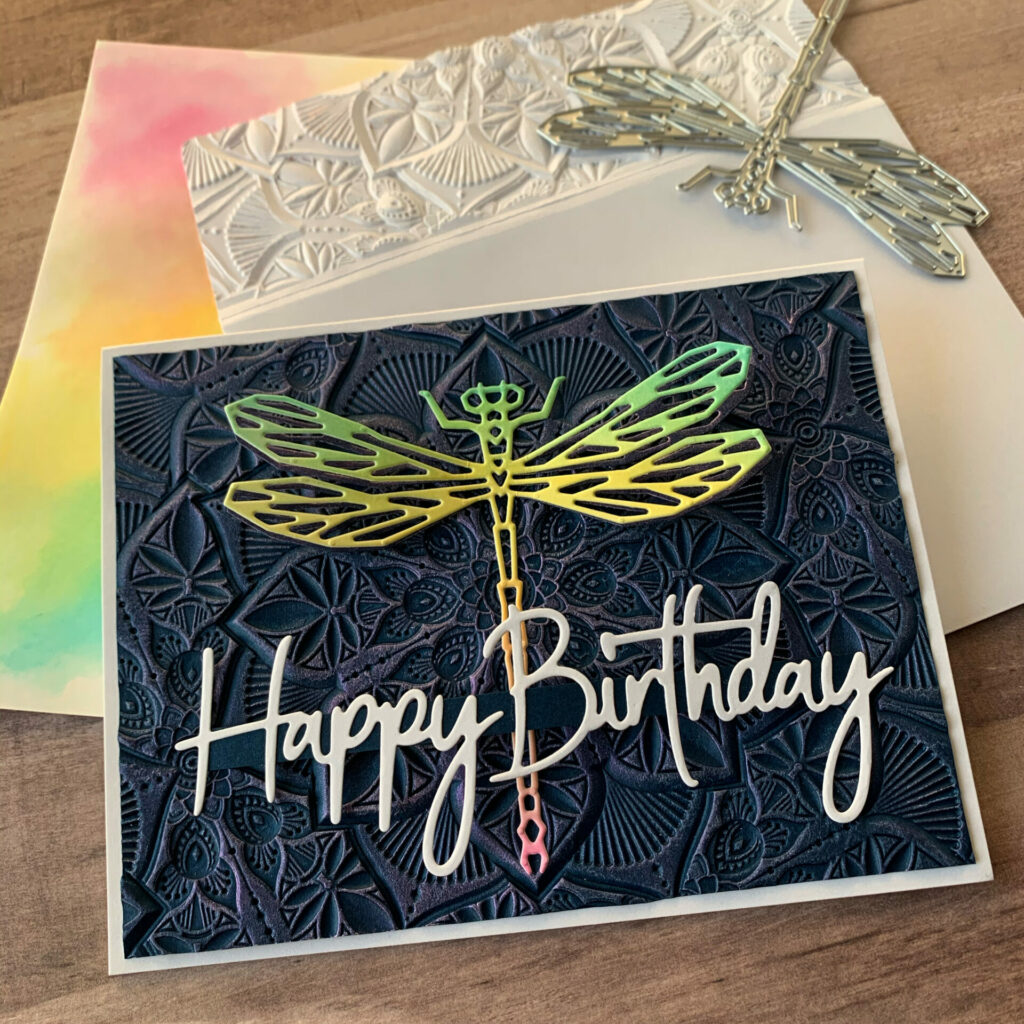
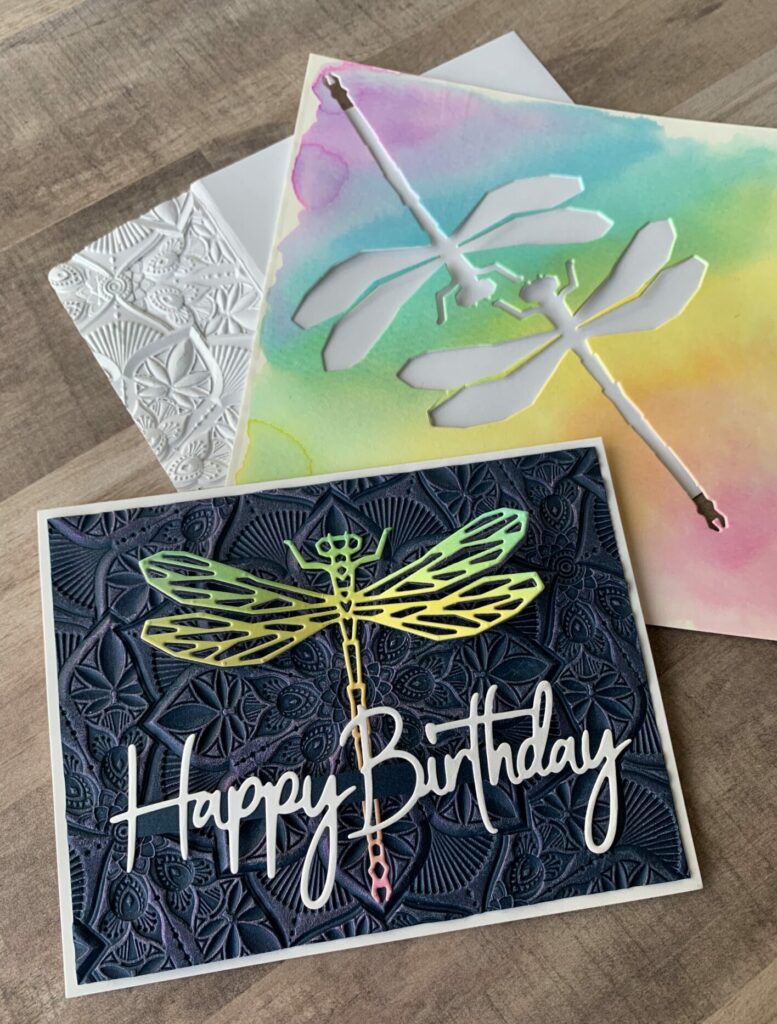
Dragonfly Birthday Card
Hello makers! Today I’m sharing how I made this dragonfly birthday card. It features a soft blended watercolor technique. However, if watercolor isn’t your forte, you could cut the dragonfly from specialty cardstock instead. For example, glitter, metallic, and holographic cardstock would all look lovely. I made mine a birthday card. But the sentiment could easily be changed to fit your specific need. This dragonfly card could also be a thank you, hello, sympathy, thinking of you, congratulations, or Mother’s Day card.
Full Disclosure: This post contains affiliate links which are indicated with an (*). If you click on an affiliate link and later make a purchase, I may receive a small commission. Clicking on an affiliate link which earns a commission does NOT result in additional charges to you or cost you anything extra. Money earned via affiliate links helps pay the fees to keep this blog up and running. Thank you so much for shopping through my links to show your support for the brands that we love and the products that I share!
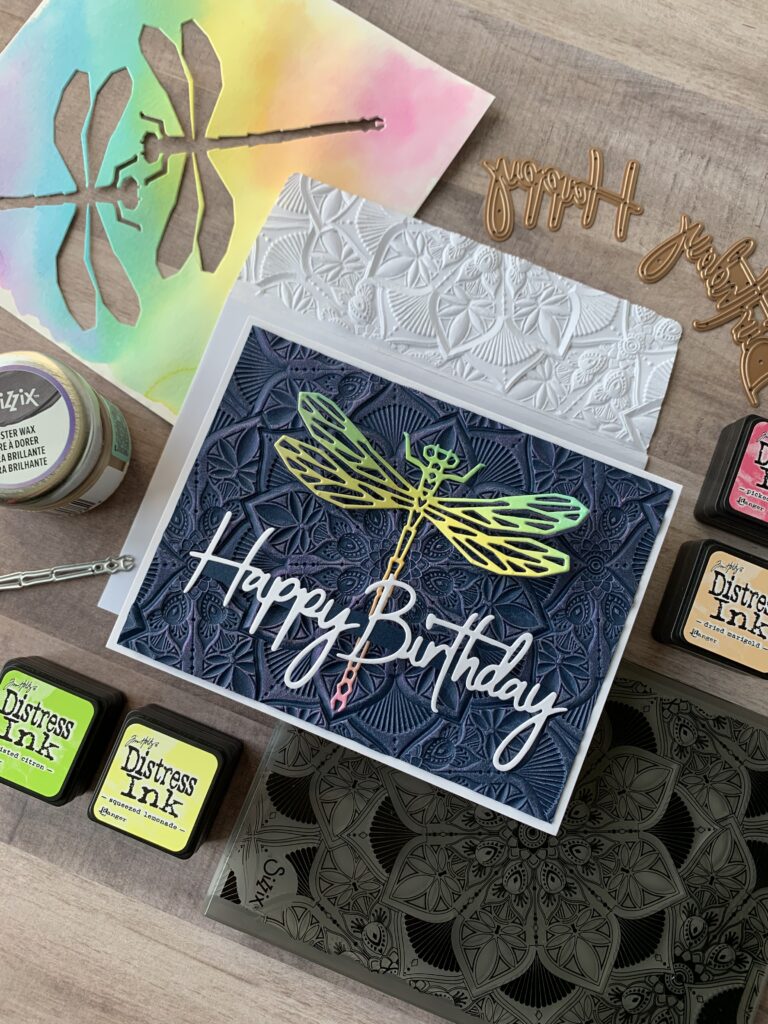
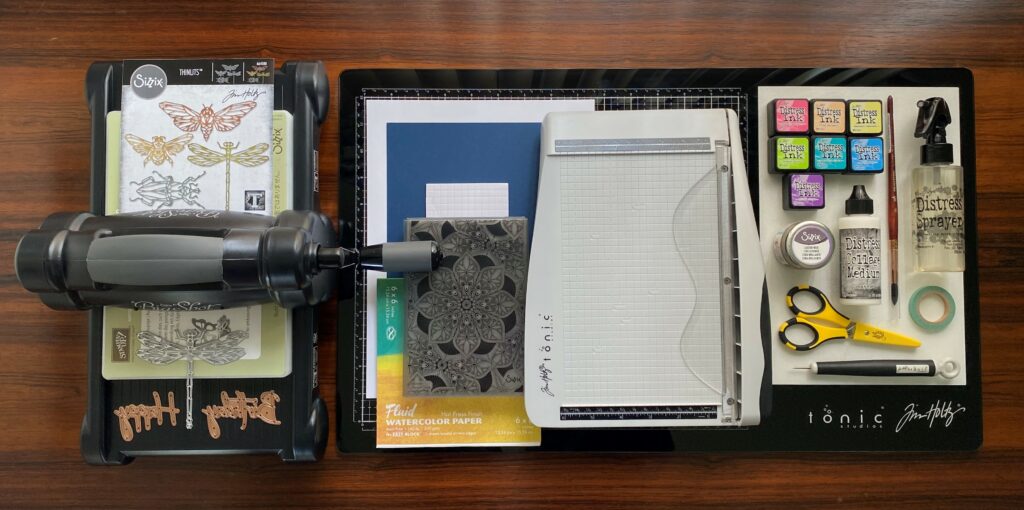
Supplies Used / Substitutions:
- *Sizzix Big Shot / *Spellbinders Platinum Six / Any die cutting machine
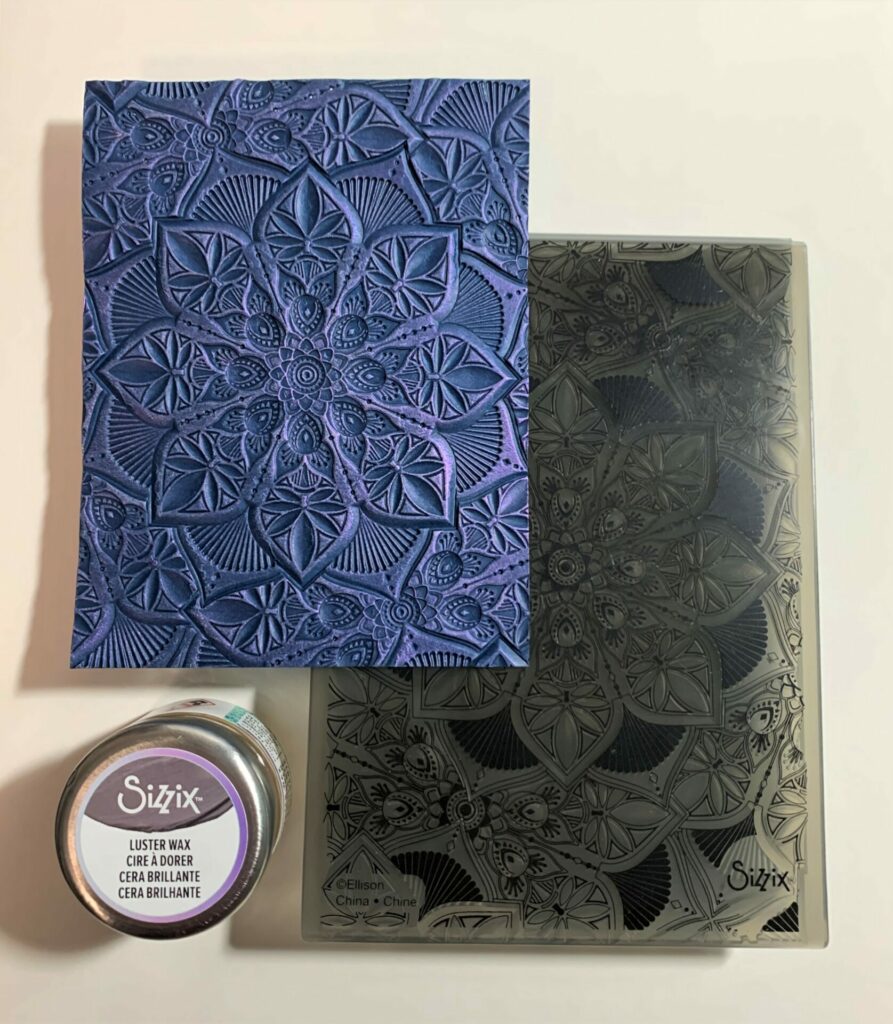
- Sizzix Tim Holtz 3D Embossing Folder – Floral Mandala #664405 / Any embossing folder
- *Spellbinders Dies – Simply Perfect Mix & Match Sentiments SKU: S5-443 / Any sentiment die
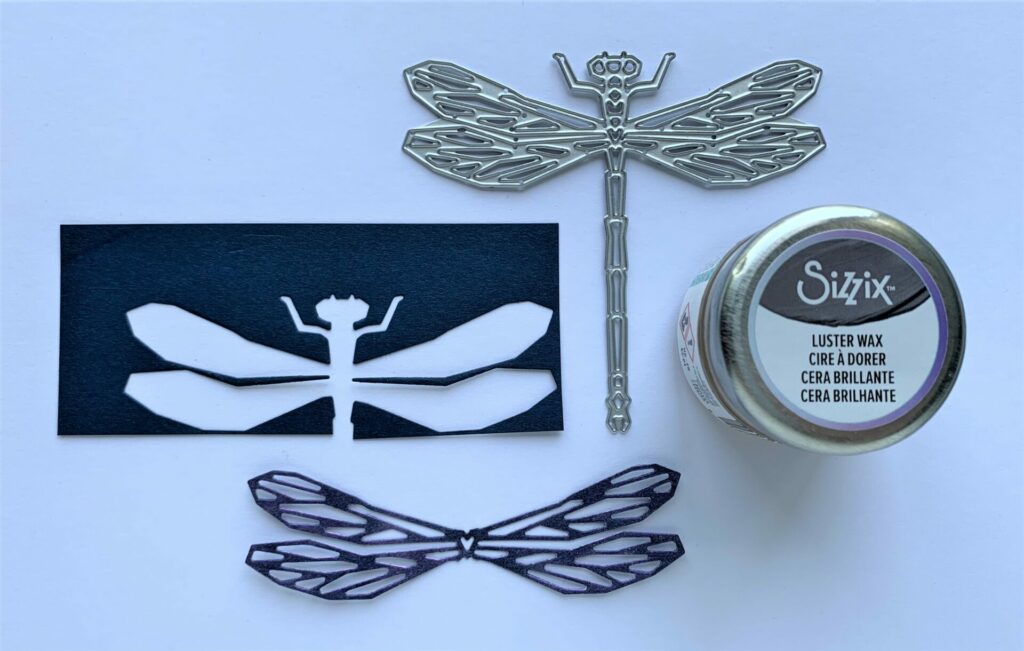
- Sizzix Tim Holtz Thinlits Dies – Geo Insects #664180 / Any insect or butterfly die
- *Sizzix Luster Wax – Lilac Rainbow / Die or pigment inks
- White 110lb Cardstock / Any color heavyweight cardstock
- Navy Cardstock / Any color
- White A2 Envelope / Any brand and color
- *Fluid Hot Press 140lb Watercolor Paper Block / *Canson / Any watercolor paper
- *Princeton Neptune Watercolor Brush – #8 Round / Any watercolor brush
- Ranger Tim Holtz Distress Ink – Picked Raspberry, Dried Marigold, Squeezed Lemonade, Twisted Citron, Peacock Feathers, Salty Ocean, & Wilted Violet / Any watercolors
- *Ranger Distress Collage Medium – Matte / Any liquid adhesive
- *Tim Holtz Tonic Studios Glass Media Mat / Non-Stick craft sheet
- *Tim Holtz Tonic Guillotine Comfort Paper Trimmer 160E / Any paper trimmer, scissors, or x-acto knife
- *EK Success Cutter Bee Scissors EKCB01 / Any small sharp scissors
- Washi Tape / *Low tact tape
- *Tim Holtz Distress Sprayer with water / Any spray bottle with water
- *Tim Holtz Tonic Studios Retractable Craft Pick / Toothpick
- Small Foam Adhesive Squares / Optional
- Post-it note / Scrap piece of paper
- Scotch Magic Tape
Making The Card Base
First, I took an 8½” x 11″ piece of white cardstock and cut it in half, giving me two 8½” x 5½”pieces. Then I folded one of them in half, which gave me a standard A-2 card size of 4¼” x 5½”. This is the base of my card, but you can make your card whatever size you want. The other half of the white cardstock will be used later on to die cut the sentiment.
Getting Ready To Watercolor
For this part of the tutorial the following supplies are needed: distress inks or watercolors, watercolor brush, watercolor paper, a jar of water, magic scotch tape, and a sheet of paper towel. If you decided to cut the dragonfly from specialty cardstock then you can skip this step.
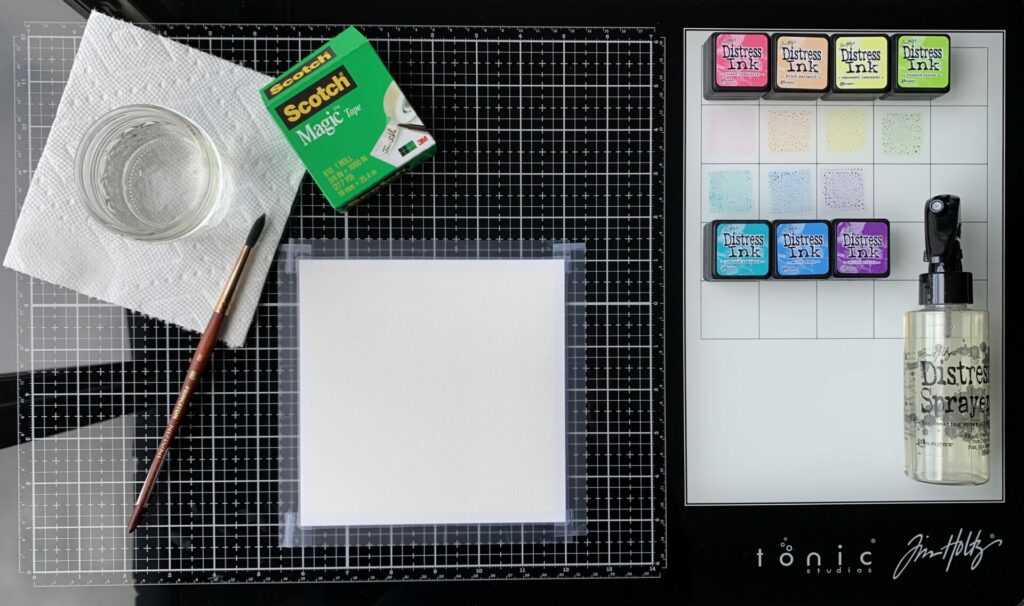
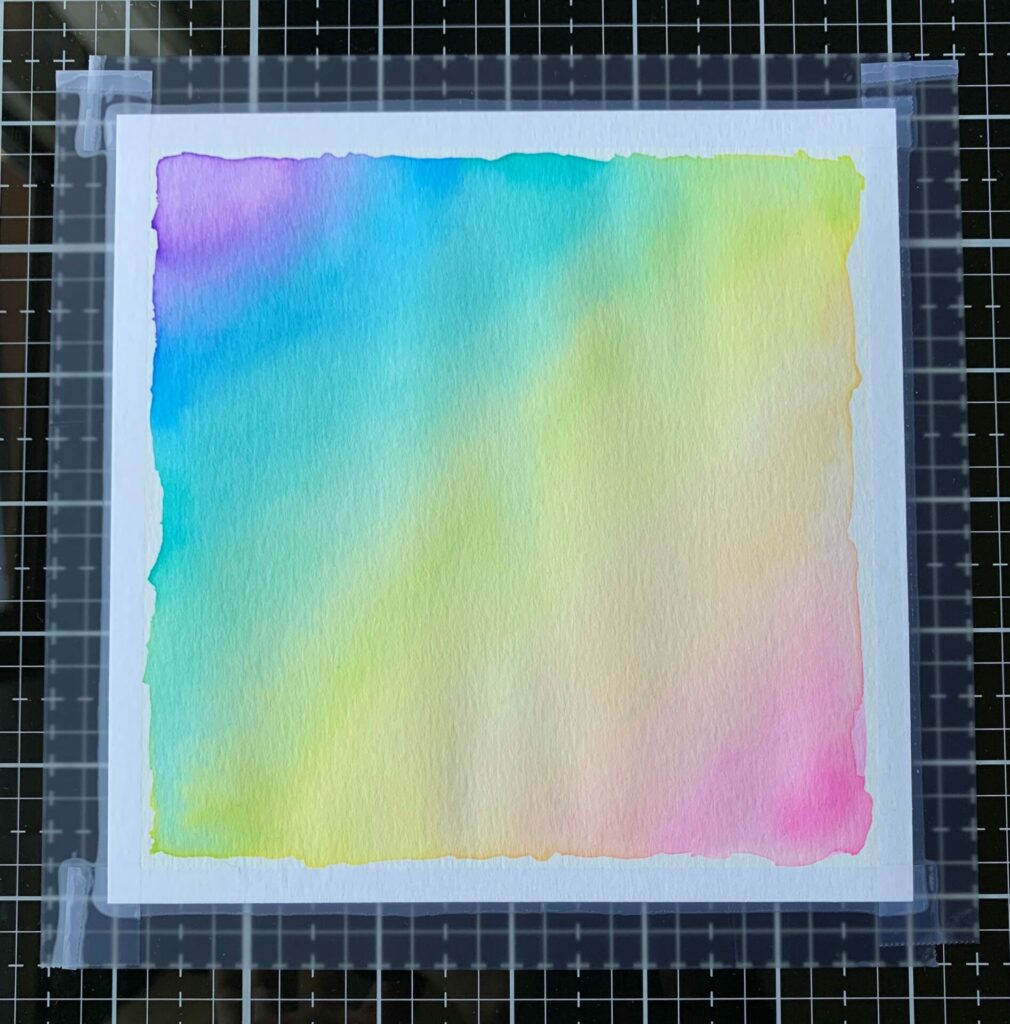
First, I trimmed the watercolor paper to 6″x6″ and taped it down to the glass media mat. I folded one end of the tape down to create a tab. This makes it easy to remove the tape at the end of the project. Then, I removed the craft sheet from the media mat and set up my ink pallet. I did that by smooshing the distress ink cubes on to the white squares of the media mat. I put the colors in rainbow order to keep everything organized.
Next, I wet the watercolor paper with my brush. But don’t use too much water! Bring the water close to the tape, but don’t let it touch. If too much water gets under the tape it will no longer be able to stick to the paper. Then the paper won’t dry down flat, and will have a slight warp. If this does happen it’s not the end of the world since we are using this for die cuts. But if this was a background we would want this to dry flat.
Time To Watercolor
First I started in the bottom right corner of the paper. I wet the area with my brush and added the pink color with Picked Raspberry. Then, I cleaned the brush by swirling it in the jar with water and dabbed it on the paper towel. This should be done every time you switch between colors. If you don’t, then your colors will get muddy and half way through you’ll just be painting with brown. With the clean brush I wet the area above the pink and then added the orange color with Dried Marigold. I then blended the two together where they met on the paper to create a smooth transition.
Now you can spend a lot of time on these transition steps if you want a really seamless gradient blend. Or you could lay the colors down and then add some water with the brush where the two colors meet and let the magic happen. Next, I wet the paper with my clean brush above the orange and added the yellow color with Squeezed Lemonade. I cleaned the brush and blended the orange and yellow together.
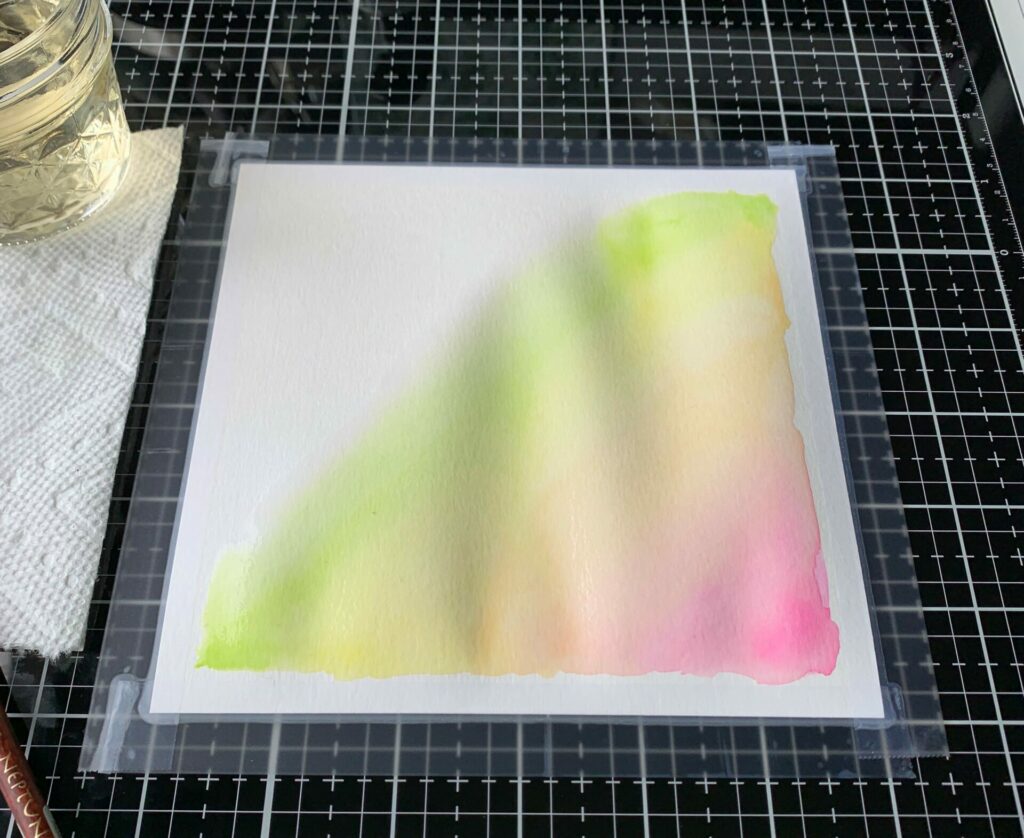
Since I choose seven colors I knew that the green would be in the exact middle of my paper. Try to space the colors out evenly on the paper. Here, in the photo above, I knew that I was half way done. I wet the paper from the top right corner to the bottom left corner with my clean brush. Right above the yellow I added the green color with Twisted Citron. Then, I blended them together.
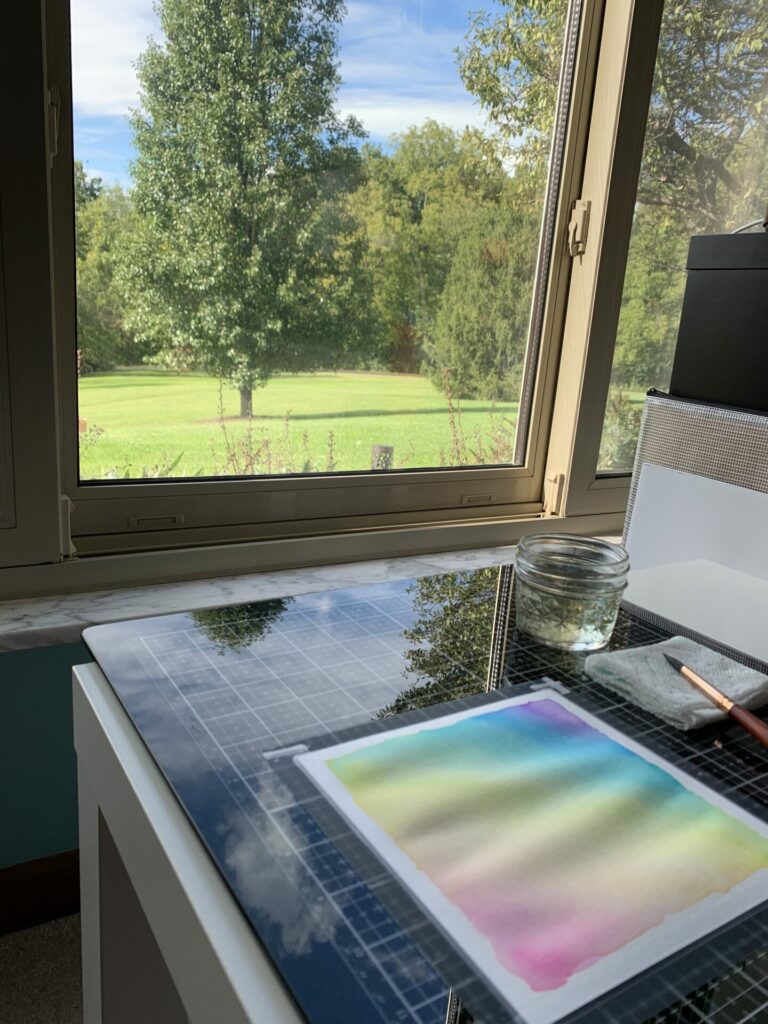
I continued to repeat this process for the rest of the colors. After the green, I added the teal color with Peacock Feathers. Then, the blue color with Salty Ocean, and lastly the purple color with Wilted Violet.
Watercolor Clean Up
When I was done and happy with how it looked, I cleaned my brush and squeezed out the water from my brush into a paper towel. Then laid it flat to dry.
You may have noticed that the paper warped and buckled a little bit. Don’t freak out, this is totally normal! If you keep the tape on, it will dry down flat in the end. Keeping it taped down helps mold the paper back to its original state. I let mine dry for about a day. If you can’t wait that long, you could dry it with a heat tool. I would recommend the Ranger Heat It Craft Tool. Personally, I like to let mine dry naturally. Something magical happens when you let the watercolors blend and dry on their own.
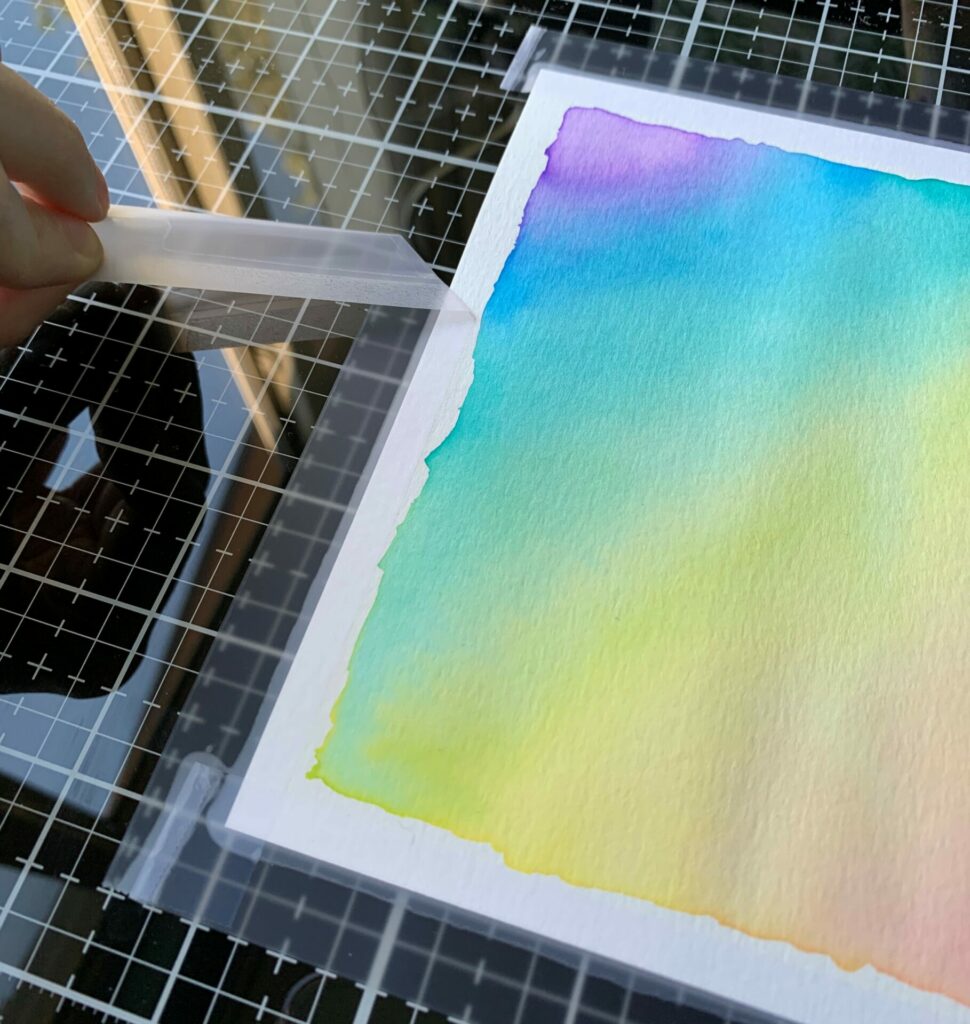
Once it was dry I peeled off the tape. When removing the tape, you always want to pull the tape away from your work (see photo below). This helps prevent the watercolor paper from tearing. Your rainbow watercolor panel is now complete!
Embossing The Background
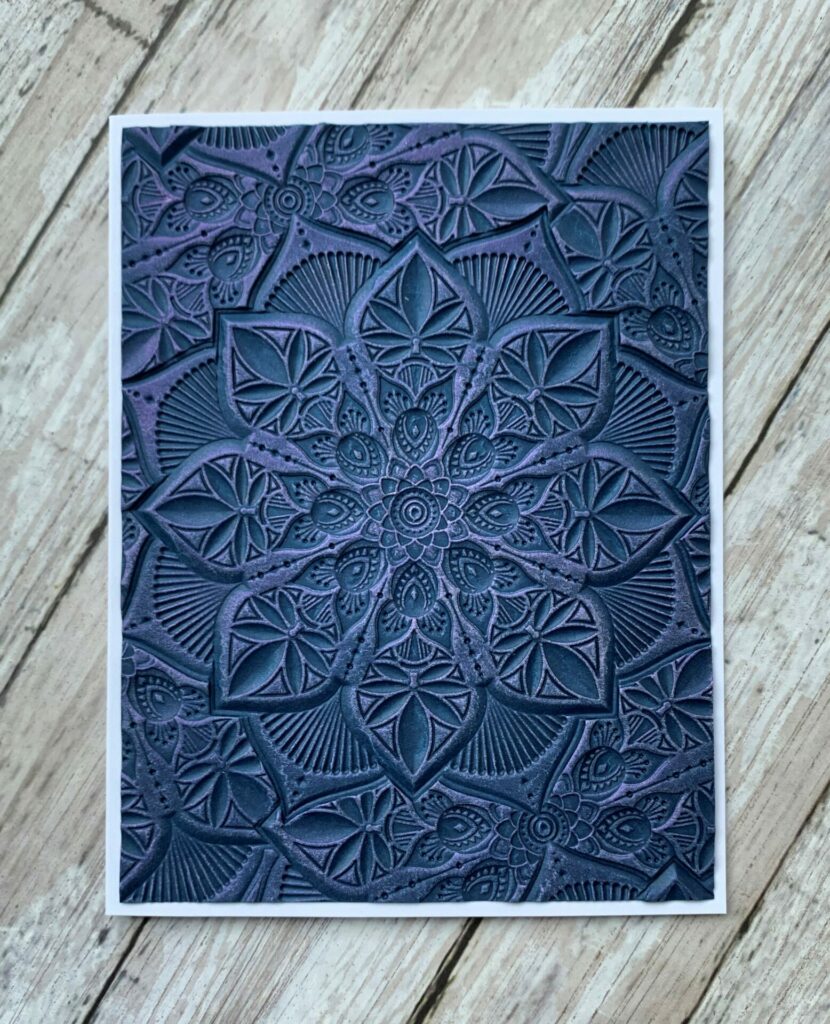
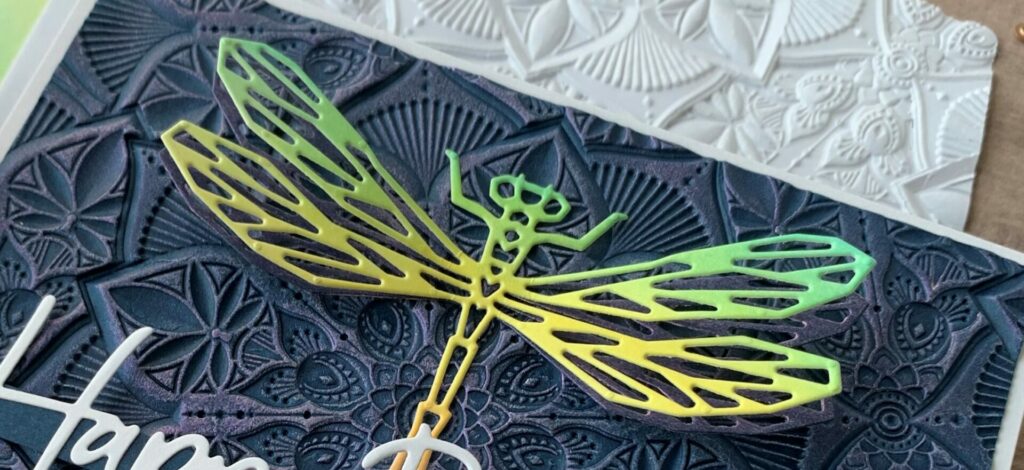
This will be the background for the dragonfly card. For this step, I took the navy cardstock and trimmed it to 4″ x 5¼” with my paper trimmer. I spritzed the front and back of it with water and placed it into the center of the Sizzix Floral Mandala 3D embossing folder. The water helps soften the fibers of the paper so it doesn’t crack. For an example of why I recommend using the water spritz, check out my side-by-side photo example in my Elegant & Simple Card tutorial. Then, I ran it through the Sizzix Big Shot three times. Remember, 3D = 3 times (it makes for a deeper and crisper impression.) I removed the panel from the 3D embossing folder and set it aside to dry.
Applying The Luster Wax
When the panel was dry, I rubbed the Sizzix Lilac Rainbow luster wax over the raised areas of the embossing. First you take a little bit out of the jar with your finger tip and rub it onto the Post-it note or scrap piece of paper. This removes some of the excess wax globs and will save you from ruining your project with hot spots of wax all in one area. It also makes for an even application of the luster wax. Use a light touch and take your time. Your finger might feel a bit numb afterward, but it will go away after a bit. When I was done I washed the luster wax off my fingers with soap and water. Then, I glued the panel to the front of my card base with distress collage medium and set something heavy (my big shot platform) on it to dry.
Cutting The Dragonfly
Next, I took the watercolor panel and die cut it using the dragonfly die from the Sizzix Geo Insects die set. I positioned the die on a diagonal so that the colors would be symmetrical on the dragonfly. But you can cut it wherever you like from the watercolor panel. I was able to get two out of my panel. But you might be able to get three out of it if you feel like playing dragonfly die cut Tetris.
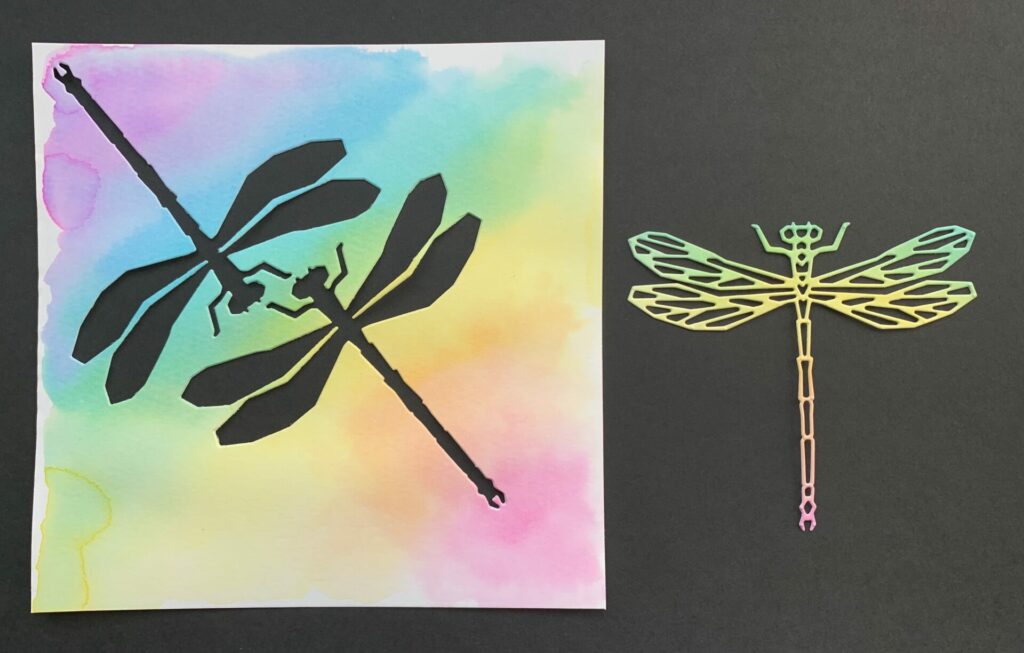
After that, I took the navy cardstock and cut just the wings of the dragonfly from it. With my craft pick, I poked out all the cutouts from the wings. Then, I trimmed off the head and body with my scissors and rubbed the Lilac Rainbow luster wax on to the wings with my finger.
I applied glue to the top center portion of the wings (right around that little heart in the center of the dragonfly). And glued it behind the watercolor dragonfly wings. Doing this adds extra dimension and depth to the dragonfly card.
Applying The Dragonfly
And lastly for this card, I glued the dragonfly to the center of the card. I chose to make my card horizontal, but it would work vertical as well. Then, I applied distress collage medium to the back of the dragonfly along the spine and head. Don’t put any glue on the wings. I aligned the dragonfly to the center of the embossed mandala and pressed it down. I put something heavy (my big shot platform) on it and let it dry. After the glue had set I bent the dragonfly wings up a bit for added dimension.

Making The Sentiment
Next, I used the Happy Birthday sentiment dies and cut them from 110lb white cardstock. I used the heavyweight cardstock because it gives the thin sentiment more stability. Also, the thicker paper makes it easier to remove the sentiment from the die. After that, I cut a 4 1/4″ x 1/4″ strip from the navy cardstock. This is the base to glue the Happy Birthday sentiment to. Then, I used collage medium and glued the sentiment to the navy strip of cardstock as shown above. Remember, this doesn’t just have to be a birthday card. You can use whatever sentiment you want. This dragonfly card is perfect for almost any occasion.
Applying The Sentiment
Lastly, I put a small foam square on the back center of the sentiment strip. I did this to add some dimension to the card, but you can skip this step if you want. Then I put some glue on the back side of both ends of the sentiment strip and centered it under the dragonfly, leaving equal space above and below the sentiment. I then set something heavy on where I placed the glue and let it dry. I usually use my distress spray bottle full of water or collage medium bottle.
Dragonfly Birthday Card Complete!
Congratulations! You have now completed your dragonfly birthday card! I hope you enjoyed this tutorial and have as much fun making it as I did. If you do make this card, please tag me and use the #grovecrafted on Instagram. I’d love to see it! Thanks for stopping by and I hope you found some new inspiration to create.
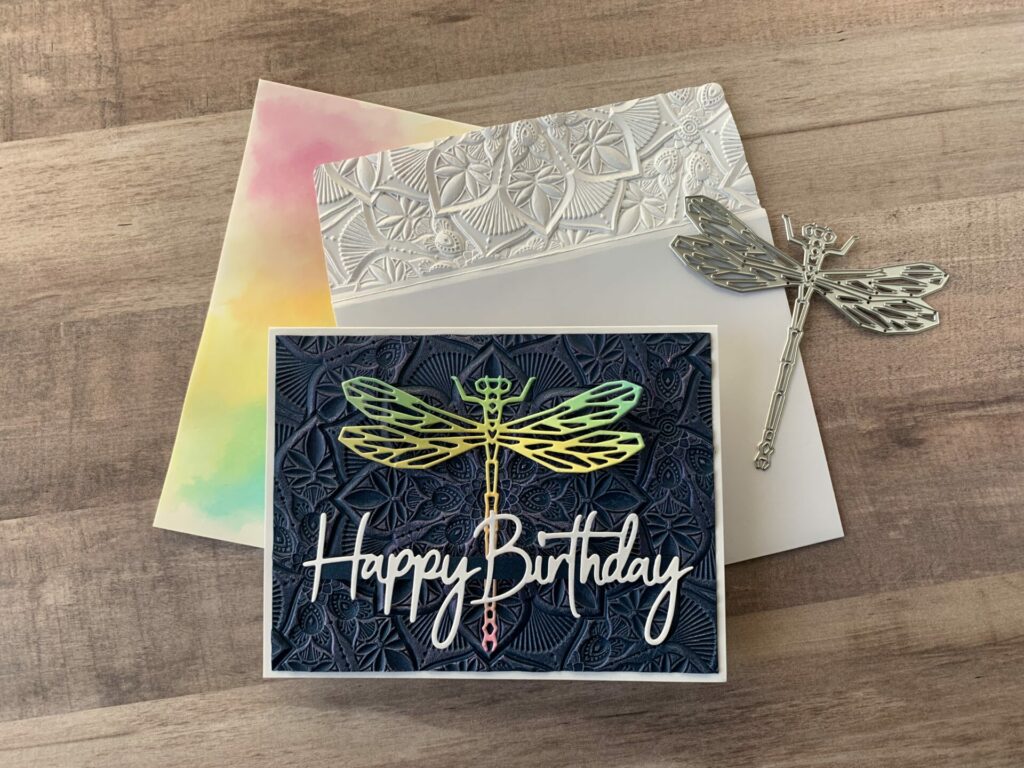
I also embossed the envelope flap with embossing folder I used on the background. You want to run it through the big shot machine only once because the paper is thinner and it will tear if you do it more than once. Also, don’t spray it with water if you have lick and seal envelopes. It will probably make your embossing folder gummy and sticky. I have not personally tested this, so it’s just a theory.
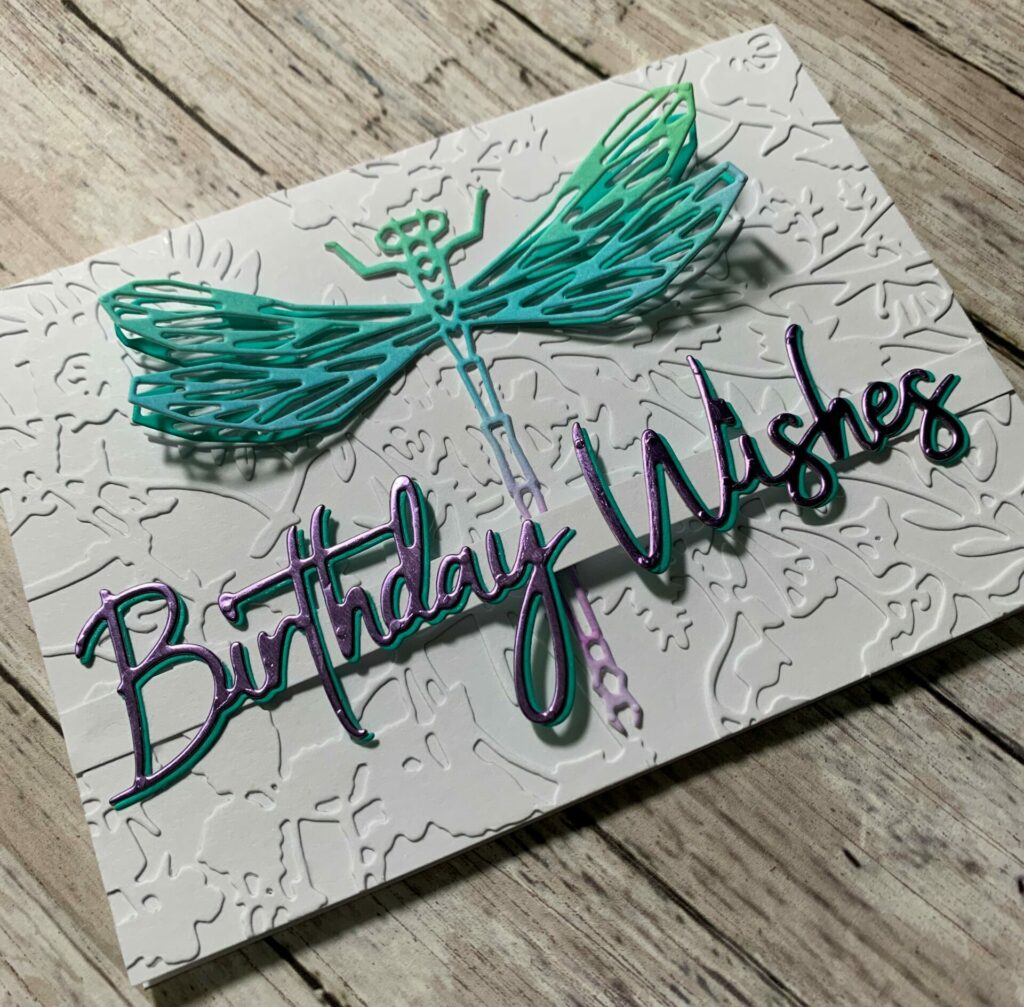
Bonus Dragonfly Birthday Card Idea
If you are wondering what I made with the other dragonfly die cut, well… pretty much the same card. Except, for this one I used a background die instead of an embossing folder. And I changed up the sentiment a bit. Below are the additional supplies I used to create the second dragonfly birthday card.
Supplies Used / Substitutions:
- Sizzix Tim Holtz Thinlits Dies – Organic #664153 (this die is discontinued) / Similar option – Sizzix Tim Holtz Thinlits Dies Leafy Twigs #665436
- Tim Holtz idea-ology Metallic Kraft Stock – Confections – Purple Shade / Any specialty cardstock
- White and Teal Cardstock / Any color cardstock
If you enjoyed making this dragonfly birthday card, you might want to check out my Layered Butterflies Card tutorial.