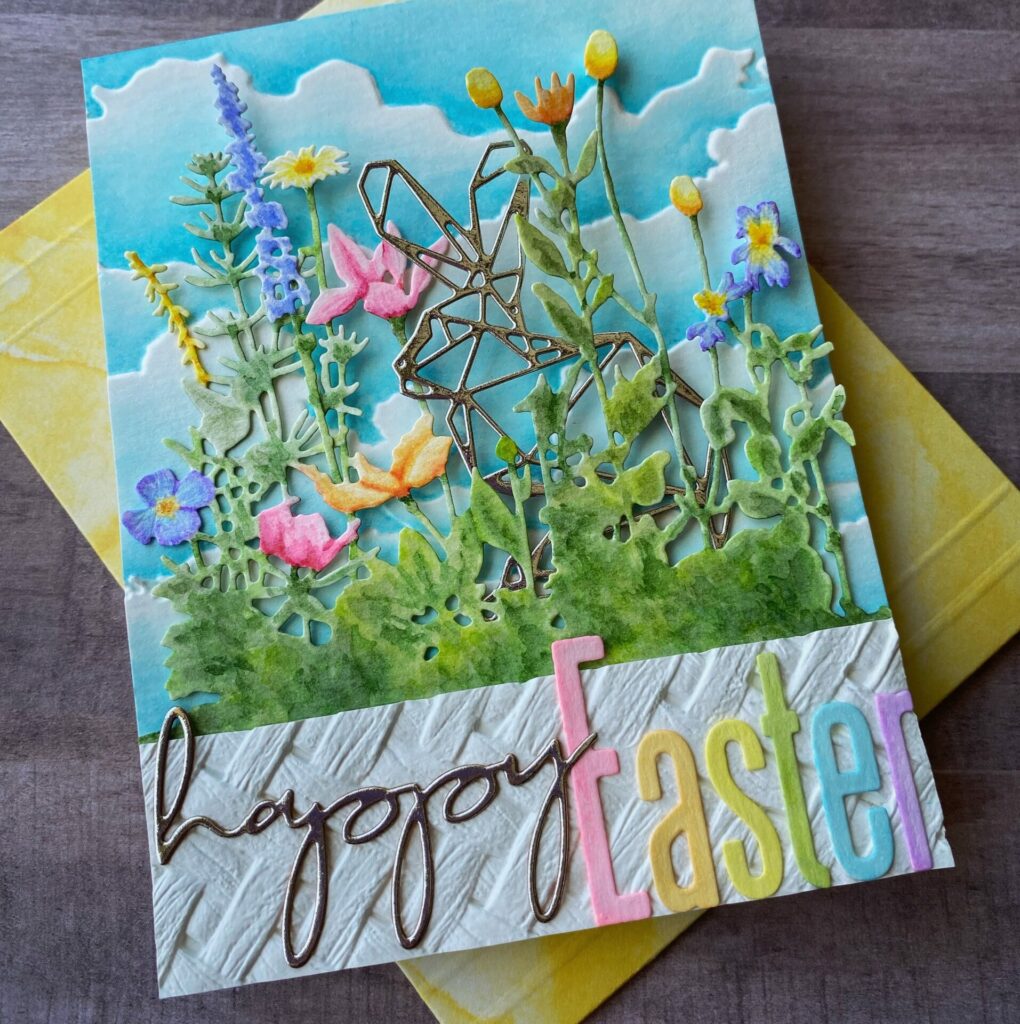
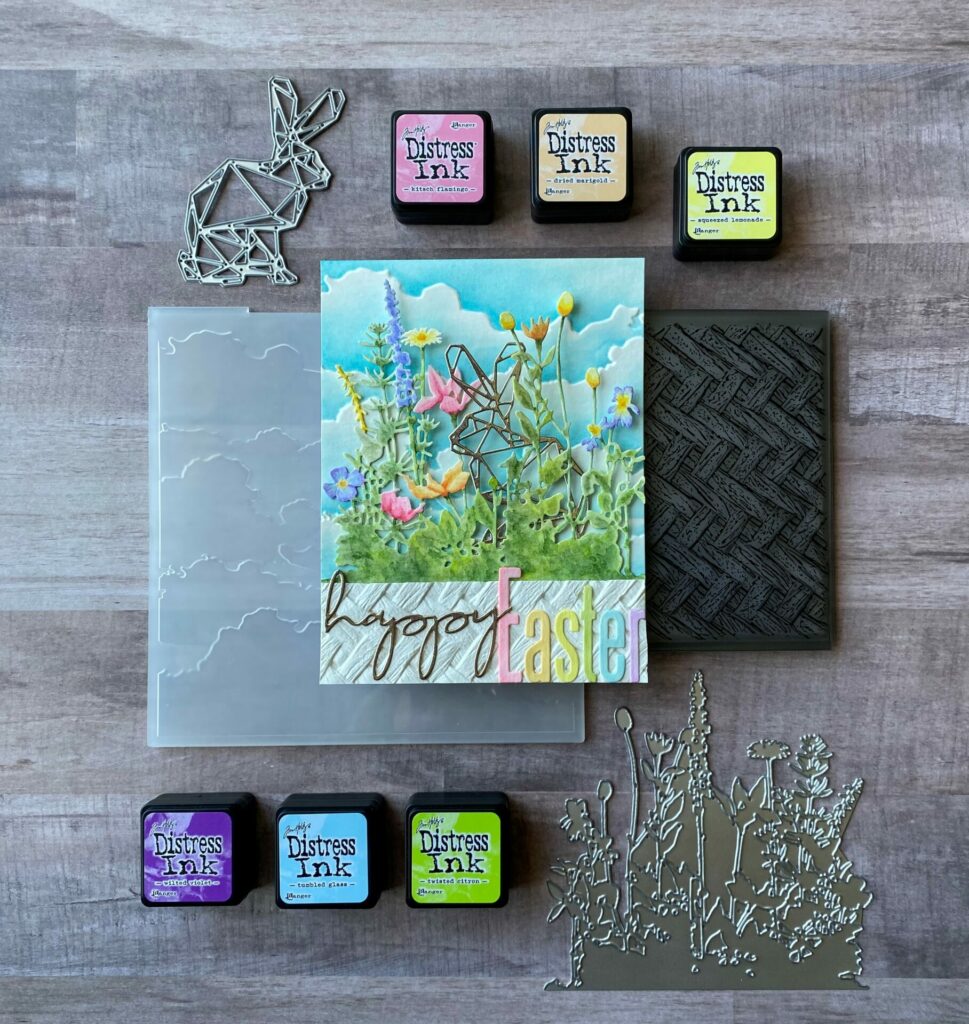
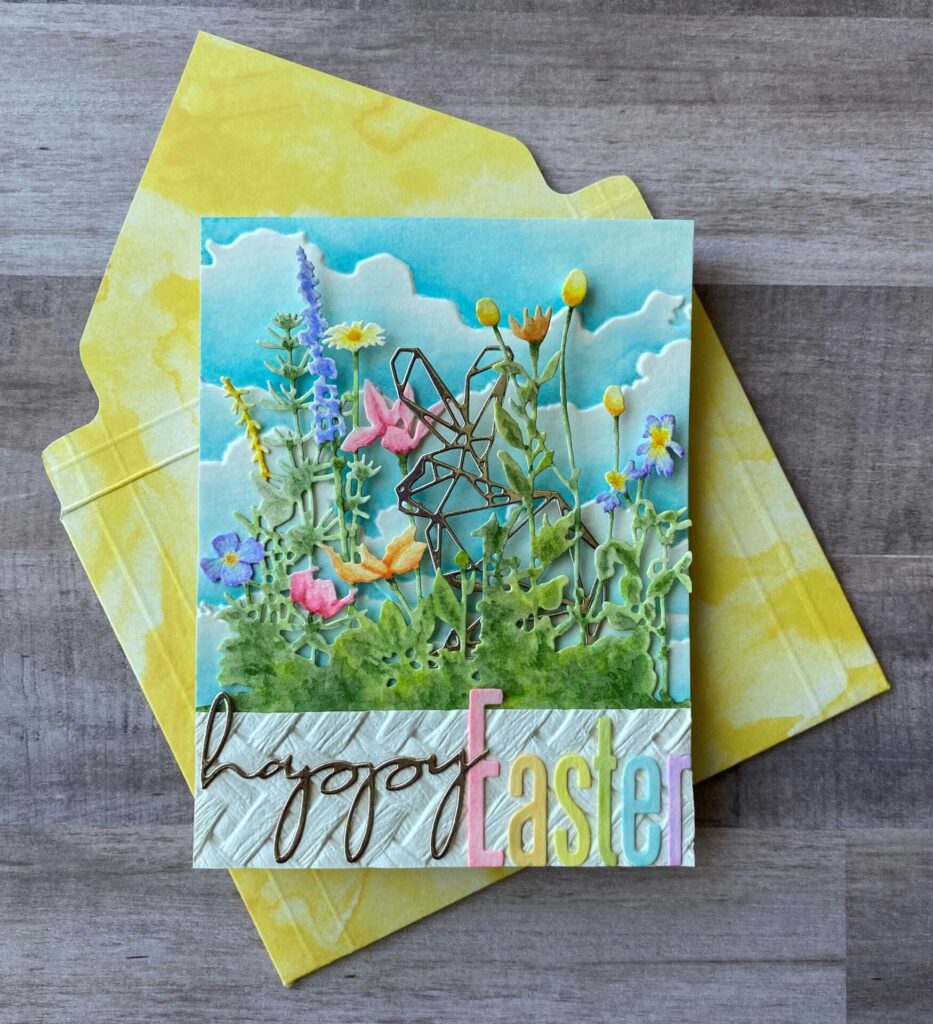
Easter Wildflowers Card
Hello crafty makers! Today I’m sharing how I made this Easter wildflowers card. It features a brushstroke watercolor technique. However, if watercolor isn’t your forte, you could use colored cardstock and/or specialty cardstock instead. For example, glitter, metallic, and holographic cardstock would all look lovely. I made mine for Easter, but the sentiment could easily be changed to fit your specific need. This Easter wildflowers card could also be a birthday, thank you, hello, thinking of you, or Mother’s Day card.
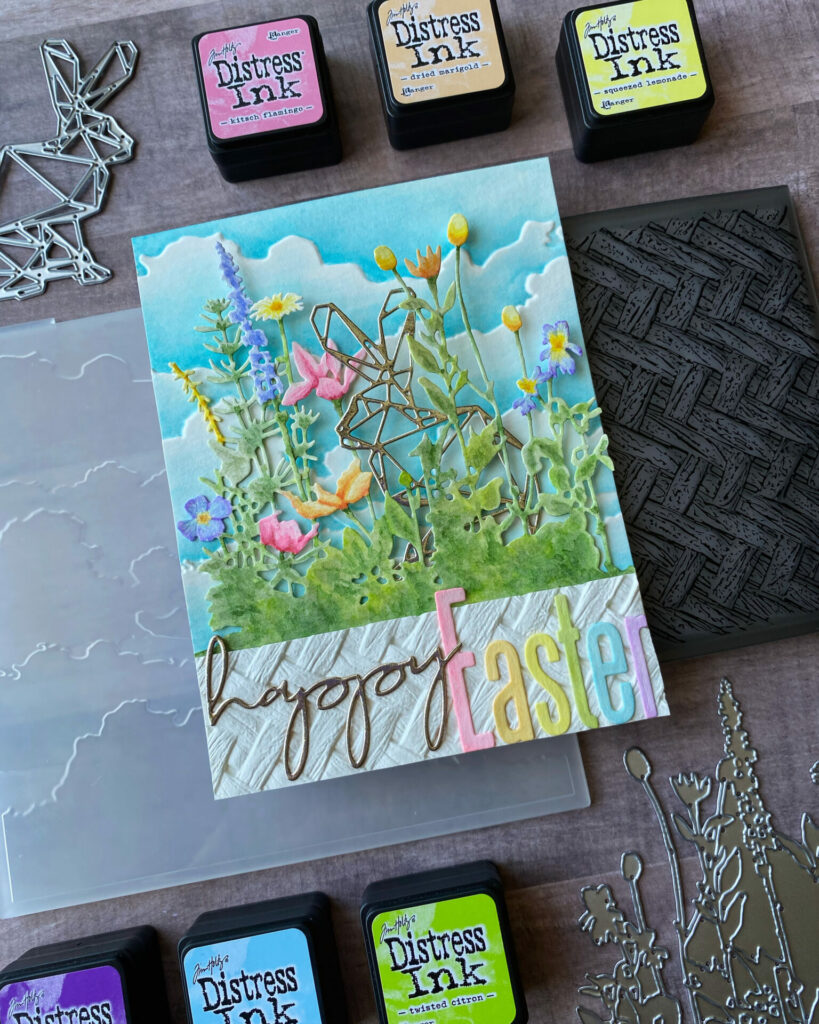
Upon writing up this blog post, I discovered that the rabbit die I used is discontinued. Sorry about that. It’s also the only rabbit die I have. Feel free to use a die that is already in your collection. Or if you need a little retail therapy, there are plenty of wonderful rabbit/bunny dies on the market. Also, if you’re keeping with the Easter theme, little chicks would look cute too. If you’re making this card for another occasion, any animal would work.
Link Abbreviations
- AMZ – Amazon*
- Sb.com – Scrapbook.com*
- SB – Spellbinders*
- SIZ – Sizzix*
- SSS – Simon Says Stamp
- RI – Ranger Ink*
- BA – Blick Art Materials*
Full Disclosure: This post contains affiliate links which are indicated with an (*). If you click on an affiliate link and later make a purchase, I may receive a small commission. Clicking on an affiliate link which earns a commission does NOT result in additional charges to you or cost you anything extra. Money earned via affiliate links helps pay the fees to keep this blog up and running. Thank you so much for shopping through my links to show your support for the brands that we love and the products that I share!
Supplies Used / Substitutions:
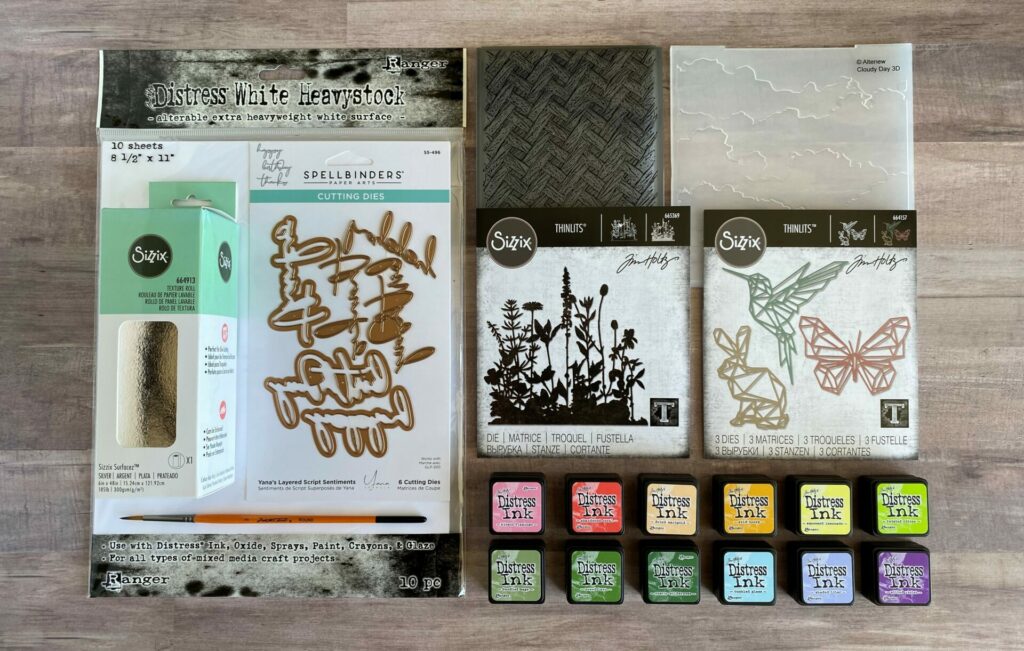
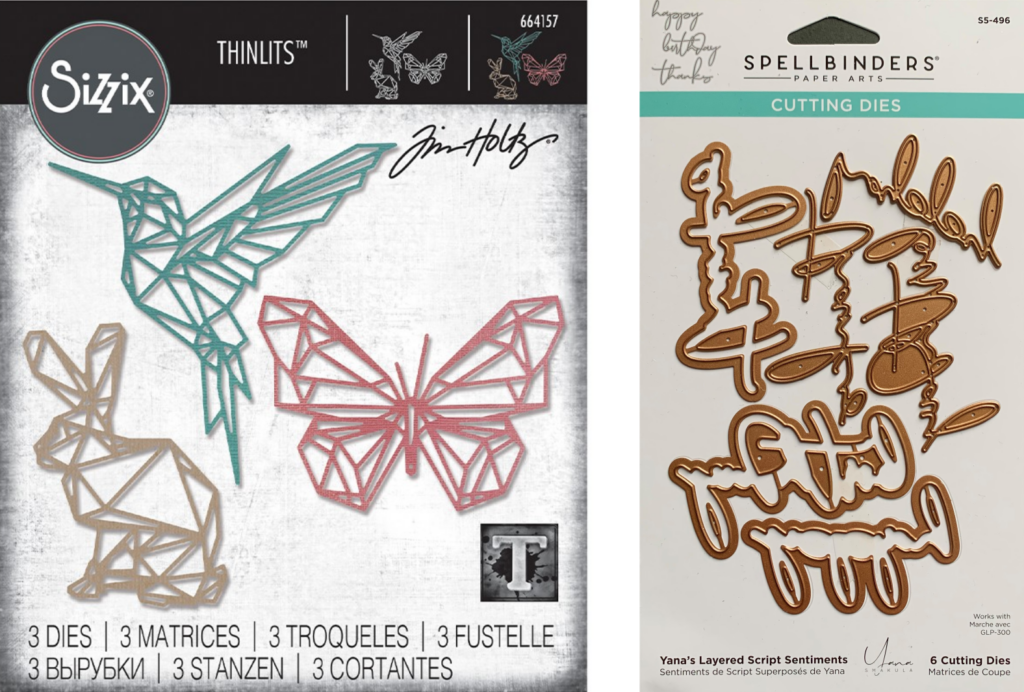
- Sizzix Tim Holtz Thinlits Dies – Flower Field #665369 | Sb.com | SIZ | AMZ | SSS |
- Sizzix Tim Holtz Thinlits Dies – Geo Springtime #664157 | AMZ / Any bunny or animal die
- Spellbinders Dies – Yana’s Layered Script Sentiments SKU: S5-496 | Sb.com | AMZ / Any sentiment die
- Altenew 3D Embossing Folder – Cloudy Day ALT6207 | Sb.com | SSS / Optional or any cloud stencil
- Sizzix Tim Holtz 3D Embossing Folder – Intertwine #664759 | Sb.com | SIZ | AMZ | SSS / Any embossing folder
- Distress White Heavystock | Sb.com | AMZ | RI | SSS / Any white heavyweight cardstock
- Canson 140lb Watercolor Paper – Cold Press | BA | AMZ / Any watercolor paper
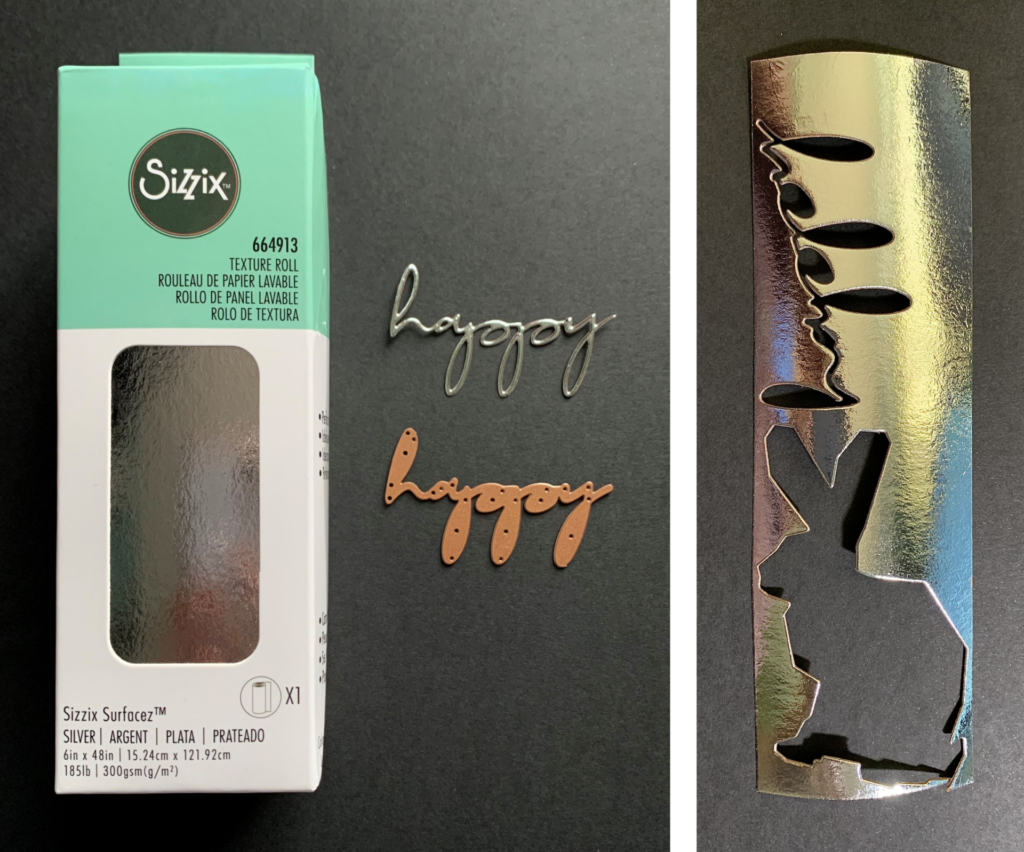
- Sizzix Surfacez Texture Roll – Silver #664913 | Sb.com | AMZ / Any specialty cardstock
- Water Brush | Sb.com | AMZ | SSS / Any watercolor brush
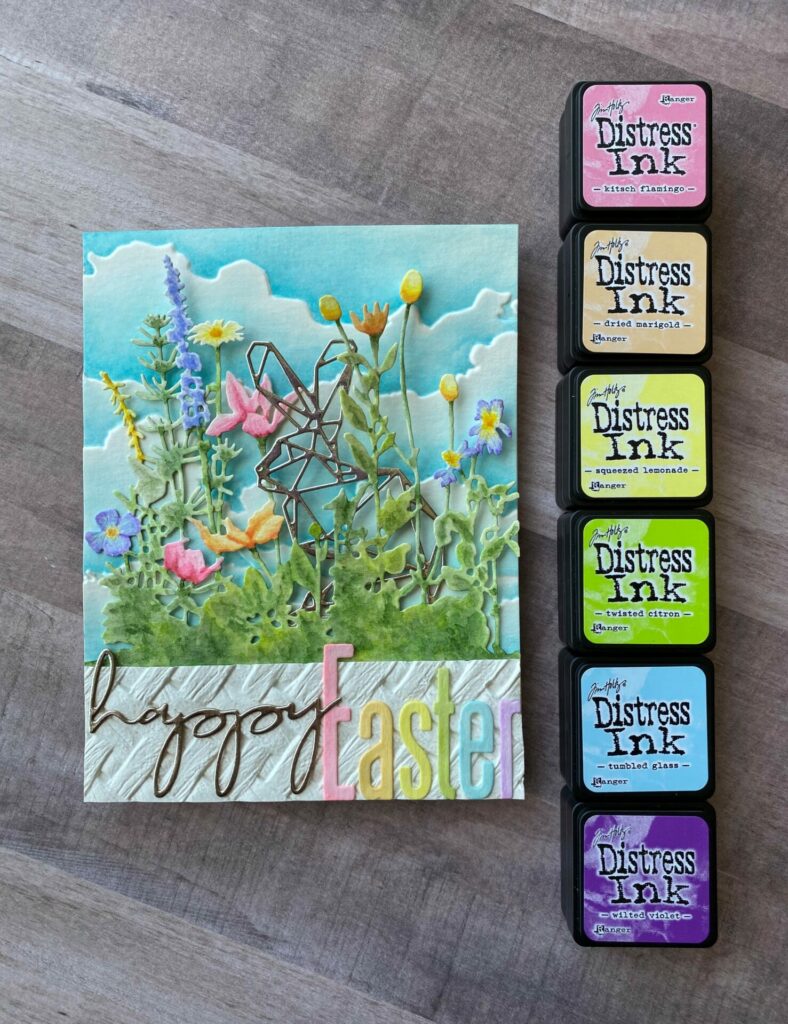
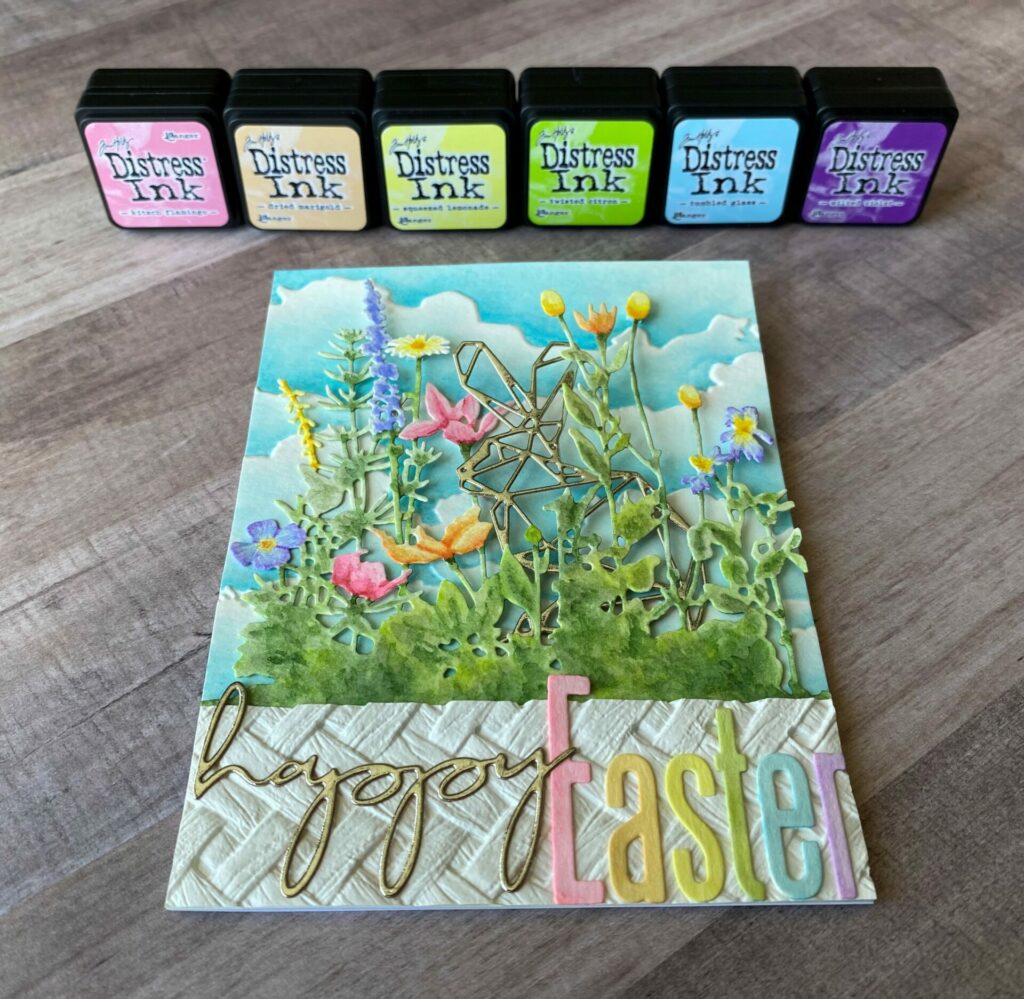
- Distress Ink Pads – full size & mini ink pads linked below / Any watercolors
- Kitsch Flamingo | Sb.com | RI |
- Abandoned Coral | Sb.com | RI |
- Dried Marigold | Sb.com | RI |
- Wild Honey | SSS | RI |
- Squeezed Lemonade | Sb.com | RI |
- Twisted Citron | Sb.com | RI |
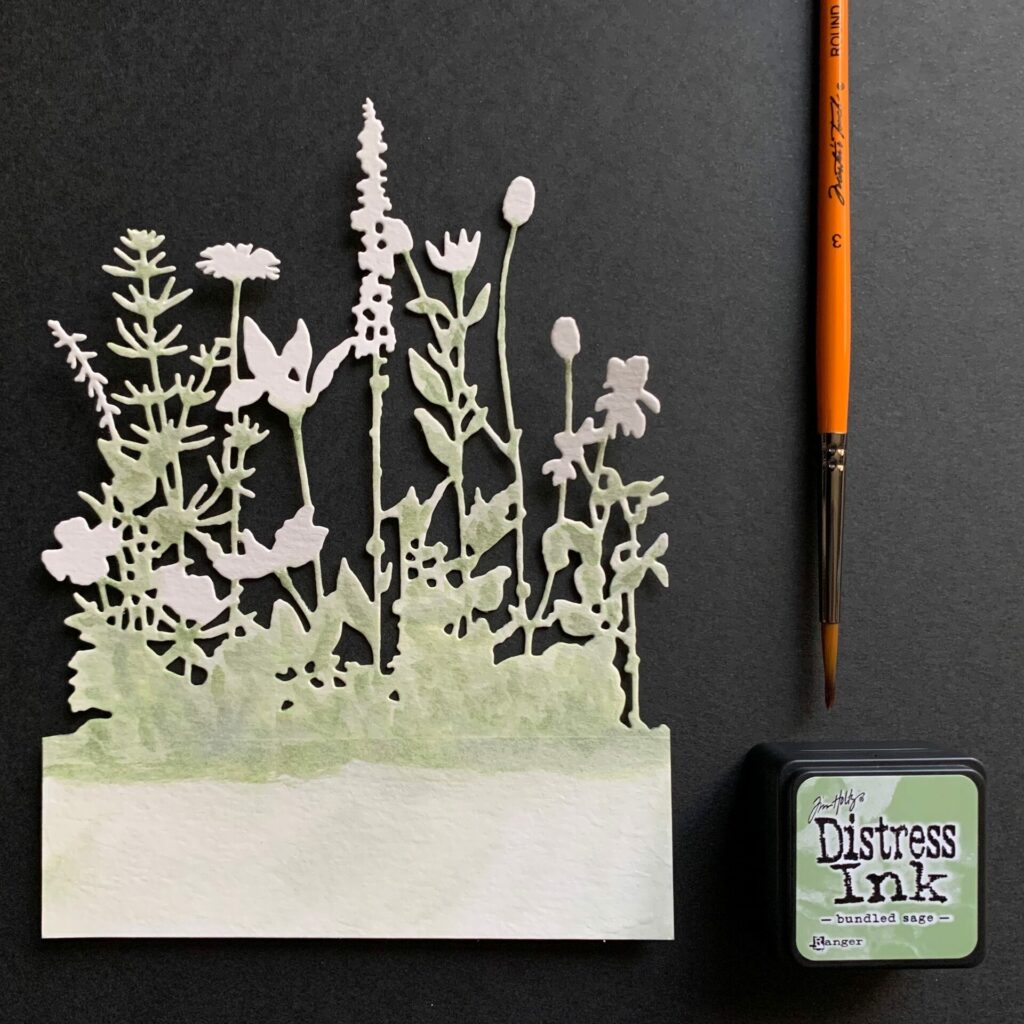
- Bundled Sage | SSS | RI |
- Mowed Lawn | Sb.com | RI |
- Rustic Wilderness | Sb.com | RI |
- Tumbled Glass | Sb.com | RI |
- Shaded Lilac | Sb.com | RI |
- Wilted Violet | Sb.com | RI |
Tools Used / Substitutions:
- Sizzix Big Shot | SIZ / Spellbinders Platinum Six | SB / Any die cutting machine
- Tim Holtz Glass Media Mat | Sb.com | AMZ / Non-Stick craft sheet
- Tim Holtz Comfort Paper Trimmer – 8.5 Inch | Sb.com | AMZ / Any paper trimmer
- Sizzix Tim Holtz Thinlits Dies – Alphanumeric Classic Upper #664223 | Sb.com | SIZ | SSS / Any alphanumeric dies
- Sizzix Tim Holtz Thinlits Dies – Alphanumeric Classic Lower #664224 | SIZ / Any alphanumeric dies
- EK Success Cutter Bee Scissors | Sb.com | AMZ / Any small sharp scissors
- Tim Holtz Reverse Action Tweezers #665304 | Sb.com | SIZ / Any reverse action tweezers
- Spray Bottle with water | Sb.com | SB | AMZ / Any spray bottle
- Tim Holtz Retractable Craft Pick | Sb.com / Toothpick
- Distress Collage Medium – Matte | Sb.com | RI / Bearly Art Glue | Sb.com | SB | AMZ | or any liquid adhesive
- Small Foam Adhesive Squares / Optional
- Washi Tape / Any low tact tape

Making The Card Base
First, I took an 8½” x 11″ piece of white cardstock and cut it in half, giving me two 8½” x 5½”pieces. Then, I folded one of them in half, which gave me a standard A-2 card size of 4¼” x 5½”. This will be the base of my Easter wildflowers card. You could also make your card base from any pastel color of cardstock. That’s what I would do if I were to make this card again.
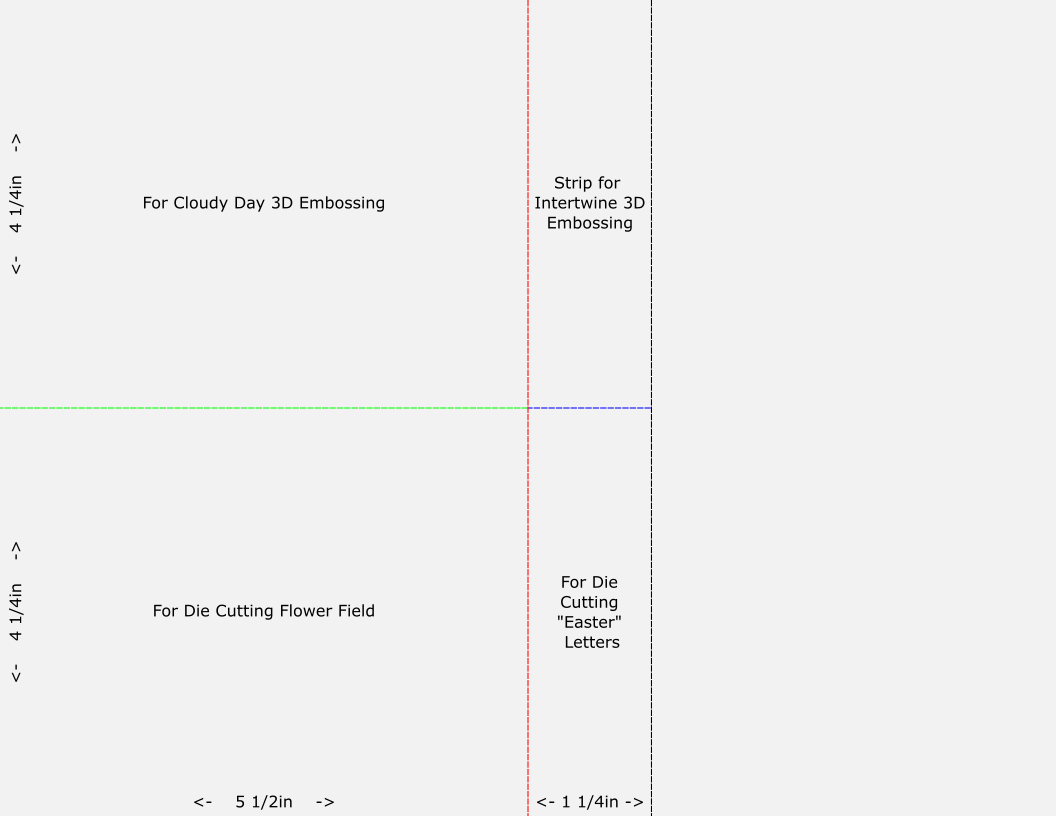
Trimming The Watercolor Paper
Next, I took a sheet of 8½” x 11″ watercolor paper and cut it in half at 5½ inches (red cut line). Then, I cut that piece in half at 4¼ inches (green cut line). After that, I took the other piece and cut off a strip at 1 ¼ inches (black cut line). Lastly, I cut that strip in half at 4¼ inches (blue cut line). For all this cutting I used the Tim Holtz Tonic guillotine comfort paper trimmer. If you don’t have this, any paper trimmer will work just fine. Or you could use an x-acto knife and ruler as well. This watercolor paper will be used for die cutting and embossing elements used in the Easter wildflowers card.
Die Cutting The Flower Field
After trimming the watercolor paper down to size, it was time to die cut. For this I used the Sizzix Big Shot machine. You can use whatever die cutting machine you’re comfortable with. But just remember all machines are not created equal. What may work for me and my machine may not work for you. So I encourage you to do your own research and make sure the dies are compatible with your machine first.
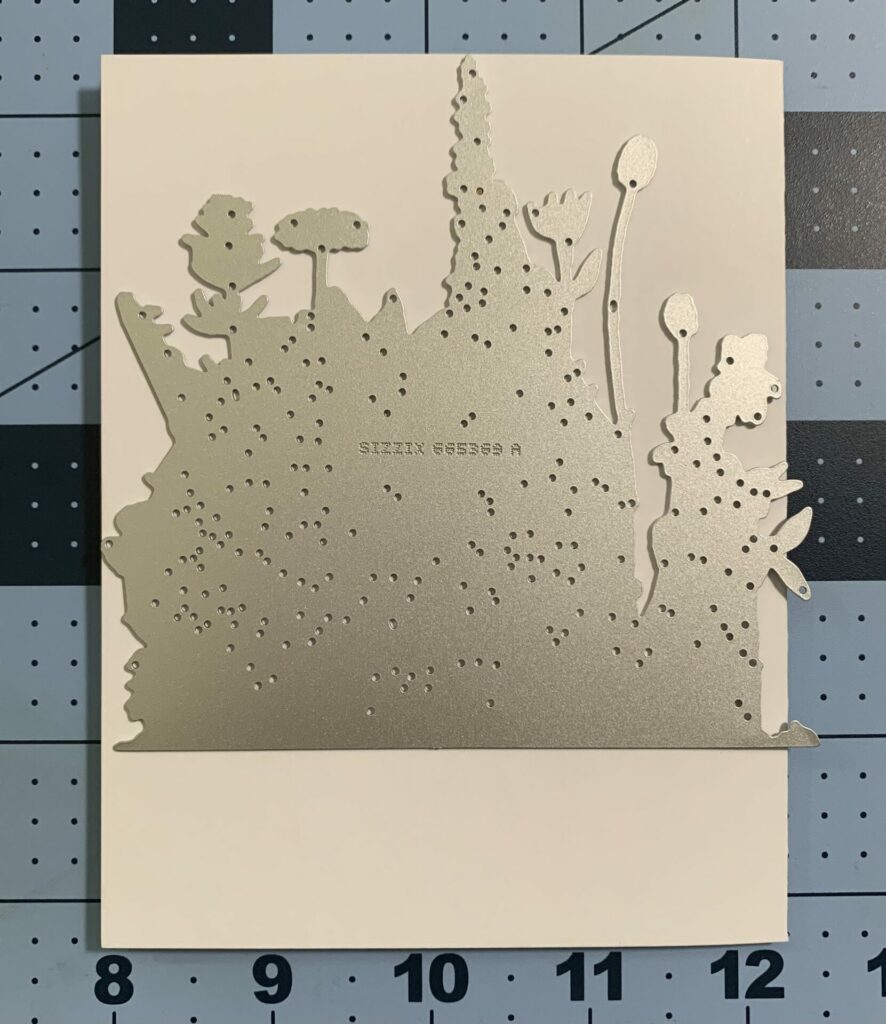
First, I took the 4¼” x 5½” piece of watercolor paper to cut the wildflowers for this Easter card. I placed the Sizzix flower field die face down and aligned it to the top and left side of the paper (see image above). Make sure the bottom edge of the die is straight horizontally. You can do this with a t-square or by measuring up 1¼ inches on both sides with a ruler and making a mark with a pencil. Then, line the bottom edge up with those marks. I adhered the die to the paper with some washi tape and ran it through the Big Shot. You might have to do a couple of passes depending on the level of pressure your machine applies. Then, I weeded out all the excess pieces of paper from the die. I did this using the Tim Holtz Tonic Studios retractable craft pick.
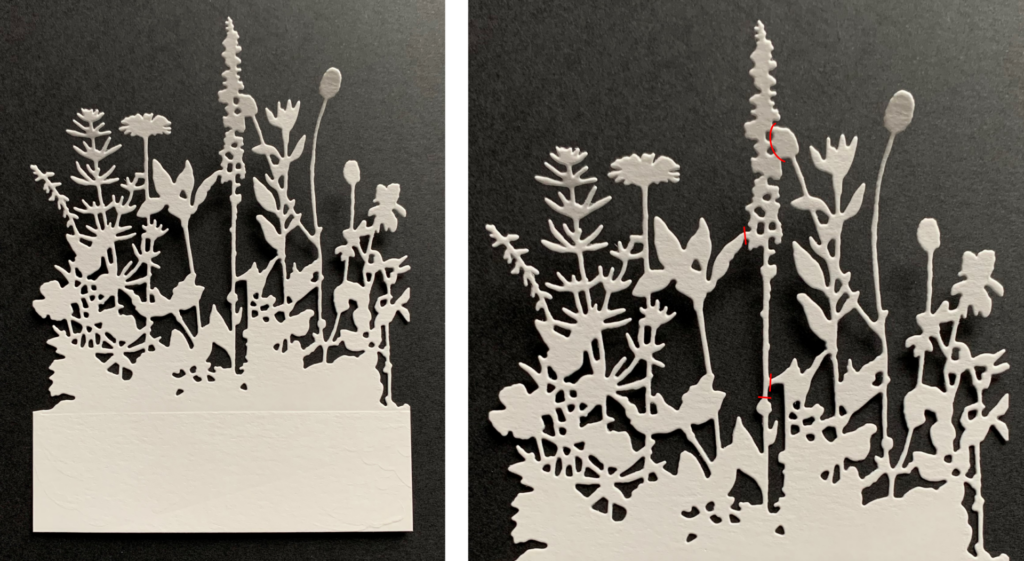
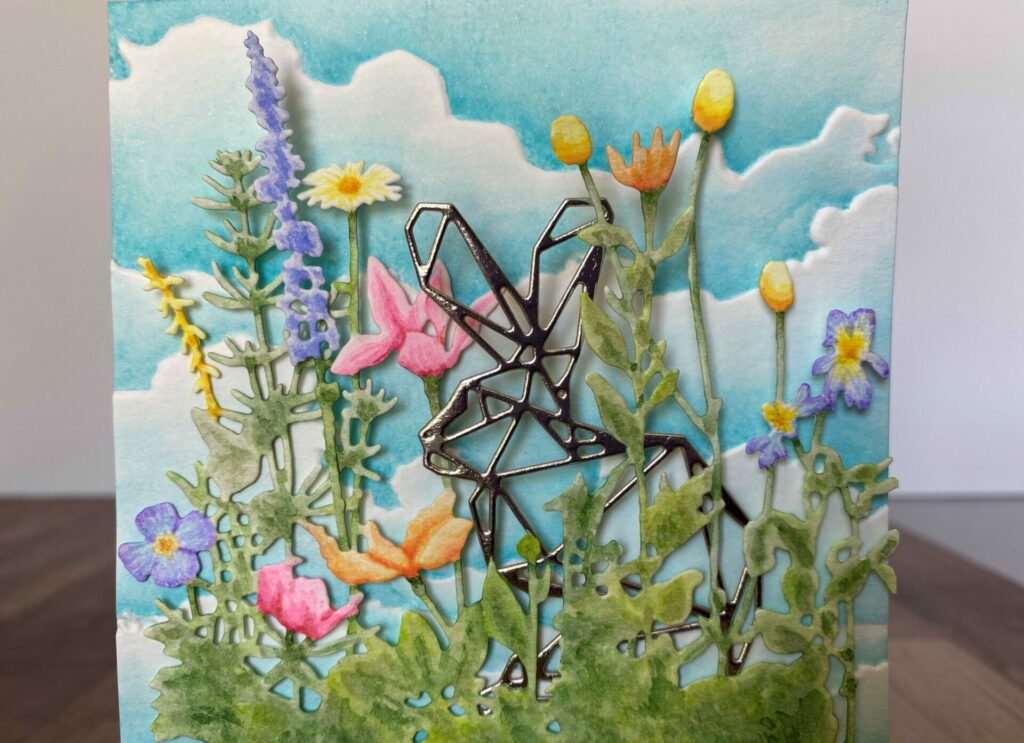
After weeding it should look like the above left image. Next, I used my scissors to cut out the tall flower in the middle. I sniped along the red lines in the above photo on the right. Then, I used my scissors to round the corners of the flowers where I had just cut. This gets rid of the blunt straight lines to make it look more natural. Now we have a nice opening for the bunny (or whatever animal you’re using) to peek its head out from.
Die Cutting The Easter Letters
Then, I used the 4¼” x 1¼” strip of watercolor paper to die cut the “Easter” letters from for this wildflowers card. For this I used the Sizzix Alphanumeric Classic Upper and Lower dies by Tim Holtz. This can be done with all upper case or all lower case. You really don’t need to have both. I happened to have both, so I used them. Also, any sans serif alphanumeric dies would work. I placed the letters face down, adhered the dies to the paper with some washi tape, and ran it through the Big Shot. Then, I removed the die cut letters from the die with my craft pick.
Embossing The Panels
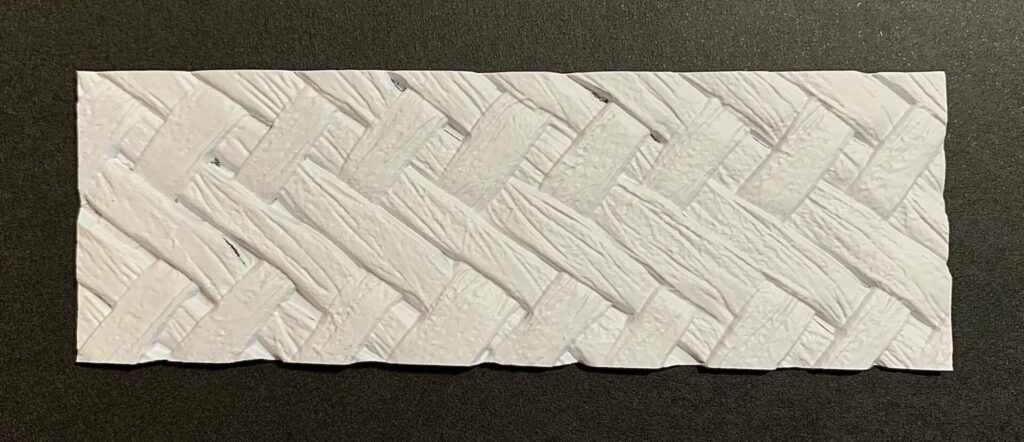
Next, I took the other 4¼” x 1¼” strip of watercolor paper and spritzed the front and back of it with water. Then, I placed it vertically into the Sizzix Tim Holtz Intertwine 3D embossing folder. The water helps soften the fibers of the paper so it doesn’t crack. For an example of why I recommend using the water spritz, check out my side-by-side photo comparison in my Elegant & Simple Card tutorial. Next, I ran it through the Sizzix Big Shot two times (it makes for a deeper and crisper impression.) Each machine applies a different amount of pressure. So I recommend doing some small test swatches to see how many passes is ideal for your machine. Then, I removed the strip from the 3D embossing folder and set it aside to dry. I also set something light on top of it to ensure that it dried flat.
After that I took the last 4¼” x 5½” piece of watercolor paper and spritzed the front and back of it with water. I put it in the Altenew Cloudy Day 3D embossing folder, aligning it with the top left corner. Then, I ran it through the Sizzix Big Shot two times. I removed it from the folder and let it dry. This embossing folder creates the perfect background for the Easter wildflowers card. I know I will be using this folder a lot.
Watercolor Advice
I know this might look a little intimidating. But I promise you it’s not. It’s actually really easy. The embossing folder has done most of the work for you already. All you need is distress ink in the shade tumbled glass (or light blue watercolor), glass media mat (or non-stick craft sheet), spray bottle with water, and a paintbrush.
First, you want to start from the bottom and work your way up. I say this because this part of the card will get covered up later. So this is the perfect place to practice and get the hang of it. You don’t have to worry about making a mistake because if you do, no one will see it. The more clouds you do, the better you will get at it. So by starting at the bottom, your best clouds will be at the top. And that’s what will show through when your card is finished.
The distress ink is really good for this because it blends out nicely, and it’s water reactive. So if you get a little too heavy handed with the ink, you can run a wet brush over it and lift off a fair bit of the color with a paper towel.
Water Coloring The Clouds
First, you want to smoosh some ink onto the media mat or craft sheet. Then, spray some water on the mat (not on top of the ink, we want to keep these separate.) Also, add more ink and water to your pallet when needed. I had to to this constantly. Also, you’ll want to work on one cloud at a time.
So let’s get water coloring. First, load up your brush with water (not dripping wet). Start with the bottom cloud. Staying within the lines, paint the whole cloud with water. Now pick up some tumbled glass ink with your brush, and apply it to the bottom of the cloud. Blend the color upward gradually. Then, wet your brush to blend it out. Add some more blue to the bottom of the cloud and blend it upward. Next, add some more water to the top of the cloud to blend it out and keep the paper light and white. So basically you’re going back and forth between blue then water, blue then water. You want the bottom of the cloud to be blue, and gradually fade up to white at the top of the cloud. Also keeping the cloud wet will ensure an even blend.
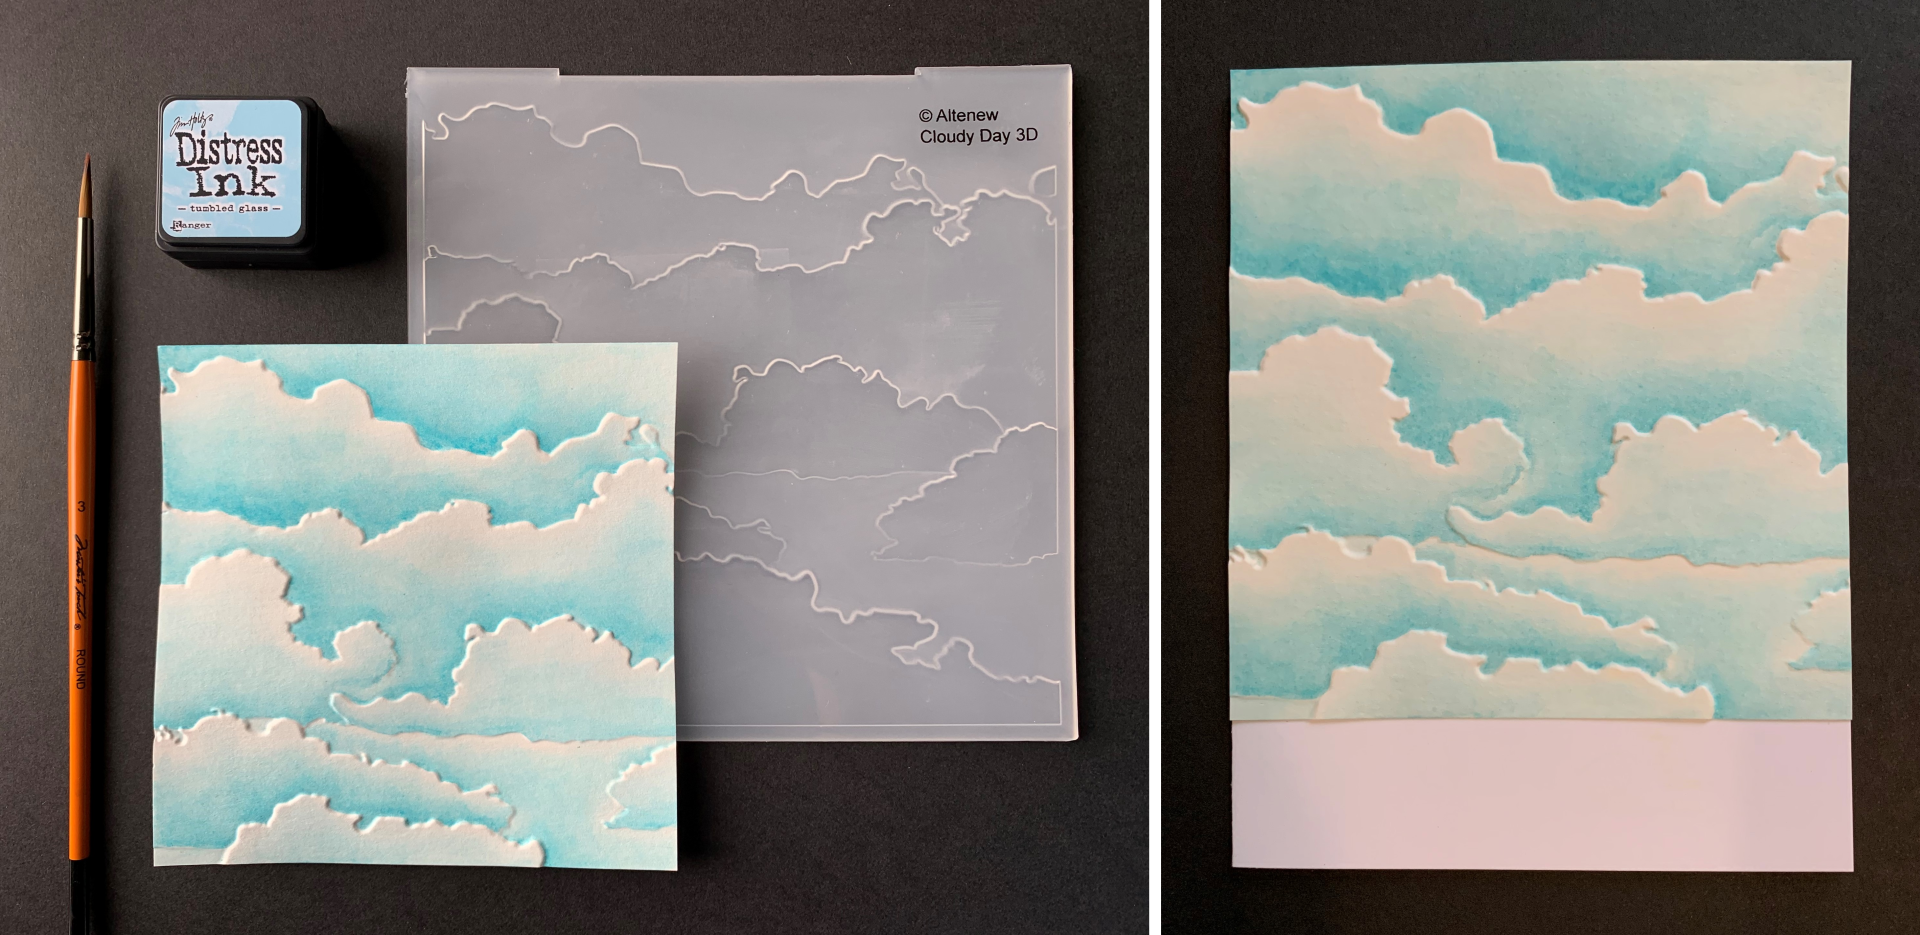
I continued to watercolor the clouds one at a time moving upward. When I finished coloring all the clouds I left the panel to dry. After the cloud panel was dry I glued it to the front of my card base with distress collage medium. Then, I set my big shot platform (or use something else that is flat and heavy) on top of it while the glue dried.
Water Coloring The Wildflowers
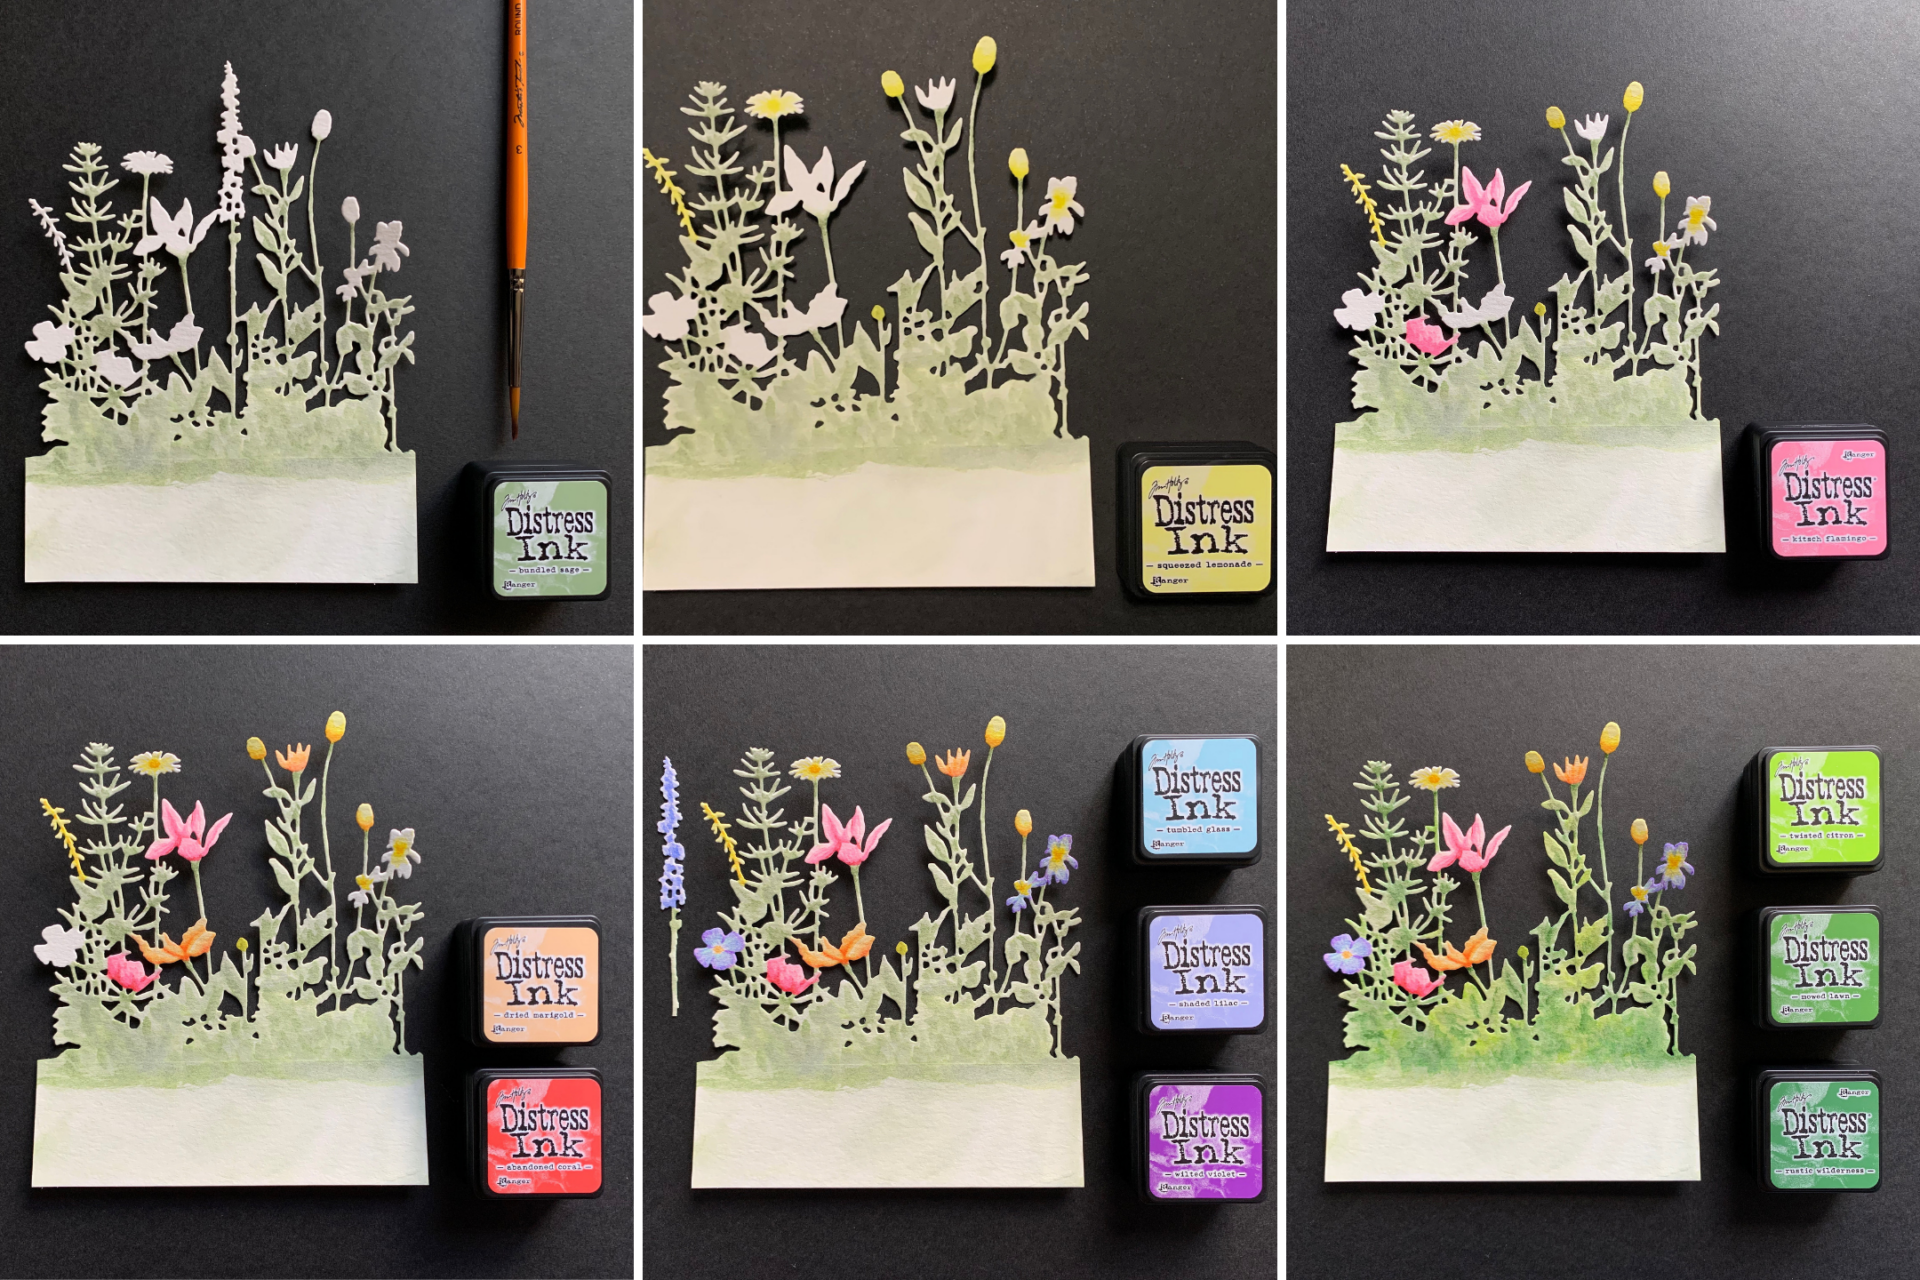
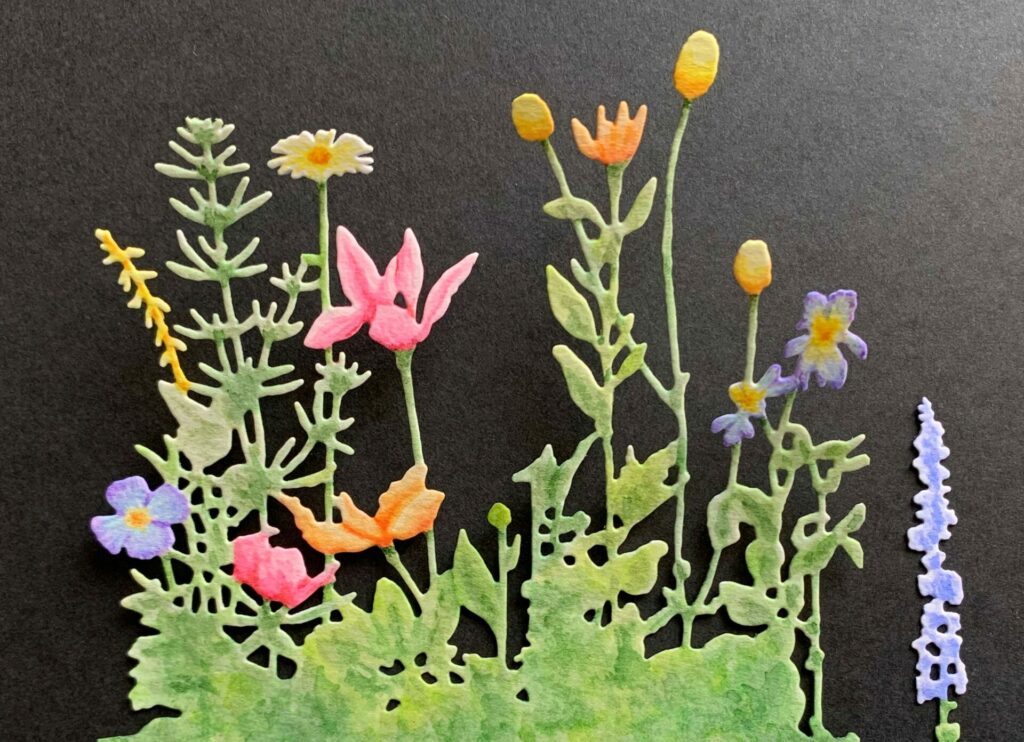
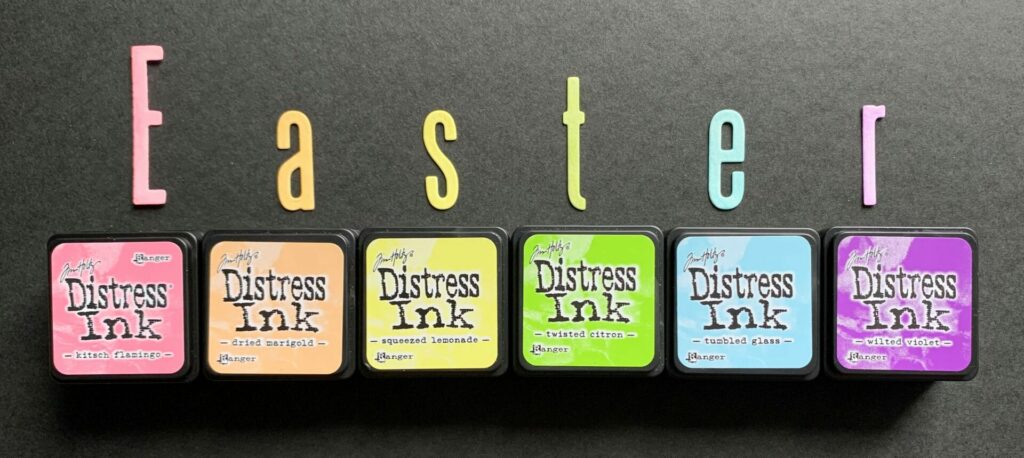
For this part you can go as loose or as detailed as you want. It is easier if you choose to go with the looser style. Here I used Tim Holtz distress ink in the shades bundled sage, squeezed lemonade , kitsch flamingo, dried marigold, and shaded lilac. If you are using watercolors, you will need the following pastel colors: green, yellow, pink, orange, and purple. Also, don’t feel like you have to use this specific color pallet. You can use whatever colors you want.
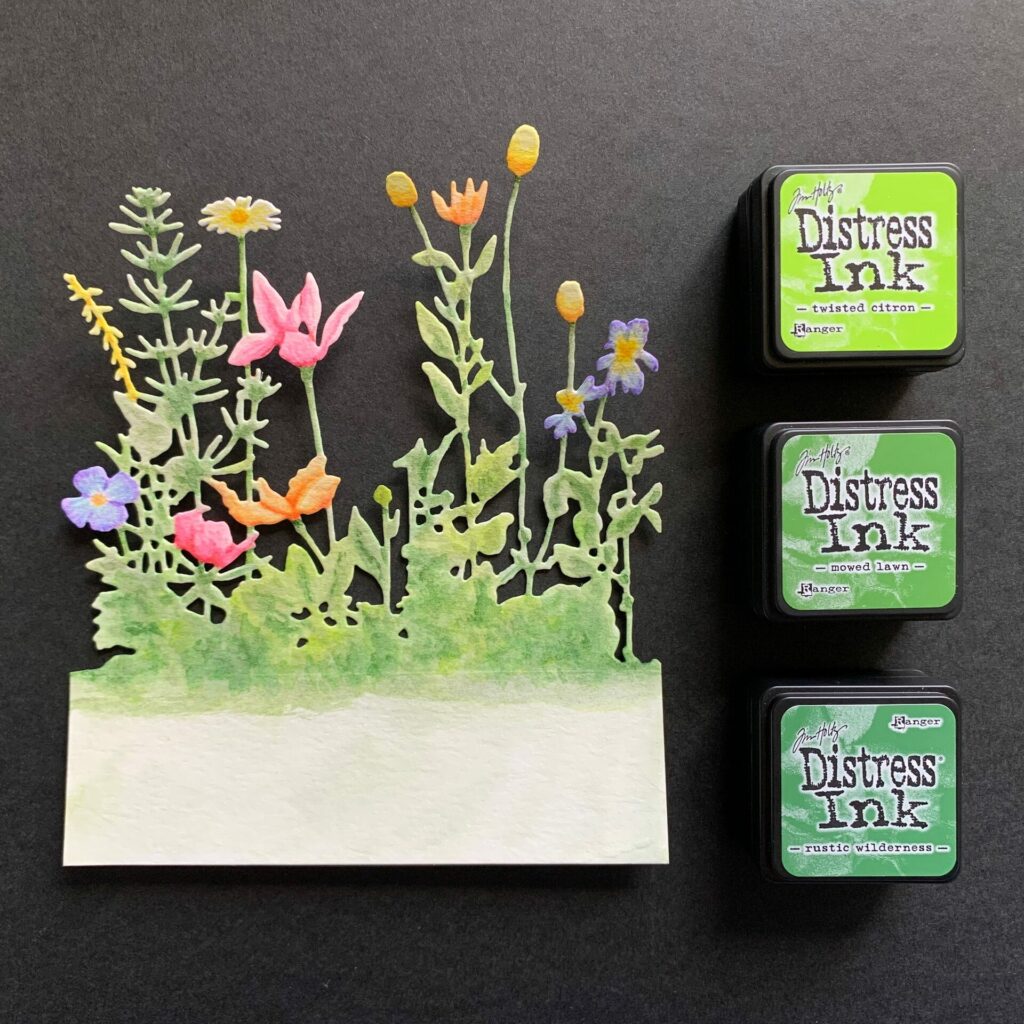
I had intended to keep mine pretty simple. As you can see that didn’t happen. I added some extra colors. What can I say, my artist brain took over and decided it needed more depth and contrast. So if you want a more detailed look, and don’t mind spending a little extra time, these are the additional colors I used to add shading: wild honey, abandoned coral, tumbled glass, wilted violet, twisted citron, mowed lawn, and rustic wilderness. If you’re using watercolors or colored pencils, just use a darker shade of whatever colors you used for your main colors.
Time to watercolor the flowers for the Easter wildflowers card.
Green
For the green, I used distress ink in the shade bundled sage. First, I wet my brush and painted the stems and leaves with water. I worked mine one stem at time. Also, try not to get the flowers wet at this stage. If you do, the green ink will bleed when added into the flower and will make it look dingy. We want the flowers to be bright and cherry. Then, I added the green everywhere except the flowers. See image below for reference. Next, I let it dry and added another layer of green. I used the side of the brush in a pouncing motion to create the look of foliage. Then, I added another layer of green to create shadows under the leaves, flowers, and at the bottom. Add as many layers to create the depth that you want.
In the more detailed version I added twisted citron, mowed lawn, and rustic wilderness. Since all flower stems are not that same shade of green. I applied twisted citron to the orange and yellow flower stems, and mowed lawn to the pink and purple flower stems. I used the same dabbing pouncing motion from before to add depth. To indicate shadows, I used rustic wilderness. I painted it under all the leaves and flowers. I also applied it to the bottom to add more foliage and create even more contrast. See image below for reference.
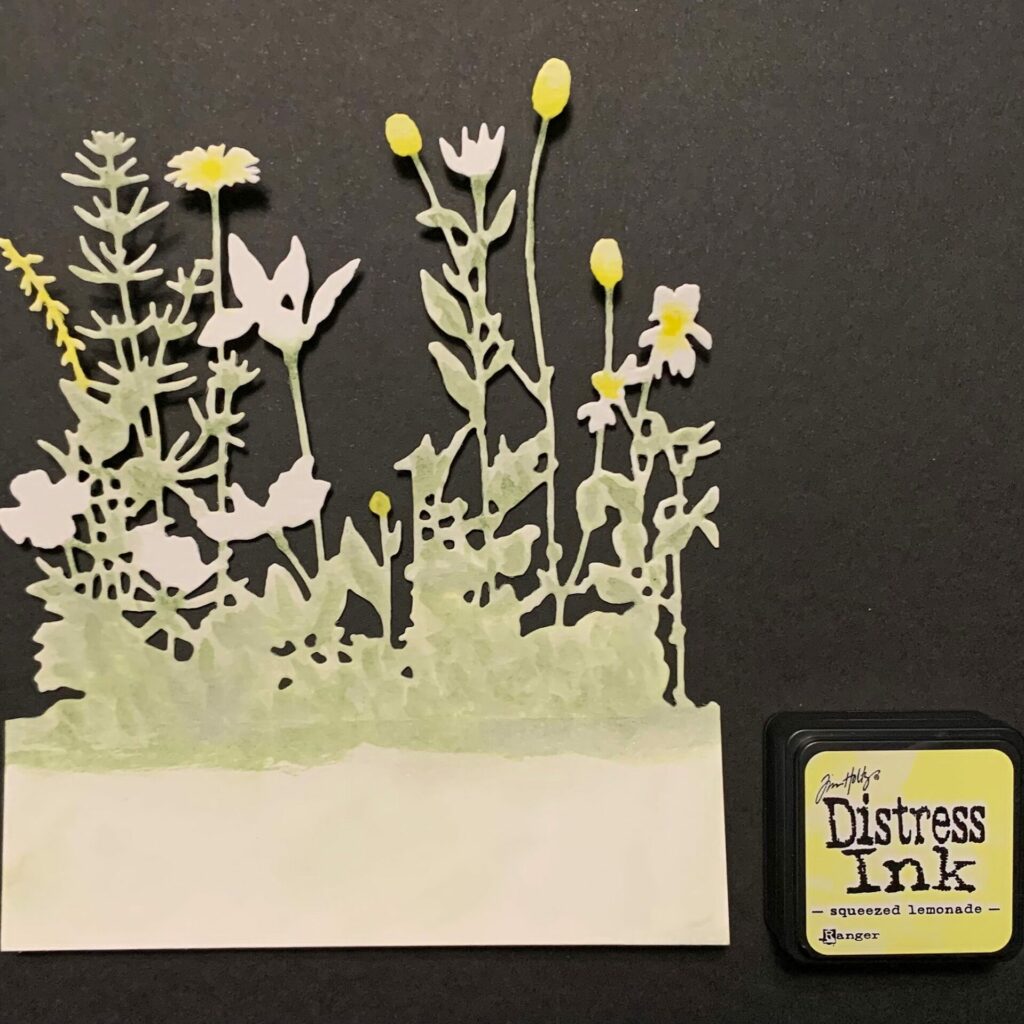
Yellow
For the yellow, I used distress ink in the shade squeezed lemonade. I picked up the yellow ink with my brush and added it to the flowers I wanted to be this color. Some I just added yellow to the center, and others I completely filled in. See image below for reference. I did a couple of layers with the yellow.
In the more detailed version I added wild honey for the shadows and center of the flowers. For the flower centers I used the tip of my brush to add tiny dots. See image at the bottom of this section for reference.
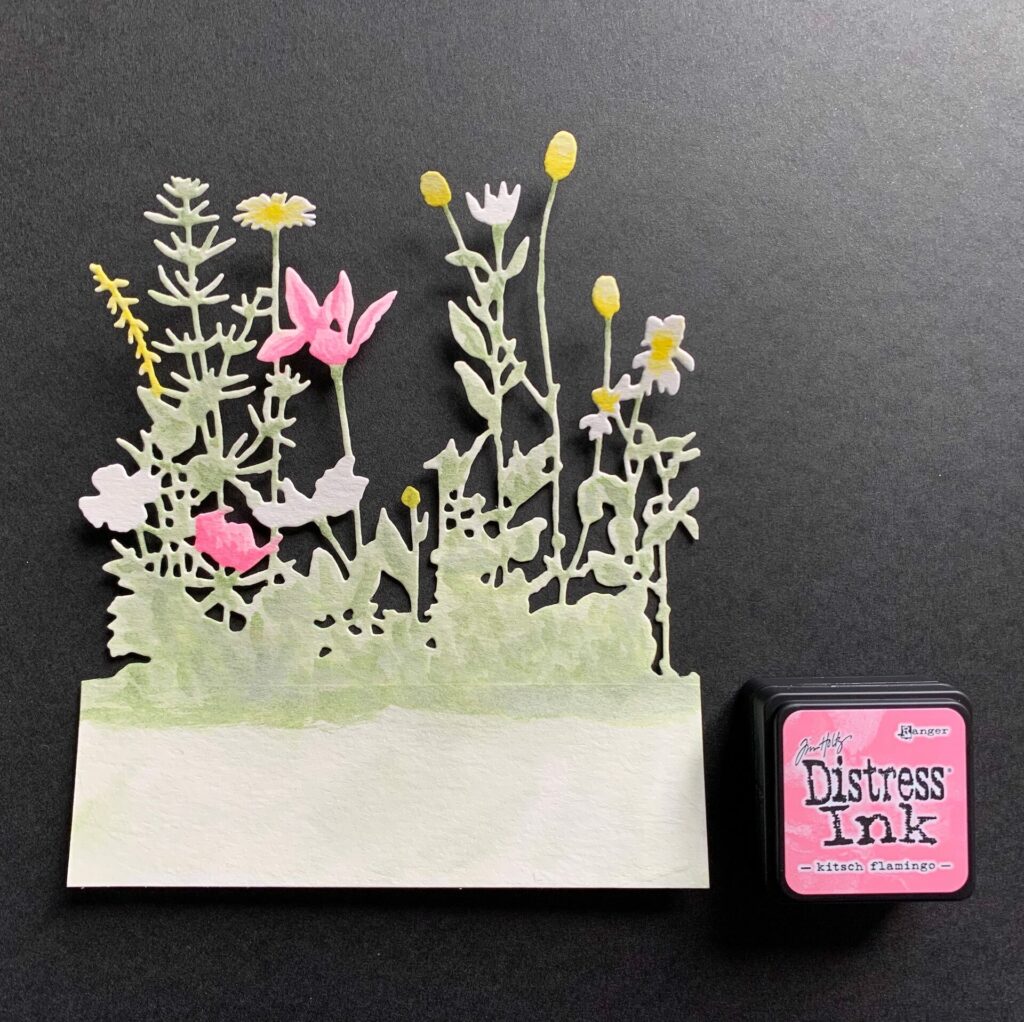
Pink
For the pink, I used distress ink in the shade kitsch flamingo. First, I picked up the pink ink with my brush and added it to the flowers I wanted to be this color. Then, I painted in lines where I thought the petals should go. I let it dry in between layers. For me it took about three layers. See image below for reference.
In the more detailed version I added abandoned coral for the shadows. See image at the bottom of this section for reference.
Orange
For the orange, I used distress ink in the shade dried marigold. This one follows the same instructions as the pink above. I picked up the orange ink with my brush and added it to the flowers I wanted to be this color. Then, I deepened the shadows with more layers of orange, letting it dry in between layers. See image below for reference.
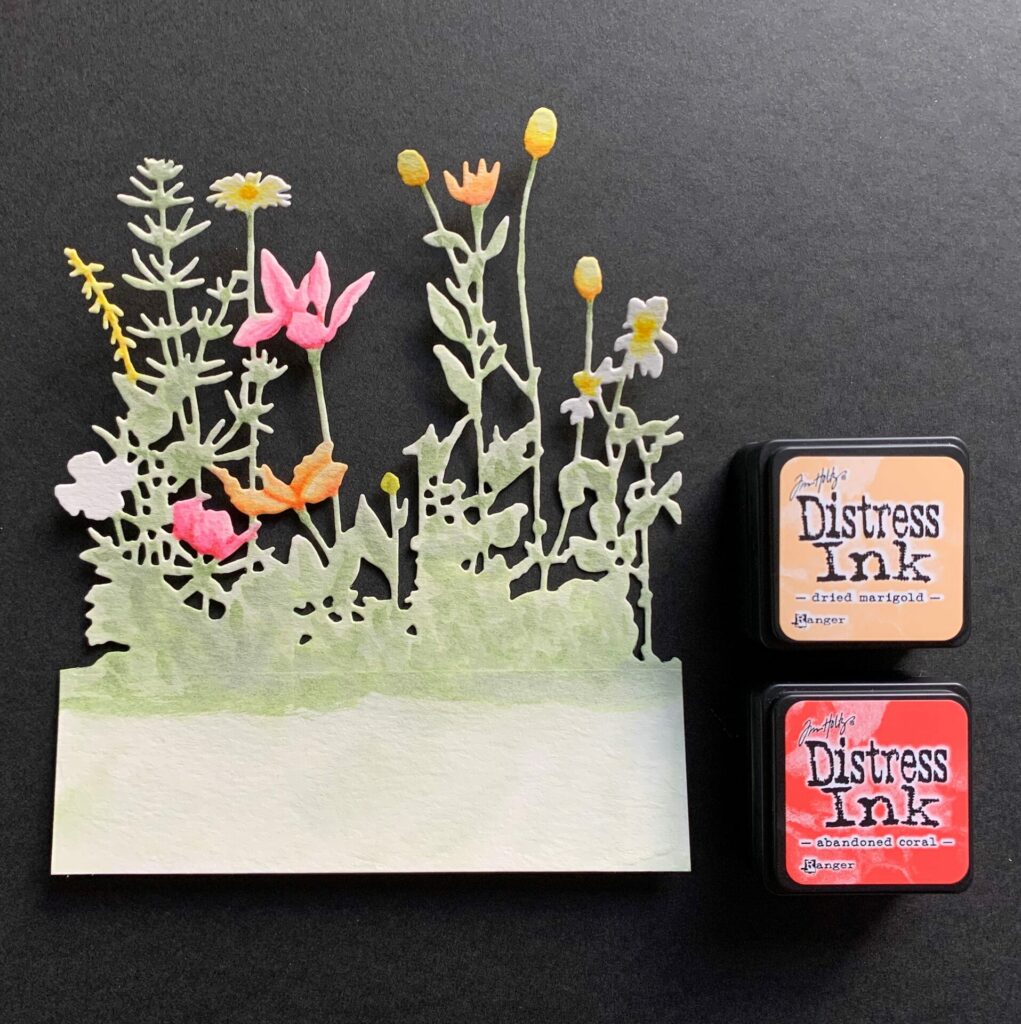
In the more detailed version I added abandoned coral for the shadows in the orange as well. See image above for reference.
Purple
For the purple, I used distress ink in the shade shaded lilac. This too follows the same method I used for the previous flowers. For the tall flower, I used three layers of ink to indicate shadows, and let it dry in between layers. On the other two flowers, I just added ink to the outer edges. Don’t let the purple touch the yellow. See image below for reference.
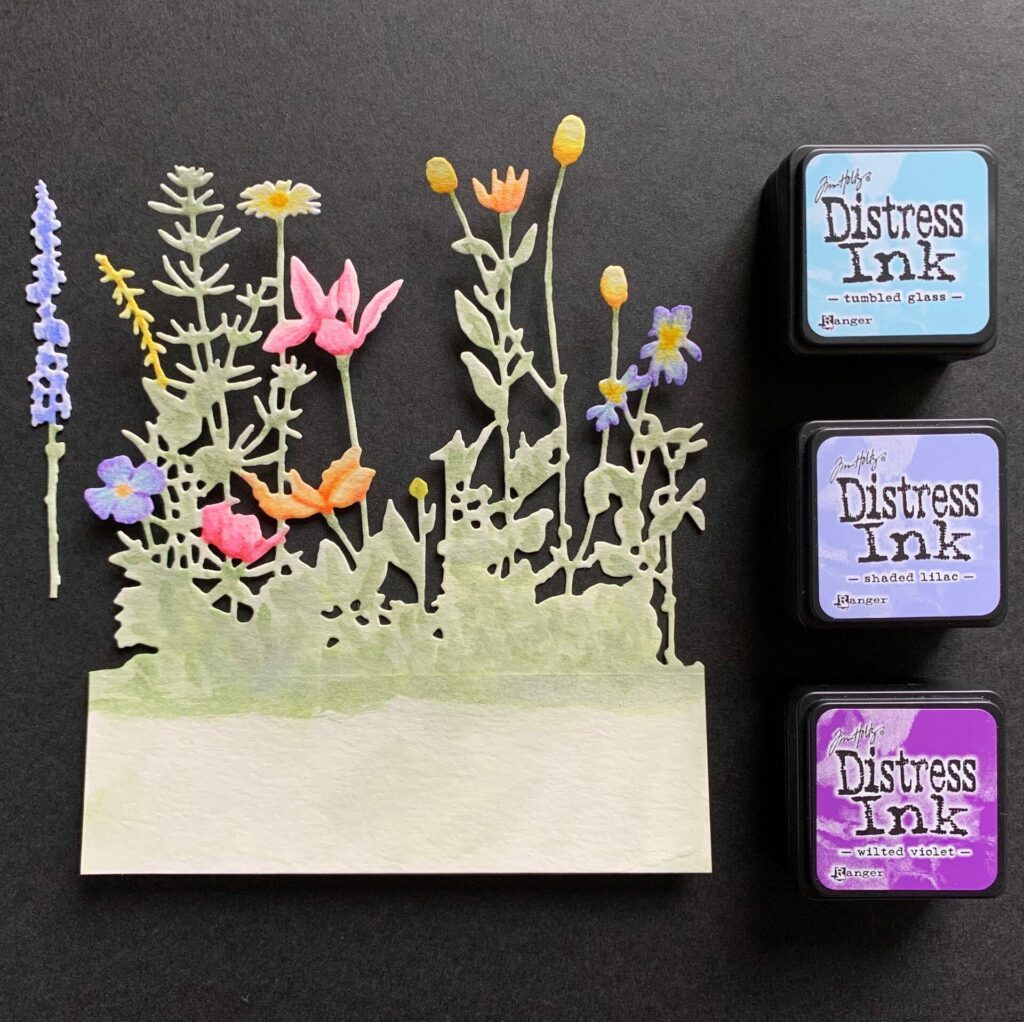
In the more detailed version I added tumbled glass for the mid tone and wilted violet for the shadows. I added the tumbled glass around the yellow part of the flowers and the wilted violet just on the outer edges. See image above for reference.
Water Coloring The Easter Letters
Next, I water colored the letters “Easter”. This one is so simple and pretty self explanatory. With a brush I inked up each letter. I colored the “E” with kitsch flamingo, the “a” with dried marigold, the “s” with squeezed lemonade, the “t” with twisted citron, the “e” with tumbled glass, and the “r” with wilted violet. See image below for reference.
Die Cutting The Bunny And Sentiment
Then, I cut the bunny and happy sentiment from Sizzix Surfacez Texture Roll in silver. If you don’t have this, that’s totally fine. There are many different specialty cardstocks that would work well here. For example, you could use glitter, holographic, or another brand of metallic in any color. The bunny die is from the Sizzix Geo Springtime set by Tim Holtz and the happy sentiment is from Yana’s Layered Script Sentiments set by Spellbinders.
First, I cut off a strip of the silver texture roll a little wider than the width of the bunny die. I positioned the dies face down on the silver texture roll and secured them with some washi tape. Then, I ran it through the Sizzix Big Shot. I weeded out the excess pieces of paper and remove them from the dies.
Gluing The Bunny & Purple Wildflower
First, I positioned the bunny die cut where I wanted and secured it in place with washi tape. See the left image below for reference. Next, I applied collage medium to permanently bond it into place. Glue placement shown below where the green circles are. Then, I placed my tweezers near the glued area (but not touching) to hold the two die cuts together while it dried.
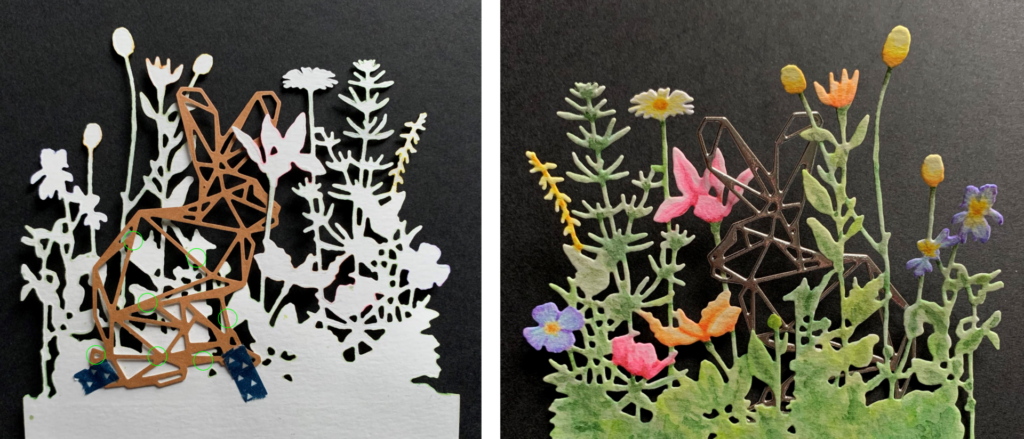
Next, I added the purple wildflower stem. This step is completely optional. You don’t have to add it if you don’t want to. First, I figured out where I wanted it to go. Then, I applied distress collage medium to the back of the stem and used my tweezers to hold the paper together while it dried. See right image below for flower stem placement. For glue placement see left image below indicated by the green circles.
Applying The Intertwine Embossed Panel
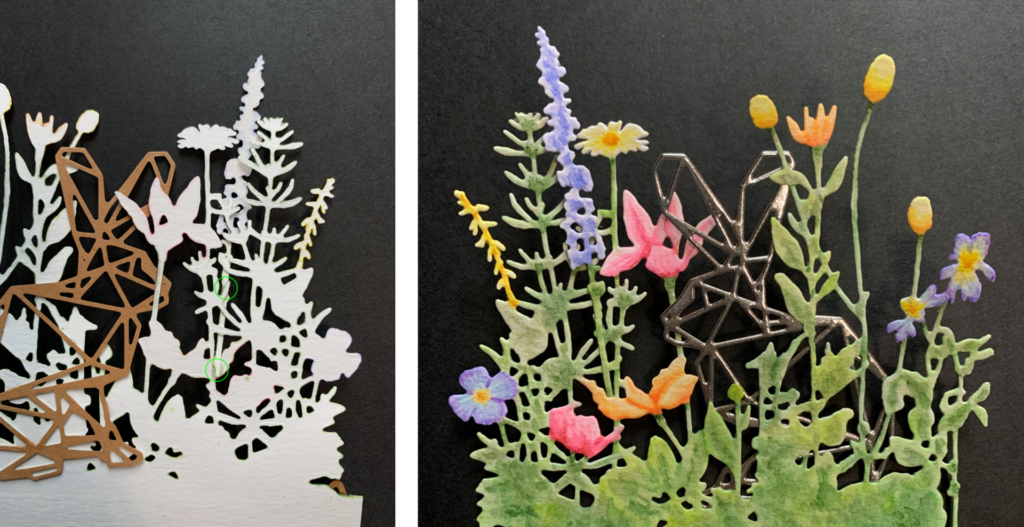
Then, I used the collage medium to adhere the intertwine embossed panel to the bottom of the wildflowers die cut. Make sure it’s flush with the bottom edge. Then, I set my Big Shot platform on top of it and let it dry.
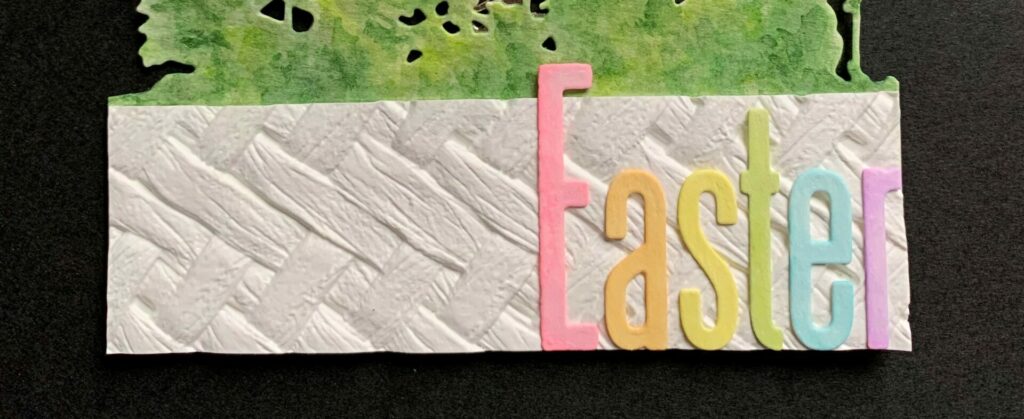
Gluing The Easter Sentiment
First, I cut a 1/16 inch strip of cardstock. This is so I can get equal spacing between letters while gluing. I glued down one letter at a time starting with the “r” and worked my way backwards to the left. Then, I added collage medium to the back of the “r” and lined it up with the bottom right side of the embossed panel. I used my reverse action tweezers to hold the papers together while it dried. After the “r” was dry, I taped the 1/16 inch strip to the embossed panel (beside the letter, left side.)
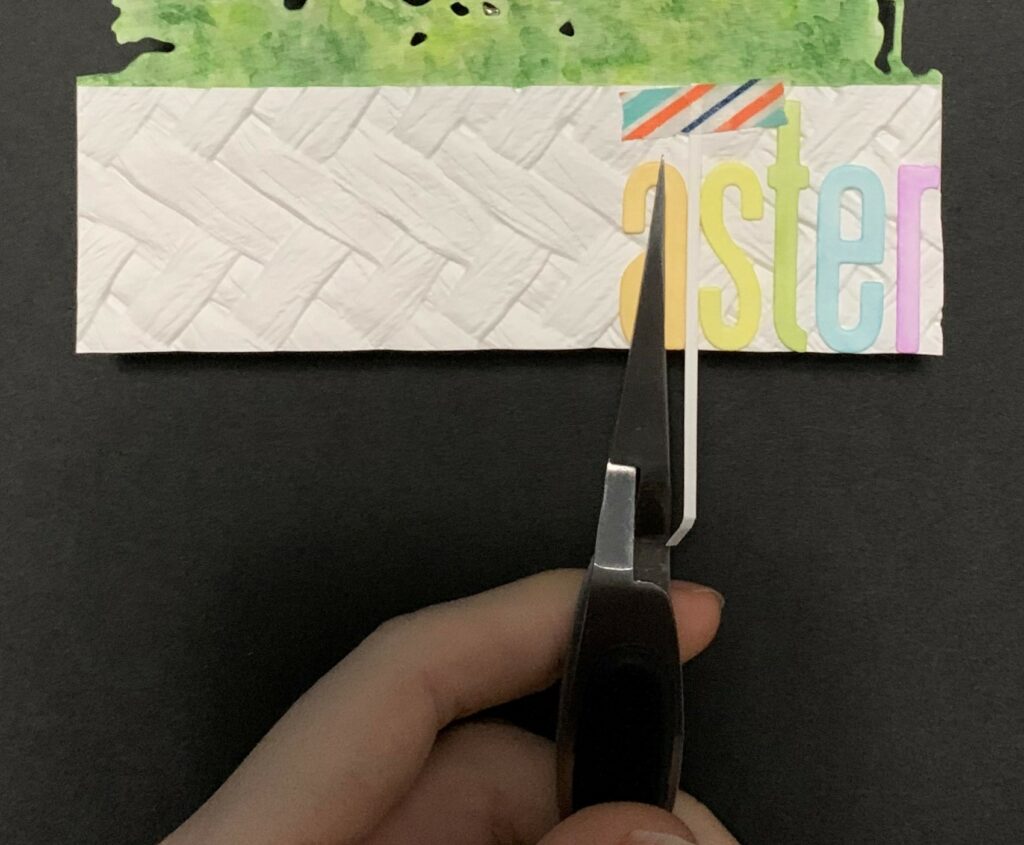
Next, I put glue on the back of the “e”. Then, I lined it up with the bottom and right up against the 1/16 inch strip of cardstock. See image above for reference. I clamped my reverse action tweezers on the “e” and let it dry. I continued to follow these steps for the rest of the letters in the word “Easter”. When your done it should look like the photo below.
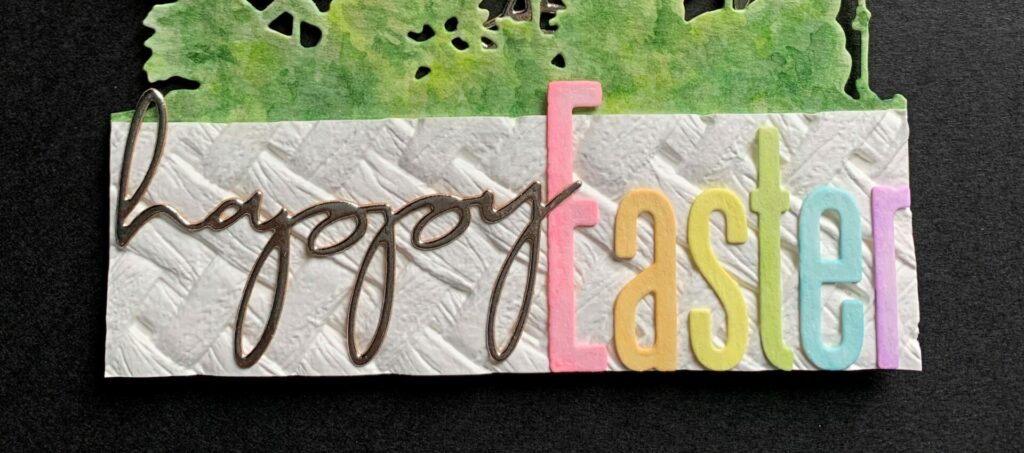
Gluing The Happy Sentiment
Then, I used the tweezers to hold the happy sentiment, and applied collage medium to the back of it. I positioned it where I wanted, pressed it down against the paper, and released the tweezers. After that I put my big shot platform on top of it and left it to dry. See image below for reference.
Putting It All Together
We’re almost done making the Easter wildflowers card! Now all we have to do is adhere it to the card base. First, I added some small foam squares behind some of the flowers to add dimension. You can add these wherever you like. And if you don’t want to use foam squares you can skip this step.
Next, I applied collage medium to the lower half of the die cut panel, and placed it onto the cloudy card base. I aligned it flush with the bottom and right edges of the card base. Then, I set my big shot platform on top of it and left it to dry. If you have any excess paper sticking out of the right side of your card, you can trim it off with you paper trimmer or scissors.
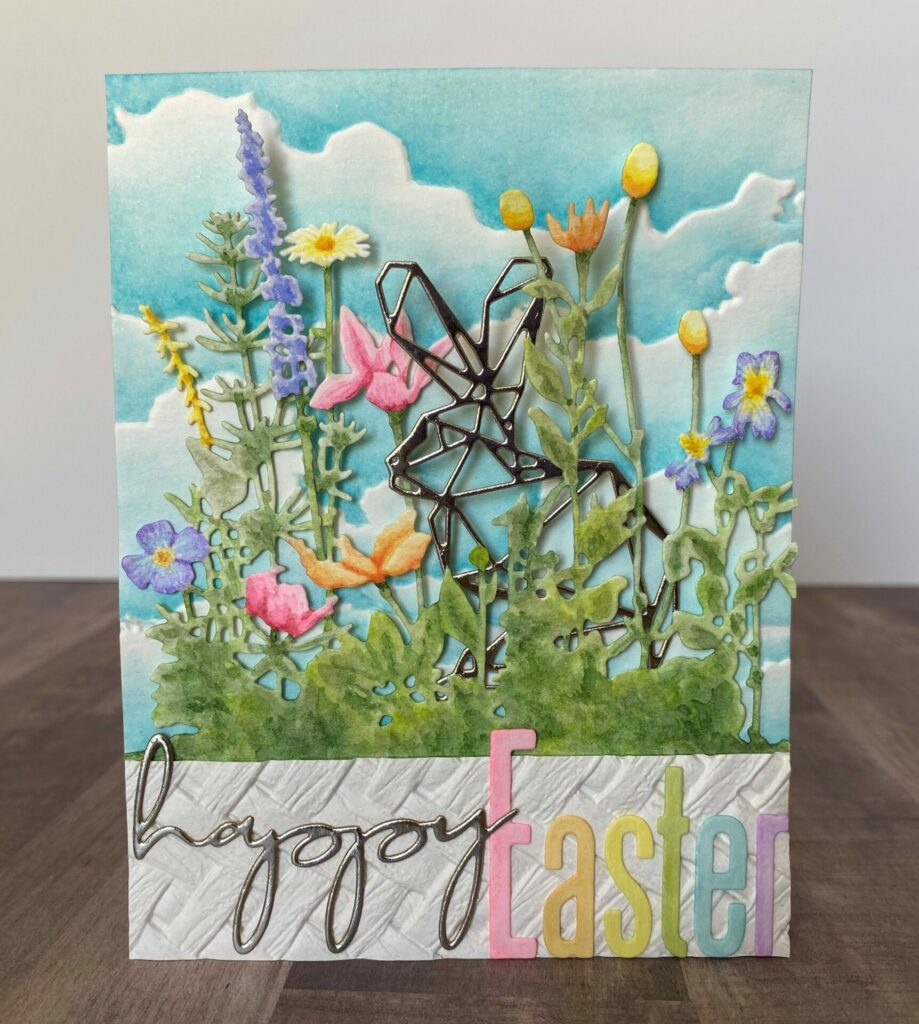
Easter Wildflowers Card Complete!
Congratulations! You have now completed your Easter wildflowers card! I hope you enjoyed this tutorial and have as much fun making it as I did. If you do make this card, please tag me and use the #grovecrafted on Instagram. I’d love to see it! Thanks for stopping by and I hope you found some new inspiration to create.

If you enjoyed making this wildflowers card for Easter, you might want to check out my Floral Easter Egg Card tutorial.