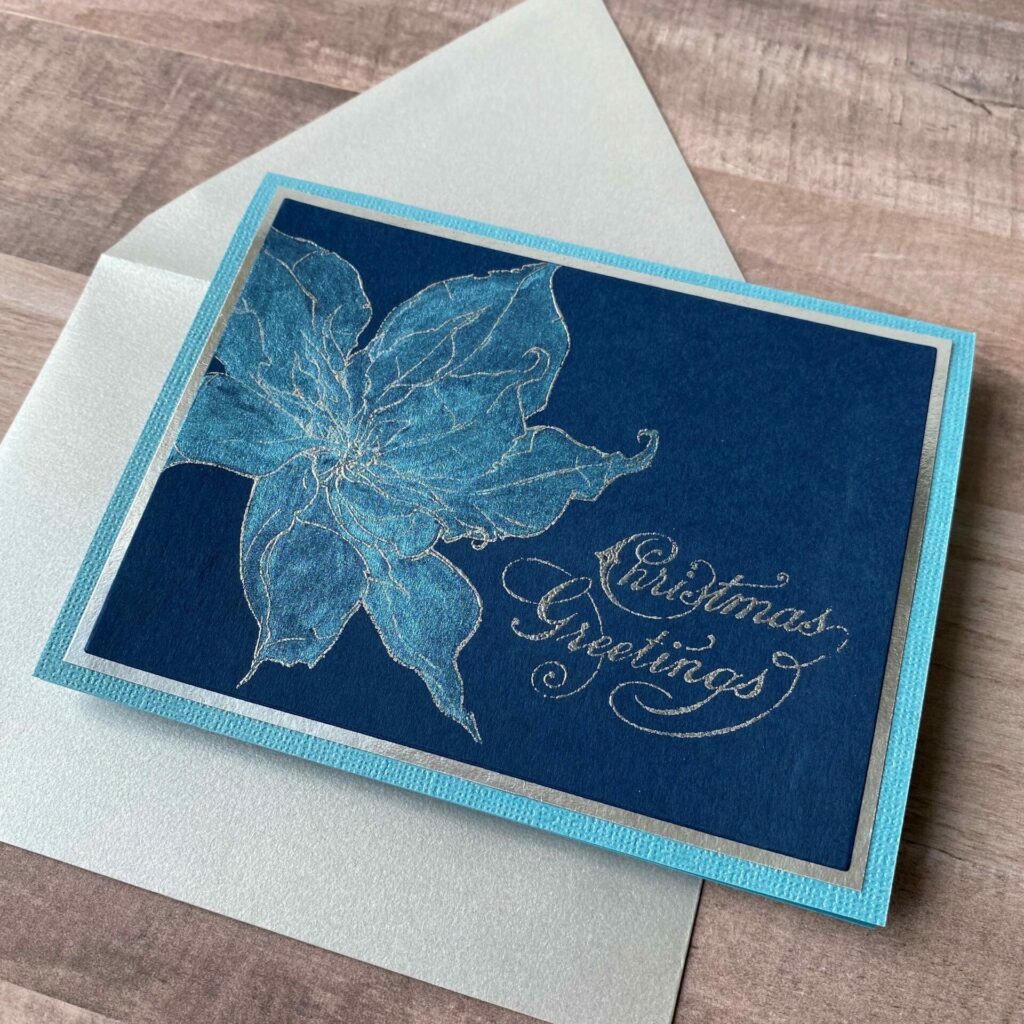
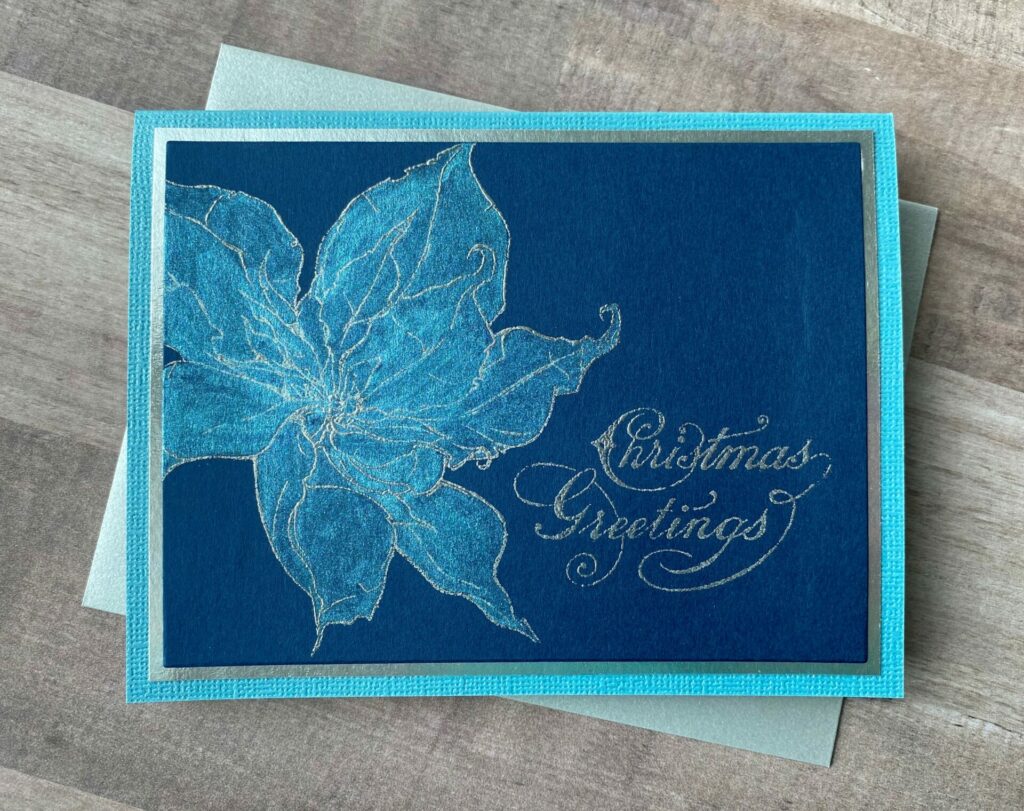
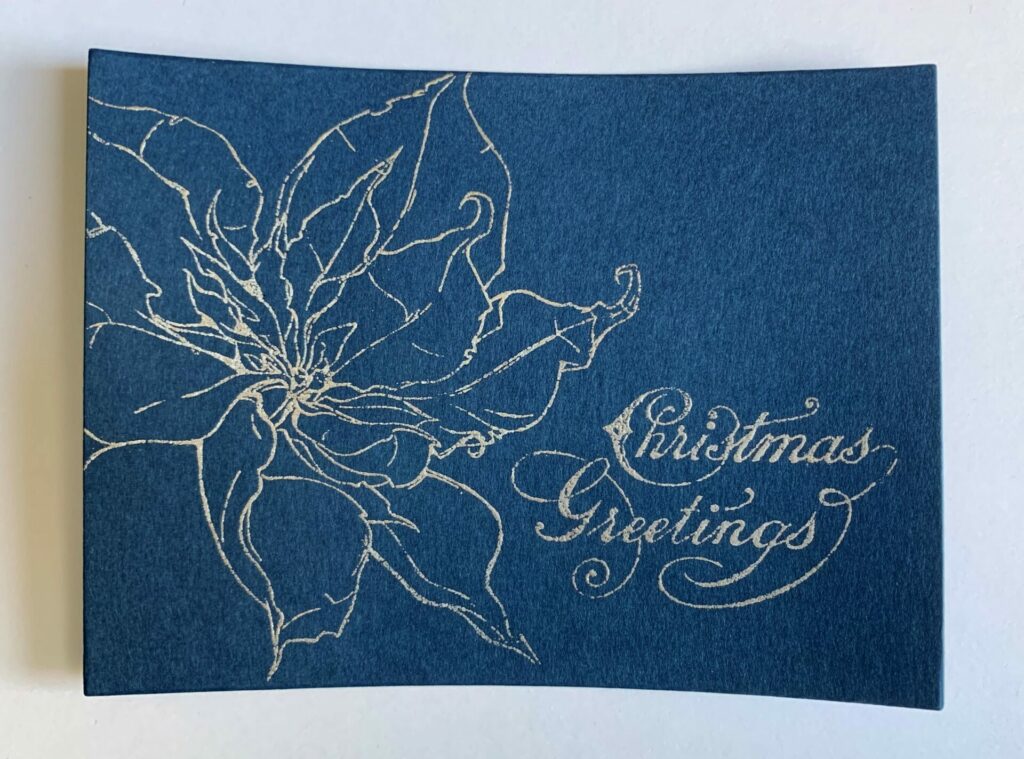
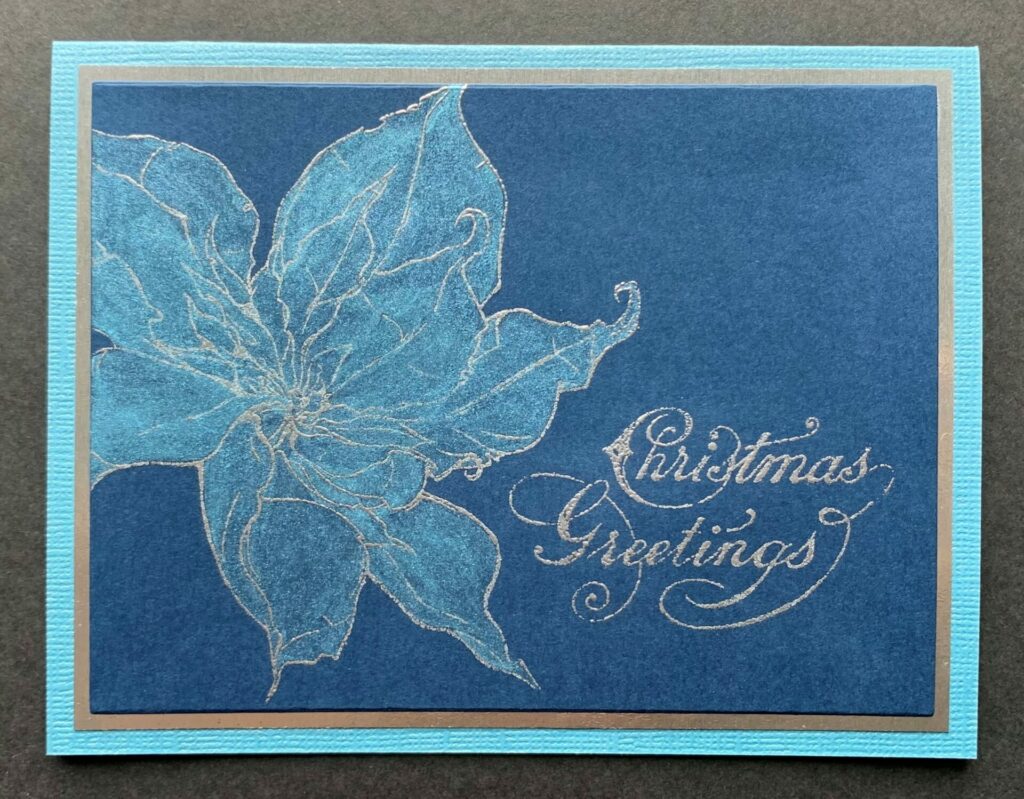
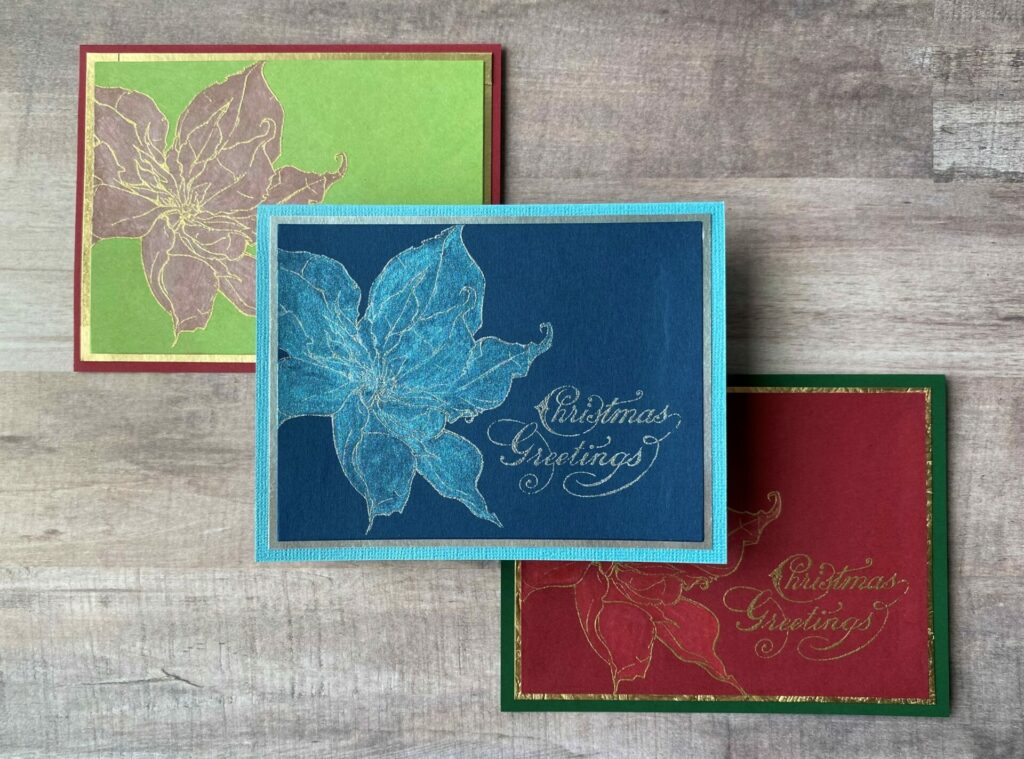
Poinsettia Christmas Greetings
Hello crafty card makers! It’s holiday card making season. I can’t believe it’s already November. I really don’t know where the time has gone. Before you know it, Christmas will be here. So we better get a head start on making those Christmas cards. Today I’m sharing how I made these poinsettia Christmas greetings cards. They feature a metallic and mica stain coloring technique, along with heat embossing. Also these cards are really fast and easy to batch produce. Perfect for anyone needing to make a lot of holiday cards.
The distress mica stains are a seasonal item and are only available during the Halloween and Christmas holiday season. So get them while you can! If you don’t have mica stains, that’s okay, because I have some alternative options for you. First would be using a metallic colored pencil. This is what I substituted the mica stain for in this tutorial. Other possible alternatives are metallic watercolors.
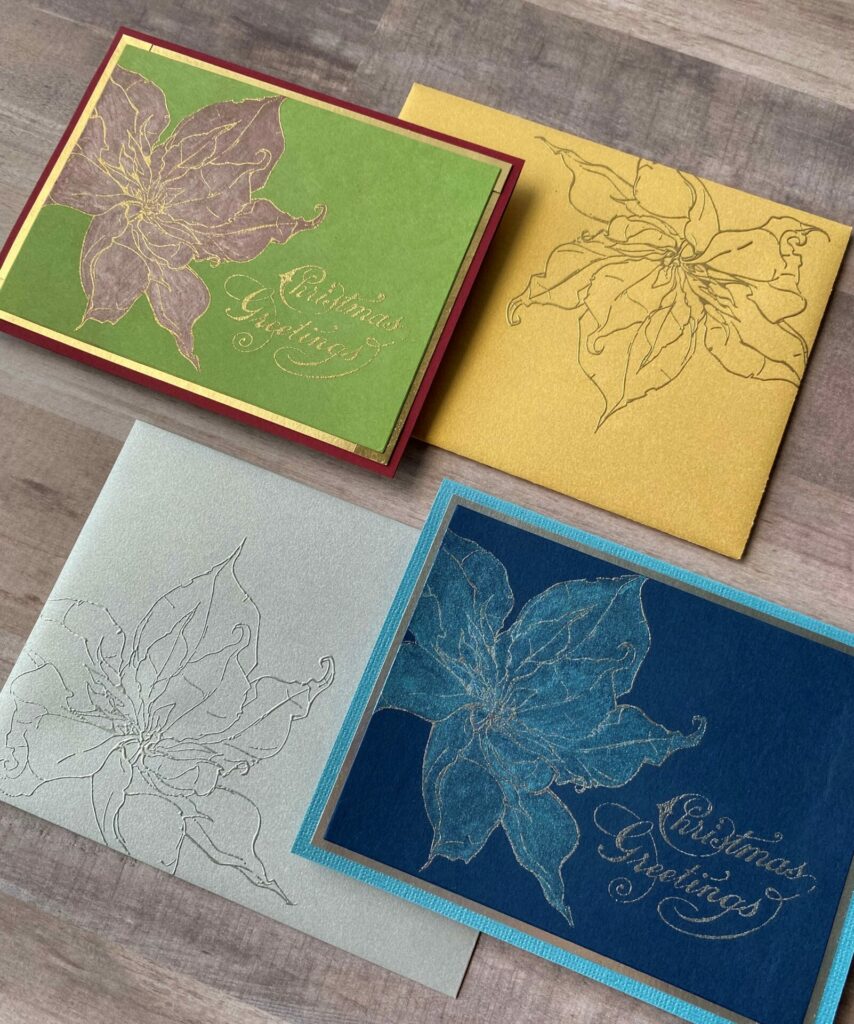
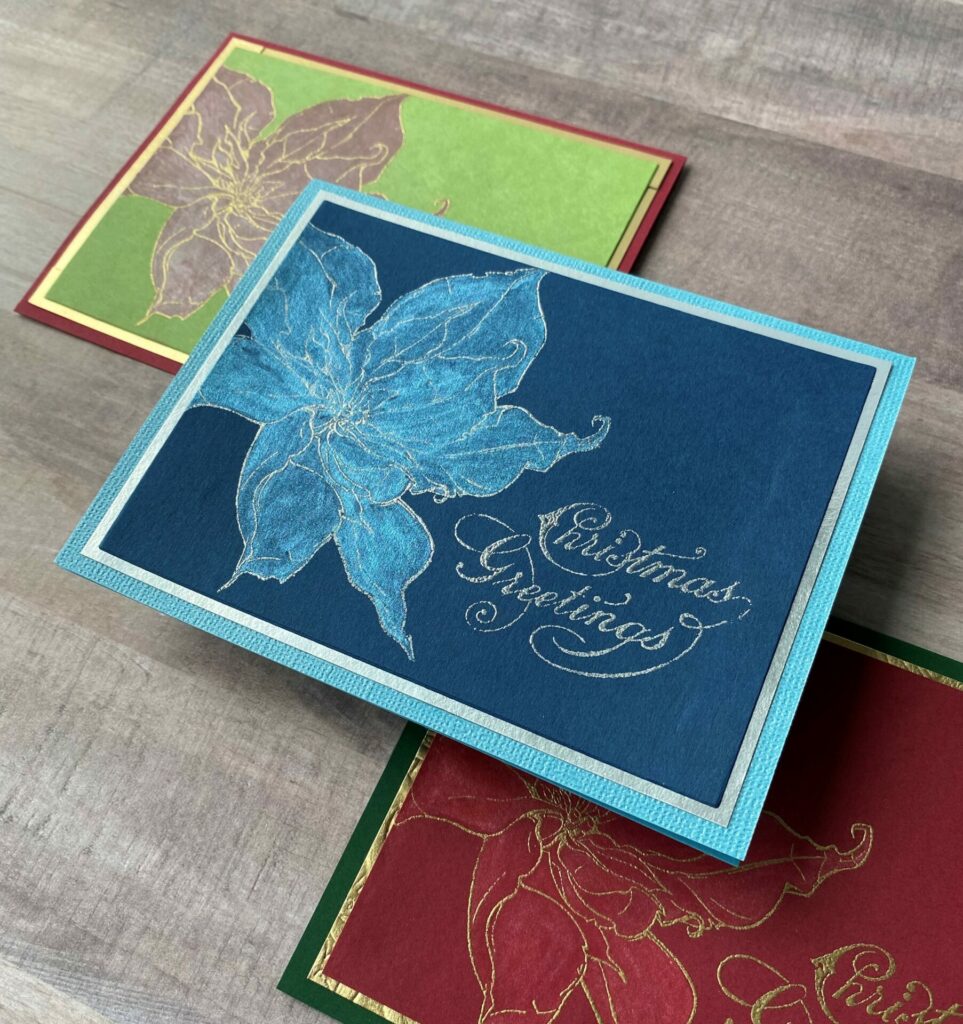
You can make this card in traditional Christmas colors, or go for a cool wintry pallet. This elegant card is perfect for the holidays. I made this card for Christmas, but the sentiment could easily be changed to fit your specific need. This poinsettia Christmas greetings card could also work for anyone with a December birthday, just by switching out the sentiment.
*Please note that mica is a bit challenging to capture in a photograph. I’m not really sure that I was able to fully capture the mica’s shimmering beauty in its entirety. Just know that they are even more stunning in person if you’ve never used them. And if you have used them. YOU KNOW!!!
Link Abbreviations
- AMZ – Amazon*
- Sb.com – Scrapbook.com*
- SIZ – Sizzix*
- SSS – Simon Says Stamp
- RI – Ranger Ink*
Full Disclosure: This post contains affiliate links which are indicated with an (*). If you click on an affiliate link and later make a purchase, I may receive a small commission. Clicking on an affiliate link which earns a commission does NOT result in additional charges to you or cost you anything extra. Money earned via affiliate links helps pay the fees to keep this blog up and running. Thank you so much for shopping through my links to show your support for the brands that we love and the products that I share!
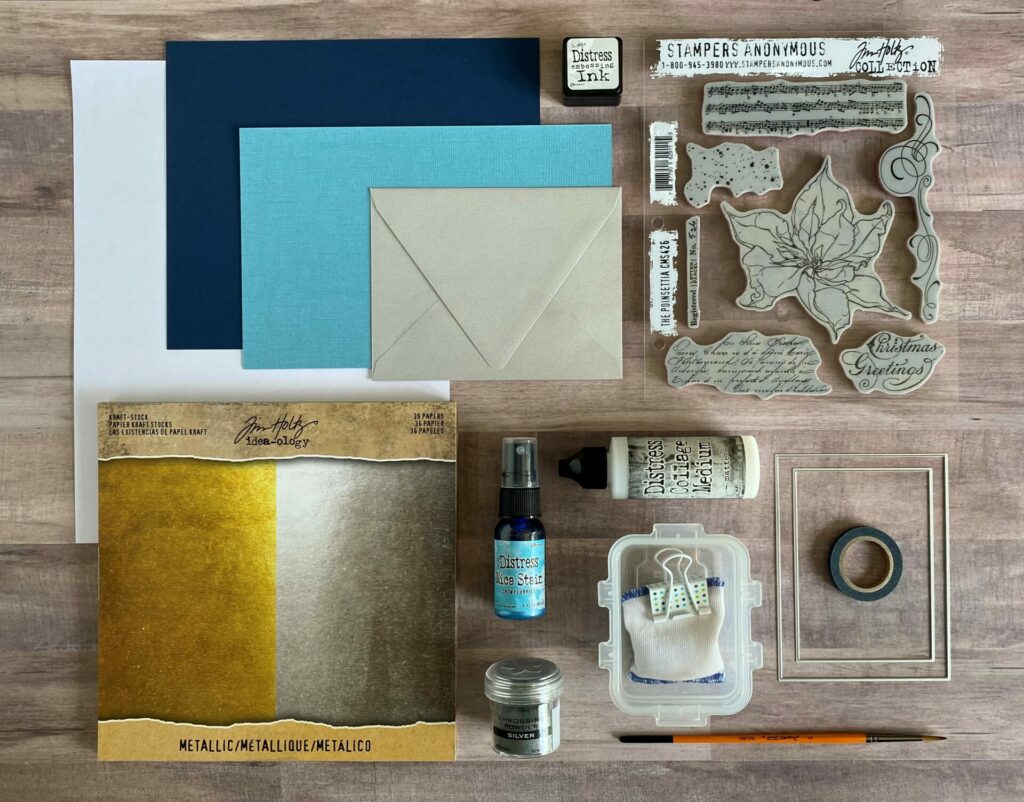
Supplies Used / Substitutions:
- Stampers Anonymous Tim Holtz Stamp Set – The Poinsettia CMS426 | Sb.com | AMZ | SSS |
- Hero Arts Nesting Rectangle Dies – Di198 | Sb.com | SSS / Optional or any rectangle frame die
- SSS Cardstock – Soft Navy | SSS / Any color cardstock
- Turquoise Cardstock / Any color cardstock
- Tim Holtz idea-ology Metallic Kraft Stock – Silver | AMZ | SSS / Any metallic casdstock
- Distress Mica Stain – Snow Flurries | Sb.com | RI | SSS / Any color mica stains, metallic pencils, or metallic watercolors
- Master’s Touch Soft Taklon Round Paint Brush – #3 / Any watercolor brush
- Ranger Embossing Powder – Silver | Sb.com | RI / Any embossing powder
- Distress Embossing Ink – Mini | Sb.com / Any embossing ink
- Anti Static Pouch | Sb.com / Any anti static tool
- Distress Collage Medium – Matte | Sb.com | SSS / Any liquid adhesive or double sided tape
- Silver Envelope / Any color envelope
- Scrap Piece of Paper
- Washi Tape / Any low tack tape
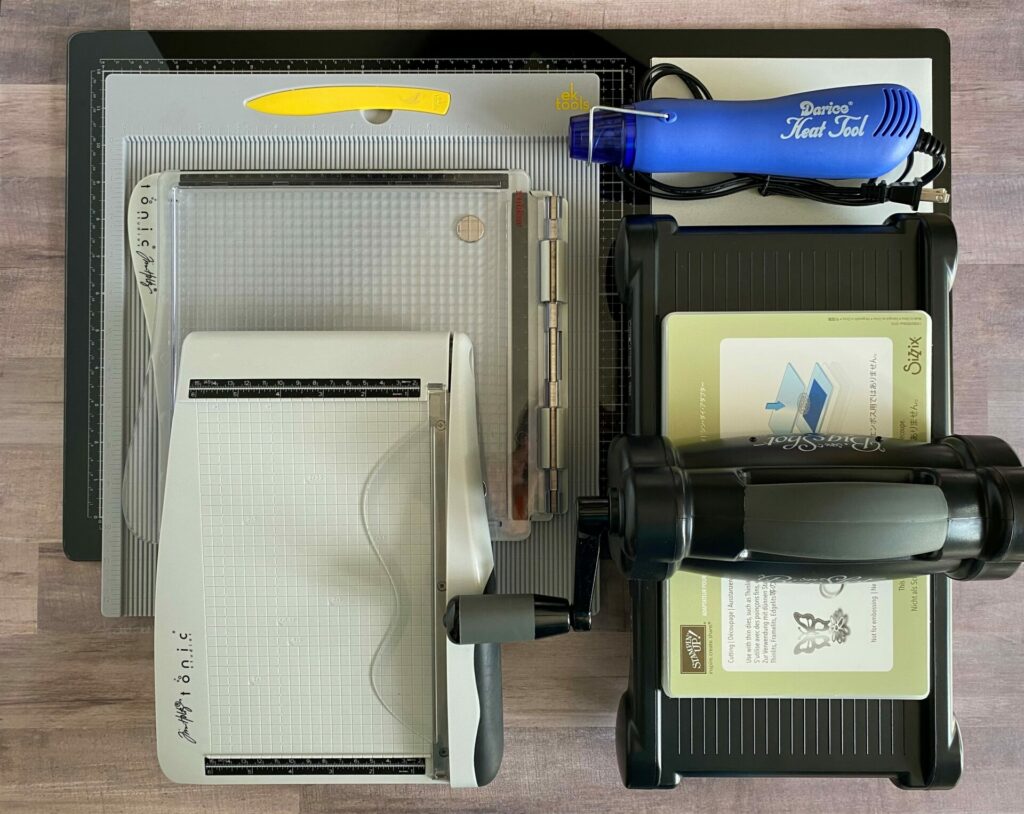
Tools Used / Substitutions:
- Sizzix Big Shot | SIZ / Any die cutting machine
- Tim Holtz Glass Media Mat | Sb.com | AMZ | SSS / Optional or non-stick craft sheet
- Tim Holtz Tonic Guillotine Comfort Paper Trimmer | Sb.com | AMZ | SSS / Any paper trimmer
- Tonic Tim Holtz Stamp Platform / Any stamping tool
- EK Scoring Board | AMZ | SSS / Any scoring board
- Embossing Gun
Making The Card Base
First, I took a sheet of the turquoise cardstock. Then, I cut the paper down to a size of 8½” x 5½”. I did this using the Tim Holtz Tonic Studios paper trimmer. Next, I scored it at 4¼″ and folded it in half. This is a standard A2 card size. But, you can make it whatever size you want. This is the base of the poinsettia Christmas greetings card.

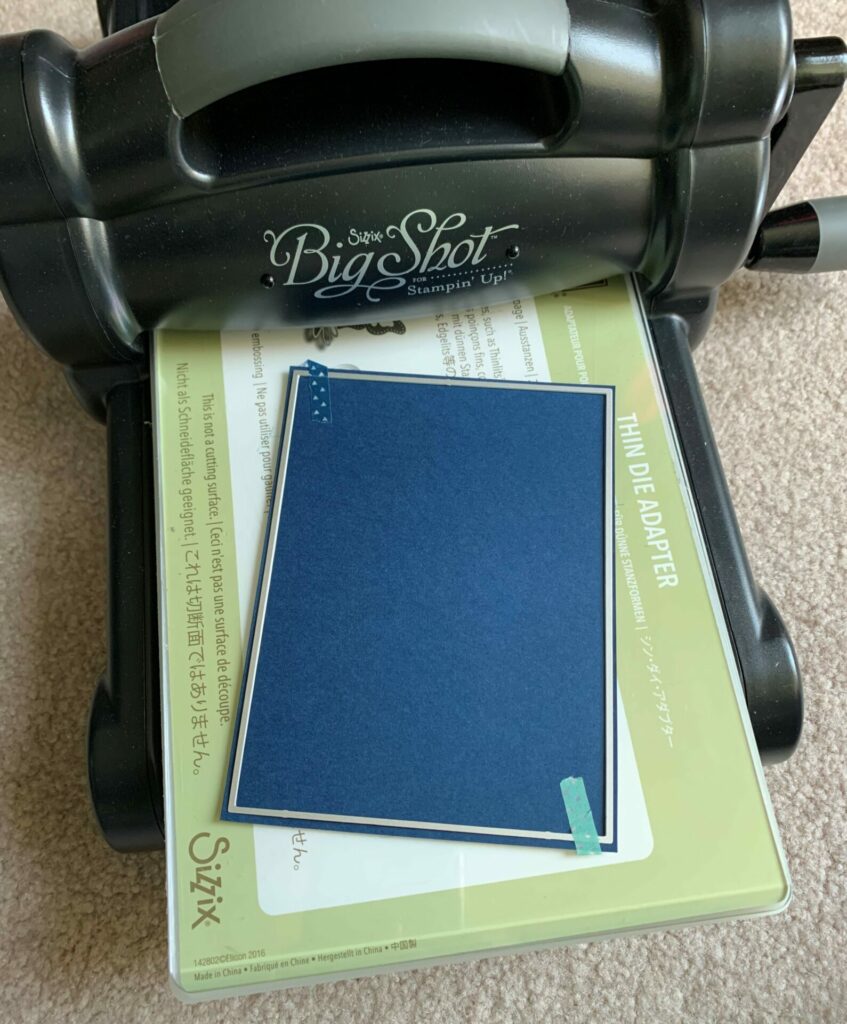
Cutting The Metallic Kraft Stock
Then, I cut down the metallic kraft stock to 5 – 3/16″ x 3 – 15/16″ with the paper trimmer. Next, I took a frame die smaller than the metallic kraft stock, and cut it from the center with the Sizzix big shot. I also used washi tape to hold the die in place. I used the 4¼” x 3″ Hero Arts nesting rectangle die set. But, you can use any frame die you wish. Then, I took the inside cutout and saved it for another project. This is a simple trick to get more bang for your buck, and stretch your fancy papers even further.

Cutting The Card Front
Next, I took the 5″ x 3¾” die in the Hero Arts nesting rectangle set and cut it from navy cardstock in the Sizzix big shot. I used washi tape to keep the die from shifting. If you don’t have this rectangle die set you could use the paper trimmer and cut it down to size.
Mica Alternative Option
Blue – If you’re going to be using the distress mica stain then disregard this next section and click here.
Green – If you’re using a mica substitution like metallic pencils or watercolors, just keep reading and follow the green heading sections.
Stamping The Poinsettia
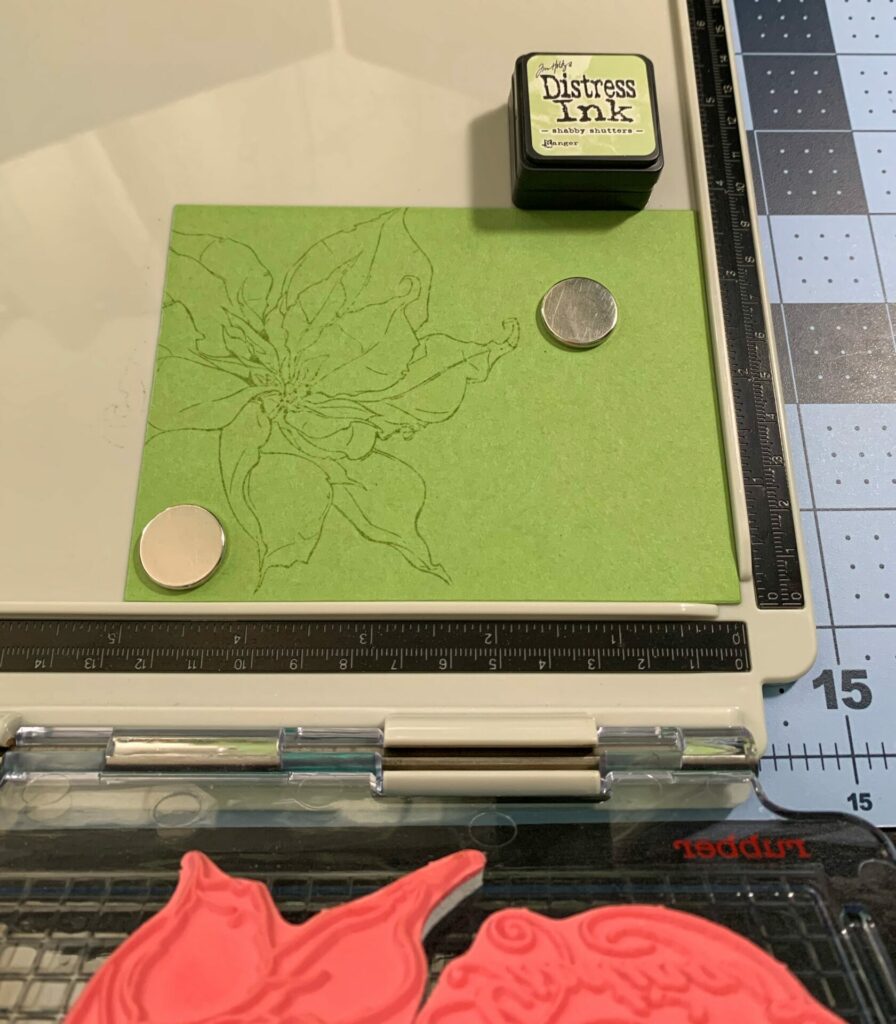
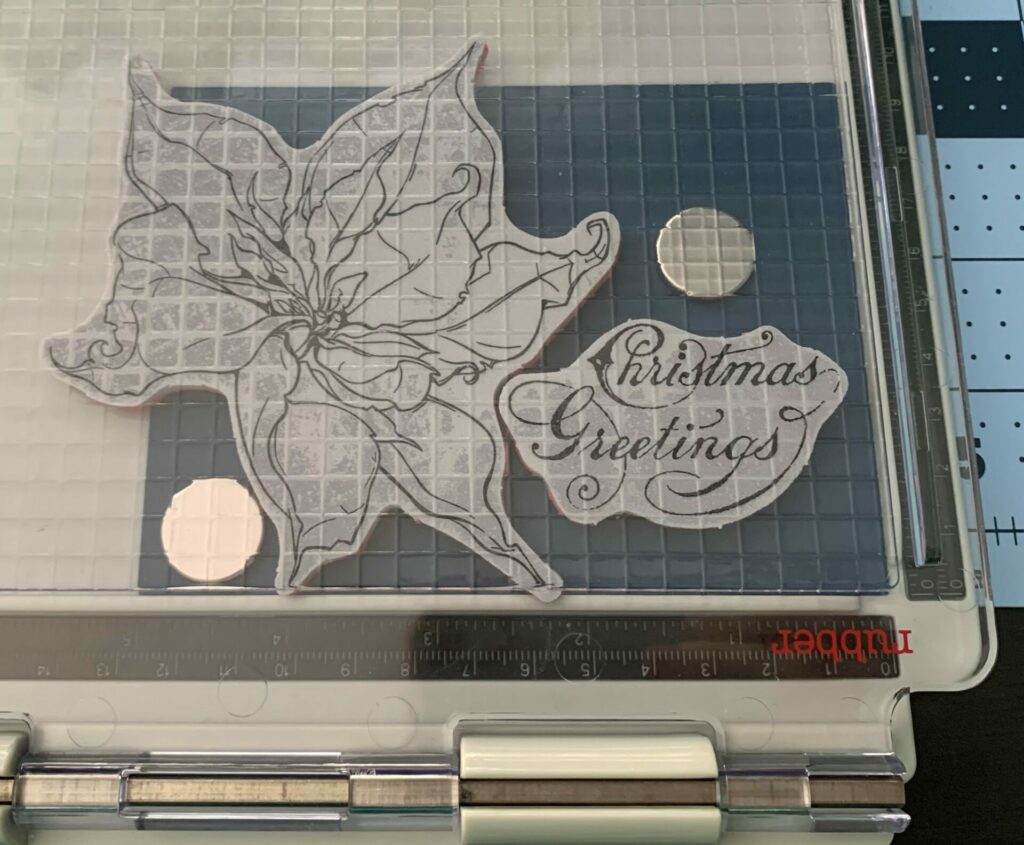
For the mica substitution card I used the green apple cardstock from Simon Says Stamp. Firstly, I took the poinsettia and Christmas Greetings stamps from the Stampers Anonymous The Poinsettia stamp set by Tim Holtz. Then, I positioned the stamps where I wanted them to go on the card front in my stamp platform. Make sure the cardstock is placed all the way in the corner of the stamp platform. See below for stamp positioning.
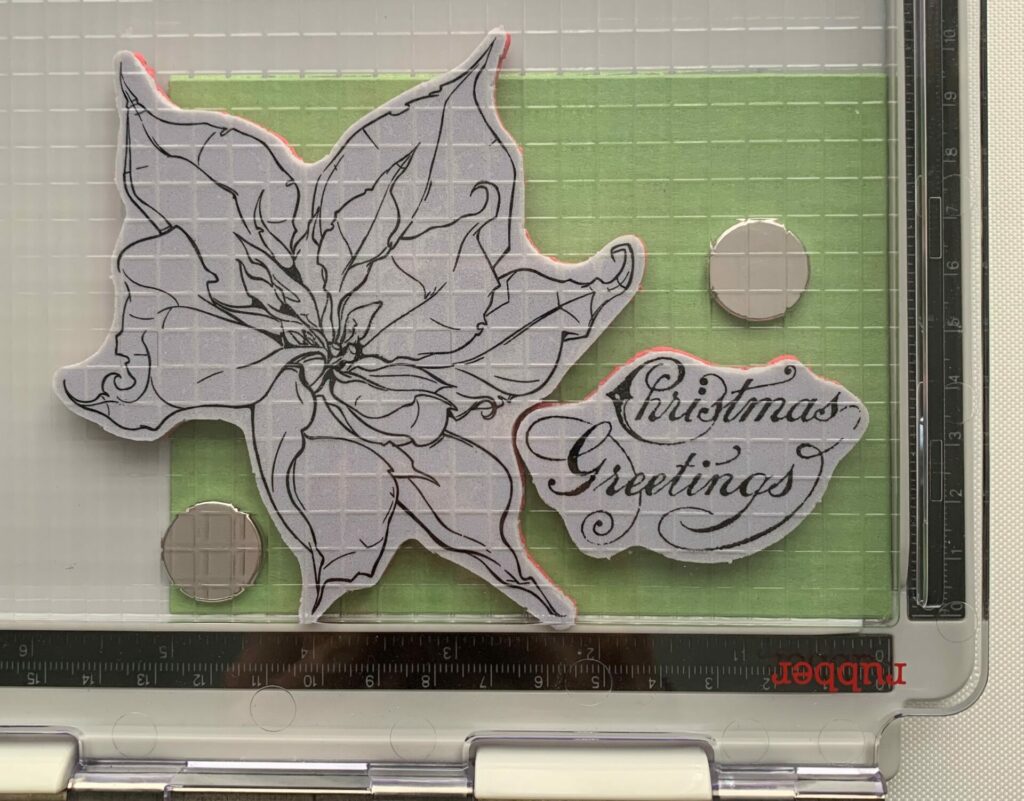
Next, I inked up ONLY the poinsettia stamp with distress ink in the shade shabby shutters. If you’re using a different color cardstock, just use an ink that is one shade darker than your cardstock. Then, I closed the stamp platform and stamped the card front. Stamp as many times as you need. This step is just to get the outline of the poinsettia so we can fill it in next with metallic pencil or watercolor. Next, I took a paper towel, sprayed it with water, and cleaned off any ink that was left on the stamp. Also very important DO NOT MOVE OR REMOVE YOUR STAMPS YET. We will be stamping again later and they need to be in the same place.
Coloring In The Poinsettia
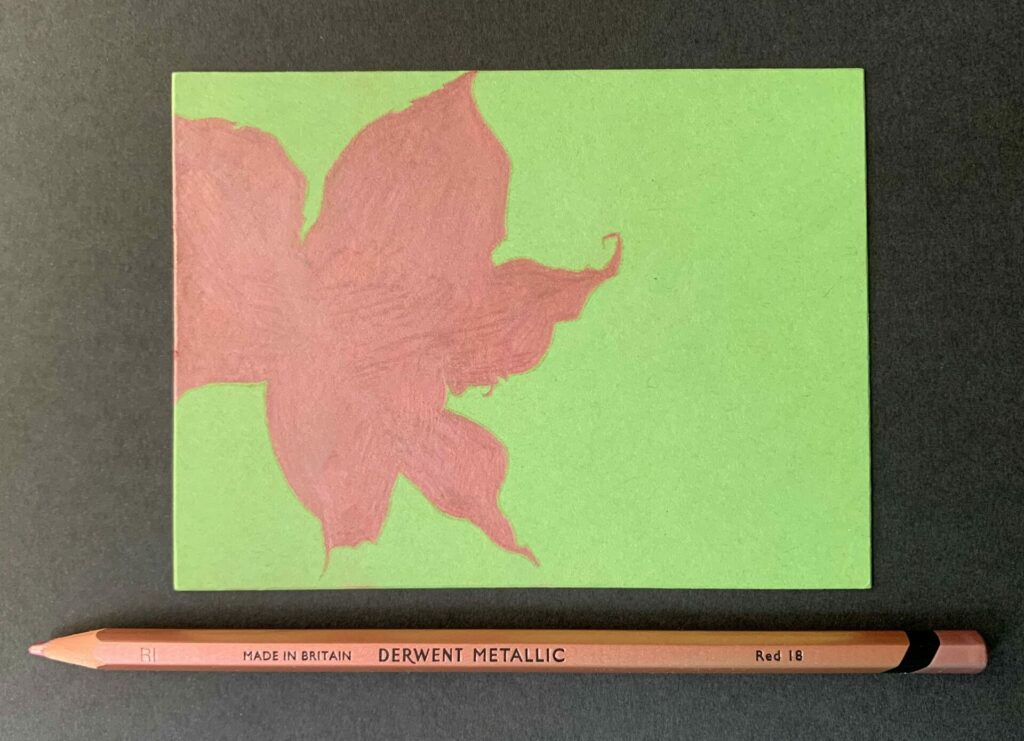
Then, I took the Red 18 metallic colored pencil from Derwent and colored in the whole poinsettia. Try to stay within the lines and get as close to the edge as you can. I would recommend sharpening the pencil and coloring the inside edge of the poinsettia first. Then, fill in the rest of it as the pencil dulls. Metallic watercolors are another alternative and would look just as beautiful at the mica stain.
Embossing The Metallic Poinsettia
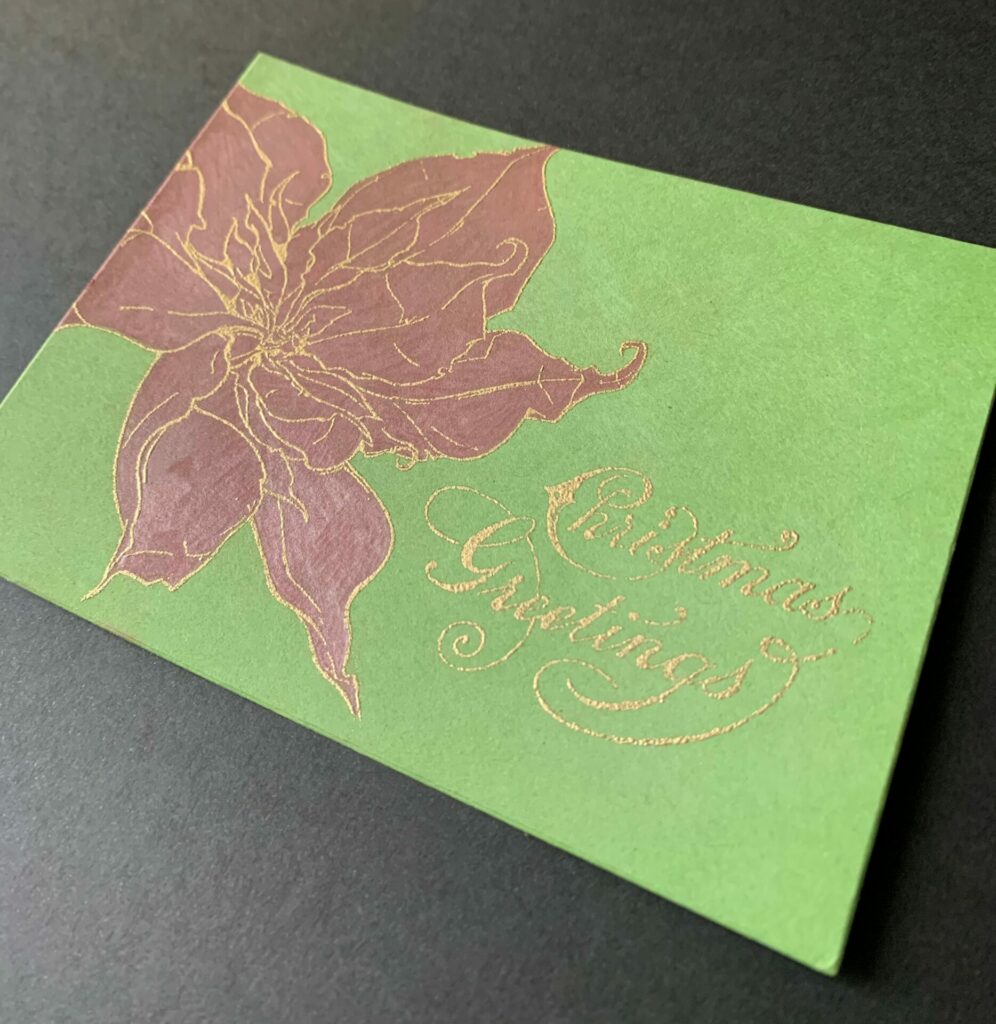
Next, I put the card front back into the corner of the stamp platform and secured it down with the magnets. Then, I used the anti-static pouch and rubbed it all over the card front. This is an important step because cardstock can hold static and the embossing powder will cling to non-inked places on the paper. This leaves you with tiny specks of embossing powder where you don’t want it to be. We definitely don’t want that. The anti-static powder eliminates 98% of the stray embossing powder. If there are any strays, I just brush them away with a small brush. If there is some in tight spaces, like between letters, I use a craft pick and with a steady hand loosen the powder from the paper, and blow it away.
Then, I inked up both stamps with distress embossing ink and stamped the paper. You might have to stamp it a couple times to get a full crisp stamping. Next, I put a scrap piece of paper down and poured the gold embossing powder all over the inked areas of the card front. Then, I gently taped off any excess powder and set it aside. Next, I folded the scrap paper and poured the excess embossing powder back into the jar. If there’s any stray powder where I didn’t want it, I removed it with a brush or craft pick. Then, I embossed it with a heat embossing gun.
Now click here to jump past the mica stain directions to finish up your poinsettia Christmas greetings card.
Getting Ready To Emboss
Firstly, I took the poinsettia and Christmas Greetings stamps from the Stampers Anonymous The Poinsettia stamp set by Tim Holtz. Then, I positioned the stamps where I wanted them to go on the card front in my stamp platform. Make sure the cardstock is placed all the way in the corner of the stamp platform. See below for stamp positioning.
Next, I put the card front into the corner of the stamp platform and secured it down with the magnets. Then, I used the anti-static pouch and rubbed it all over the card front. This is an important step because cardstock can hold static and the embossing powder will cling to non-inked places on the paper. This leaves you with tiny specks of embossing powder where you don’t want it to be. We definitely don’t want that. The anti-static powder eliminates 98% of the stray embossing powder. If there are any strays, I just brush them away with a small brush. If there is some in tight spaces, like between letters, I would use a craft pick and with a steady hand loosen the powder from the paper, and blow it away.
Embossing The Card Front
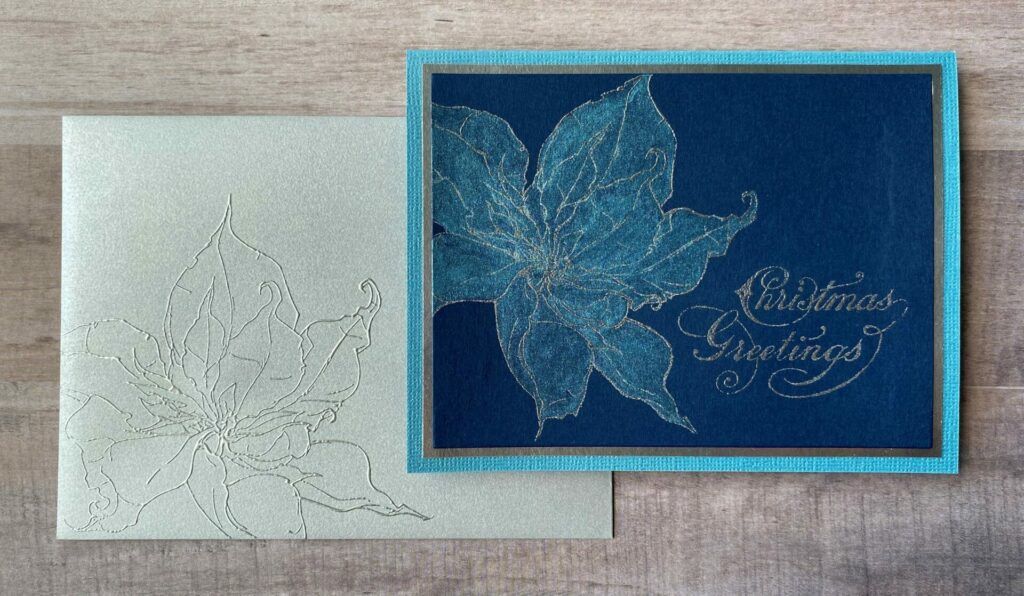
Then, I inked up both stamps with distress embossing ink and stamped the paper. You might have to stamp it a couple times to get a full crisp stamping. Next, I put a scrap piece of paper down and poured the silver embossing powder all over the inked areas of the card front. Then, I gently taped off any excess powder and set it aside. Next, I folded the scrap paper and poured the excess embossing powder back into the jar. If there is any stray powder where I didn’t want, I removed it with a brush or craft pick. Then, I embossed it with a heat embossing gun.
Coloring The Poinsettia
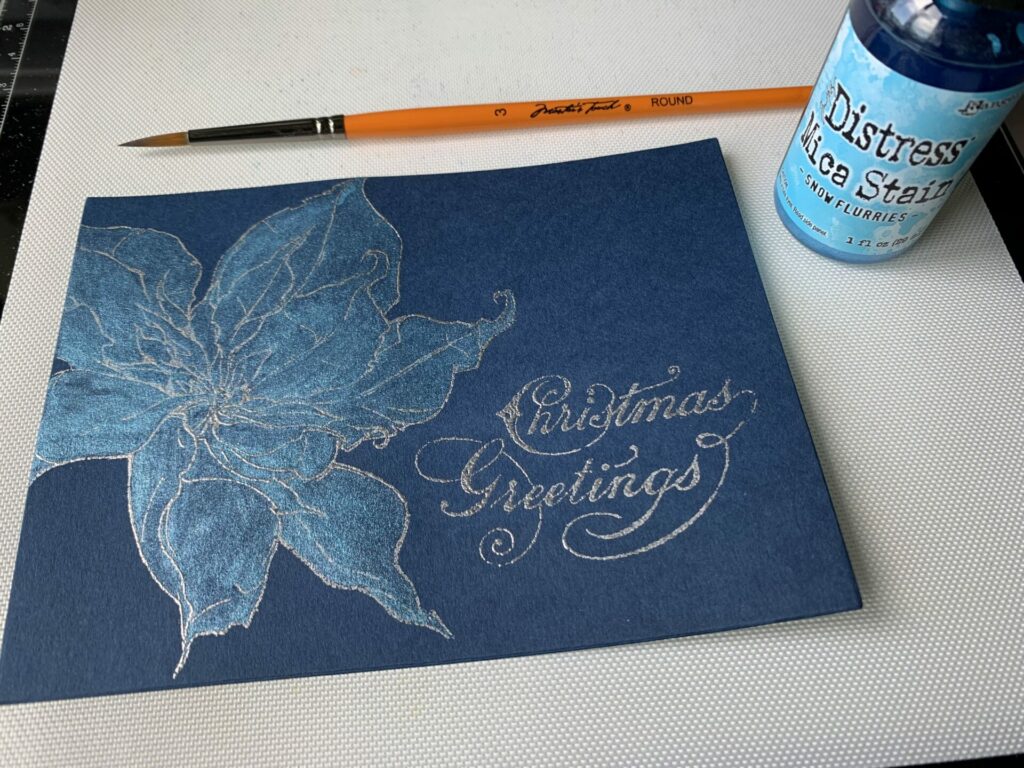
Once the card front was embossed, it was time to color. For this, I used distress mica stain in the shade snow flurries. But you can use whatever color you want. The distress mica crayons would work as well. First, I shook up the mica stain to get all the mica mixed evenly through the bottle. When shaking, wrap a paper towel around the top of the bottle. Some of my bottles tend to leak when shaking. Also, shake the bottle side-to-side, not up and down. This will minimize the leaking. Then, I sprayed the mica stain on the craft sheet.
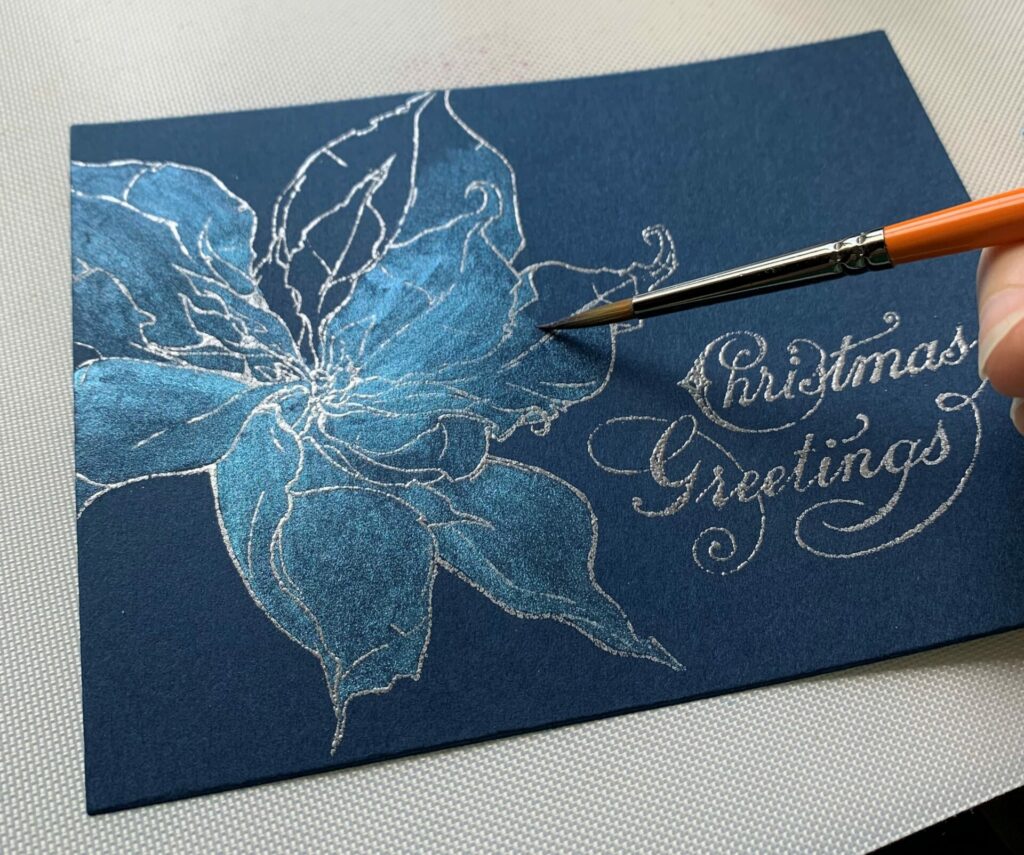
Next, I took my paintbrush, picked up some mica stain with it, and started filling in the poinsettia. Now this can be quite subtle or really dramatic, depending on how much mica you apply. If you want to have a subtle effect, just add some water to the mica stain on your craft sheet and mix it together. Then, fill in the poinsettia. If you want more drama, just add more layers of mica to the poinsettia. Let each layer dry in between coats.
Gluing It All Together
After all that coloring, it’s time to glue it all together. Firstly, I took the metallic kraft stock frame and put glue on the back of it. The glue I like to use is distress collage medium. Then, I adhered it to the front center of the card base. I like to put something heavy (I use my big shot platform) on top of it while it dries.
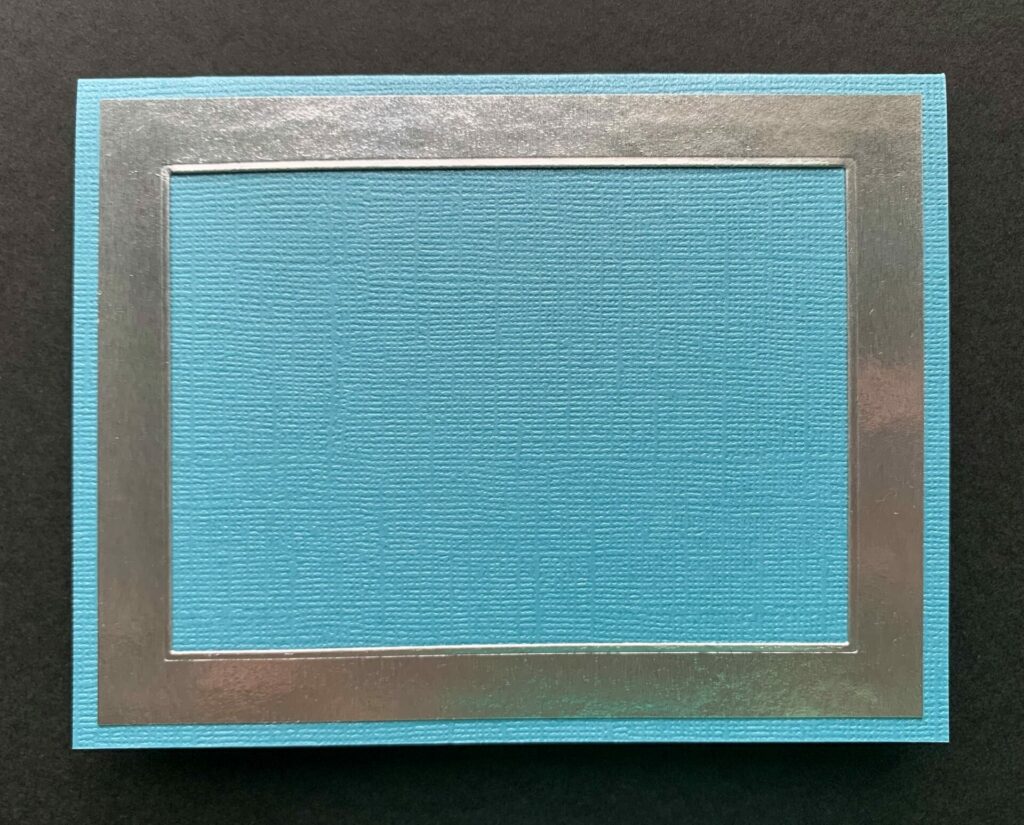
Next, I put collage medium on the back of the poinsettia Christmas greetings card front. I adhered it to the card base, centering it within the metallic kraft stock. Then, I put the big shot platform on top of it and left it to dry.
Embossing The Envelope
If you’re going to be sending these through the mail make sure you leave enough space to write the address. For this, I was going for a subtle elegant approach. So since my envelope was silver, I used silver embossing powder to give it a tone on tone feel. But you can use what ever color you want. I heat embossed the poinsettia in the bottom left corner on my envelope.
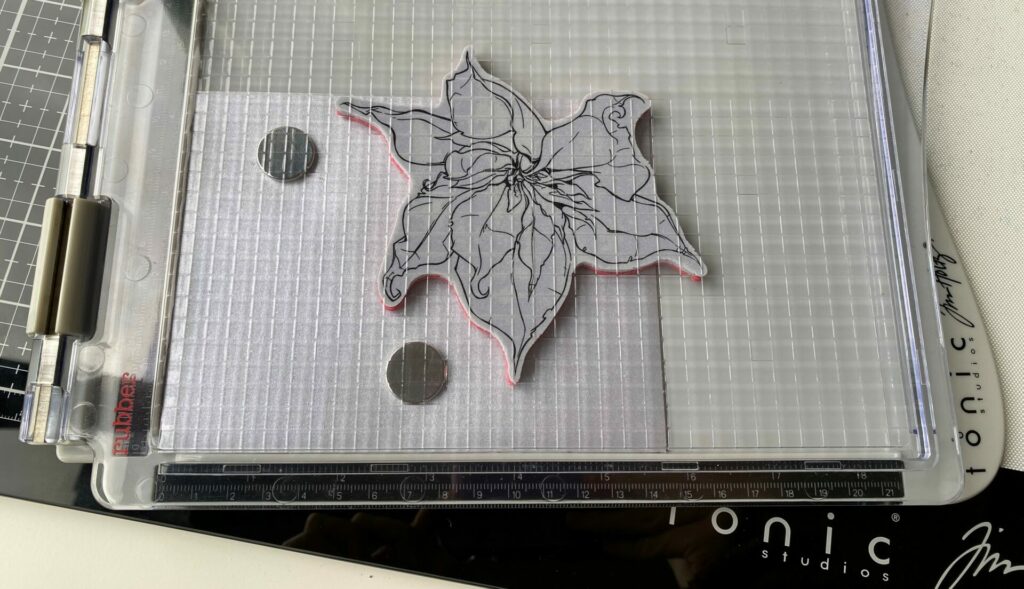
Firstly, I place the envelope into my stamp platform with the top of the envelope up against the bottom edge of my stamping tool. See image above for reference. I’m basically working upside down here. Next, I place the poinsettia stamp where I wanted it to go on my envelope and closed the stamping tool. Then, I used the anti-static pouch and rubbed it over the envelope where the poinsettia will be stamped. After that, I inked up the stamps with distress embossing ink and stamped the envelope. Next, I put a scrap piece of paper down and poured silver embossing powder over the inked poinsettia. I taped off any excess powder and poured the excess embossing powder back into the jar. Then, I removed any stray powder and embossed it with a heat embossing gun.

Poinsettia Christmas Greetings Card Complete!
Congratulations! You have now completed your poinsettia Christmas greetings card! I hope you enjoyed this tutorial and have as much fun making it as I did. If you do make this card, please use the #grovecrafted and tag me on Instagram. I’d love to see what you’ve created! Thanks for stopping by and I hope you found some new inspiration to create.
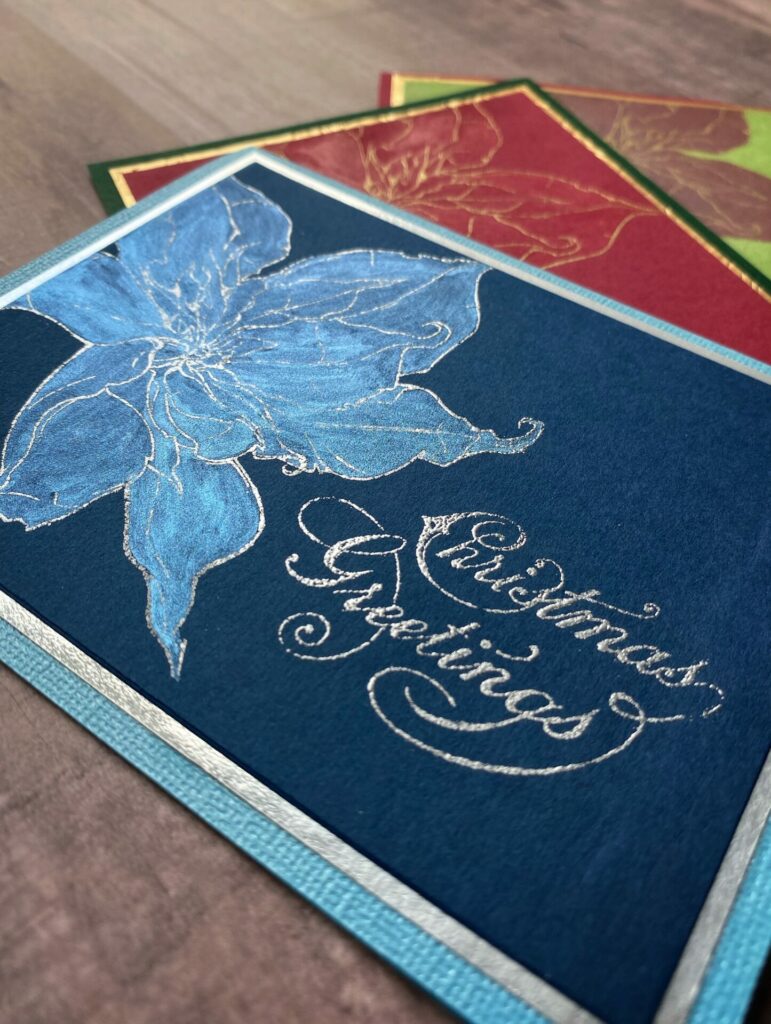

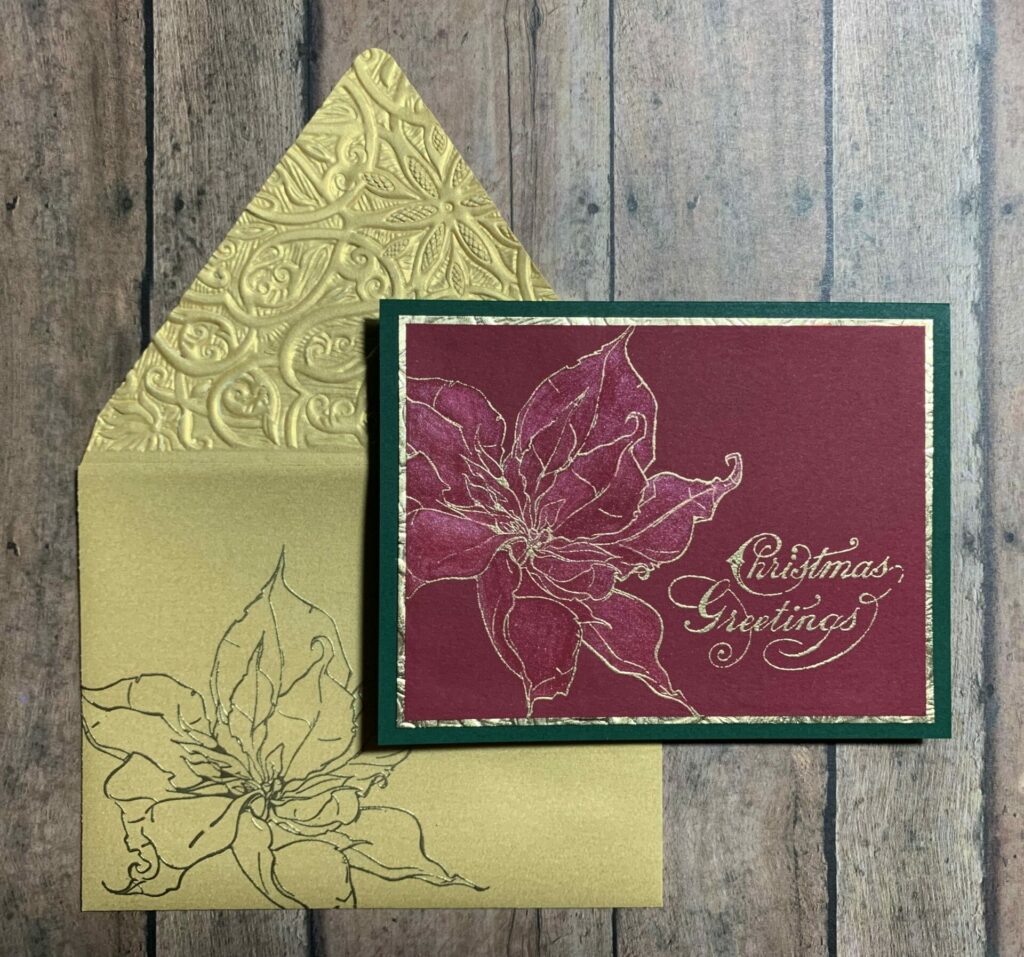
For this one, I chose a more traditional color pallet. I used dark green cardstock for the card base, gold metallic idea-ology kraft stock, and deep maroon red cardstock for the card front. I embossed it with gold embossing powder and used peppermint stick mica distress crayon to color in the poinsettia. For the envelope, I heat embossed the poinsettia on a gold envelope with gold embossing powder. I also used the Tim Holtz Engraved 3D Embossing Folder by Sizzix to emboss the envelope flap and the metallic kraft stock.
If you enjoyed making this poinsettia Christmas greetings card, you might want to check out my other Christmas Card tutorials.