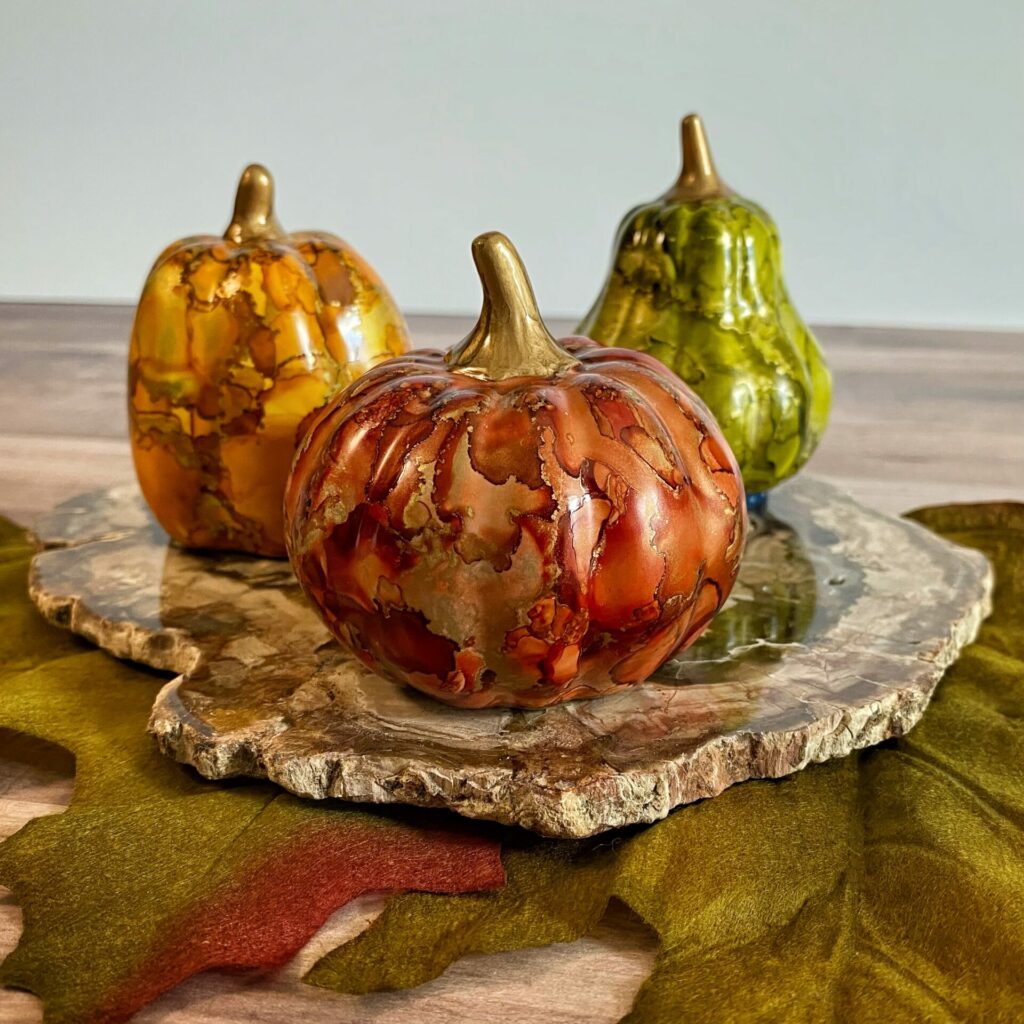
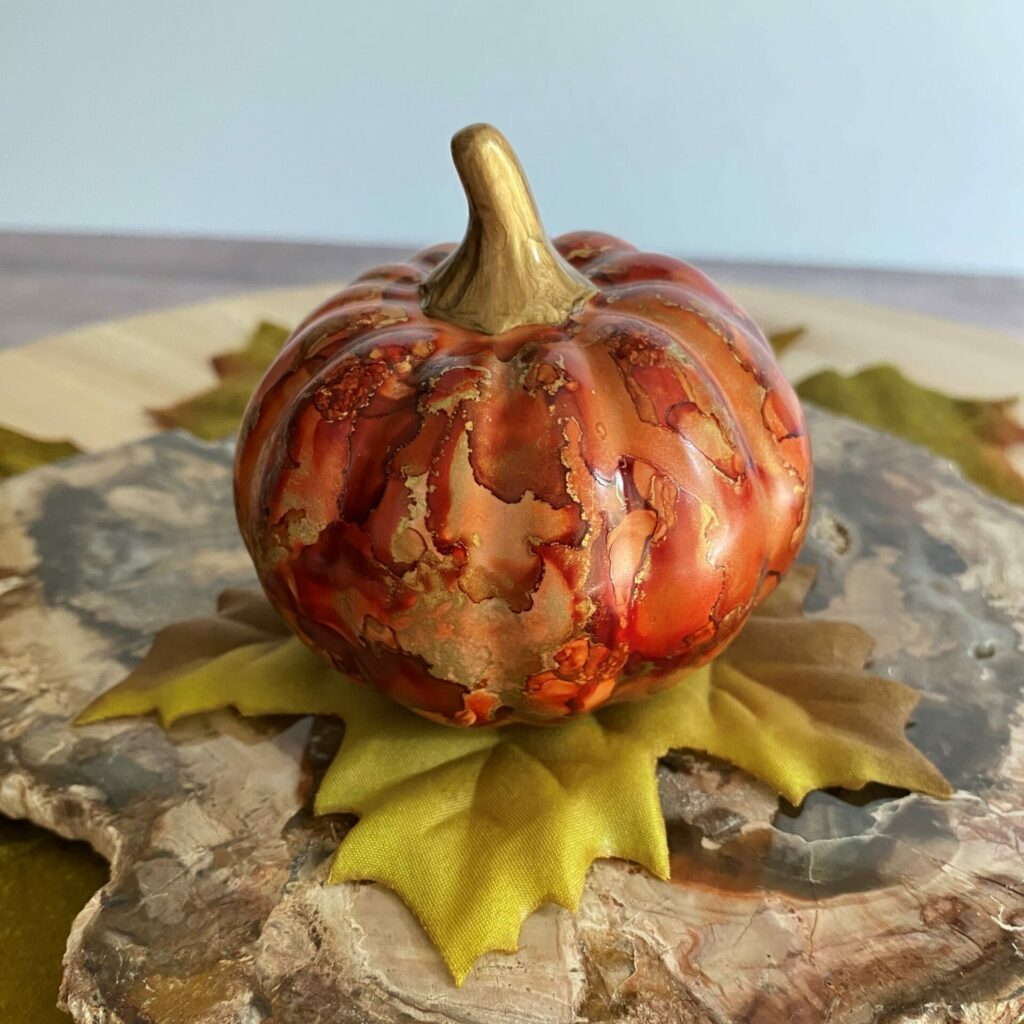
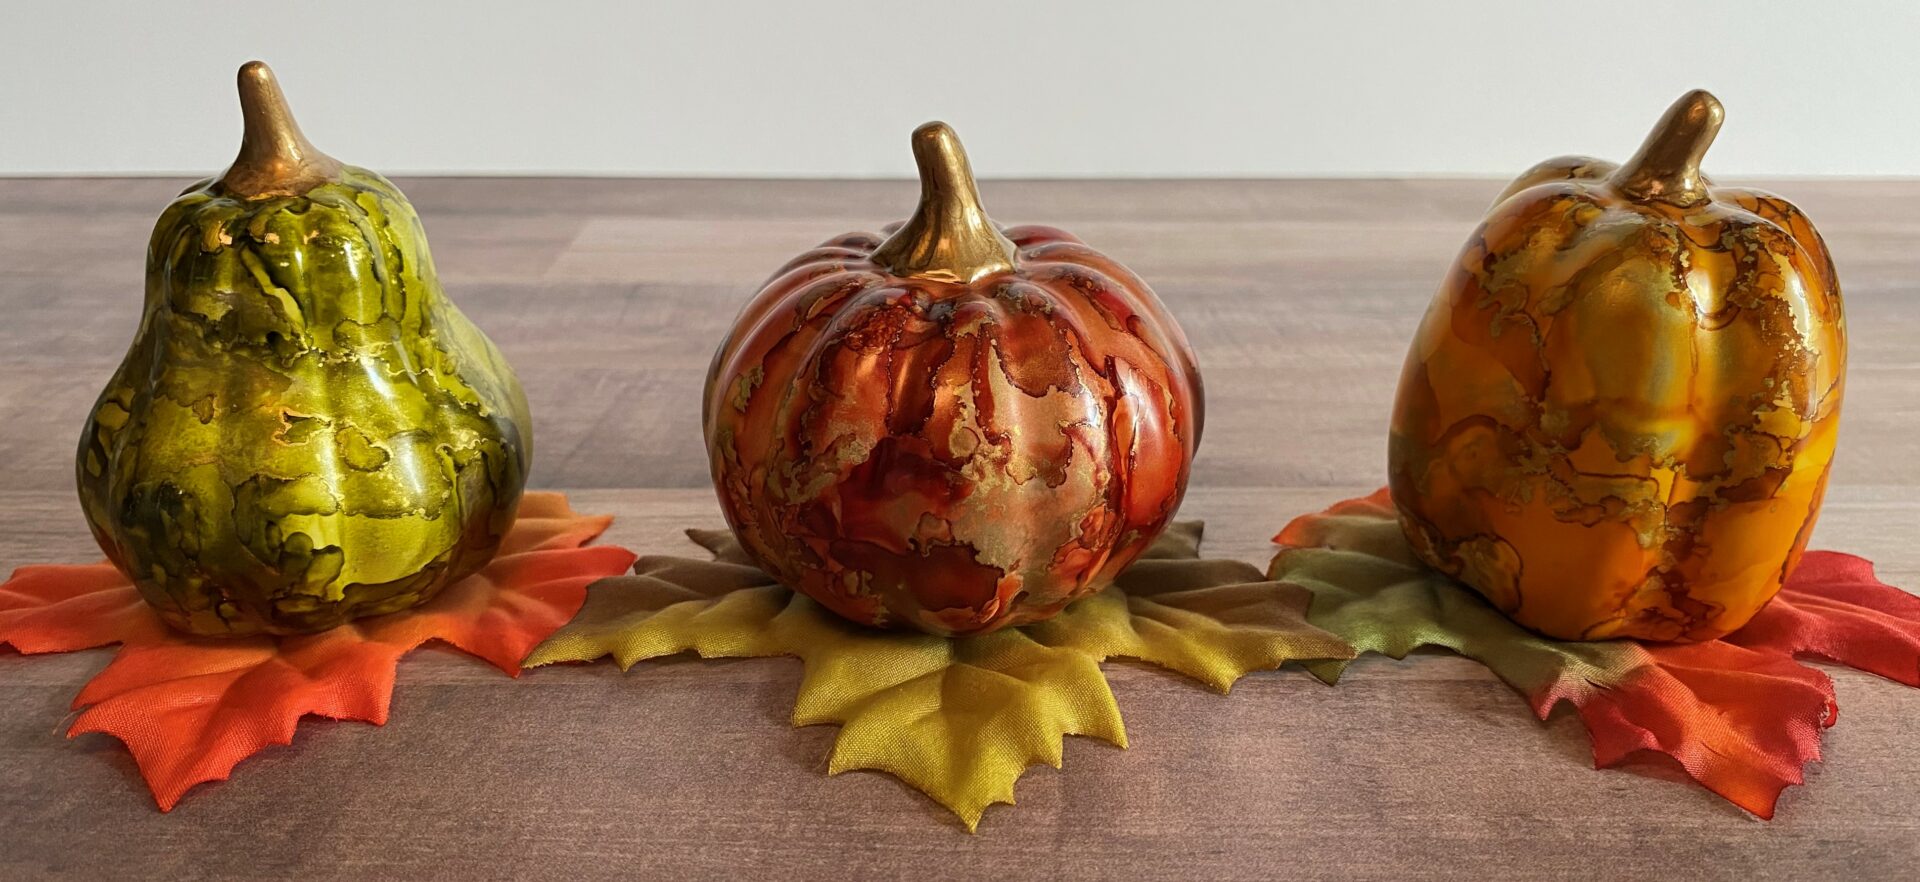
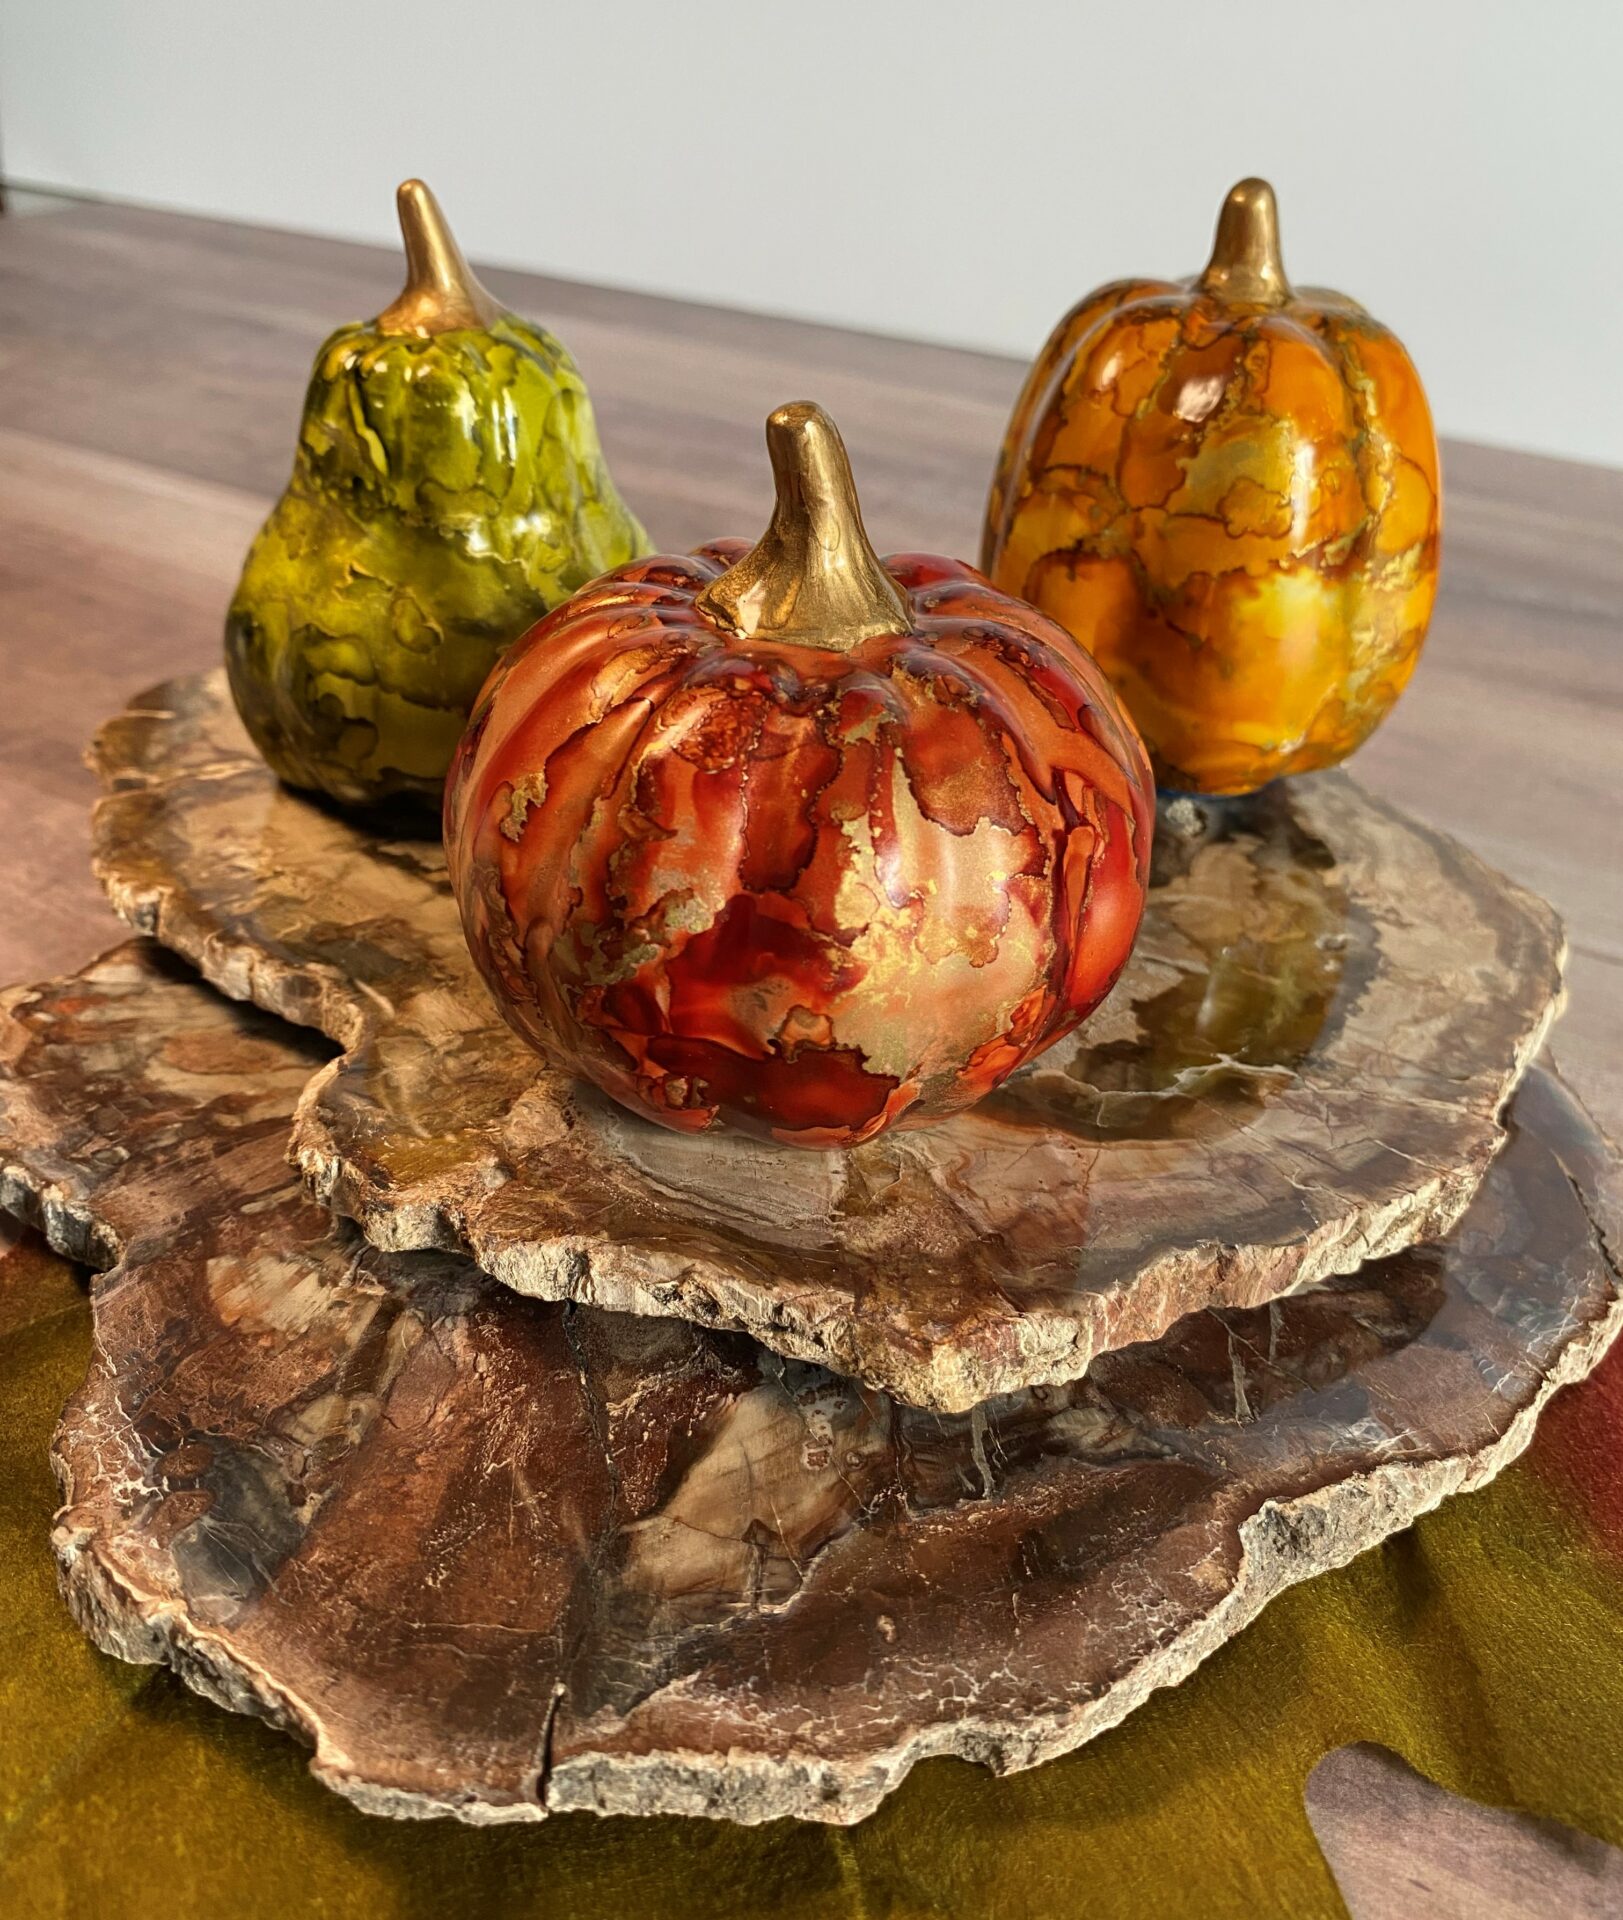
Gilded Alcohol Ink Pumpkins
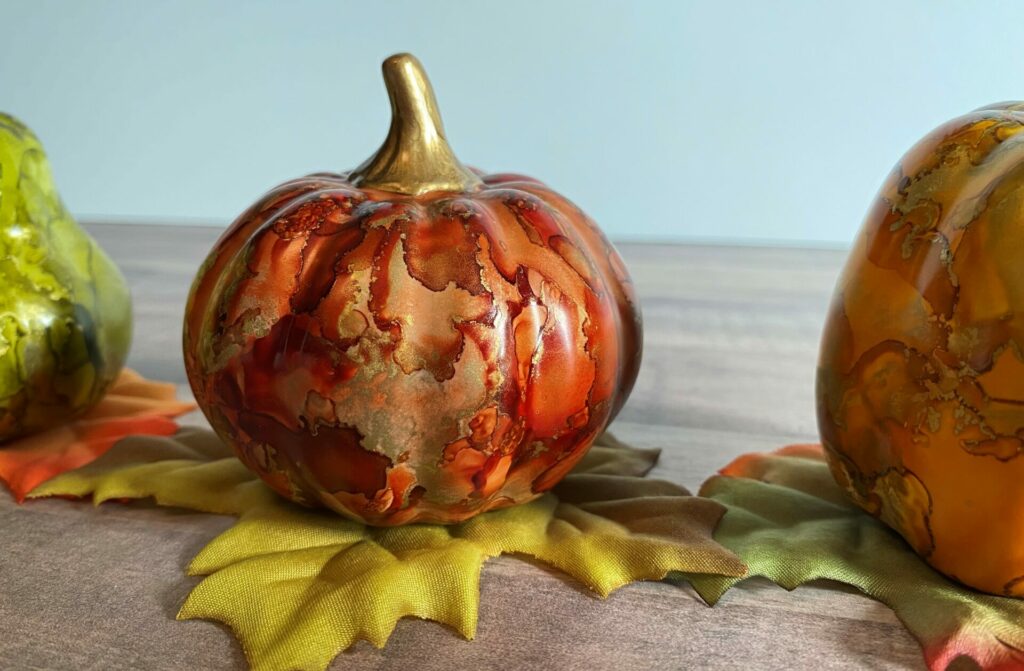
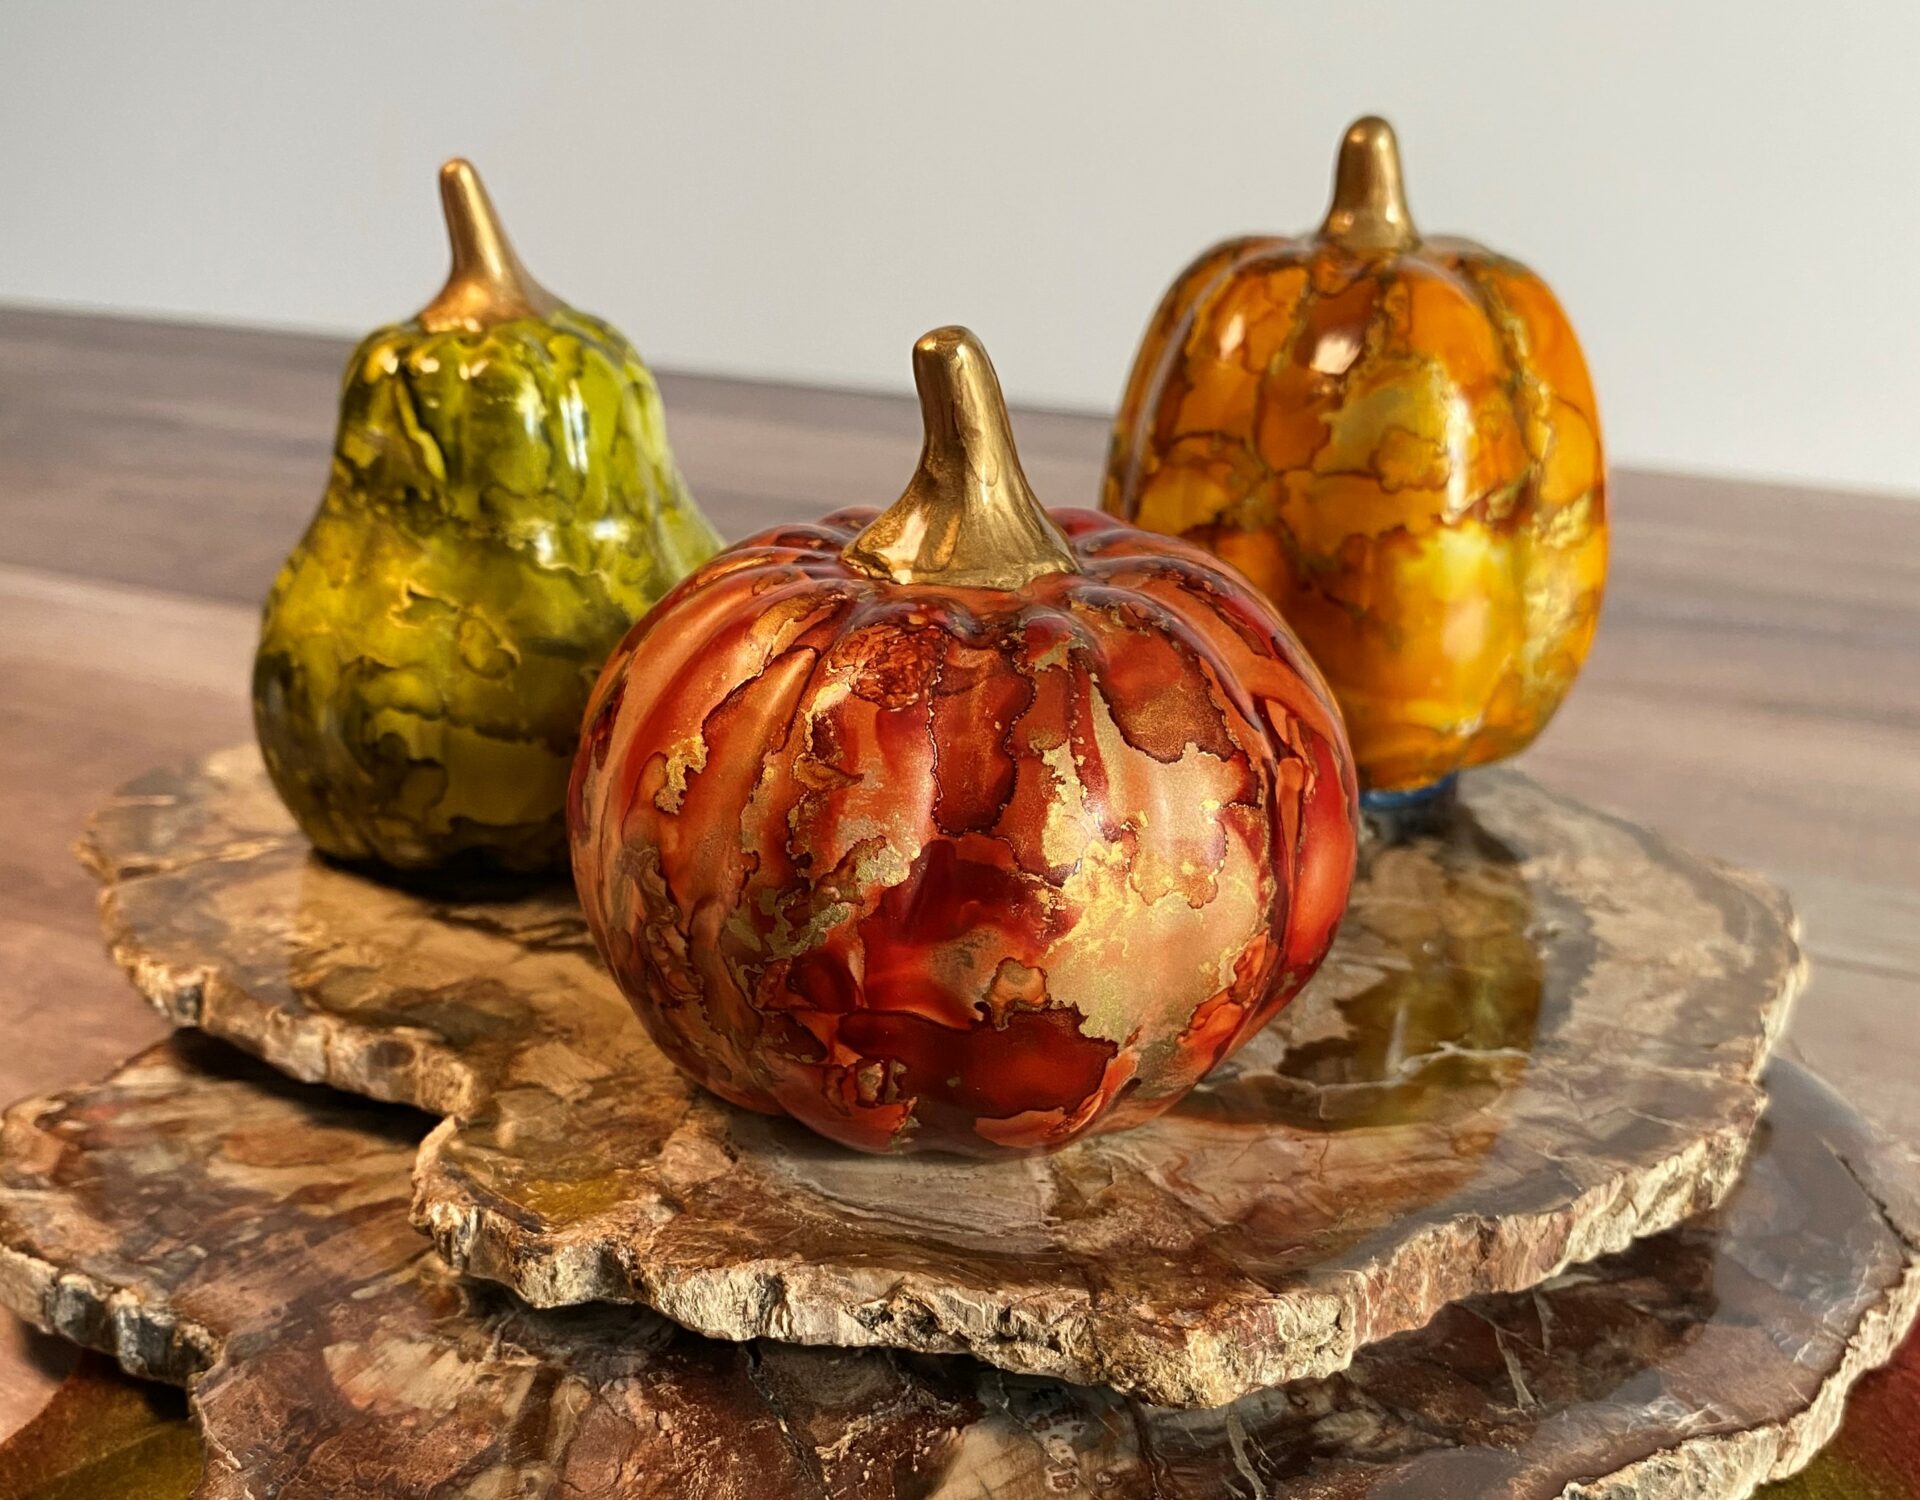
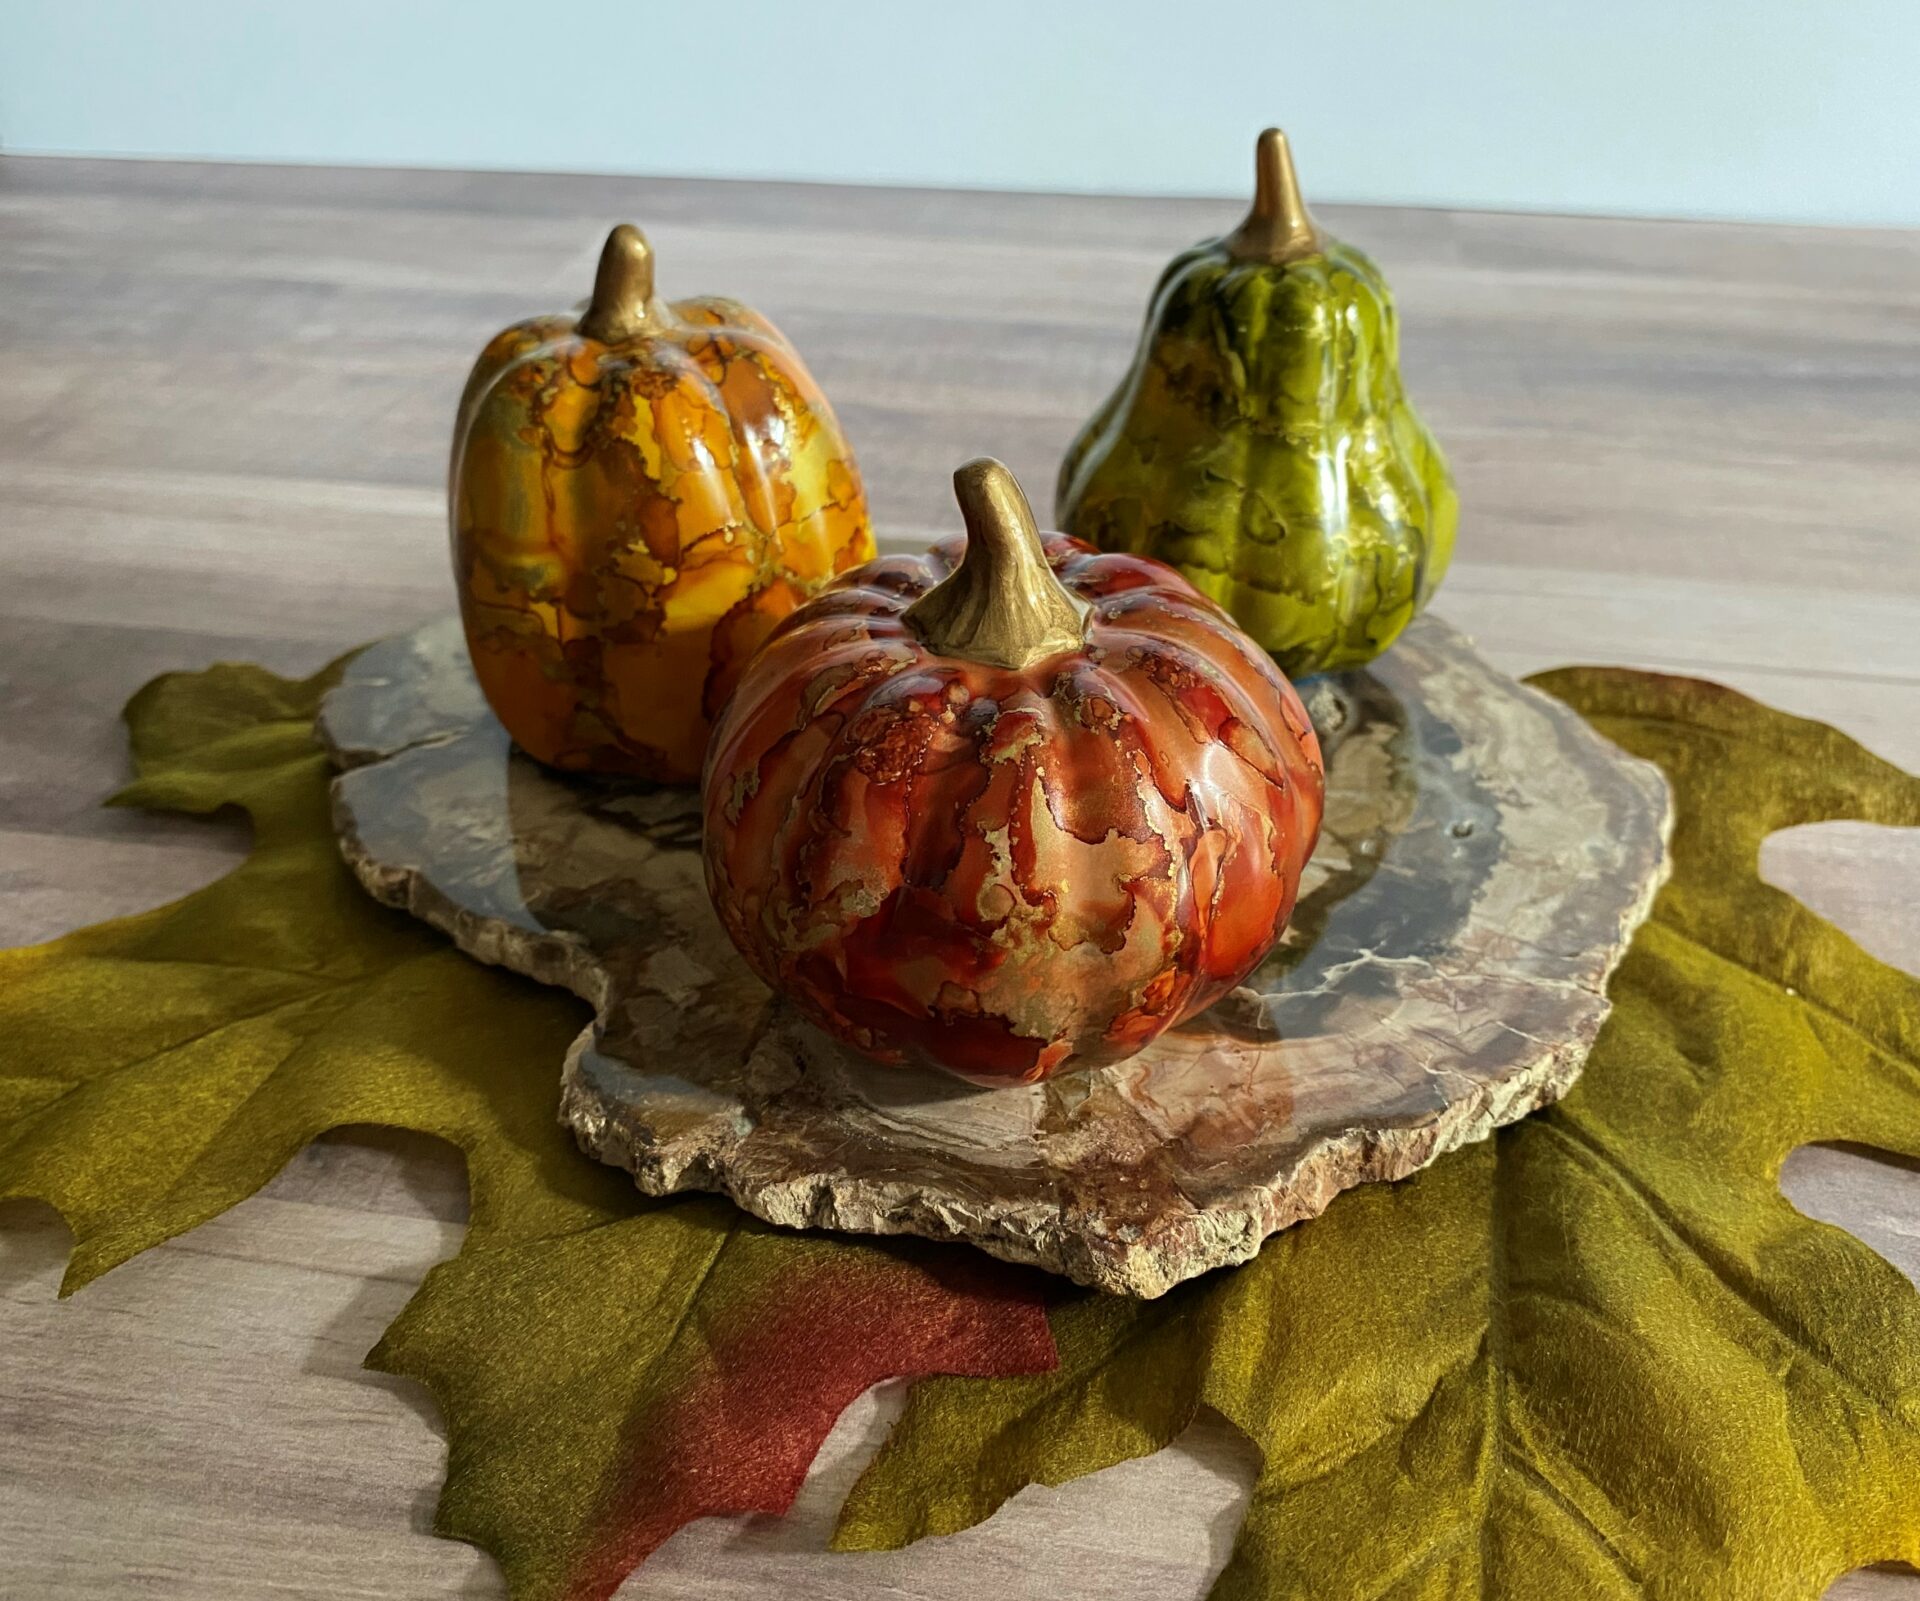
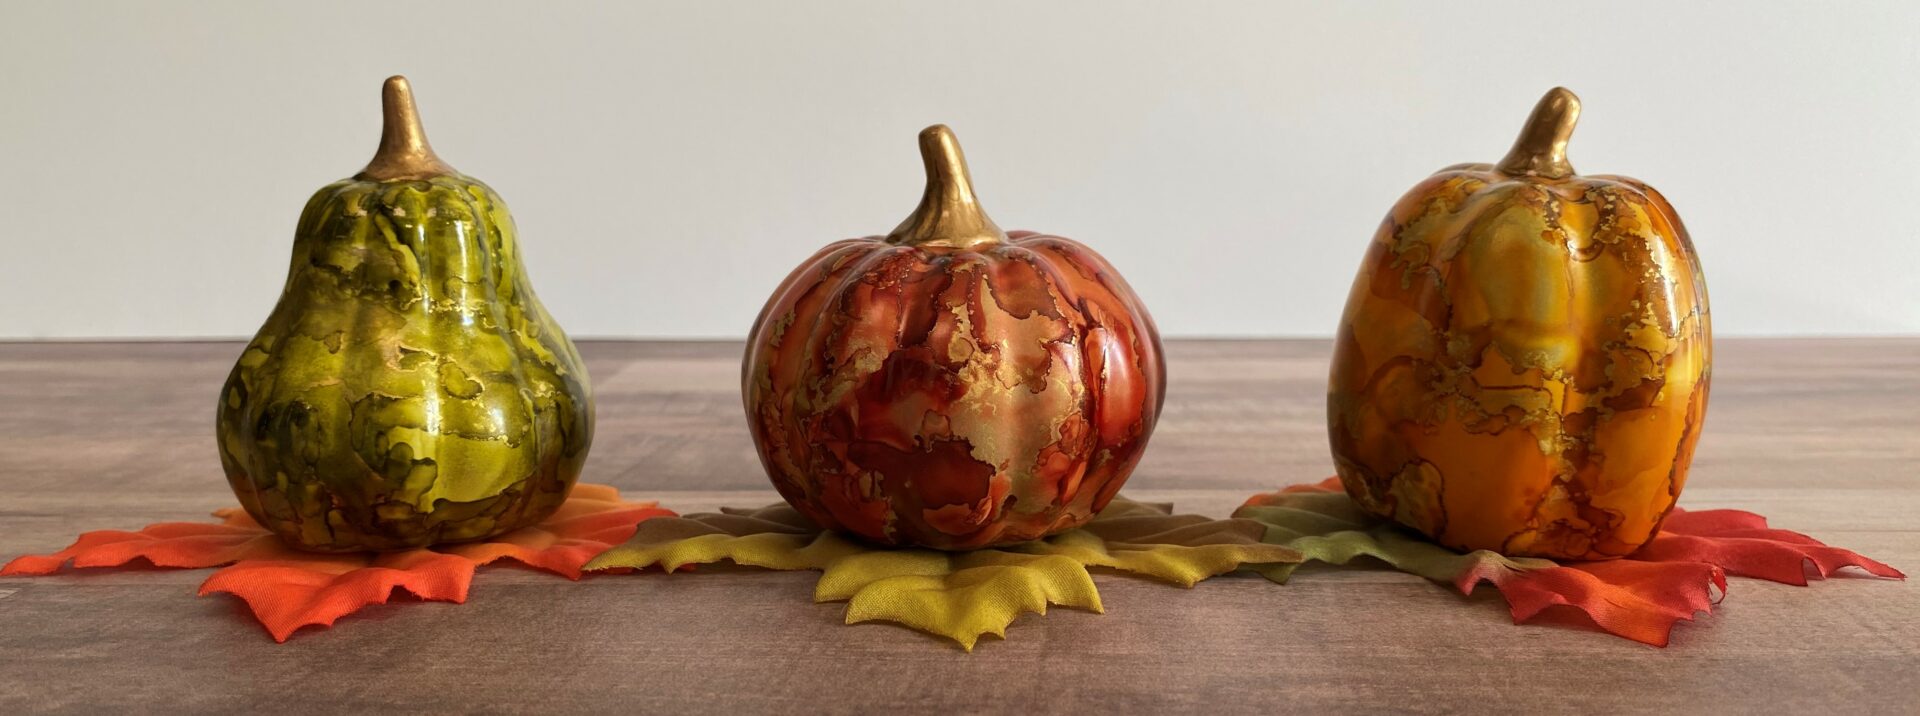
Hello crafty makers. HAPPY FALL! You know what that means? It’s pumpkin season! Today I’m sharing how I made these cute little gilded alcohol ink pumpkins. They feature a marbled look with gold metallic veining. They’re pretty simple to make and perfect for fall. You can use these for home decor and even decorate your Thanksgiving table with them.
So if you want to learn how I made these gilded alcohol ink pumpkins, then just keep reading.
Link Abbreviations
- AMZ – Amazon*
- RI – Ranger Ink*
- BA – Blick Art Materials*
- Sb.com – Scrapbook.com*
- SSS – Simon Says Stamp
- WM – Wal Mart
- HL – Hobby Lobby
- MIC – Michaels
Full Disclosure: This post contains affiliate links*. If you click on an affiliate link and later make a purchase, I may receive a small commission. Clicking on an affiliate link which earns a commission does NOT result in additional charges to you or cost you anything extra. Money earned via affiliate links helps pay the fees to keep this blog up and running. Thank you so much for shopping through my links to show your support for the brands that we love and the products that I share!
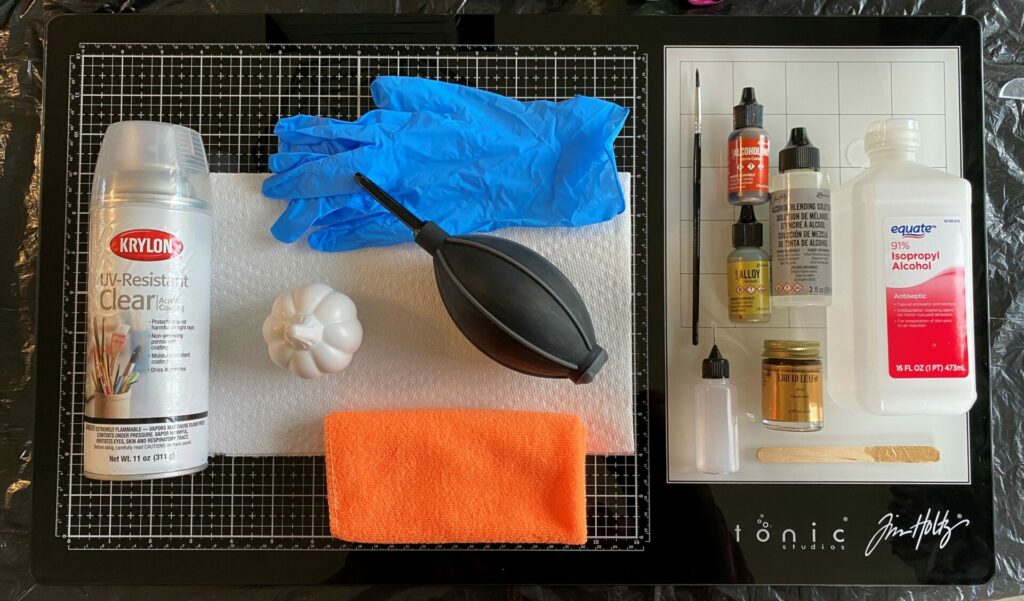
Supplies Used / Substitutions:
- White Glazed Ceramic Pumpkin / Any color ceramic or glass pumpkin
- Tim Holtz Alcohol Ink – Terra Cotta | RI | SSS / Any alcohol ink in any color
- Tim Holtz Alcohol Ink Alloy – Gilded | Sb.com | RI /Any color alloy
- Ranger Tim Holtz Alcohol Blending Solution | Sb.com | RI | SSS |
- 91% Isopropyl Alcohol | WM |
- Ranger Tim Holtz Alcohol Ink – Air Blower | Sb.com | RI | SSS |
- Ranger Tim Holtz Alcohol Ink – Tool Set | Sb.com | RI / Any small round paintbrush
- Liquid Leaf – Classic Gold | HL / Optional
- Tim Holtz Glass Media Mat | Sb.com | AMZ / Cardboard
- Gloves
- Paper Towels
- Plastic Trash Bag
- Clean Cloth / Tissue
- Popsicle Stick / Any stir stick
- Krylon UV- Resistant Clear – Gloss | BA | MIC |
- Lazy Susan | WM / Optional but very helpful
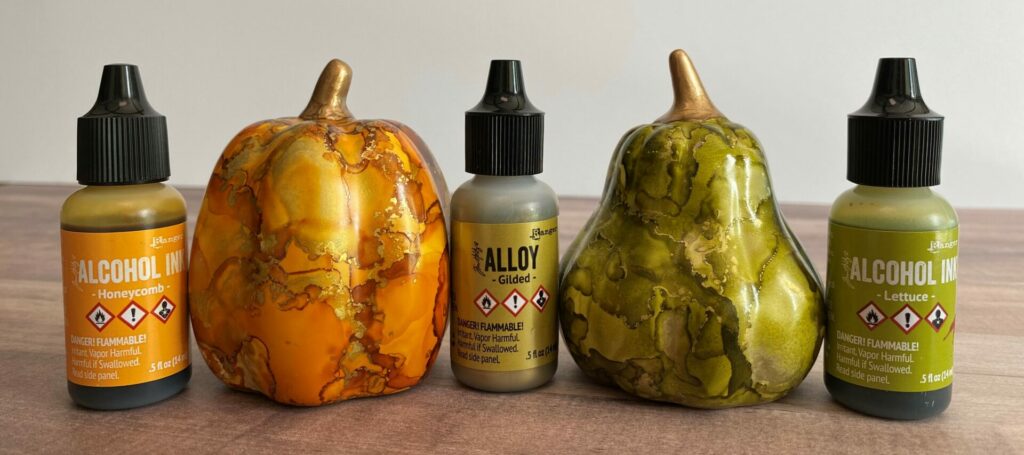
To make the yellow pumpkin, I used honeycomb alcohol ink and gilded alloy. As for the green pumpkin, I used lettuce alcohol ink and gilded alloy.
- Tim Holtz Alcohol Ink – Honeycomb | Sb.com | RI | SSS |
- Tim Holtz Alcohol Ink – Lettuce | Sb.com | RI | SSS |
- Tim Holtz Alcohol Ink Alloy – Gilded | Sb.com | RI | SSS |
About Alcohol Inks & Advice
If you’re new to alcohol inks, here’s a little info about them. For this project, I used the Tim Holtz alcohol inks from Ranger Ink. Rangers website describes the inks as follows:
“Alcohol Inks are fast drying, acid free, fade resistant dye inks specially formulated to create gorgeous backgrounds and vivid pops of color on non-porous surfaces.”
“Tim Holtz Alloys are reflective metallic acid free inks specially formulated with unique metal powders to create intense metallic highlights when combined with Alcohol Inks and Alcohol Blending Solution on non-porous surfaces.”
When using the Alloys, you NEED to use at least a drop of Tim Holtz Alcohol Blending Solution along with it. Now I know what you’re thinking, “Can’t I just use 91% Isopropyl Alcohol instead of blending solution?” The answer is NO. To get the result I achieved, you CAN NOT substitute the blending solution for 91% Isopropyl Alcohol. I’m not sure on the exact science behind it, but all I know is it helps the Alloys to do a magical dance to create the beautiful gilded veining. If you use the 91% Isopropyl Alcohol instead of the blending solution, the Alloys won’t perform as they were designed and it will be a hot mess.
Important Safety Warnings
Alcohol Inks do have an odor, so if you are sensitive to smells, this might not be the medium for you. Also, this is an adult project, and is not intended for children.
- Work in a well ventilated area.
- Open up doors and windows and/or wear a respirator.
- Wear gloves.
- Keep away from heat, sparks, and flame.
- Keep out of reach of children
- Do not use a straw to blow ink. Use an air blower tool instead.
- Never ever spray alcohol inks or blending solution.
Below is a safety note from Ranger Inks website:
Note: Ranger does not recommend using Tim Holtz® Alcohol Inks, Metallic Mixatives, Snow Cap Mixative or Alcohol Ink Blending Solution in spray bottles as these contents contain alcohol and should not be airborne.
Finding The Right Pumpkin
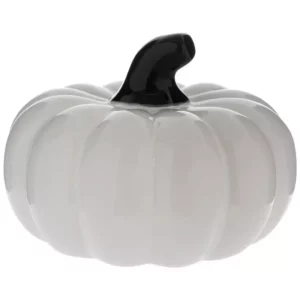
The first step of this tutorial is finding the right pumpkin. You want to choose a pumpkin that is made of non-porous materials. For example, glazed ceramic or glass pumpkins would work best. The pumpkin I used for this tutorial was purchased at JoAnn’s in 2021, and is no longer available. But you can find these type of pumpkins at any craft store. Some of my favorite places to look for pumpkins are Hobby Lobby. I even found some cute small pumpkins at Target in the dollar spot section. (Picture from 2022)
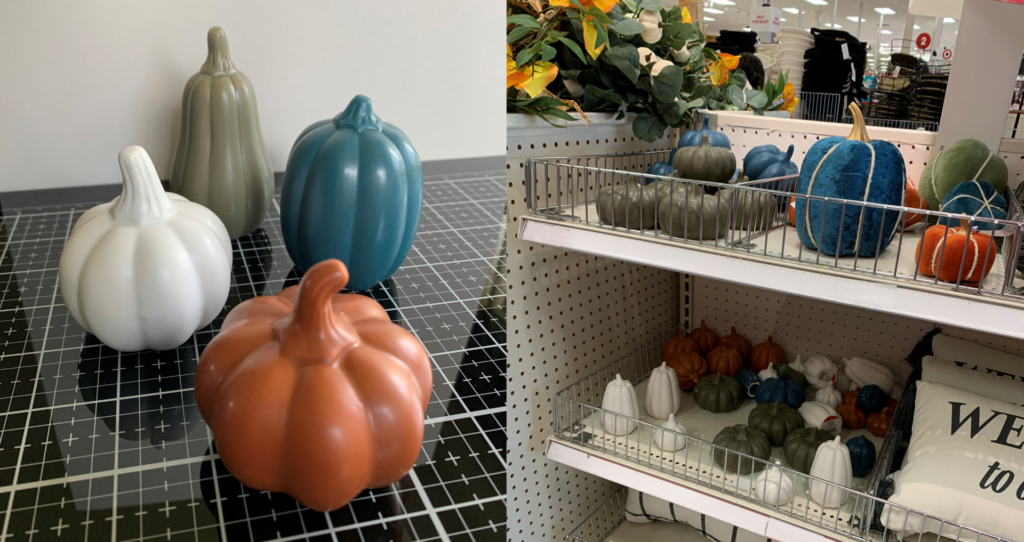
Also, you’re not limited to only choosing a white pumpkin, you can choose a colored pumpkin as well. Actually choosing a colored pumpkin would work in your favor, because you wouldn’t have to do the filling in the gaps step.
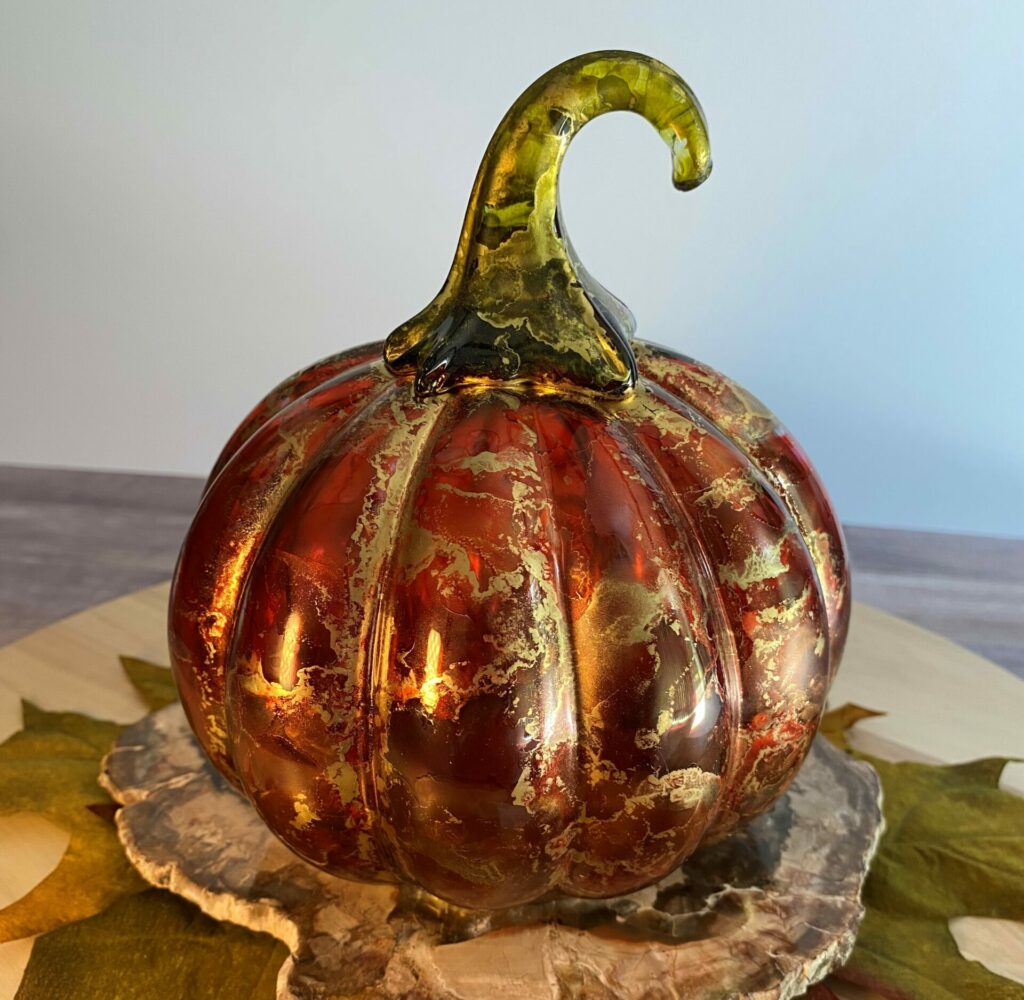
Below is an example of what alcohol inks look like on a glass pumpkin. I made this pumpkin using the same techniques I share in this tutorial. This was actually a gray transparent glass pumpkin to start with. The alcohol ink colors I used were ember, lettuce, and gilded alloy.
- Alcohol Ink – Enber | Sb.com | RI | SSS |
- Alcohol Ink – Lettuce | Sb.com | RI | SSS |
- Alcohol Ink Alloy – Gilded | Sb.com | RI | SSS |
Below are links to a selection of pumpkins from Hobby Lobby that I believe would be ideal for this tutorial. (List updated in 2025)
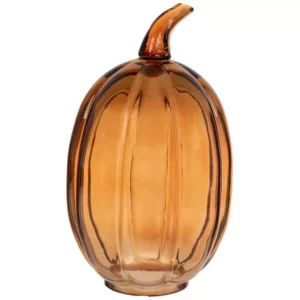
- Orange Glass Pumpkin | Hobby Lobby |
- Glazed Ceramic Pumpkin | Hobby Lobby |
Cleaning The Pumpkin
Before we do any inking, the pumpkin needs to be cleaned. By doing this, it removes any dust and oils on the pumpkin and preps the surface for the alcohol inks.
- Pour some 91% Isopropyl Alcohol onto a clean cloth/tissue (just enough to get the cloth damp).
- Wipe down the pumpkin with the cloth/tissue.
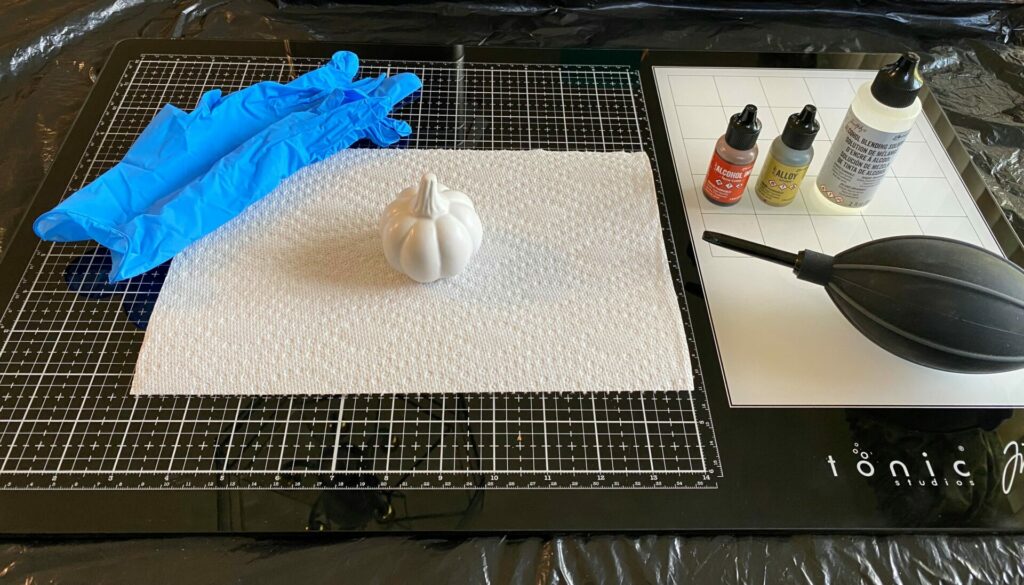
Setup Work Surface & Supplies
Then, it’s time to setup the work surface and gather supplies. You might want to put a plastic trash bag under the glass media mat to protect the table. Also, you want to work in a well ventilated area, so crack a window while your working. Gather the supplies listed below and lets get started.
- Glass Media Mat (remove kraft sheet from mat)
- Plastic Trash Bag
- Pumpkin
- Alcohol Ink – Terra Cotta
- Alcohol Ink Alloy – Gilded
- Blending Solution
- Alcohol Ink Air Blower
- Paper Towels
- Gloves
Applying The Alcohol Inks
After your work surface is all setup, it’s time to start inking. Firstly, watch the video below to get a visual understanding on my inking process. Then, follow the steps below the video.
- Open a window for ventilation.
- Put on gloves.
- Apply terra cotta alcohol ink to a section of the pumpkin.
- Then, add a drop of gilded alcohol ink alloy on top of the area you just inked.
- Next, add a drop of blending solution on top of the alloy.
- Then, add a drop of terra cotta alcohol ink on top of the blending solution.
- Use the air blower to move the ink around until dry.
- Repeat steps 3-7 around the pumpkin until it is fully covered with ink.
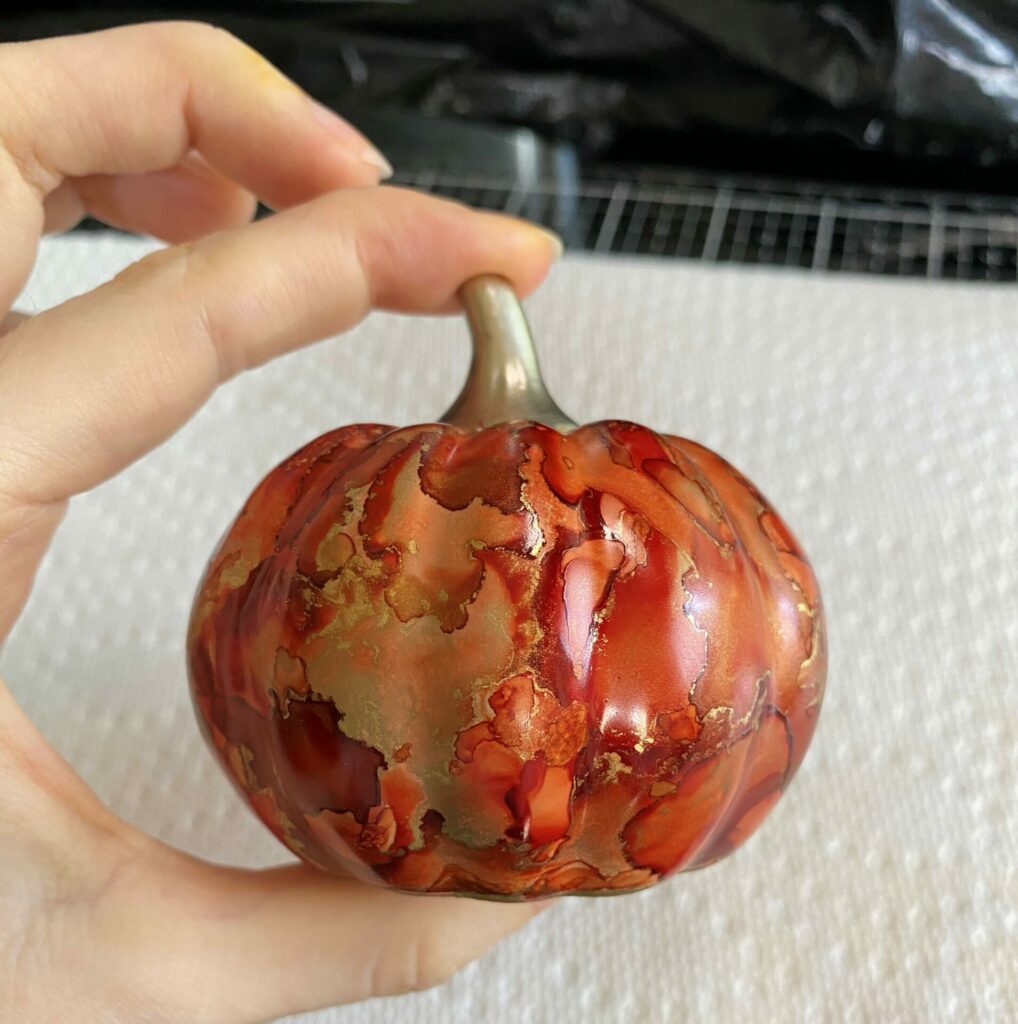
When I finished inking, the gilded alcohol ink pumpkin looked like this.

Filling In The Gaps
Now, it’s time to fill in the white gaps. If you happened to choose a colored pumpkin, then you can skip this step because you won’t have any white spots that need to be filled in.
For this, you’ll need your terra cotta alcohol ink, 91% isopropyl alcohol, small round #2 paintbrush, glass media mat, paper towel, and gloves. I like to put the 91% isopropyl alcohol into a needle tip bottle. But if you don’t have that, you could pour some into a jar and dip your brush into it.
- Add a drop of terra cotta alcohol ink to the white pallet area of the glass media mat.
- Pick up some ink with a small round paintbrush and apply it to the white spots on the pumpkin.
- When the ink dries on the glass media mat, add a drop of 91% isopropyl alcohol to refresh the ink. If the ink color gets too diluted by the isopropyl alcohol then add another drop of terra cotta alcohol ink.
- Repeat steps 2-3 until all the white spots are covered with ink.
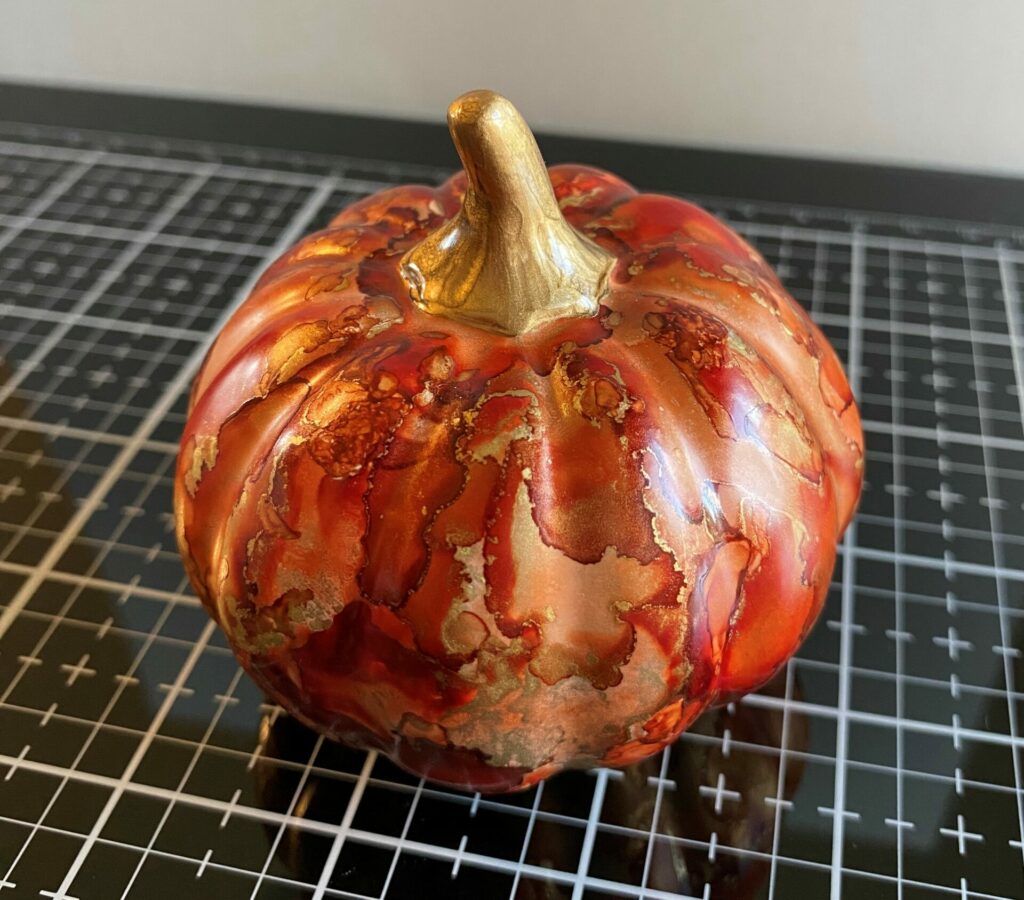
When I filled in all the white gaps, this is how my gilded alcohol ink pumpkin looked.
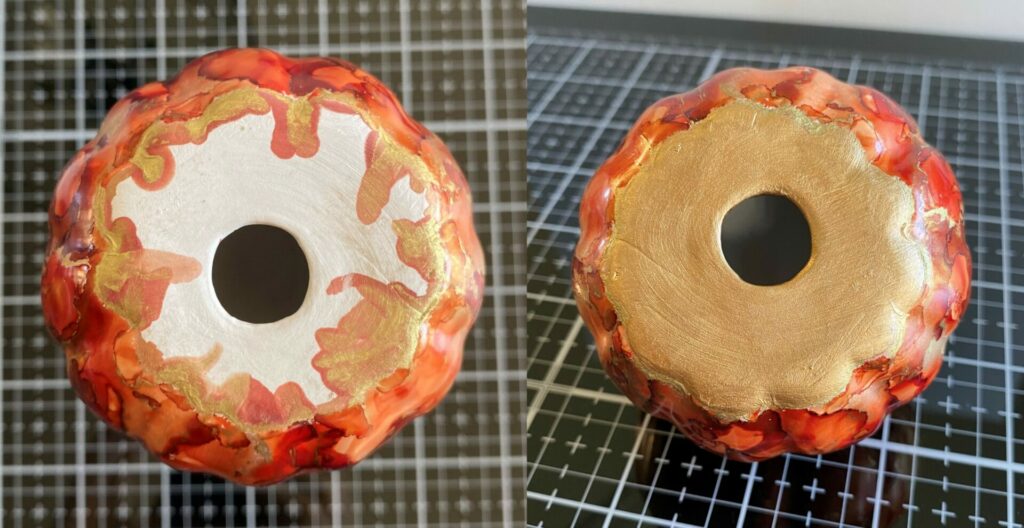
Painting The Stem & Bottom
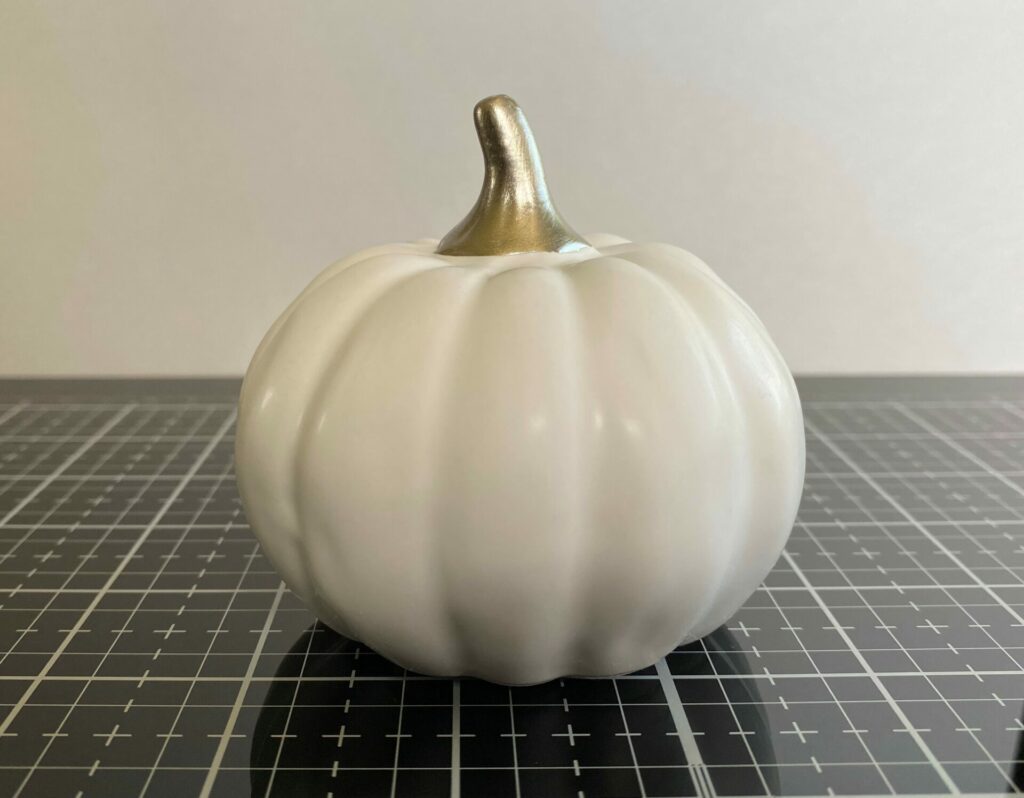
Now it’s time to paint the stem and bottom of the pumpkin. But, keep in mind this step is completely optional. You don’t have to paint the stem. Your stem might already look great as it is. I painted the stem on my gilded alcohol ink pumpkin because it was already painted in a champagne color. And I thought it didn’t go with the bright gold of the gilded alloy ink.
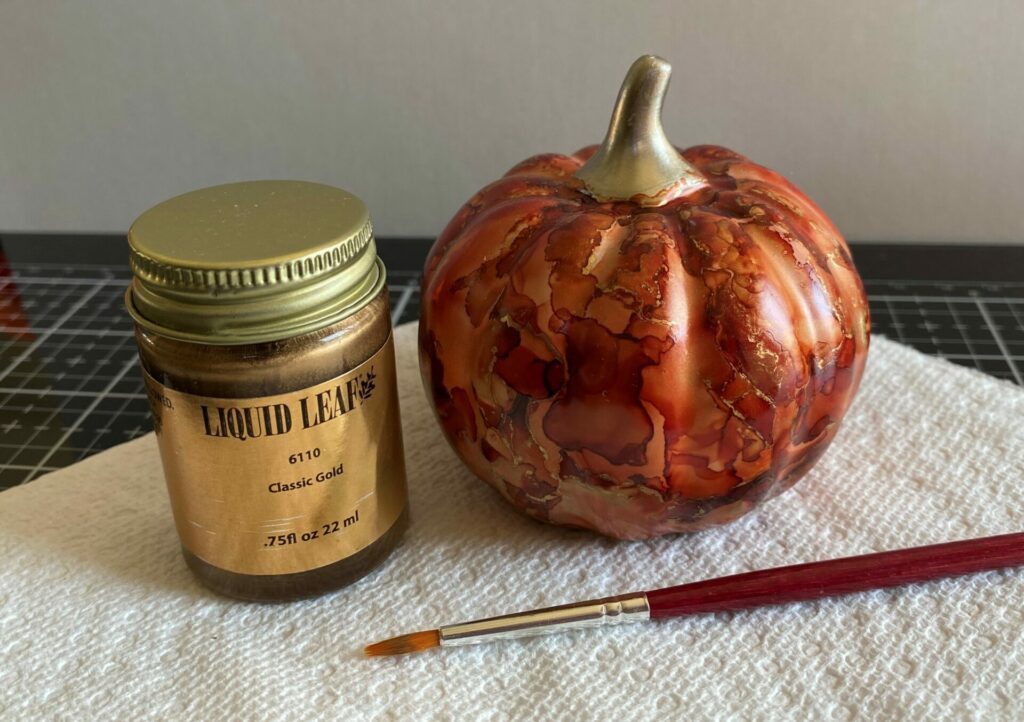
To paint the stem, I used Liquid Leaf paint in classic gold. Now this paint is not an exact match in color to the gilded alloy ink, but it’s close. I’d say it’s a couple shades darker. Fair warning, this paint has a bit of a smell to it. Also, you’ll need some paint thinner to clean the brush when you’re done.
- Open liquid leaf paint in classic gold and stir it with the stir stick.
- Dip the tip of a small round #2 paintbrush into the liquid leaf paint.
- Paint the stem of the pumpkin.
- Put the lid back on the paint.
- Clean brush with some paint thinner.
- Let the stem dry.
- Repeat step 1-5 to paint the bottom of the pumpkin and let it dry.
Painting the bottom of the pumpkin is also an optional step. Since the bottom of the pumpkin isn’t seen, you don’t have to do this step. I did it because it hides the messy drips of the alcohol ink run offs, and gives the project a cleaner look.
Sealing The Alcohol Ink
Then, I sealed the gilded alcohol ink pumpkins with Krylon UV-Resistant Clear Gloss. This is a important step because it sets and seals in the alcohol ink. Why does this matter? Because some cleaning products contain alcohol, and if it comes in contact with the pumpkin, it will reactivate the alcohol ink. That would ruin your masterpiece and possibly bleed alcohol ink onto surfaces you don’t want; i.e. tablecloth, wooden table, bookcase. Another reason to seal your gilded alcohol ink pumpkins is to protect it from fading in the sun.
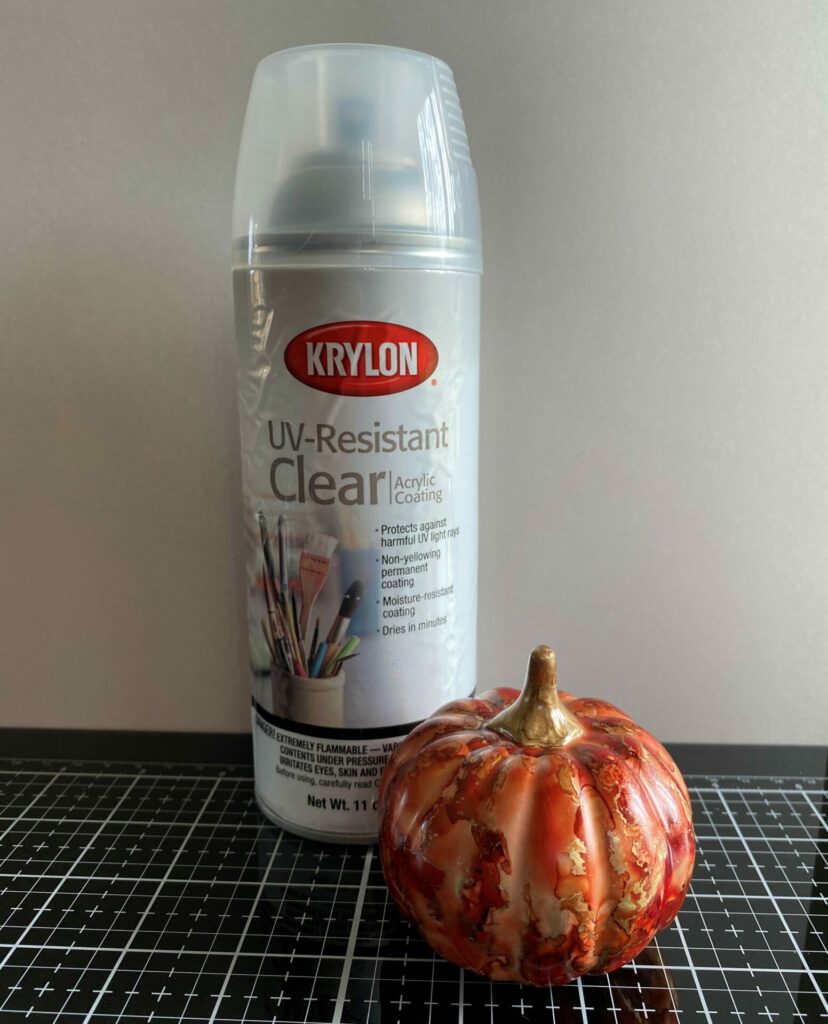
Lastly, it was time to spray the pumpkins with the UV-Resistant Clear Gloss. Firstly, you’ll want to set up the spray paint station outside using a table covered with a trash bag or a cardboard box. I like to put my pumpkin on a lazy susan. This make spray painting easier and you’ll get a nice even coat on all sides.
Please read the instruction on the can thoroughly before starting.
- Setup a spray paint station outside.
- Weather conditions must be 55° to 75°F with little to no wind and low humidity.
- Shake can for 2 minutes.
- Stand up wind from your project, if there is a little bit of wind.
- Do a test spray on a scrap piece of cardboard. Clear is Good. If it looks like silly string, it’s a defective can and is bad.
- Hold can 10 to 12 inches from pumpkin and spray in a sweeping motion beginning off the surface around all sides of the pumpkin and continuing off the other side. Don’t over spray. You want this to be a thin coat.
- Follow “After Use” instructions on can.
- Let dry for at least 15 minutes.
- Repeat steps 3-7 one more time for a total of two thin coats.
- Let pumpkin dry over night.
Gilded Alcohol Ink Pumpkins Complete!
Congratulations your gilded alcohol ink pumpkins are now complete! I hope you enjoyed this tutorial and have as much fun making it as I did. If you do make these pumpkins, please tag me on Instagram @grovecrafted and use the #grovecrafted. I’d love to see what you’ve created! Thanks for stopping by and I hope you found some new inspiration to create. Happy crafting!

If you enjoyed making these gilded alcohol ink pumpkins and you’re looking for some more fall inspiration, then you might want to check out my Leaf Thanks Cards tutorial.


Thanks for sharing.