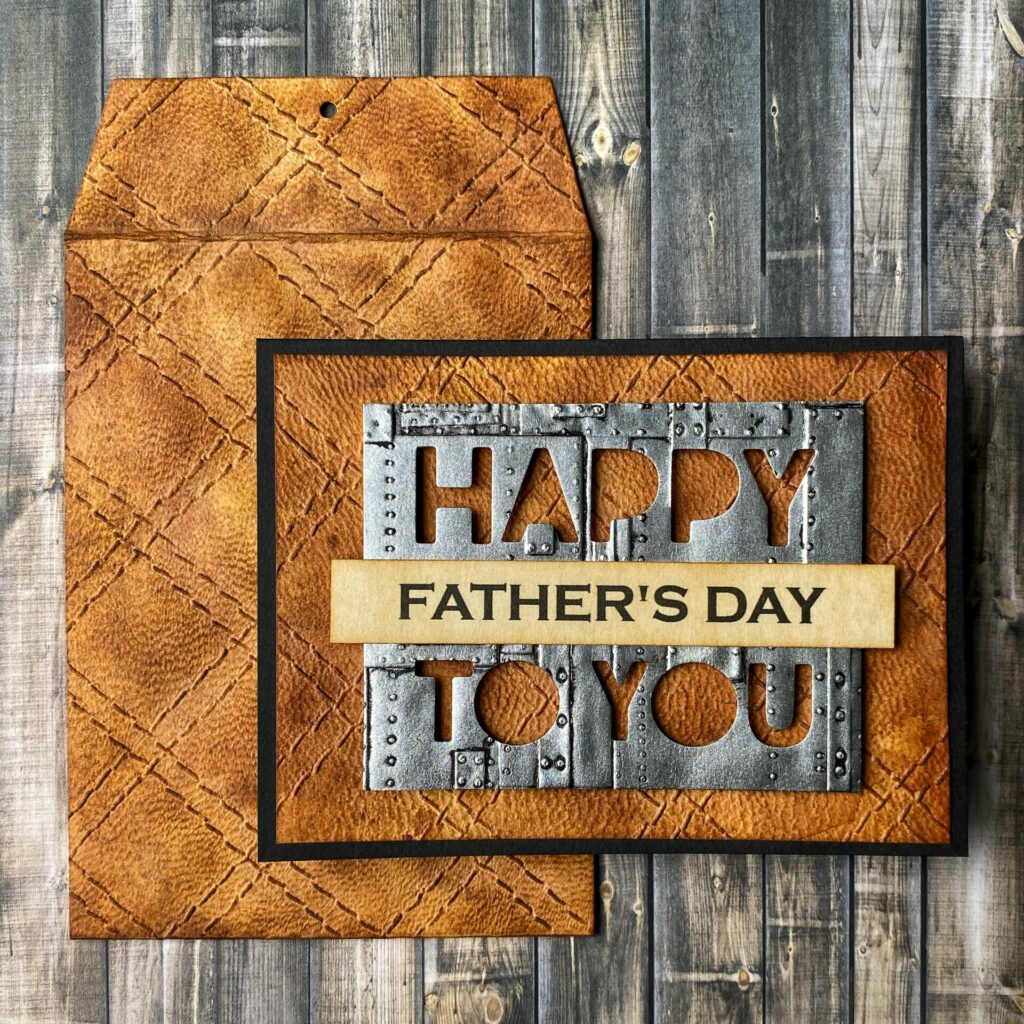
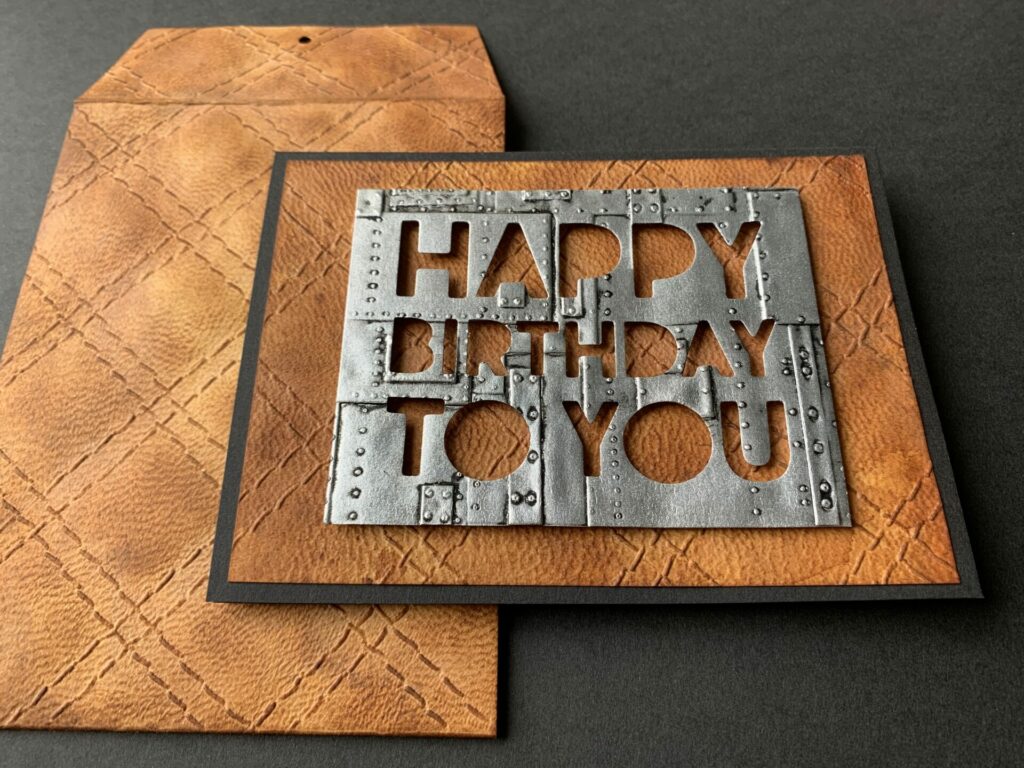
Quilted Leather Card
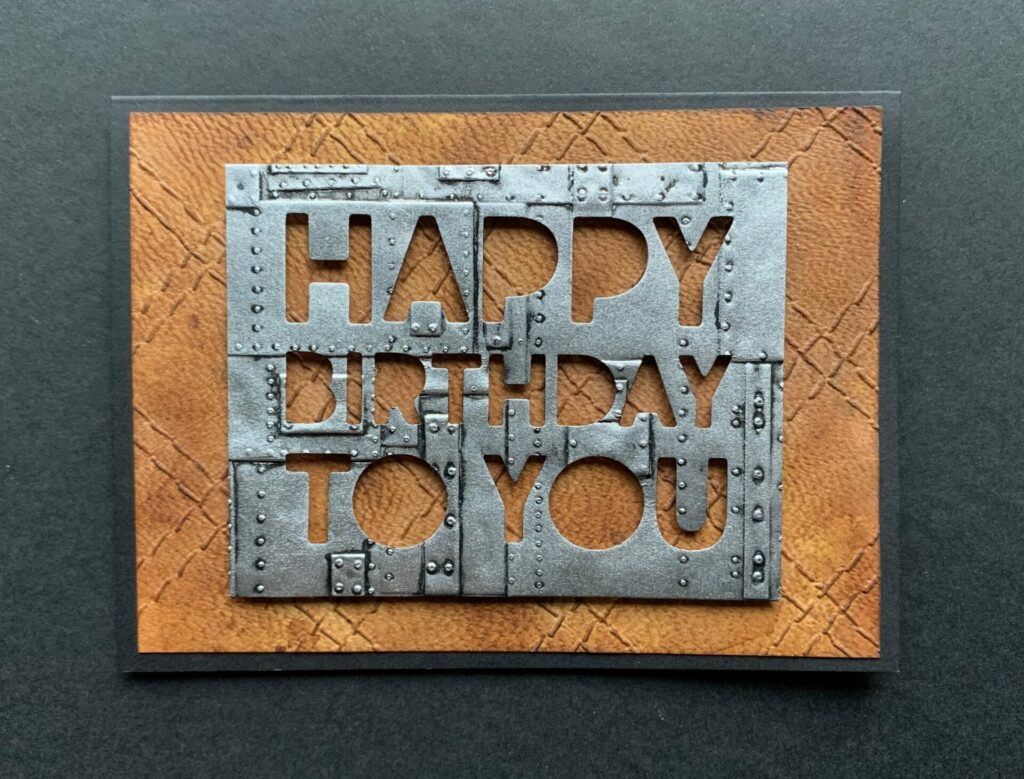
Hello crafty card makers! Today I’m sharing how I made this quilted leather card. It features a faux metal finish technique, and 3D embossed texture. I also made a matching envelope to go with the card. It has the same 3D embossed texture as the card. If you want to learn how I made that, you can skip straight to the envelope tutorial here. This masculine card is perfect for all the men in your life. I made this card for Father’s Day, but the sentiment could easily be changed to fit your specific need. This quilted leather card could also be a birthday, thank you, congrats, or anniversary card.
Link Abbreviations
- AMZ – Amazon*
- Sb.com – Scrapbook.com*
- SIZ – Sizzix*
- SSS – Simon Says Stamp
- RI – Ranger Ink*
- BA – Blick Art Materials*
Full Disclosure: This post contains affiliate links which are indicated with an (*). If you click on an affiliate link and later make a purchase, I may receive a small commission. Clicking on an affiliate link which earns a commission does NOT result in additional charges to you or cost you anything extra. Money earned via affiliate links helps pay the fees to keep this blog up and running. Thank you so much for shopping through my links to show your support for the brands that we love and the products that I share!
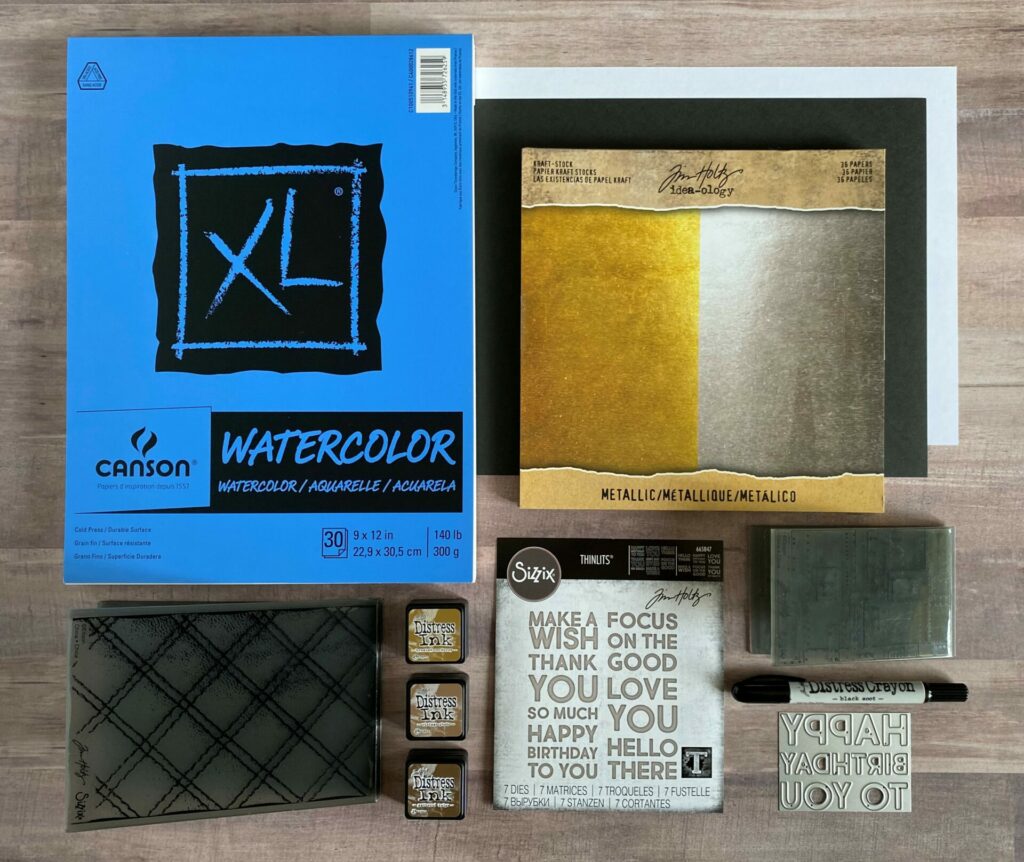
Supplies Used / Substitutions:
- Tim Holtz Sizzix Thinlits Dies – Bold Text #1 #665847 | Sb.com | SIZ | AMZ | SSS |
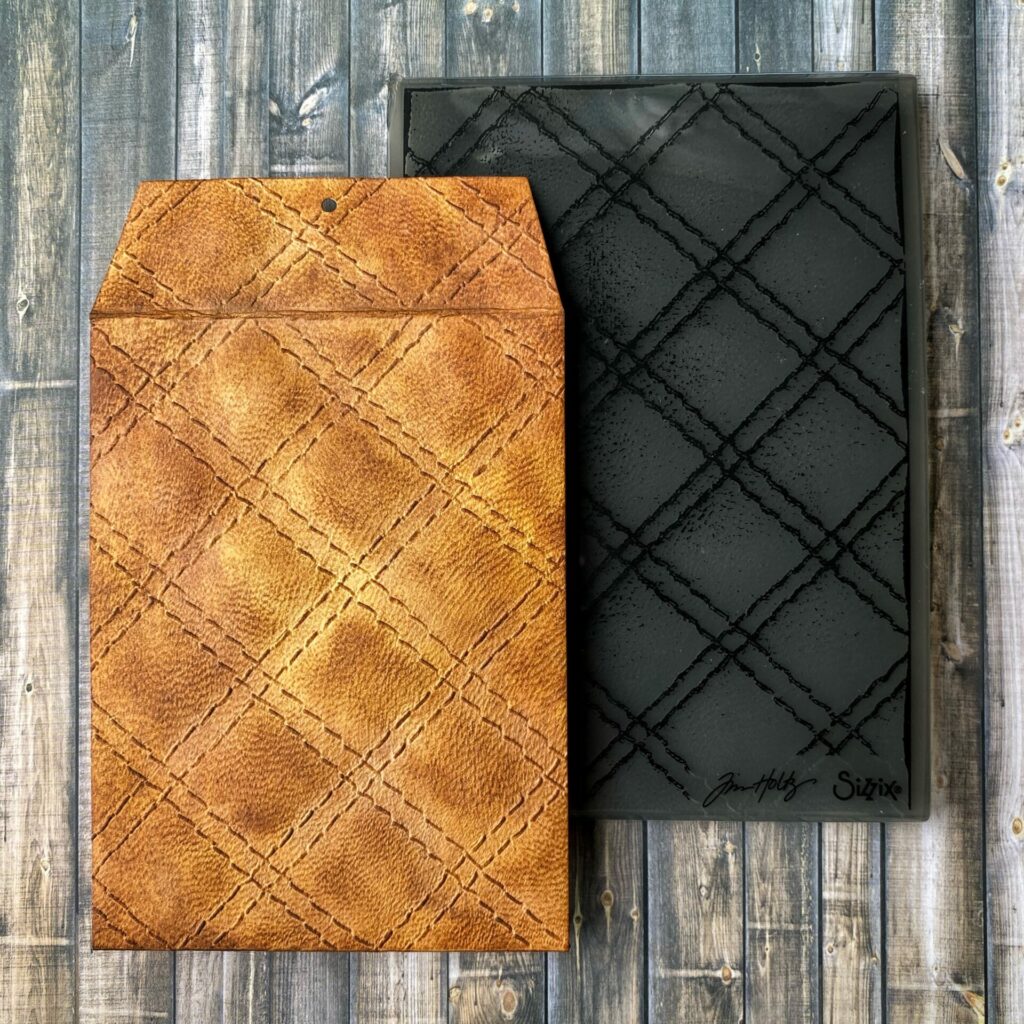
- Sizzix Tim Holtz 3D Embossing Folder – Quilted #665734 | Sb.com | SIZ | AMZ | SSS / Any embossing folder
- Sizzix Tim Holtz 3D Embossing Folder – Mini Foundry #665634 | Sb.com | SIZ | AMZ | SSS / Any embossing folder
- Black Cardstock / Any color cardstock
- White Cardstock / Any light colored cardstock
- Canson 140lb Watercolor Paper – Cold Press | BA | AMZ / Any watercolor paper
- Tim Holtz idea-ology Metallic Kraft Stock – Silver | Sb.com | AMZ | SSS / Any silver metallic cardstock
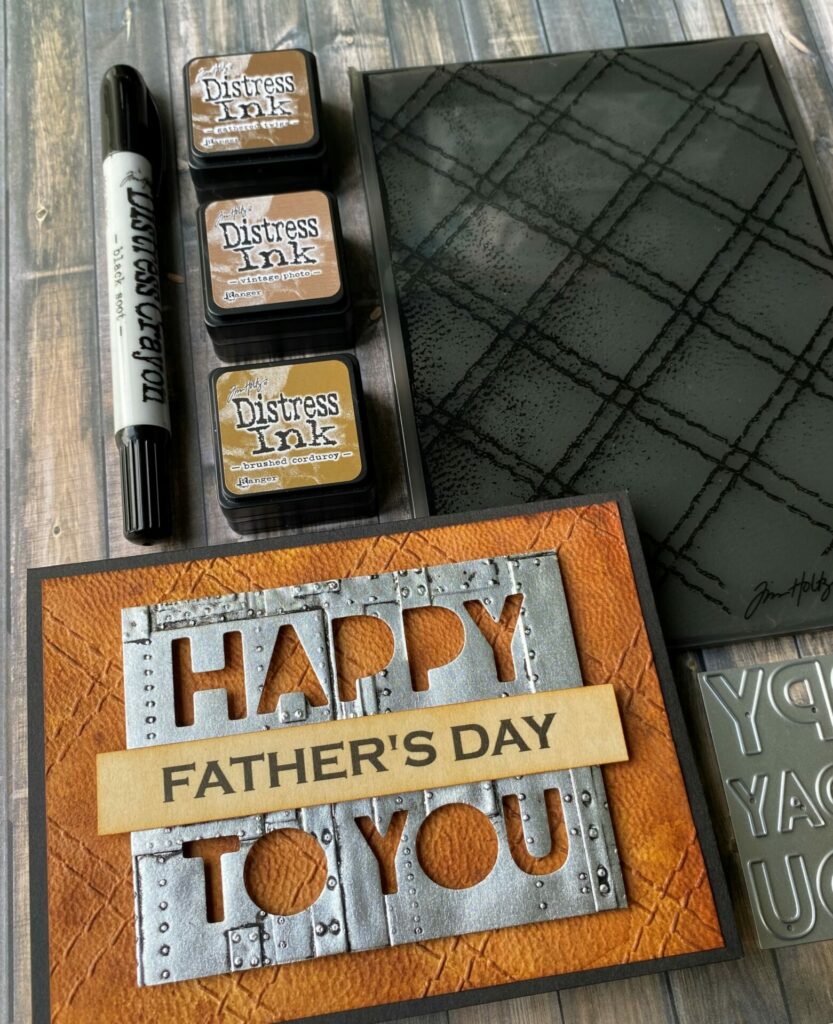
- Ranger Tim Holtz Distress Crayon – Black Soot | Sb.com | AMZ | SSS |
- Ranger Tim Holtz Distress Ink / Any colors of distress ink
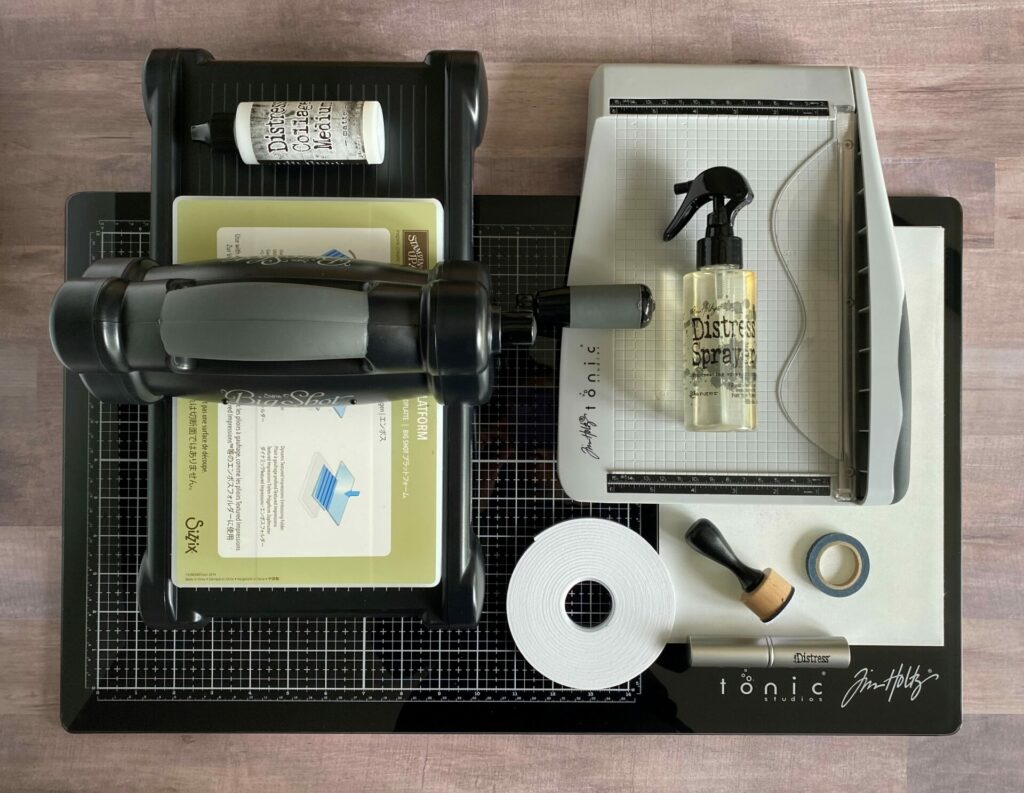
Tools Used / Substitutions:
- Sizzix Big Shot | SIZ / Any die cutting machine
- Tim Holtz Glass Media Mat | Sb.com | AMZ | SSS / Non-stick craft sheet
- Tim Holtz Tonic Guillotine Comfort Paper Trimmer | Sb.com | AMZ | RI | SSS / Any paper trimmer
- Distress Collage Medium – Matte | Sb.com | RI / Any liquid adhesive
- Tim Holtz Distress Sprayer with water | Sb.com | RI / Any spray bottle with water
- Ranger Mini Round Ink Blending Tool & Foam | Sb.com | RI | AMZ | SSS |
- Tim Holtz Distress Blending Brush | Sb.com | RI | SSS / Any blending brush
- Foam Tape / Small foam adhesive squares
- Washi Tape / Any low tact tape
Making The Card Bases
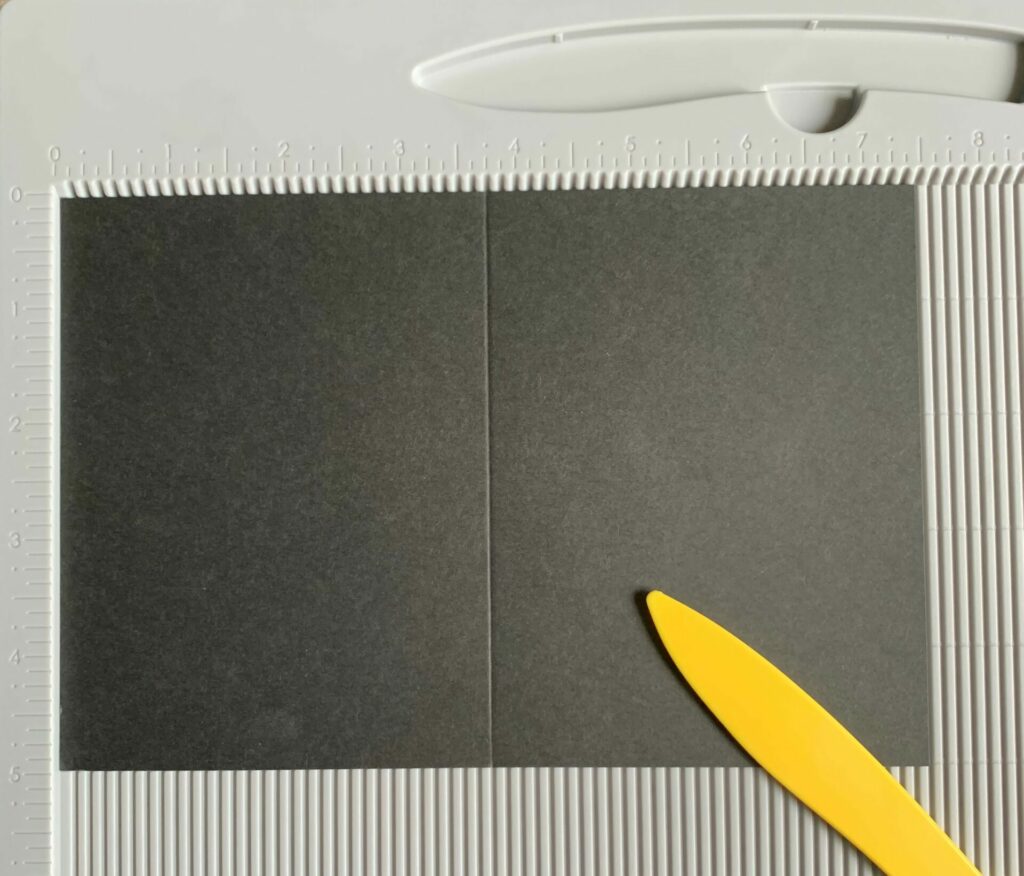
Firstly, to make the card base for the quilted leather card, I took the black cardstock and cut it down to size. I used the Tim Holtz paper trimmer and cut at the 5 inch mark. This gave me a strip measuring 5″ x 8½”. Then, I cut a 1 inch strip off that which gave me my card base measuring 5″ x 7½” (see image below for reference).
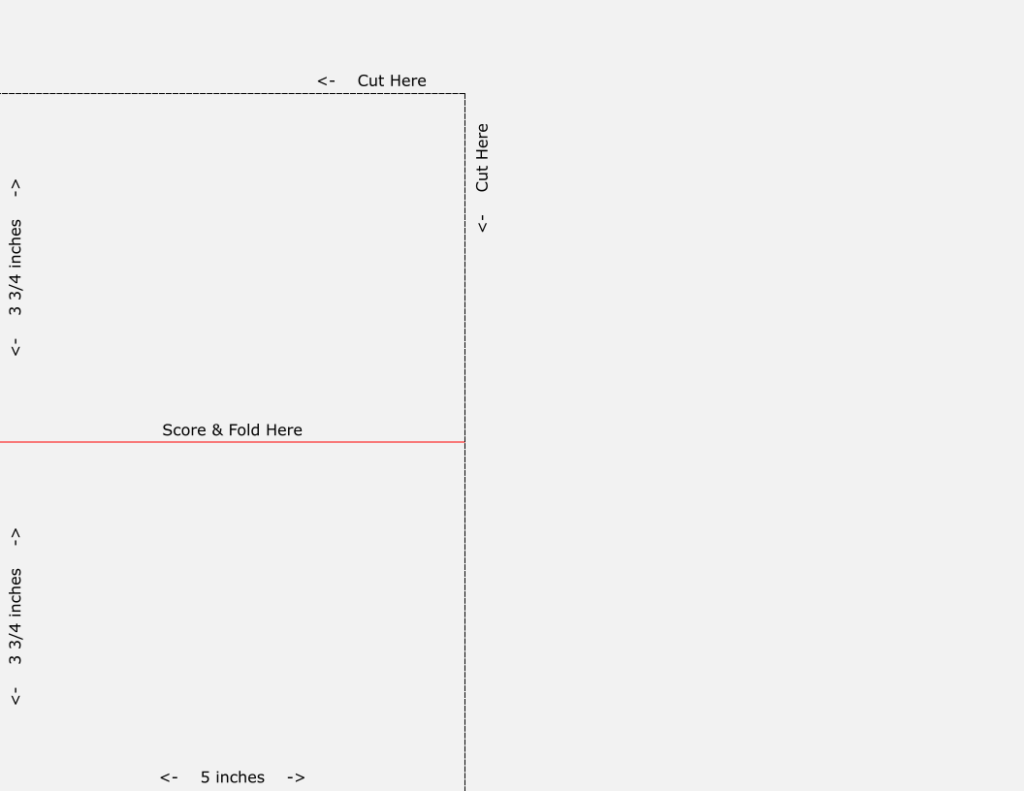
Next, I used a score board and scored the card at 3¾” (see image below for reference). Finally, this gave me a finished card base of 5″ x 3¾”. I sized this card to fit in the coordinating 4 bar envelope. But, feel free to make the card whatever size you want.
Cutting The Watercolor Paper
Then, I took a piece of watercolor paper and trimmed it down to size. For this I again used my trusty paper trimmer by Tim Holtz. I trimmed the watercolor paper to the size of 4¾” x 3½”. If you’re making your card a different size than mine, then trim it to be a quarter inch smaller than your card base.
Inking The Background
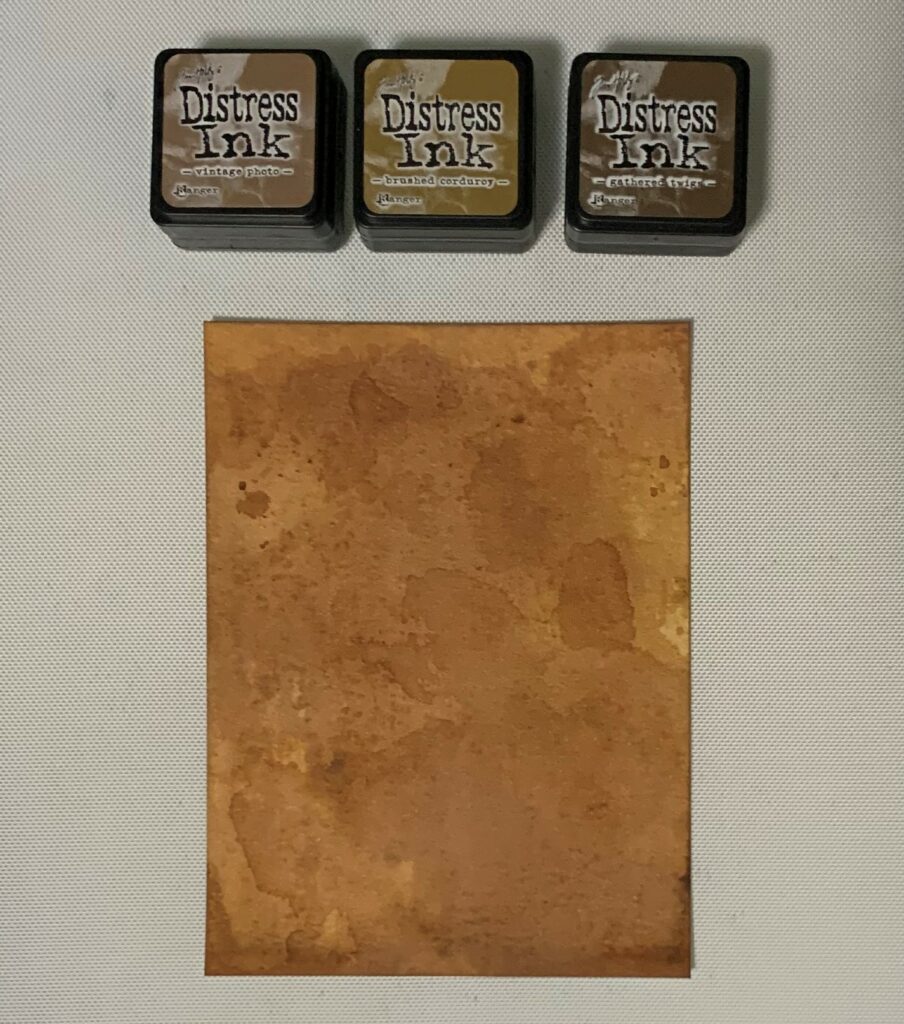
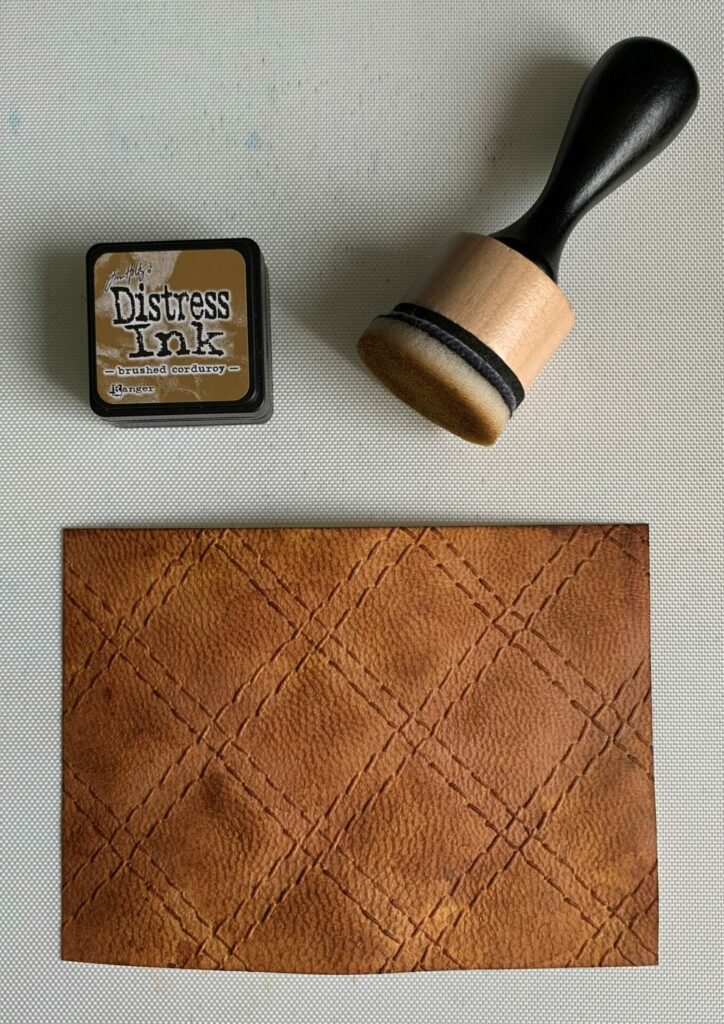
Now it’s time to get a little inky. Firstly, you’ll need the watercolor paper you just cut, distress inks, spray bottle with water, and a glass media mat/non-stick craft sheet. The shades of distress ink I used were brushed corduroy, vintage photo, & gathered twigs. To start, I pressed all three brown shades of distress ink pads onto my craft sheet. Next, I spritzed the inks on the craft sheet with water and ran my fingertips through the ink droplets. I do this to brake up the straight harsh lines created by the square ink cubes. I misted my watercolor paper with water and made a print. To do this I press and drag the paper through the ink.
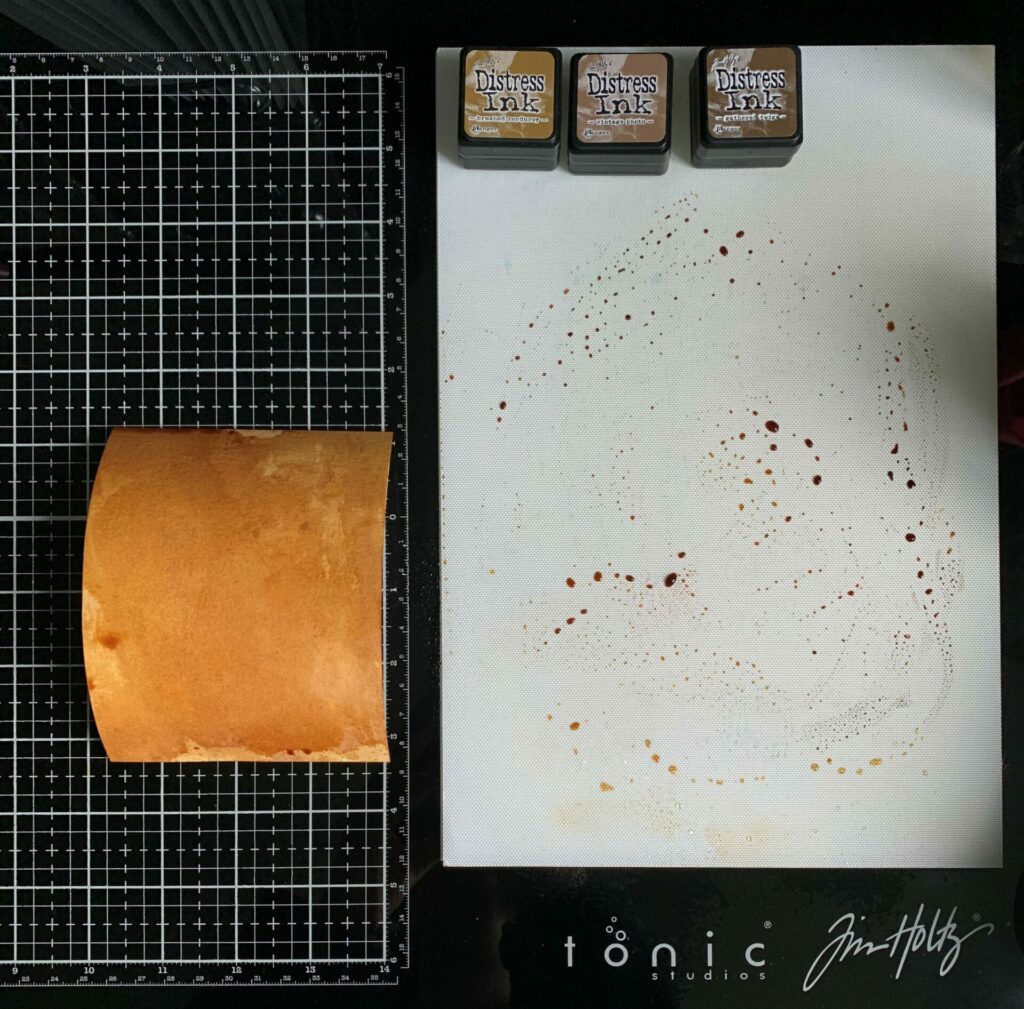
You can dry each layer with a heat tool or you can just let it air dry. If you want to use a heat tool, then I would recommend the Heat It Craft Tool by Ranger (linked United States version). I repeated the inking process a couple more times until I achieved the look that I wanted. In all, I did about three to four layers. Then, let the inked background dry.
3D Embossing The Background
Next, when the inked background was completely dry, I spritzed the back of it with water and put it into the Sizzix TH Quilted 3D embossing folder. You only want to spray the back of the paper because the distress inks are water reactive. This means the water will remove some of the ink and ruin the inking that was done in the previous step. The water helps soften the fibers of the paper so it doesn’t crack. For more examples of why I recommend using the water spritz, check out my side-by-side photo comparisons in my Elegant & Simple Card tutorial.
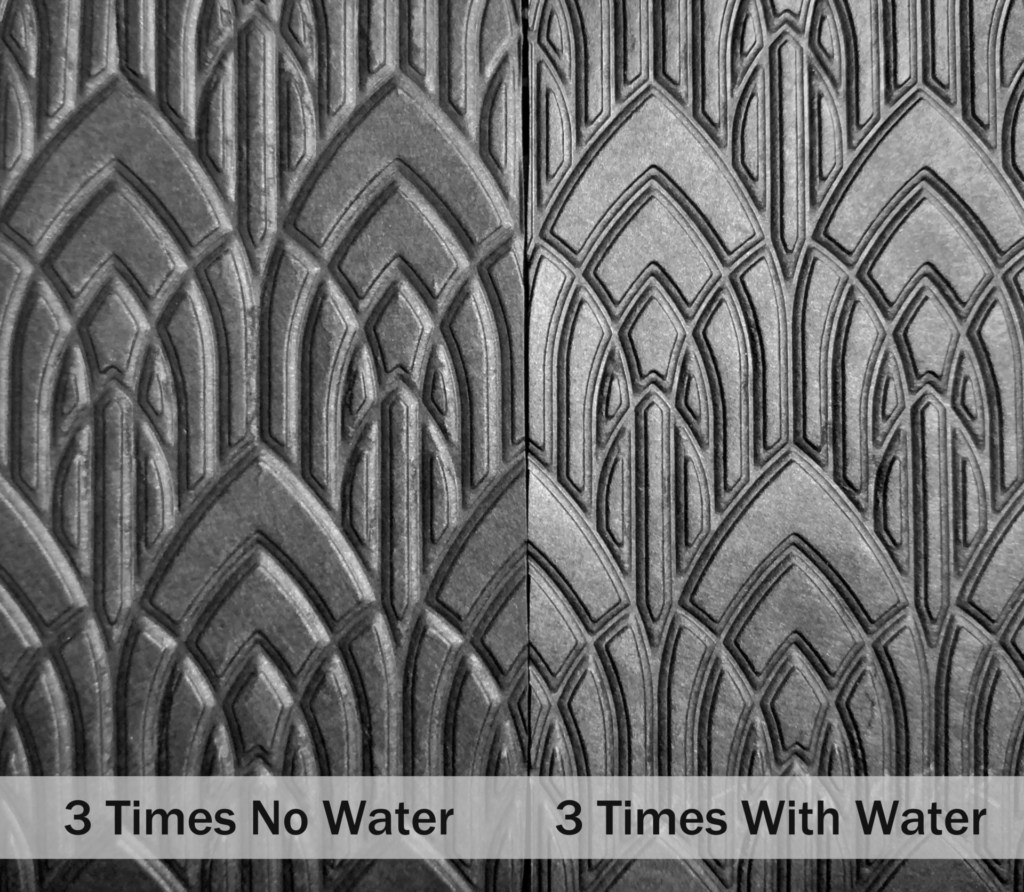
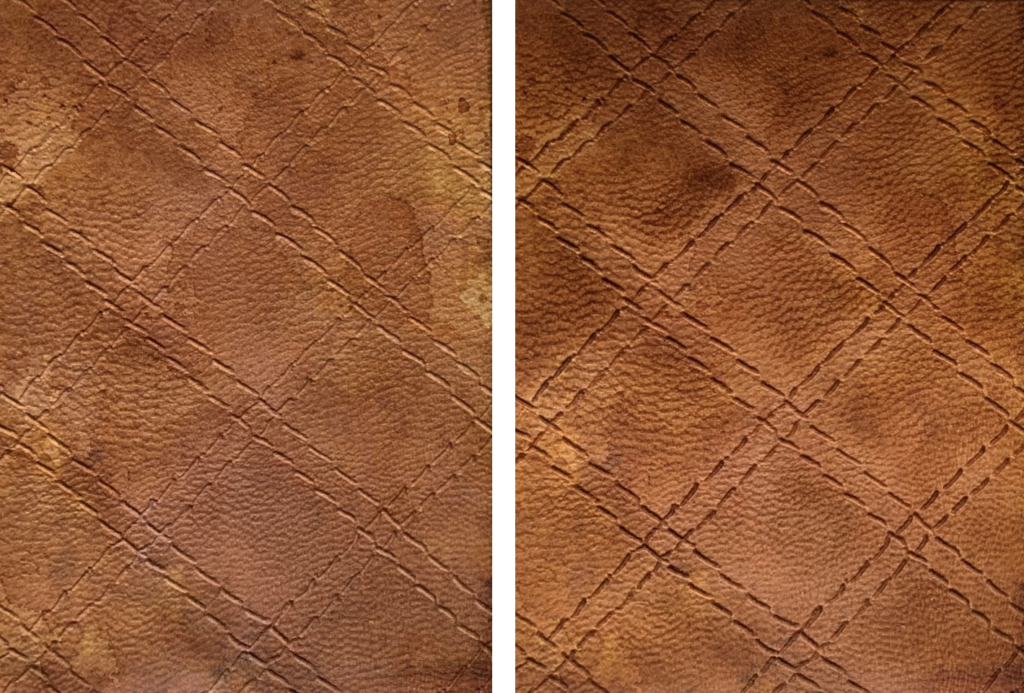
Then, I ran it through the Sizzix Big Shot three times. Remember, 3D = 3 times (it makes for a deeper and crisper impression.) See photo above for a side-by-side comparison. However, each machine applies a different amount of pressure. So I recommend doing some small test swatches to see how many passes is ideal for your machine. Next, I removed it from the 3D embossing folder and set it aside to dry. I also set something light on top of it to ensure that it dried flat. I used my clear cutting pad.
Adding Ink To The Embossed Background
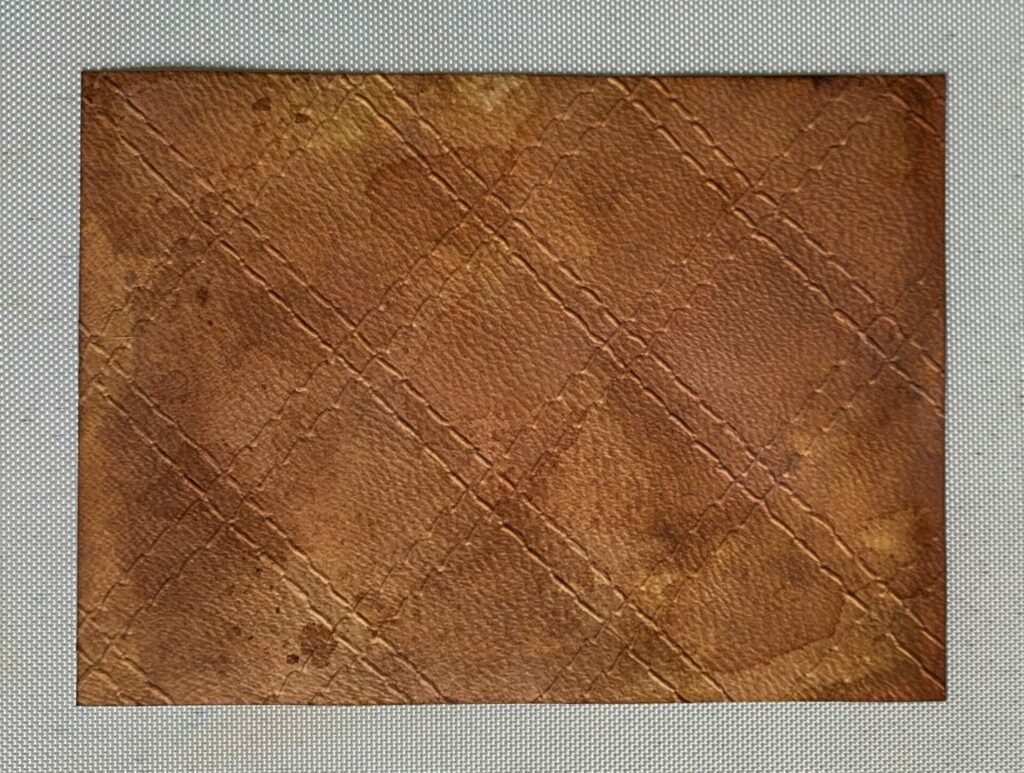
After that, I took the embossed background and added some ink to the raised areas. For this I used the blending tool with foam and rubbed distress ink in the shade Brushed Corduroy on all the high points of the quilted leather. You will want to do this with a lighter hand. You can add as much or as little as you like. Below is a side-by-side comparison on how it looked before adding the ink (left photo) and after (right photo). I think this little step really brings out the stitching and texture of the leather and makes it look more realistic.
Next, I used the blending foam and inked all four edges of the paper with the Brushed Corduroy. This covers up the white core of the watercolor paper and makes the card look more finished. Especially since it’s being mounted against a black card base.
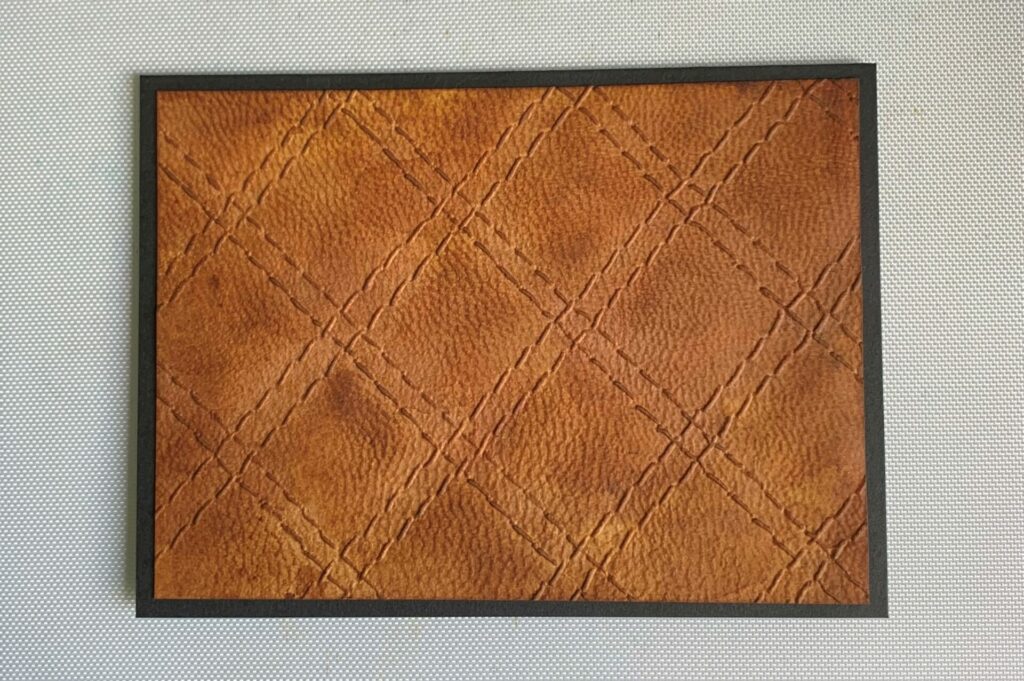
When it was dry I glued it to the front of my card base with distress collage medium. Then, I set something heavy (my big shot platform) on top of it and let the glue dry.
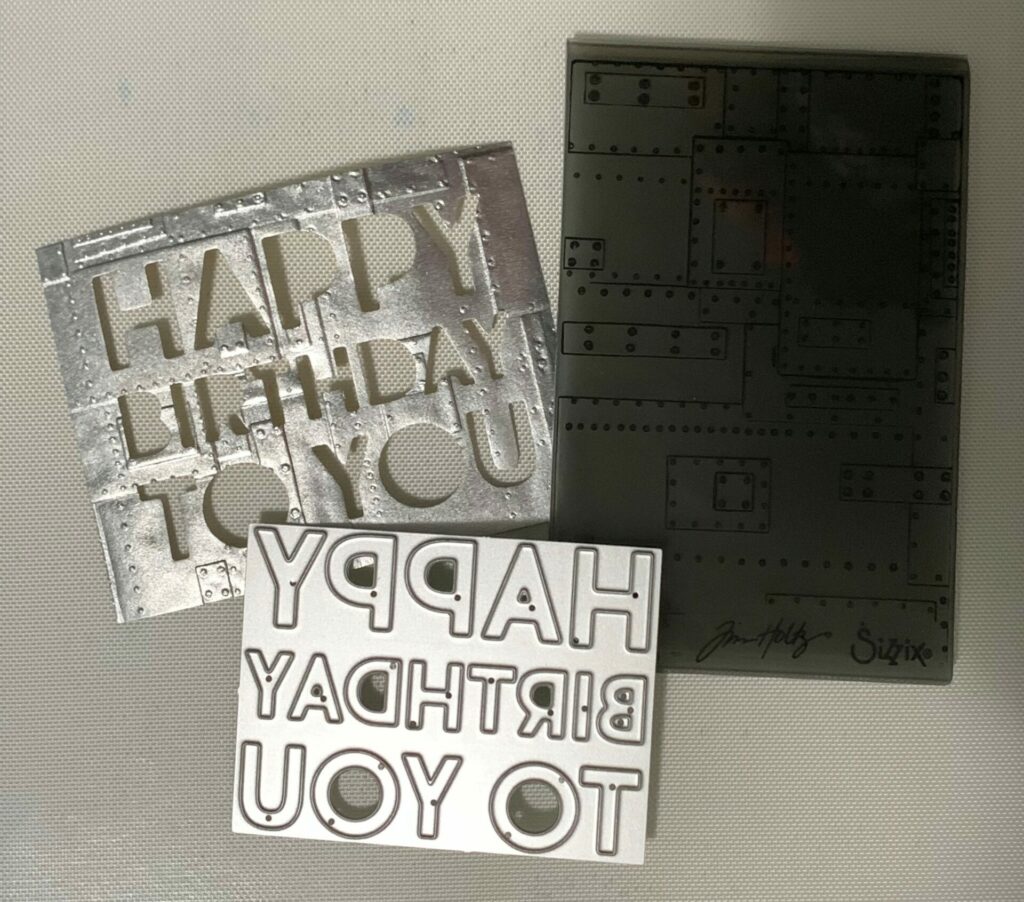
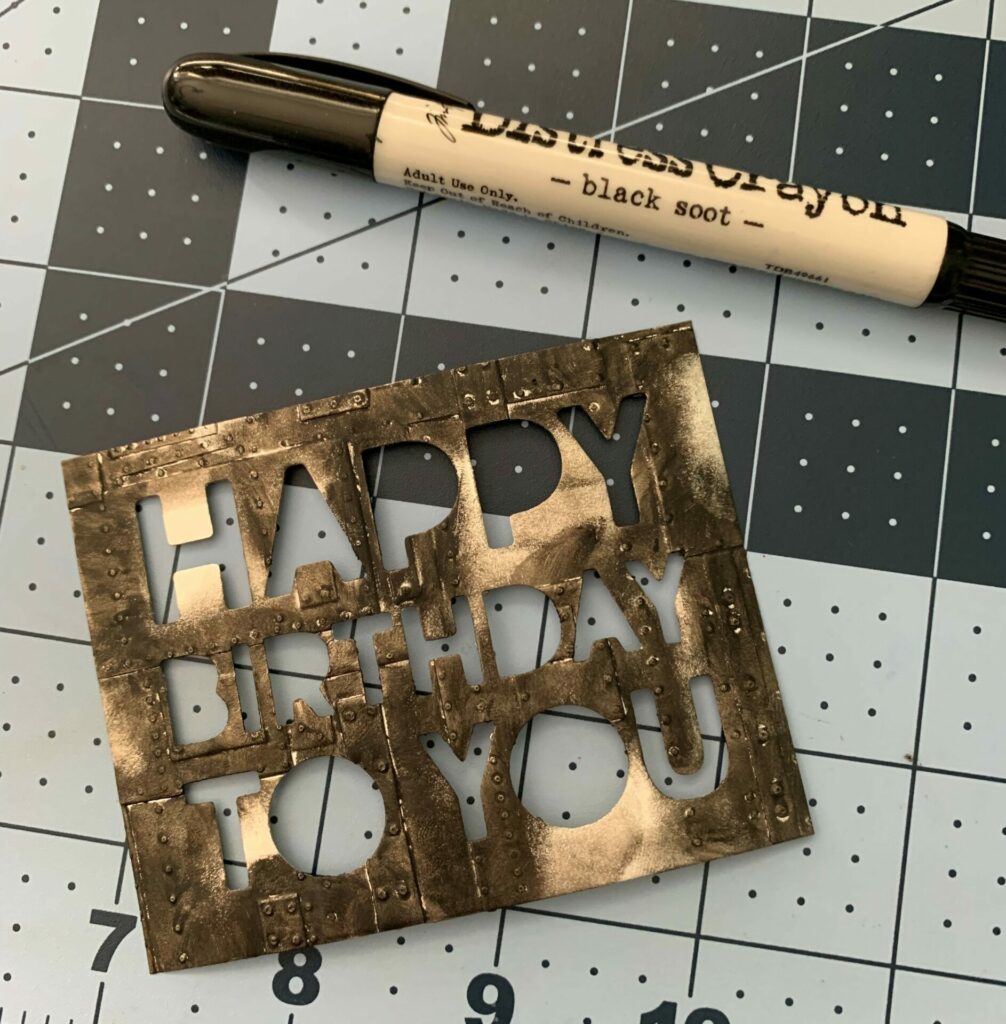
Die Cutting The Metallic Kraft Stock
Next, it was time to work with the metallic kraft stock. For this, I used the silver shade from the Tim Holtz idea-ology metallic kraft stock paper pad. But you can use whatever metallic paper you like. Firstly, I used my paper trimmer and cut the paper down to a size of 3½” x 2¾”. Then, I used the “happy birthday to you” die from the Tim Holtz Bold Text #1 die set from Sizzix. I placed it in the center of the kraft stock, secured it down with washi tape, and ran it through the Big Shot. Next, I weeded out all the letters and excess pieces of paper from the die and die cut. I did this using the Tim Holtz Tonic Studios retractable craft pick.
Embossing The Metallic Kraft Stock
Now it’s time to emboss. Firstly, I lightly misted the back of the die cut kraft stock with water. Next, I placed it in the Sizzix TH Mini Foundry 3D embossing folder and ran it through the Big Shot three times. Then, I removed it from the folder and set it aside to dry. I also set something light on top of it to ensure that it dried flat. I used my clear cutting pad.
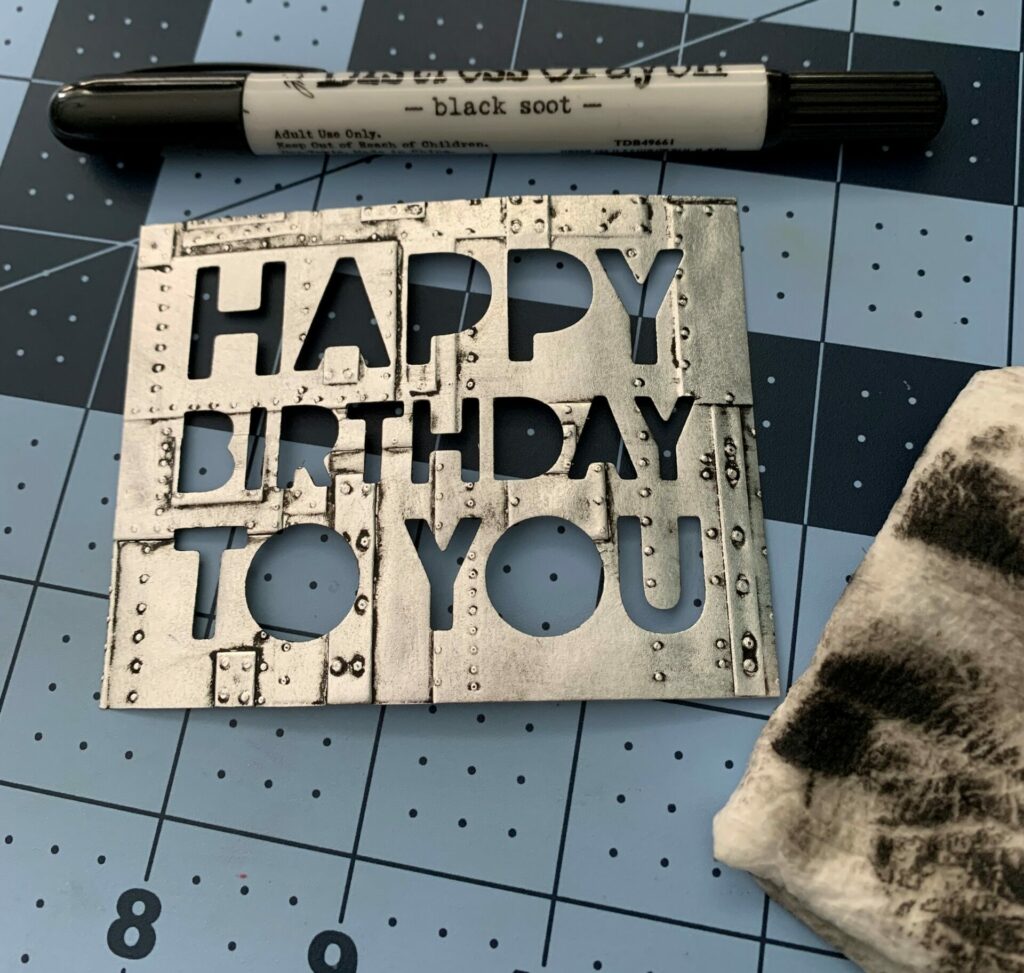
Adding The Distress Crayon
Next, it was time to add the crayon. Firstly, I took the metallic embossed panel and added distress crayon in the shade black soot on to it. I like to work on a scrape piece of paper so the black crayon doesn’t get everywhere and I don’t have to clean it off my work surface. I scribbled the crayon along the rivet lines and rubbed it in with my finger. You’ll want to work the crayon into all the lines and crevices. I also suggest you work in small sections because the crayon starts to dry and it’s harder to rub it in.
After the rivet lines were covered with crayon I took a wet paper towel (wring out most of the water) and gently rubbed it over the panel. This is to remove the crayon from all the high points of the paper. This gets a little messy and your fingers will get black. But don’t worry because it wipes right off with water. You’ll also want to move to a clean part of the paper towel once it becomes to black. If you end up rubbing off too much crayon, no big deal. Just add more crayon to that area and repeat the process. Once I was happy with how it looked, I set it aside to dry.
Applying The Foam Tape
Then, once the crayon had dried and set, I added foam tape to the back. I used a ¼” foam tape roll I got from the craft store. But, you can use any brand foam tape/foam squares you want. Adding the foam tape gives the card some extra dimension and depth. If you’re going to be sending this card through the mail, I would suggest you skip the foam tape. Just glue the sentiment panel flat to the card.
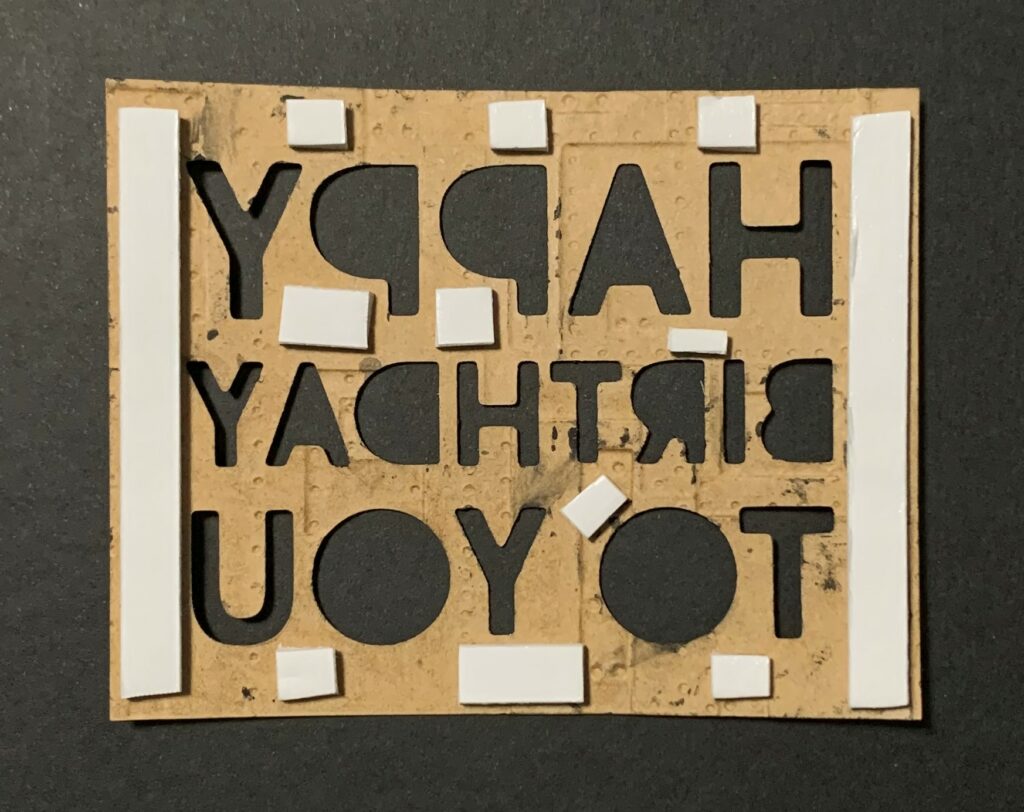
Next, I pulled off all the release paper from the foam tape and adhered it to the front center of the card.
Now if you’re making your card for a birthday, you’re all done! Congratulations! You have now completed your quilted leather card! If you want to make the matching envelope then click here for the step-by-step quilted leather embossed envelope tutorial.
If not, and you’re making a Father’s Day card like me. Then, just keep reading. We’re almost done.
Printing The Father’s Day Sentiment
I didn’t have a Father’s Day sentiment stamp, so I made my own sentiment strip. It was while scrolling through an endless amount of fonts, trying to find ones that looked masculine, I decided to design a whole sheet of sentiment strips. If I was going to make some sentiment strips, I figured I might as well fill the page. I included many fonts, sizes, and occasion options for you to use on this card and future cards. You can download the free sentiment strips PDF here. Then, I printed it out on white cardstock. But you can use any light colored cardstock you want. Just make sure you set it to print on normal/best quality at 100%.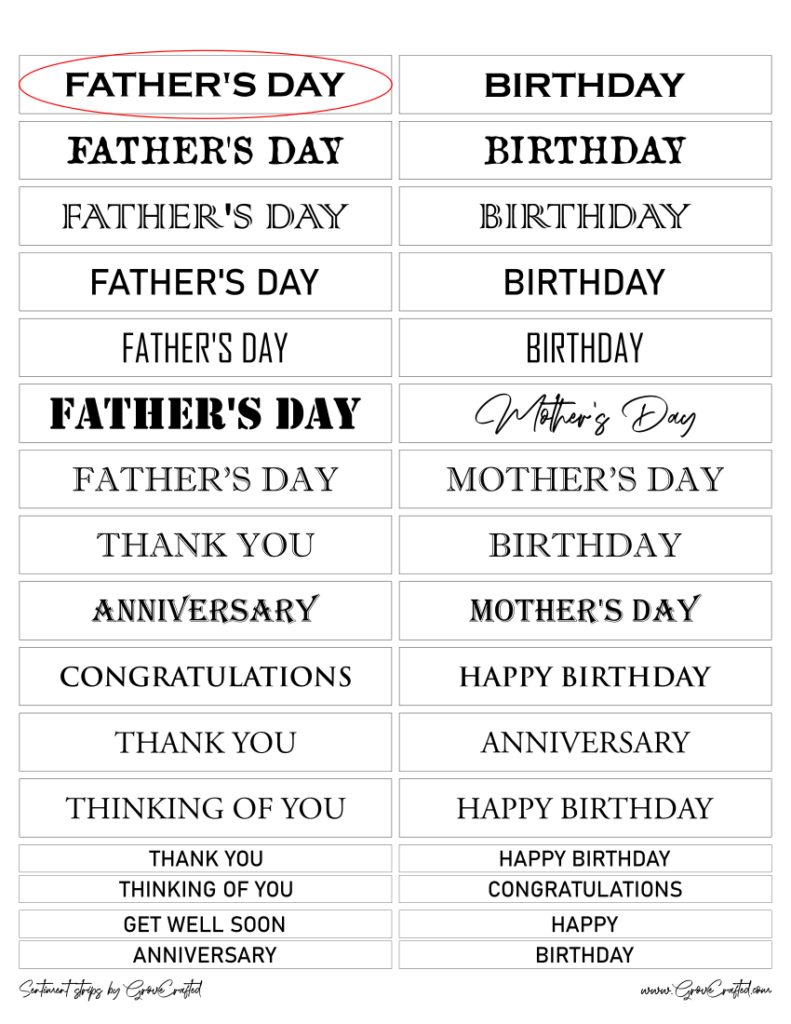
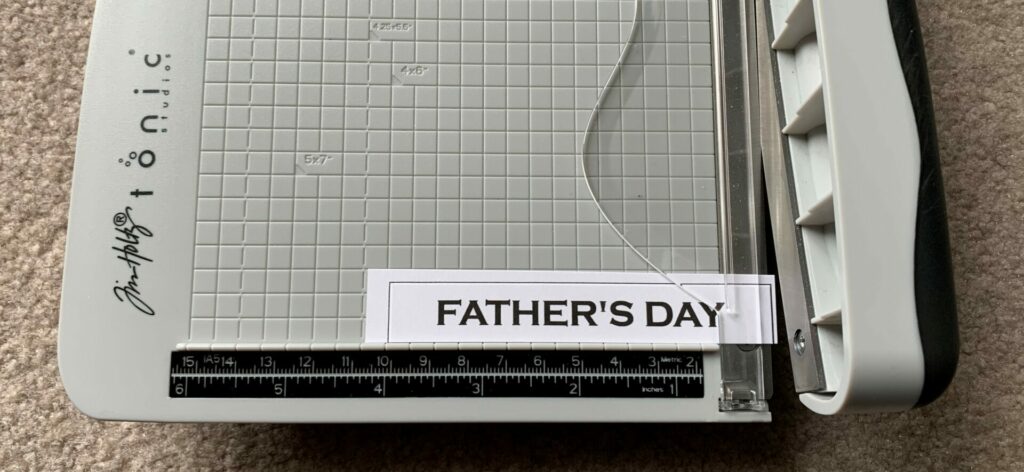
Trimming The Sentiment Strip
After printing out the sentiment sheet, I trimmed it down. I chose the Father’s Day sentiment in the top left corner (circled in red above.) But feel free to choose whichever one you want. I used my paper trimmer to cut off the black lines. You can also use a x-acto knife and ruler to do this.
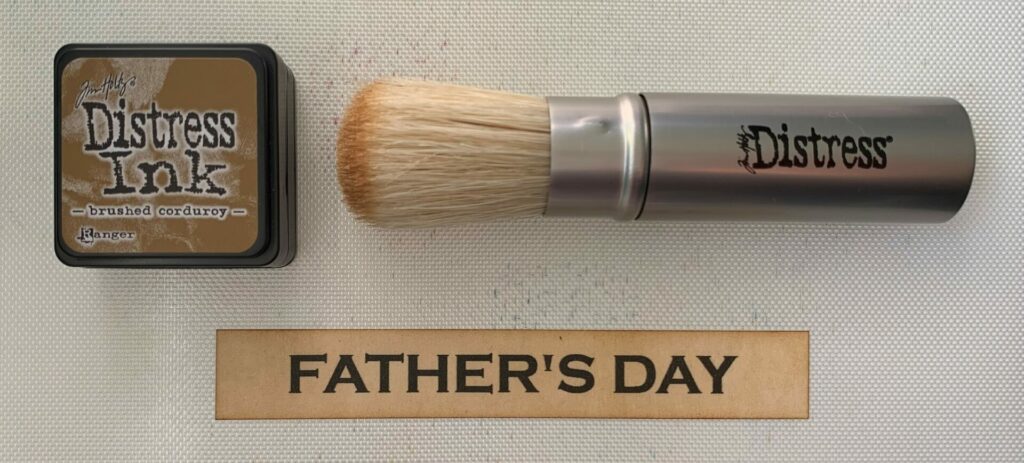
Inking & Attaching The Sentiment Strip
Next, I added ink to the sentiment strip. I felt the white was a little too white for this card, so I toned it down with ink. If you like it white, then you can skip this step. To do the inking, I used the Tim Holtz distress blending brush and distress ink in the shade Brushed Corduroy. For this, I worked on the craft sheet on the glass media mat.
Then, I used collage medium and glued it on top of the word “BIRTHDAY”. I made sure it was centered on the card, set my clear cutting pad on top of it, and let the glue cure.
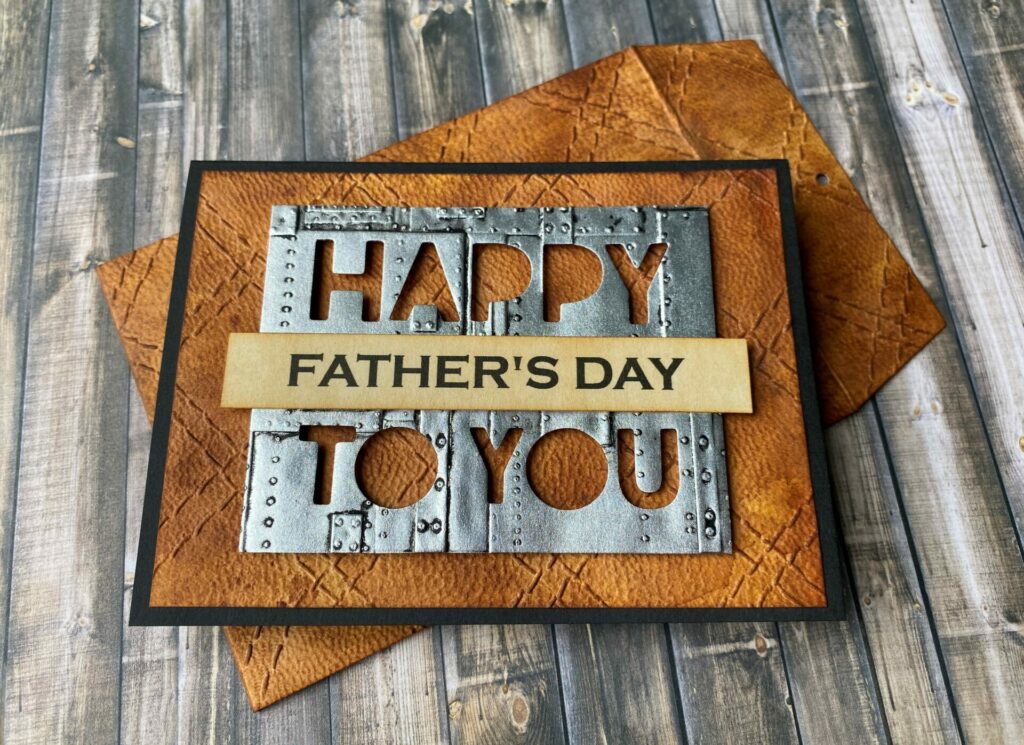
Your Quilted Leather Card Is Now Complete!
Congratulations! You have now completed your quilted leather card! I hope you enjoyed this tutorial and have as much fun making it as I did. If you do make this card, please tag me and use the #grovecrafted on Instagram. I’d love to see it! Thanks for stopping by, and I hope you found some new inspiration to create.
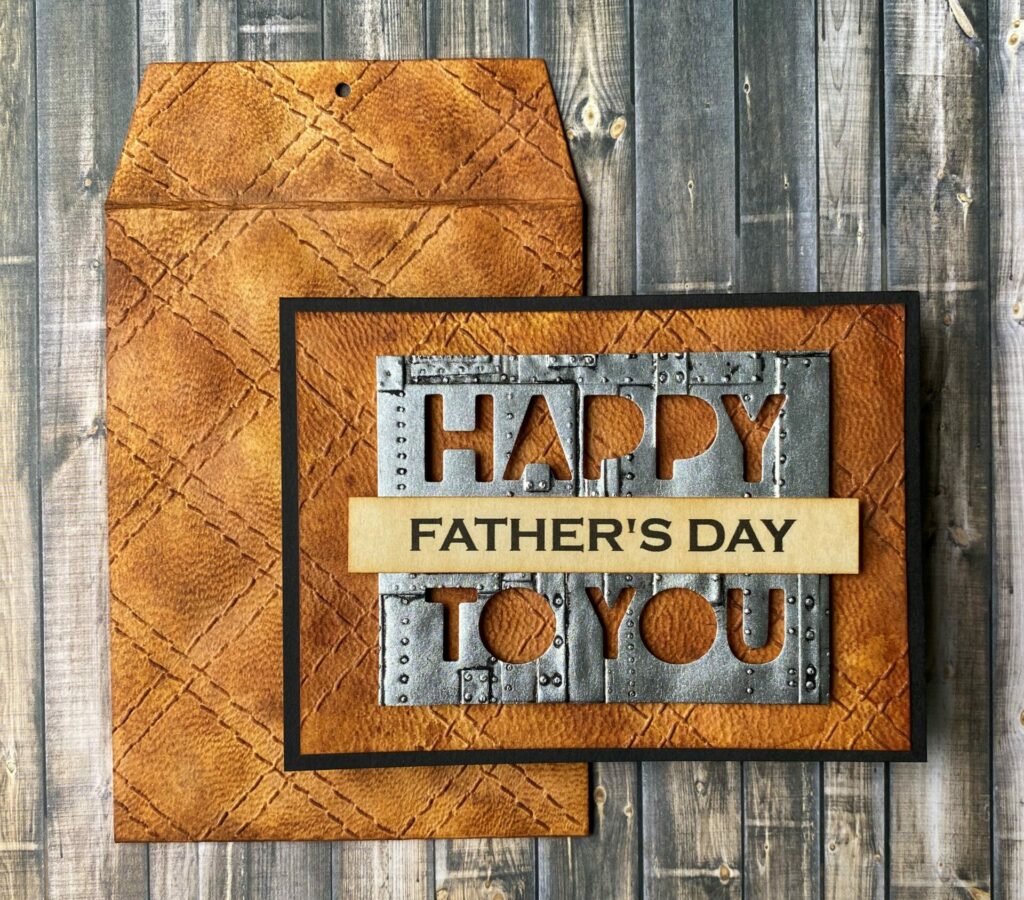

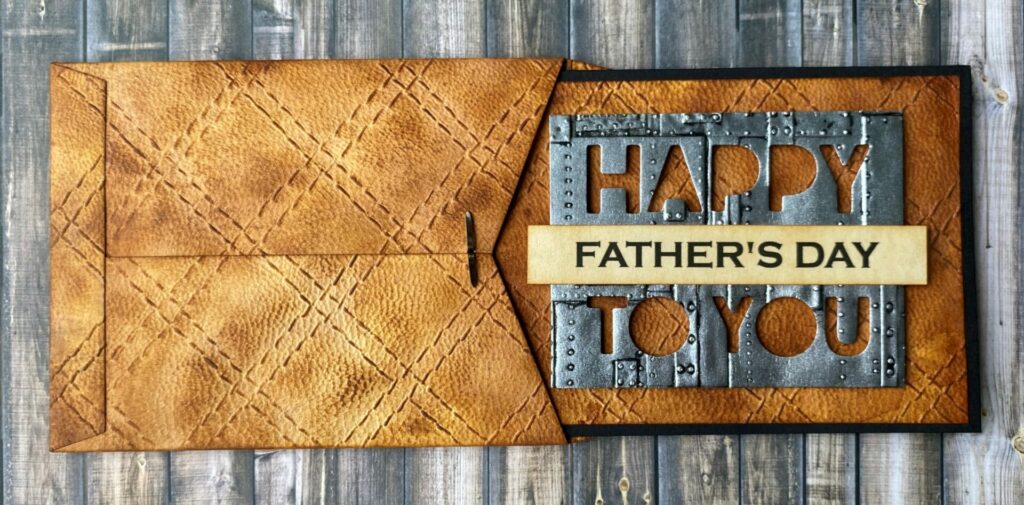
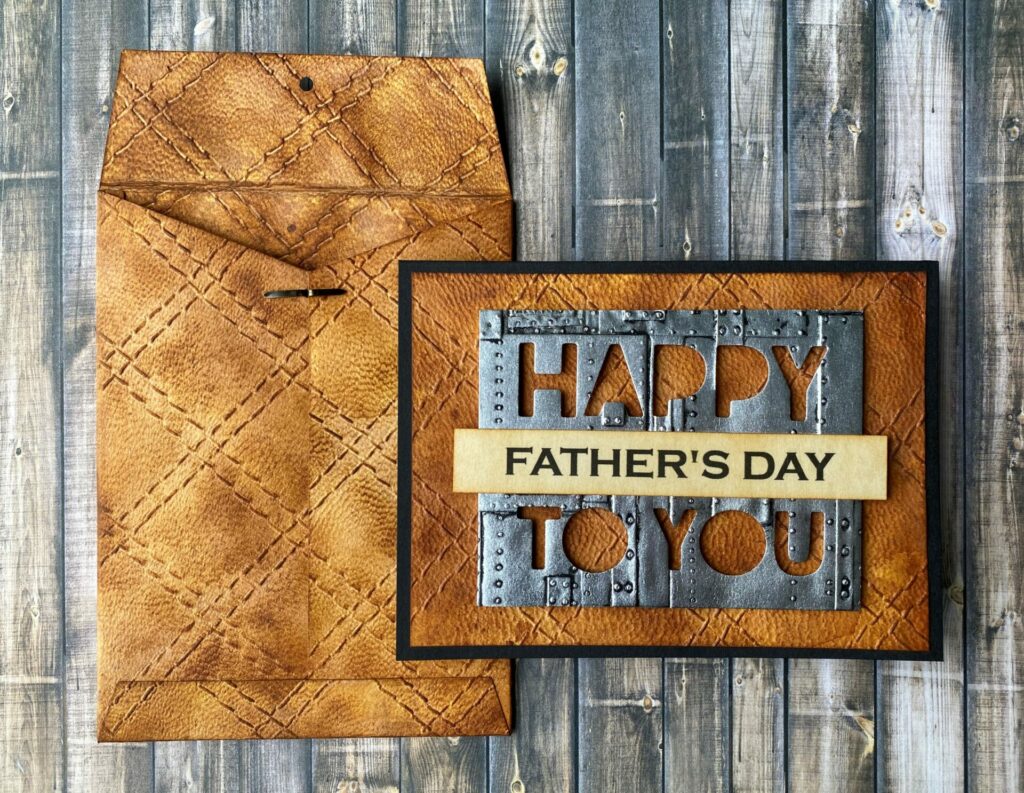
If your interested in making the matching envelope you might want to check out my Quilted Leather Envelope tutorial. It coordinates perfectly with the quilted leather card that you just made
If you enjoyed making this quilted leather card, you might want to check out my Elegant & Simple Card tutorial.