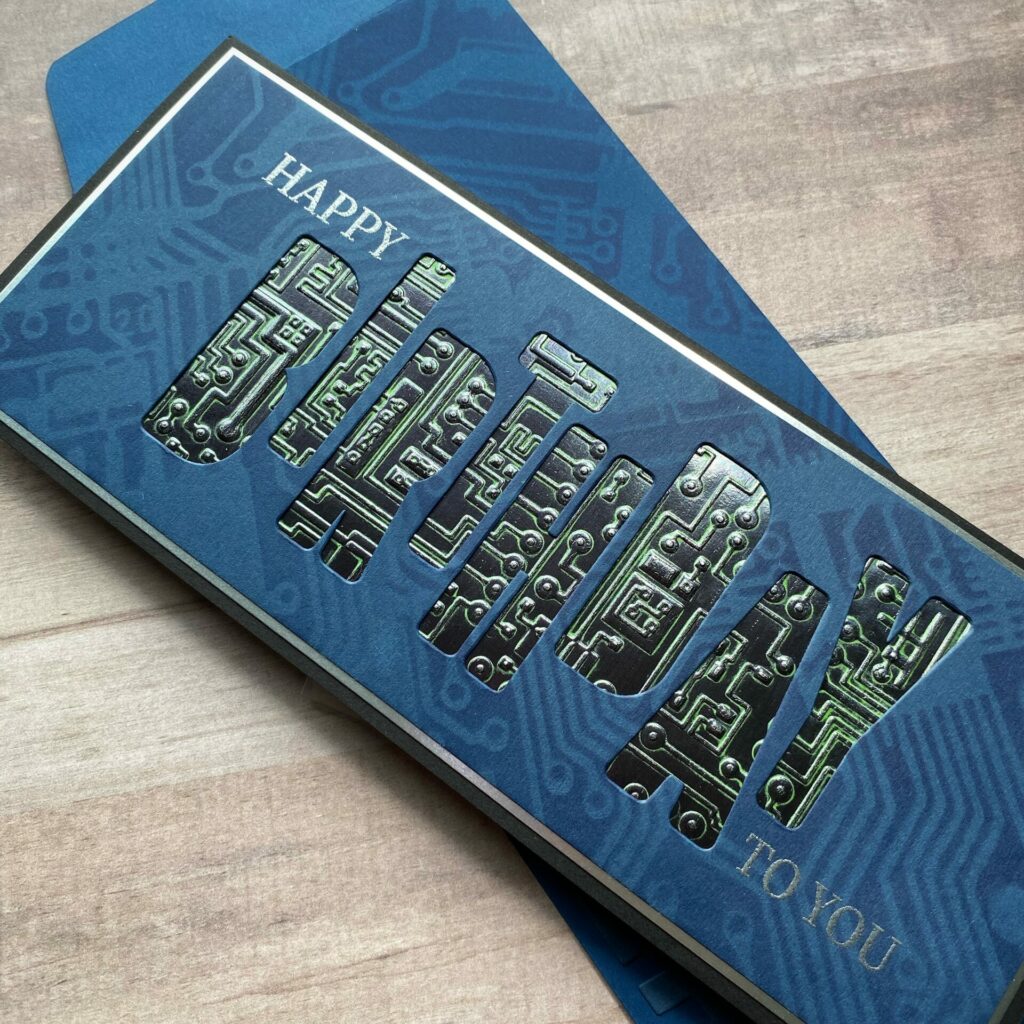
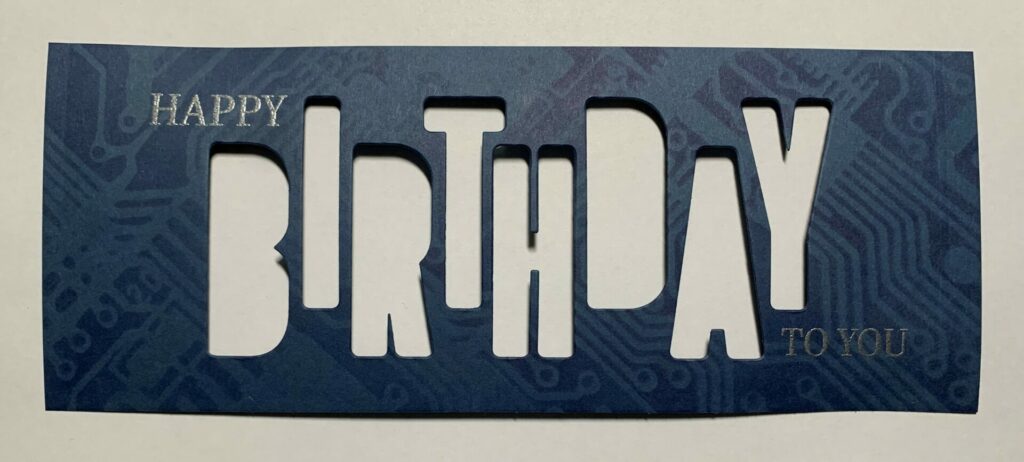
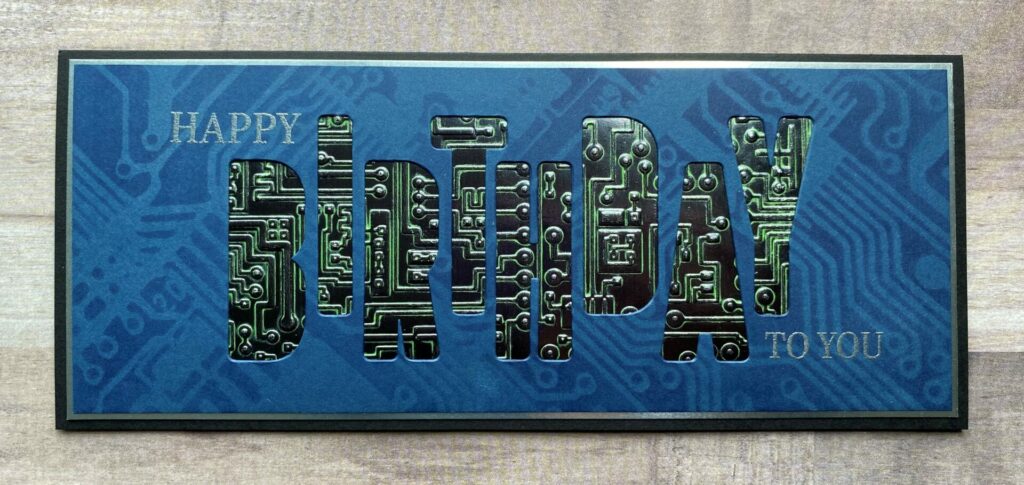
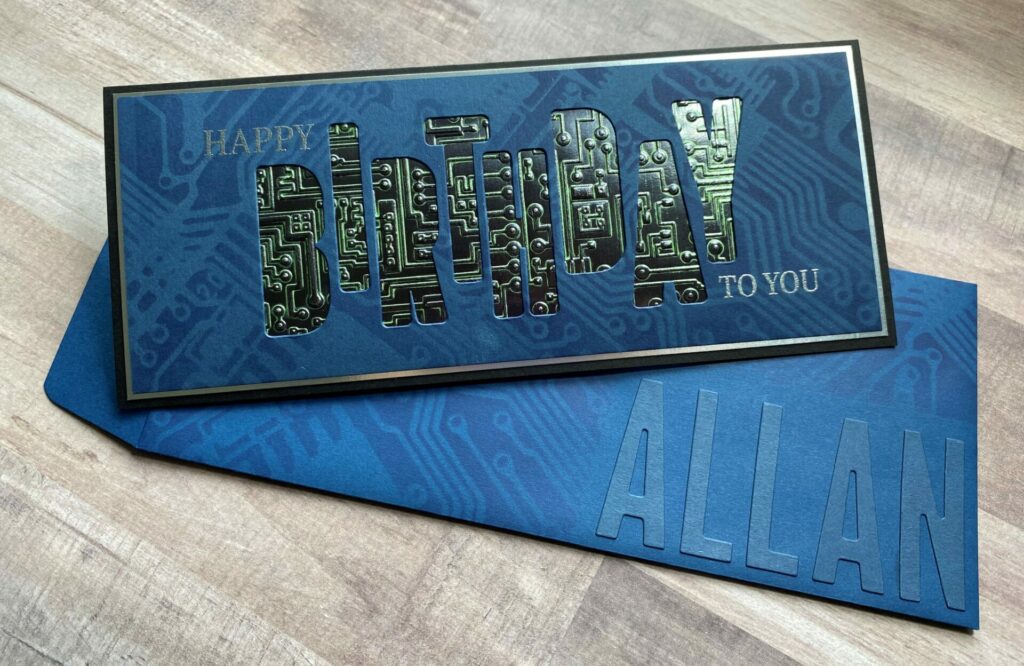
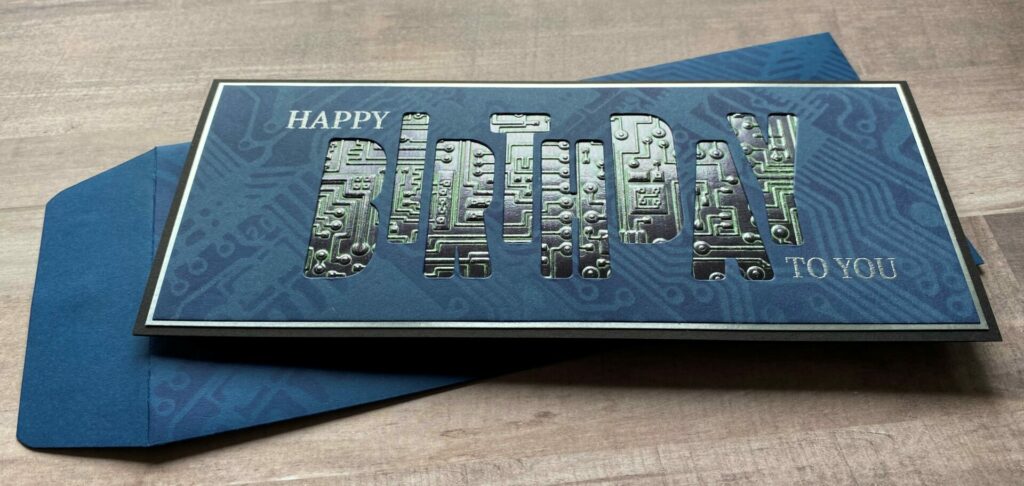
Circuit Birthday Slimline Card
Hello crafty card makers! Today I’m sharing how I made this circuit birthday slimline card. It features a 3D embossed texture, along with multiple metallic finishes. I made this one a birthday card, but the letters could easily be changed out to make a card for any occasion. It could also be a thank you, hello, sympathy, get well, congratulations, or Father’s Day card. The beauty of this card layout is that it is fully customizable. Just by changing up the colors, embossing folder, stencil, and paper finishes, it could have a completely different look and feel. Perfect for any occasion. This circuit birthday slimline card layout would also work great as a shaker card too.
Link Abbreviations
- AMZ – Amazon*
- RI – Ranger Ink*
- SA – Stampers Anonymous
- SB – Spellbinders*
- Sb.com – Scrapbook.com*
- SIZ – Sizzix*
- SSS – Simon Says Stamp
Full Disclosure: This post contains affiliate links which are indicated with an (*). If you click on an affiliate link and later make a purchase, I may receive a small commission. Clicking on an affiliate link which earns a commission does NOT result in additional charges to you or cost you anything extra. Money earned via affiliate links helps pay the fees to keep this blog up and running. Thank you so much for shopping through my links to show your support for the brands that we love and the products that I share!
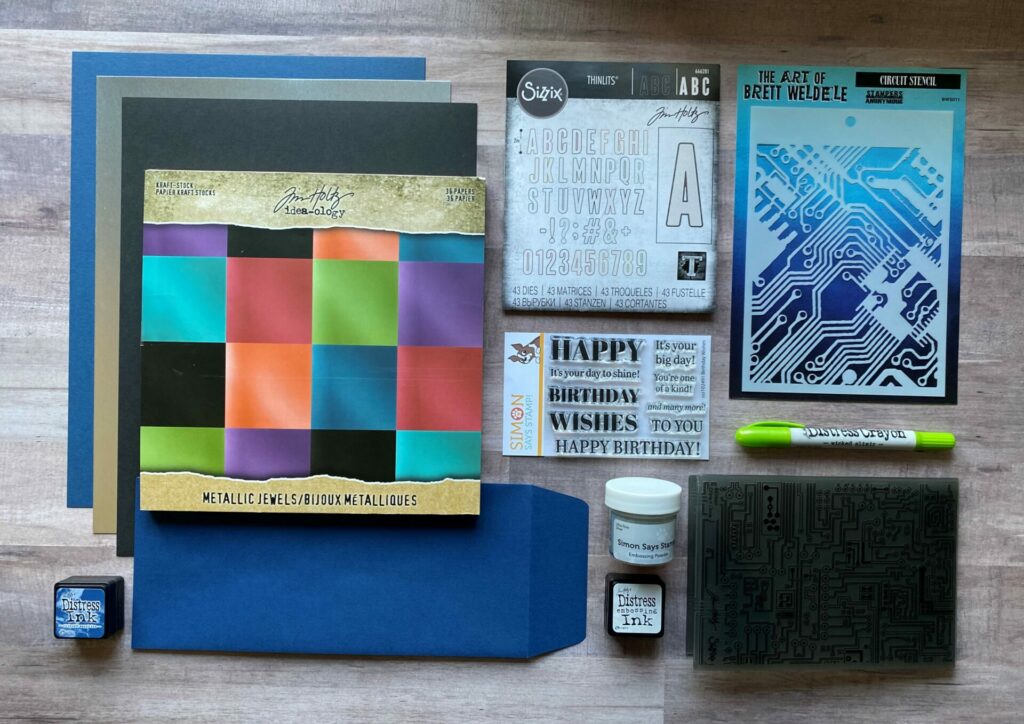
Supplies Used / Substitutions:
- Sizzix Tim Holtz Thinlits – Alphanumeric Bulletin #666281 | Sb.com | SIZ | AMZ | SSS / Any alphanumeric dies
- Sizzix Tim Holtz Embossing Folder – Circuit #665372 | Sb.com | SIZ | SSS / Any embossing folder
- SSS Stamp Set – Birthday Wishes #sss102491 | SSS / Any sentiment stamp set
- Stampers Anonymous Brett Weldele Stencil – Circuit BWS-011 | SA / Optional or any stencil
- SSS Slimline Envelope – Soft Navy / Any slimline envelope
- SSS Cardstock – Soft Navy | SSS / Any color cardstock
- Black Cardstock / Any color cardstock
- SSS Cardstock – Matte Silver #SSP1007 | SSS / Any metallic silver cardstock
- Tim Holtz Idea-ology Kraft Stock – Metallic Jewels -Black | Sb.com | AMZ | SSS / Any metallic cardstock
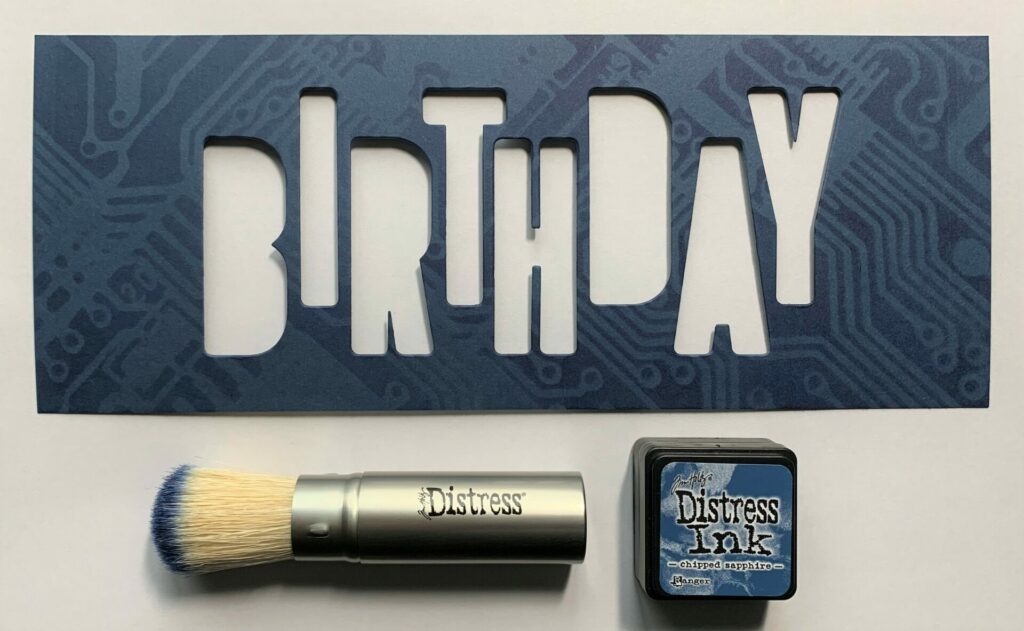
- Distress Ink Mini – Chipped Sapphire | Sb.com | RI | SSS / Any color ink
- Distress Crayon – Wicked Elixir | Sb.com | SSS / Twisted Citron or any color crayon
- SSS Ultra Fine Embossing Powder – Silver | SSS / Any embossing powder
- Distress Embossing Ink – Mini | Sb.com / Any embossing ink
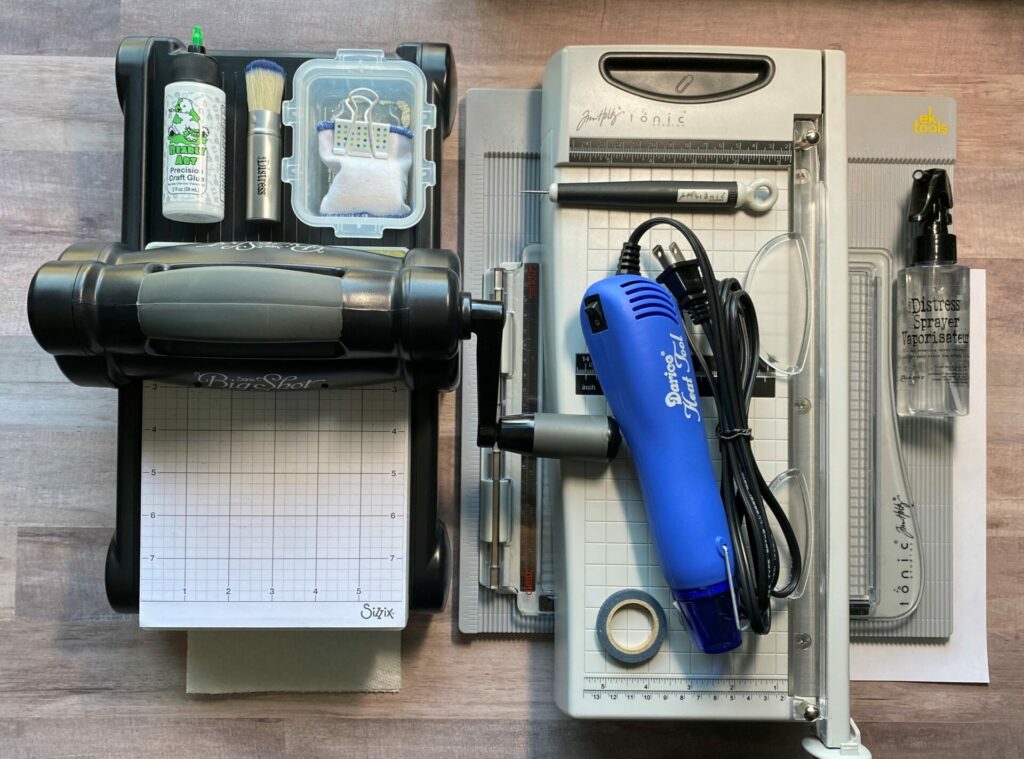
Tools Used / Substitutions:
- Sizzix Big Shot | SIZ / Spellbinders Platinum Six | Sb.com | SB / Any die cutting machine
- Tim Holtz Maxi Guillotine Trimmer – 12.25 Inch | Sb.com | SSS / Any paper trimmer
- Tonic Tim Holtz Stamp Platform / Any stamping tool
- EK Scoring Board | AMZ | SSS / Any scoring board
- Embossing Gun
- New/Flat Clean Cutting Pad | Sb.com | SIZ | SSS |
- Sizzix Sticky Grid Sheet #663533 | Sb.com | SIZ | SSS |
- Bearly Art Glue | Sb.com | SB | AMZ | SSS / Any liquid adhesive
- Spray Bottle with water | Sb.com | SB / Any spray bottle with water
- Tim Holtz Retractable Craft Pick | Sb.com | SSS | AMZ |
- Distress Blending Brush | Sb.com / Any blending brush
- Anti Static Pouch | Sb.com / Any anti static tool
- Copy Paper – 2 to 3 sheets
- Paper Towel
- Washi Tape / Any low tack tape
Making The Card Base
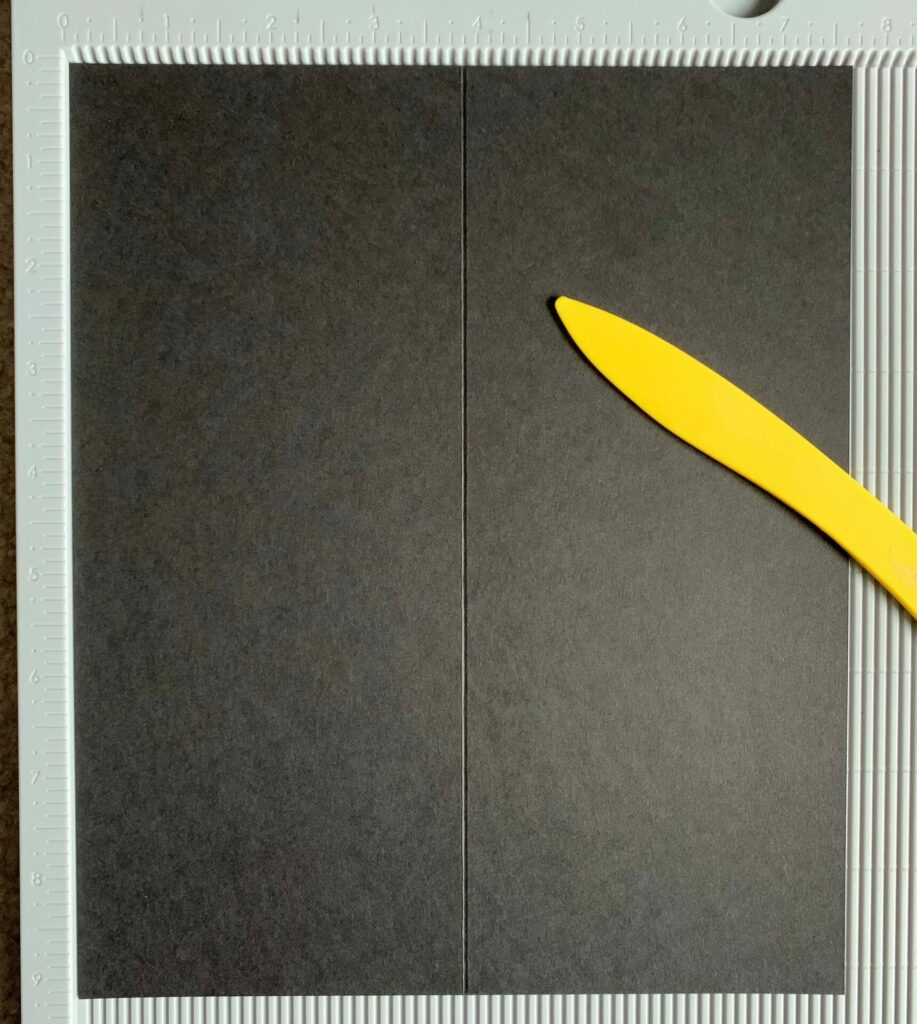
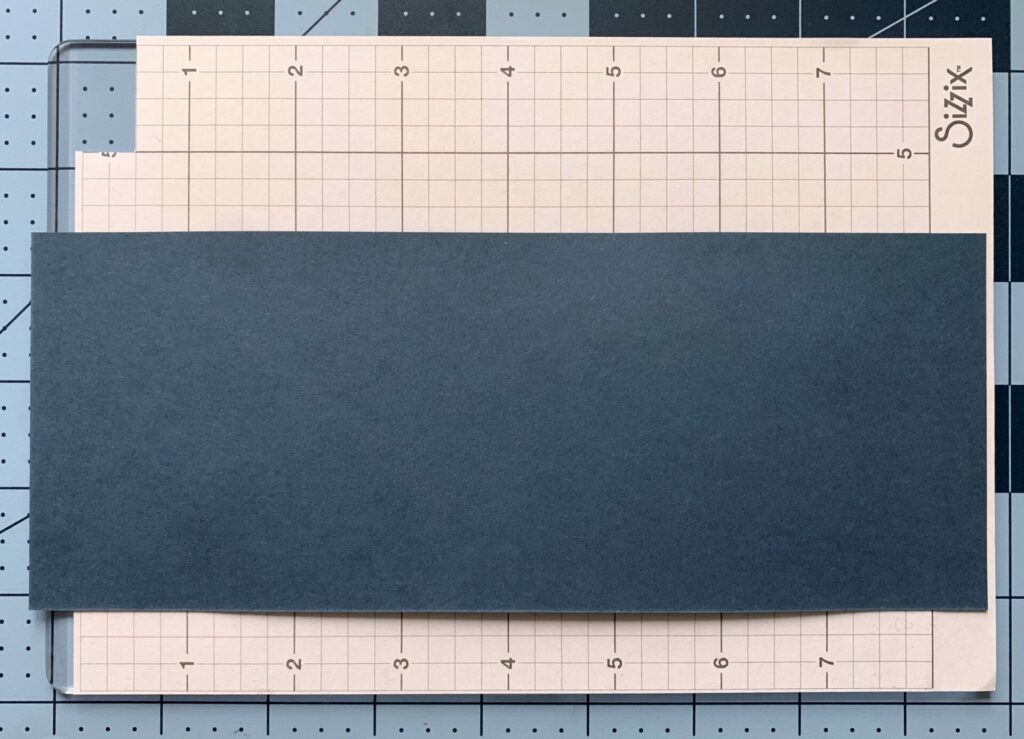
Firstly, I started by making the card base. For this you’ll need a sheet of black cardstock, paper trimmer/x-acto knife and ruler, and scoring board.
- Take a sheet of black cardstock and cut it down to a length of 9 – 1/4 inches with your paper trimmer.
- Score the card base at the 3 – 7/8 inch line. (See image below)
- Fold on the score line and reinforce the fold with a bone folder.
- Trim off the excess strip of cardstock with your paper trimmer or with an x-acto knife and ruler.
Your card base should be 9 – 1/4″ x 3 – 7/8″.
Preparing The Cutting Pad
After that, I set up my cutting pad for die cutting the “BIRTHDAY” sentiment. For this part you’ll need a new/clean flat cutting pad, a sheet of sticky grid, a frame die, and the Alphanumeric Bulletin dies that spell “BIRTHDAY”.
- Remove the back release paper from the sticky grid sheet.
- Apply the sticky grid to the cutting pad and press it in to secure it down.
- Remove the front release paper from the sticky grid. Keep this release sheet to put back on when you’re done. This will keep it sticky for longer and makes storing it more manageable.
Remember when working on sticky grid, everything is backwards. A simple trick I like to do is, as I’m working I periodically flip the cutting pad over and hold it up to the light to check my work.
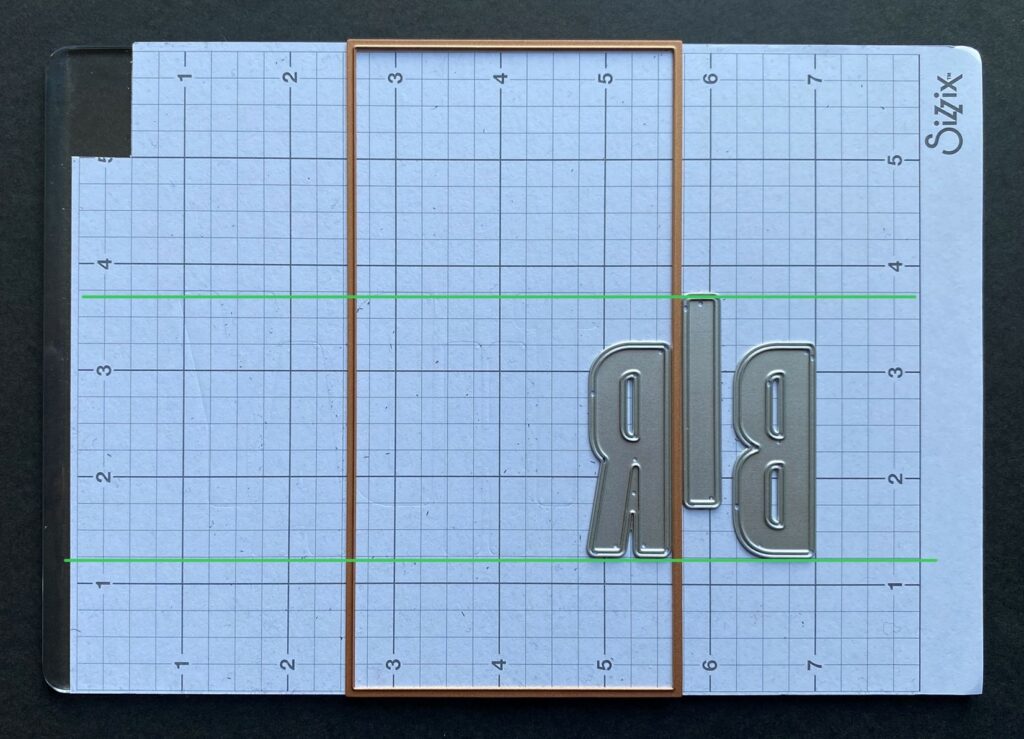
Positioning The Letters
- Start by position the letter “B” die on the sticky grid cutting pad with the blade side facing up. Align the right edge of the “B” to the 7 inch line, and the bottom to the 1 – 1/4 inch line. Then press the die down. See photo below for reference.
- Use a frame die for consistent spacing between letters. I used the second largest die from the Precision Layering Mini Slimline A set by Spellbinders.
- Then, position the letter “I” die to the left of the letter “B”. Align the top edge of it to the 3 – 3/4 inch line and press the die down.
- Move the frame die to the left of the letter “I”.
- Next, position the letter “R” die down to the left of the letter “I”. Align the bottom edge of it to the 1 – 1/4 inch line and press the die down.

- Repeat this pattern with the rest of the letters. By alternating every other letter aligning the top of the letter to the 3 – 3/4 inch line and aligning the bottom of the letter to the 1 – 1/4 inch line.
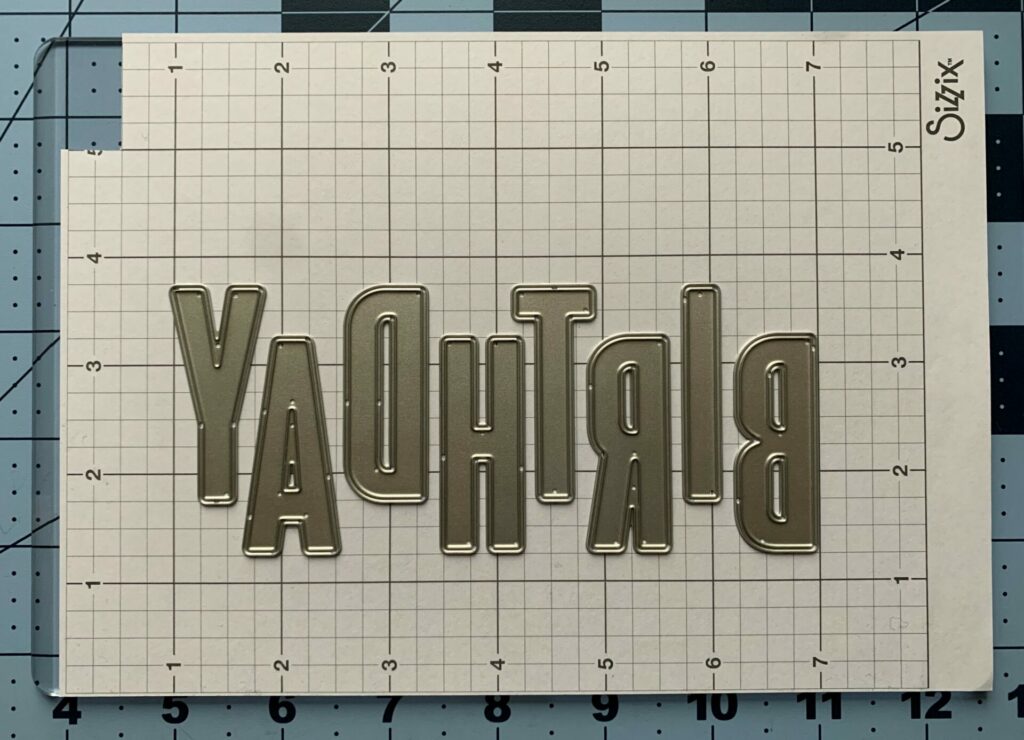
When finished, your sticky grid cutting pad should look like this:
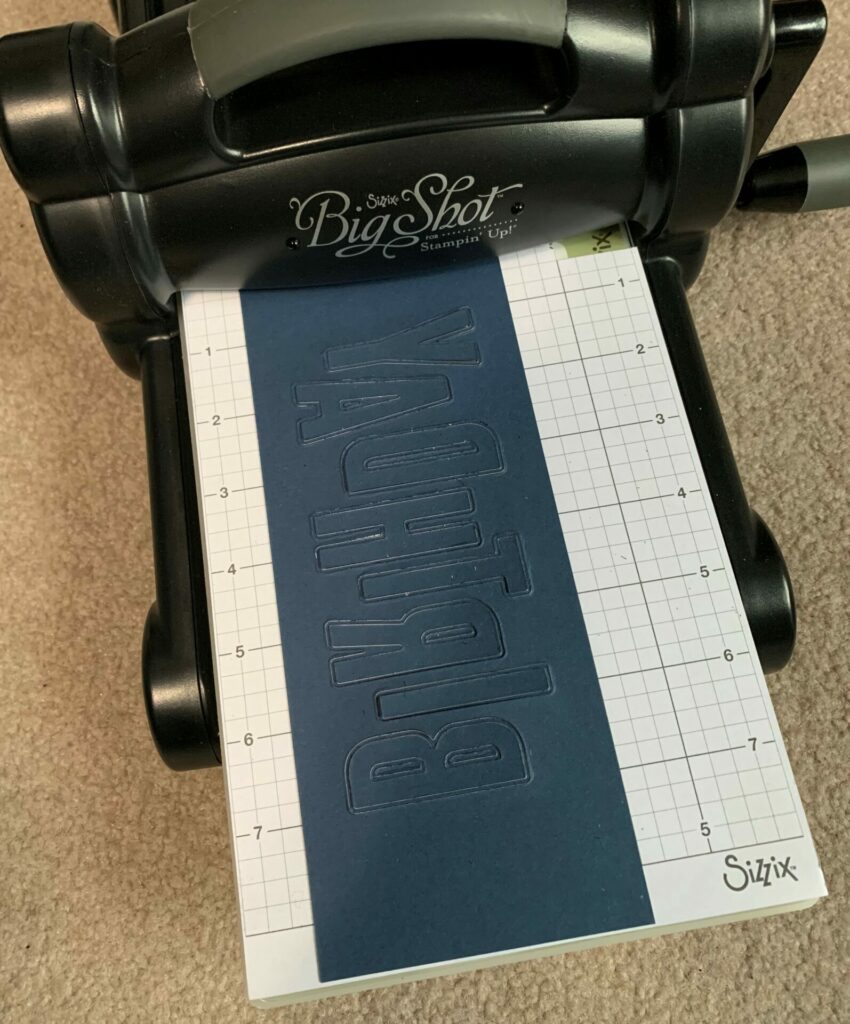
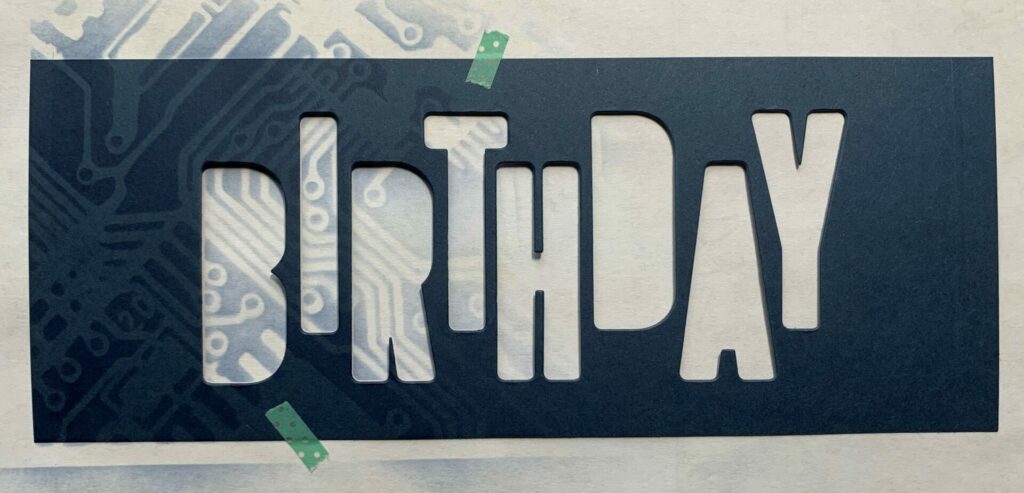
Cutting The Card Front
Then, it was time to die cut the circuit birthday slimline card front. In this step, you’re going to need the cutting pad you prepared in the previous step, die cutting machine, paper trimmer/x-acto knife and ruler, a sheet of navy cardstock, retractable craft pick, and washi tape.
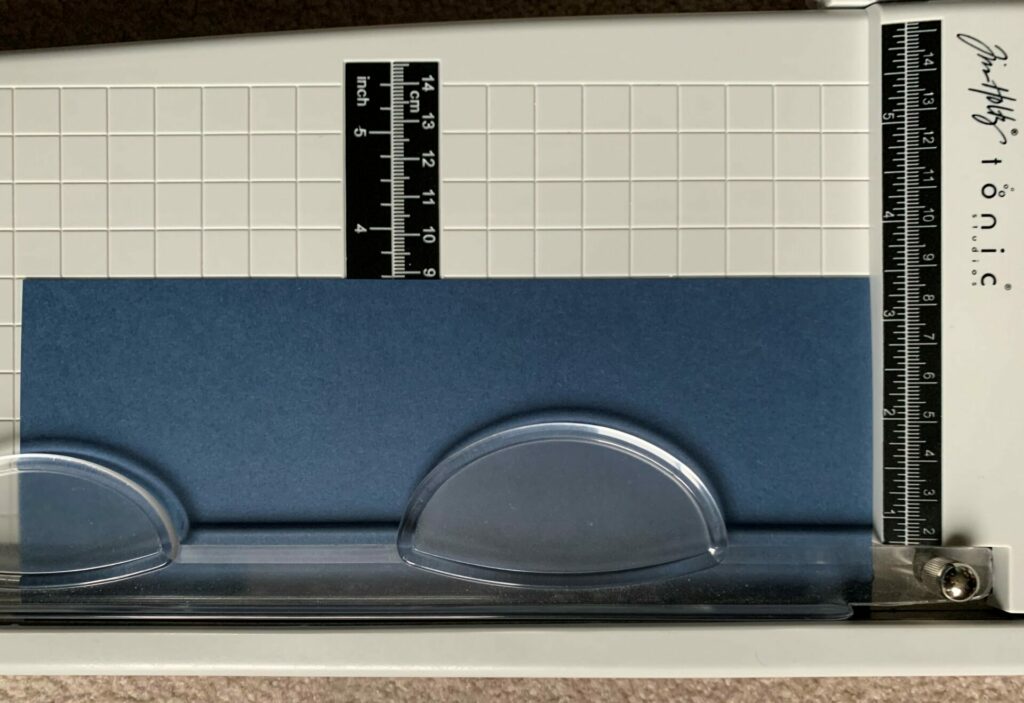
- Cut the navy cardstock down to a size of 8 – 7/8″ x 3 – 1/2″ with the paper trimmer or x-acto knife and ruler.
- Place the trimmed navy cardstock with the front side facing down onto the sticky grid cutting pad.
- Use the grid lines to center the cardstock. See photo below.
- Once the cardstock is centered press it down around the edges to secure it to the sticky grid. This ensures the cardstock won’t shift while die cutting.
- The sticky grid cutting pad replaces your normal bottom cutting pad. So the die cutting sandwich should be in this order from bottom to top: platform, thin die adaptor, sticky grid cutting pad, and then the top cutting pad (the one you normally cut into all the time). I’m using the Sizzix Big Shot die cutting machine.
- Run it through the die cutting machine.
- Carefully peel up the cardstock from the sticky grid. Use the retractable craft pick and wedge it between the sticky grid and cardstock to help release the paper.
- Remove all die cuts from the dies. For this, I like to use washi tape. However, if the die cut isn’t coming out, you might need something stronger. Try using some scotch magic tape instead.
- If you’re making more than one card just repeat steps 1-8.

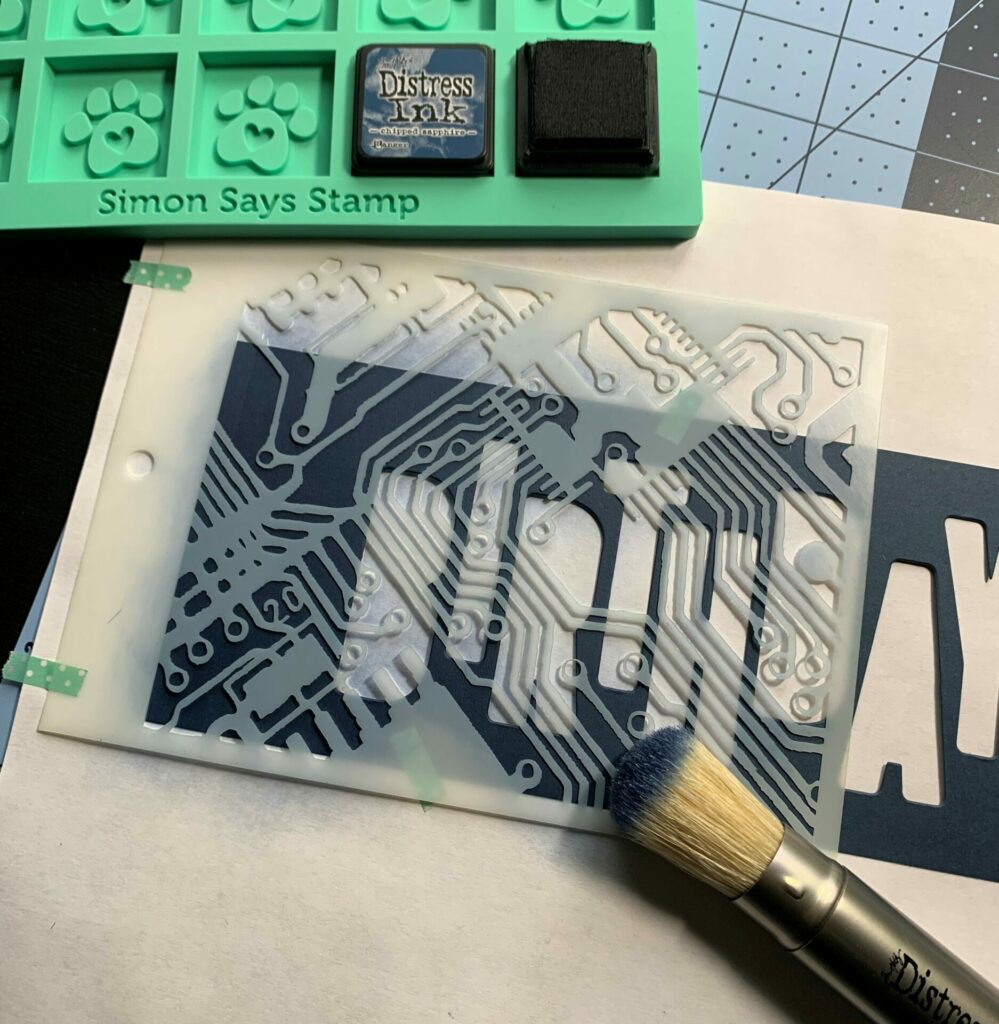
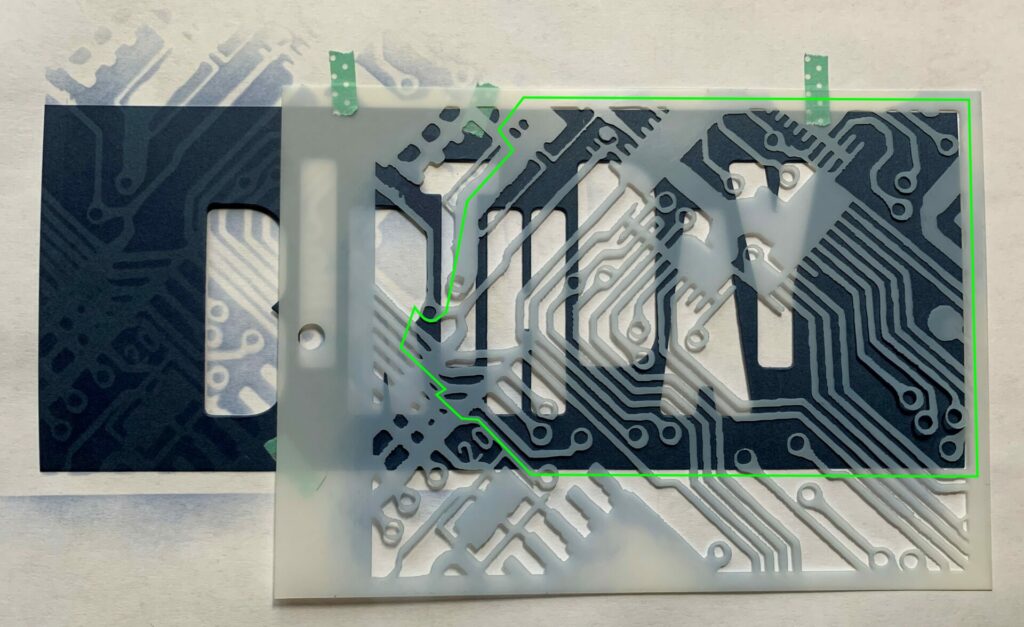
Stenciling The Circuit
Next, it’s stenciling time. In this step you’ll need the navy birthday card front, copy paper, circuit stencil, distress ink in the shade chipped sapphire, blending brush, and washi tape.
- Tape the navy birthday card front to a sheet of copy paper. Then, tape the copy paper to your work surface so it doesn’t move around.
- Hinge tape the circuit stencil down aligning it in the bottom left corner. Move any washi tape that is showing to an area hidden under the stencil.
- Ink up the blending brush and blend the ink over the stencil and into the paper within the green box. See photo below. Also brush in the same direction as the circuit lines are going.
- You can periodically lift up the stencil to check your work.
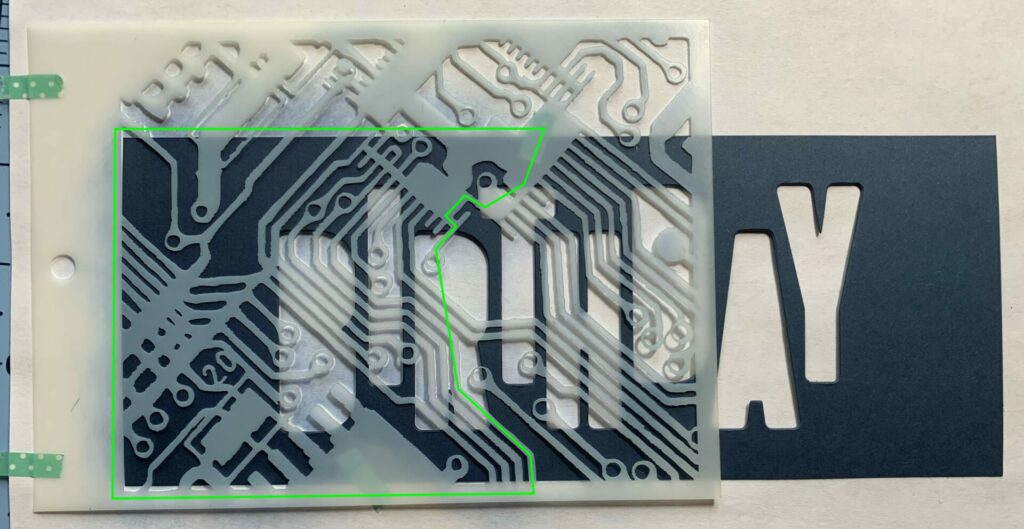
- Move the stencil over and align it with the top right corner. Tape the stencil down with washi tape.
- Ink up the blending brush and blend the ink over the stencil and into the paper. Ink the area within the green box. See photo below.
- Remove stencil.
- Clean the stencil with water and a paper towel/cloth.
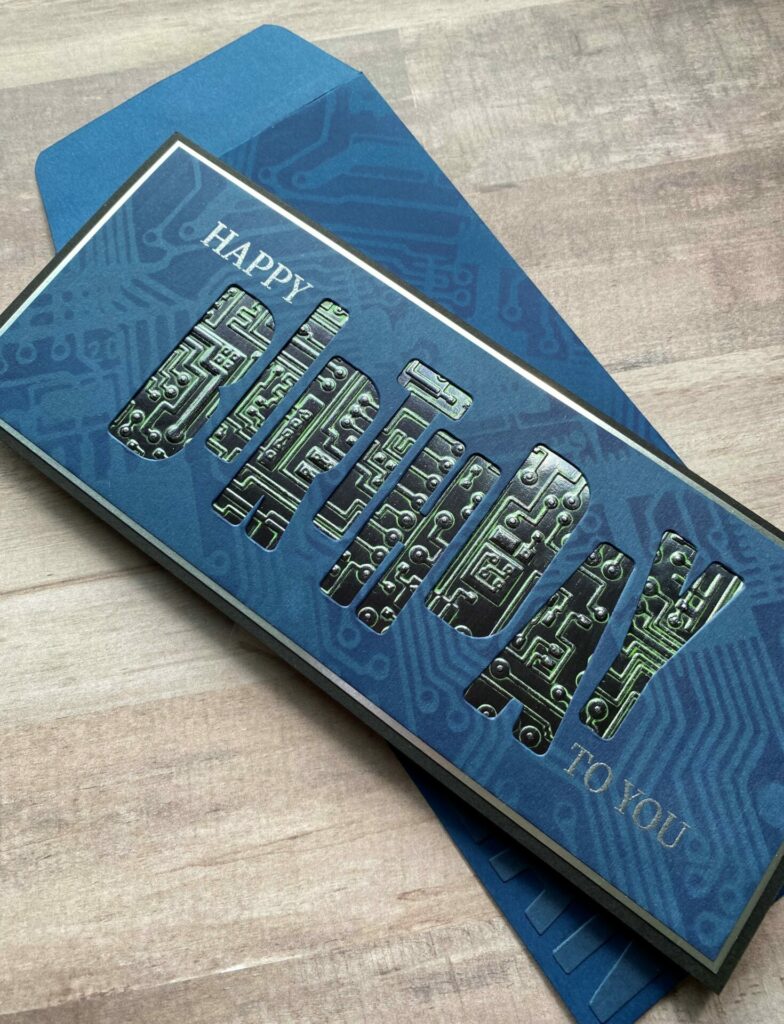
Heat Embossing The Sentiment
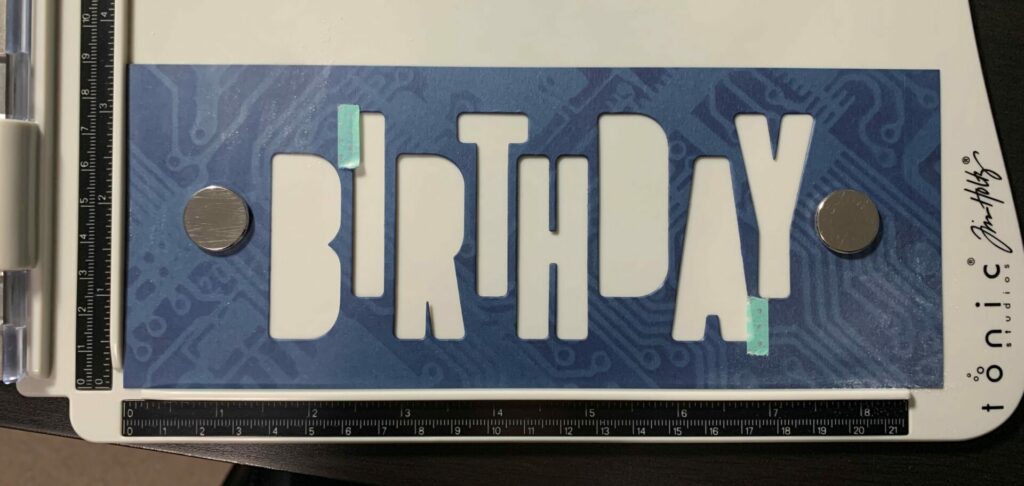
Now it’s time to heat emboss. For this step, you’ll need the navy birthday card front, stamping tool, washi tape, Simon Says Birthday Wishes stamp set, anti-static pouch, embossing ink, silver embossing powder, sheet of copy paper, and embossing gun.
Setting Up The Stamp
- Put the navy birthday card front in the corner of the stamp platform and secure it down with the magnets.
- Apply washi tape beside the letter “I”. This is to mask off the “B” in the birthday stamp. I did this because I only want to stamp the “happy” part of the “Happy Birthday” stamp. See photo below for tape placement.
- Position the “HAPPY” sentiment stamp above the letter”B” and align it with the top of the letter “I”. Also align the right edge of the “Y” in “HAPPY” up against the washi tape. Then, close the stamping tool. See photo down below for stamp placement.
- Apply washi tape to the right of the letter “A” as well.
- Position the “TO YOU” stamp below the letter “Y” and align it with the bottom of the letter “A”. Also align the left edge of the “T” in “TO YOU” up against the washi tape. Then, close the stamping tool.
Embossing The Sentiment
- Rub the anti-static pouch over the top left corner and the bottom right corner.
- Ink the stamps with embossing ink and close the stamping tool to stamp the sentiment.
- Remove the birthday card front from the stamping tool and pour silver fine detail embossing powder over the stamped sentiments. Tap off the powder over a sheet of copy paper and pour the extra powder back into the jar.
- Brush away any stray embossing powder with a small brush.
- Lastly, emboss the powder with a embossing gun. Hold the birthday card front in the air and heat the sentiment from the back side of the paper. This prevents over embossing and scorching of the shiny metallic finish.
Pro Tip: Turn on the embossing gun and let it run for a bit to warm up before aiming it at the paper. Also, keep the heat gun moving.
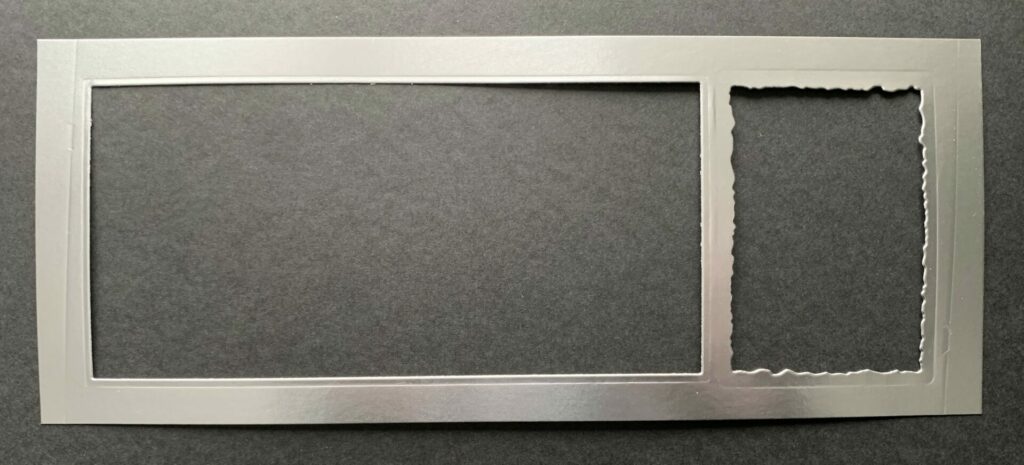
Cutting The Metallic Border
For this part, you will need metallic matte silver cardstock and the paper trimmer/x-acto knife and ruler. Cut the metallic matte silver cardstock down to a size of 9″ x 3 – 5/8″ with the paper trimmer or x-acto knife and ruler.
I like to get the most out my specialty papers as I can. When I’m making a card that has a thin border, I don’t want the paper that isn’t seen to go to waste. So I like to use frame dies to die cut the middle of the metallic paper and use those pieces in a later project. If you want to do this as well, then you’ll need a die cutting machine, frame dies, and some washi tape.
- Adhere frame dies to the center of the silver cardstock with some washi tape. Choose dies that give you at least a half inch border. The border needs to be thick enough that the paper still maintains its original size and shape. If the border is too skinny, then the die cutting machines pressure can skew the paper and you’ll no longer have straight edges. This is especially true if your cutting pad is warped.
- Run it through your die cutting machine.
- Remove the dies and pop out the die cuts.
3D Embossing Tips
Before we emboss, here are some tips for getting the best 3D embossing. You’ll want to spritz the front and back of the paper with water before putting it into the 3D embossing folder. If your paper is inked with distress inks, you’ll only want to spray the back of the paper because the distress inks are water reactive. This means the water will remove some of the ink and ruin the inking that was done previously. The water helps to soften the fibers of the paper so it doesn’t crack. For more examples of why I recommend using the water spritz, check out my side-by-side photo comparisons in my Elegant & Simple Card tutorial.
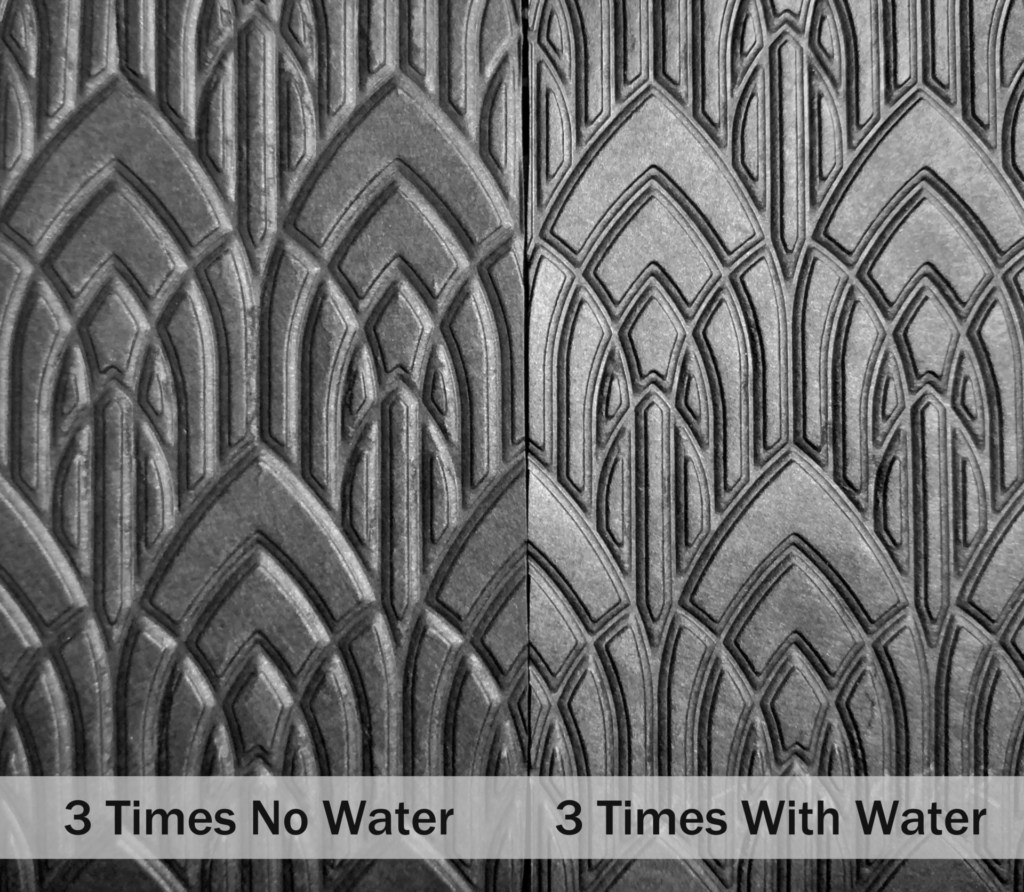
Then, you’ll put the misted paper into the 3D embossing folder and run it through the Sizzix Big Shot/any die cutting machine three times. Remember, 3D = 3 times (it makes for a deeper and crisper impression.) See photo above for a side-by-side comparison. However, each machine applies a different amount of pressure. For instance, the Sizzix big shot foldaway machine applies a lot of pressure, and would only need one pass for a 3D embossing folder. The weight of your paper is also a contributing factor. The thinner the paper the less number of passes you’ll need to run it through. The heavier weight paper may need an extra pass through the machine. I recommend doing some small test swatches to see how many passes is ideal for your machine with the different weights of paper that you will be using.
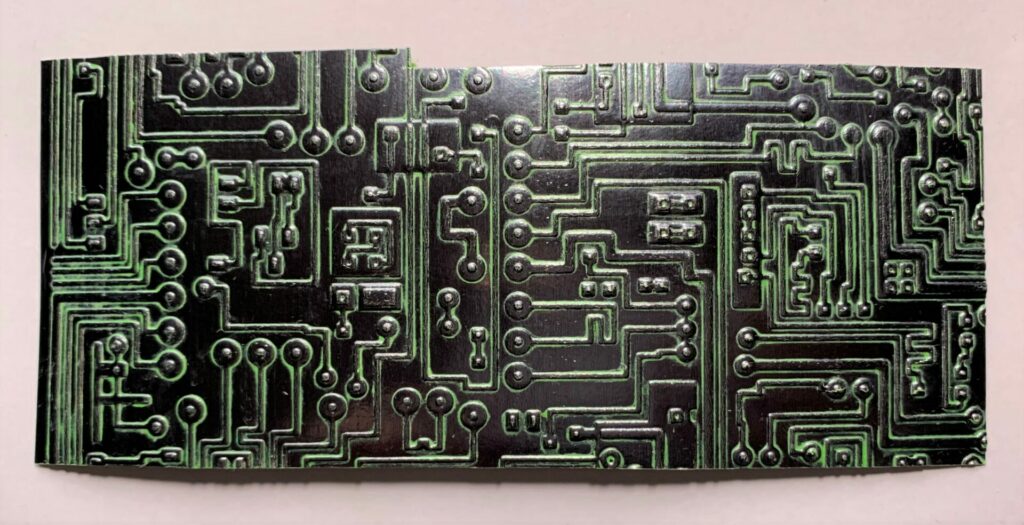
Embossing The Circuit
Then, it is time to emboss the circuits. In this step you’re going to need a paper trimmer/x-acto knife and ruler, metallic black kraft stock, die cutting machine, circuit embossing folder, and a spray bottle with water.
- Cut the metallic black kraft stock down to a size of 3″ x 6 – 1/4″ with the paper trimmer or x-acto knife and ruler.
- Mist the back side of the metallic kraft stock with water.
- Place it in the circuit embossing folder.
- Run it through your die cutting machine. I did two passes for mine.
- Remove the embossed panel from the folder and let it dry under a flat cutting pad.
Applying The Crayon
After that, I added distress crayon to the circuit embossed panel. For this you’ll need the metallic black embossed panel, distress crayon in wicked elixir, a damp paper towel, and a scrap piece of paper to work on.
- Scribble the crayon along all the circuit lines.
- Rub it in with your finger. You’ll want to work the crayon into all the lines and crevices.
- Take a wet paper towel (wring out most of the water) and gently rubbed it over the raised areas of the circuit embossed panel. This is to remove the crayon from all the high points of the paper.
- Set it aside to dry.
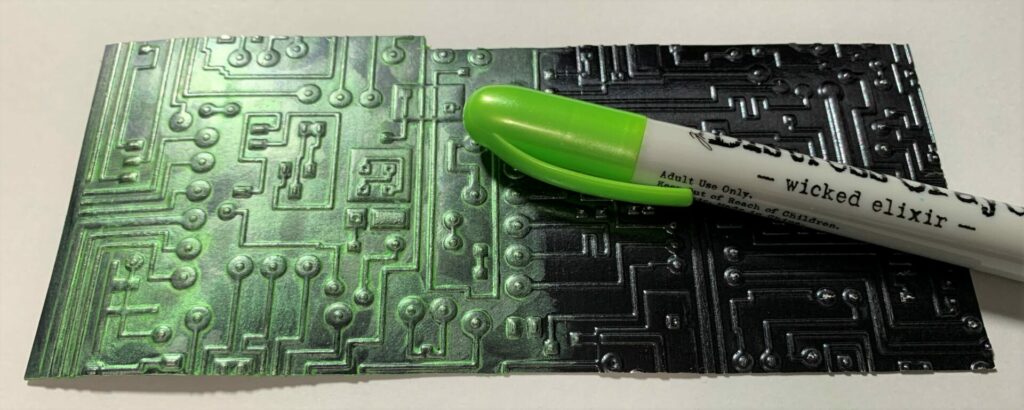
Crayon Tips: This gets a little messy and your fingers will get inked with crayon, but don’t worry because it wipes right off with water. You’ll also want to move to a clean part of the paper towel once it becomes to coated with crayon. If you end up rubbing off too much crayon, no big deal. Just add more crayon to that area and repeat the process.
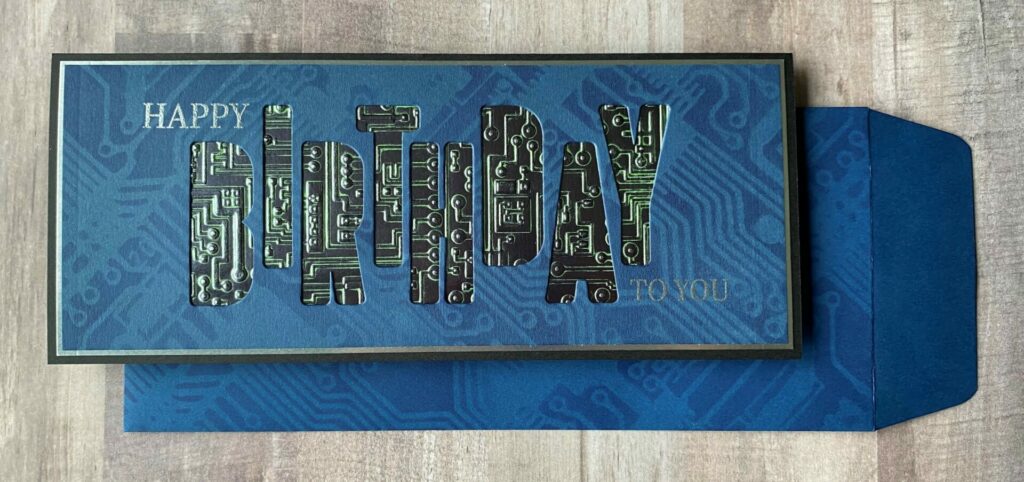
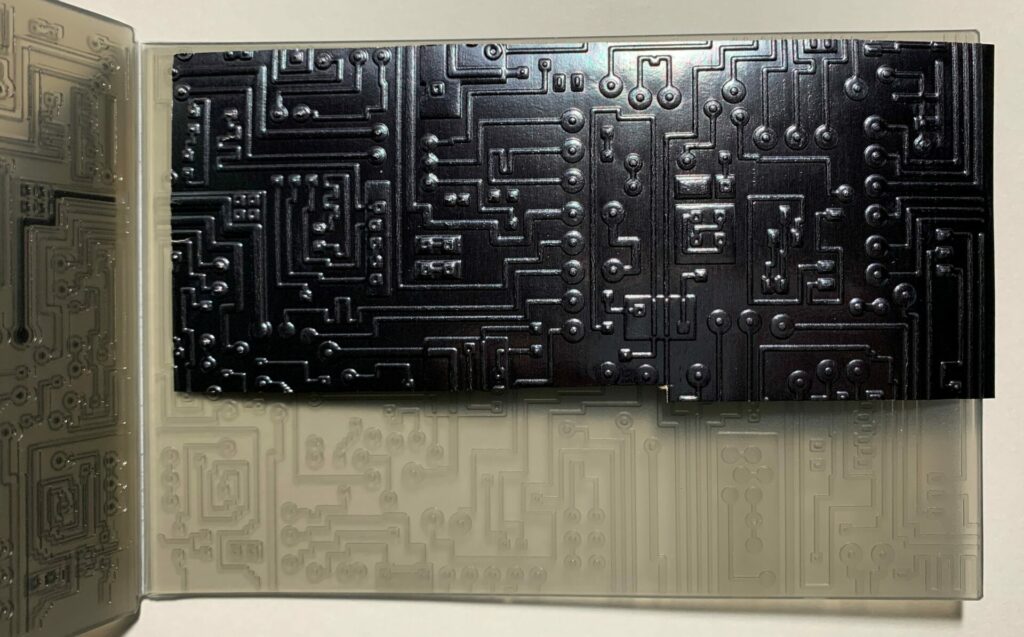
Gluing The Circuit Birthday Card Together
Then, it was time to glue the circuit birthday slimline card together. Firstly, I glued the metallic black circuit embossed panel behind the navy die cut birthday panel. Then, I set something heavy on top of it while the glue dried. I like to use my Big Shot platform for this.
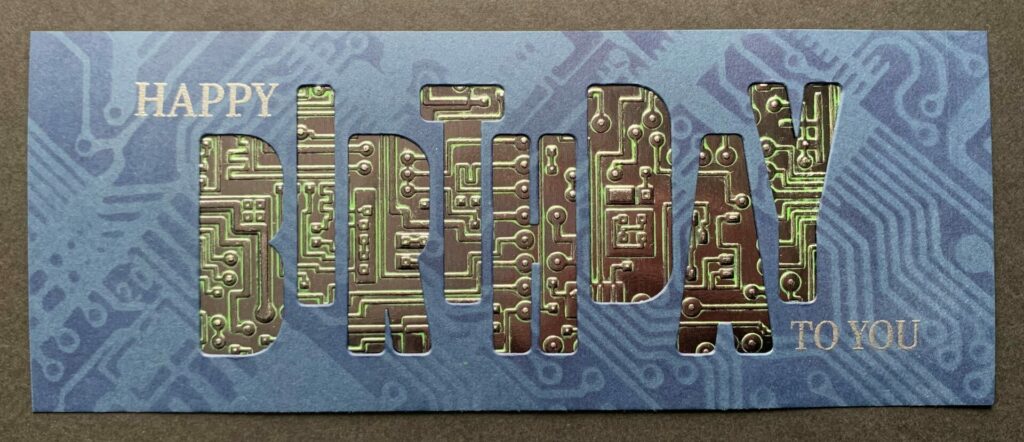
Next, I glued the metallic silver frame behind that and set the Big Shot platform on top of it while the glue dried.
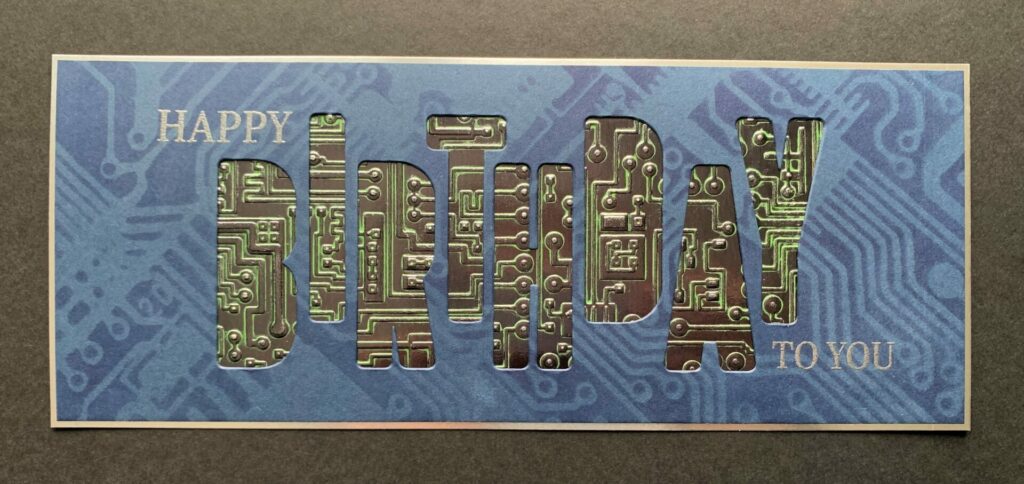
Lastly, after it was dry I glued the card front to the card base and set the Big Shot platform on top of it while it dried.
Finishing The Inside & Back Of The Card
To finish off this card, I cut some medium gray cardstock to a size of 8 – 3/4″ x 3 – 3/8″ with the paper trimmer. This extra layer helps to provide stability and structure to the card. Otherwise the back of the card is too flimsy without this additional layer.
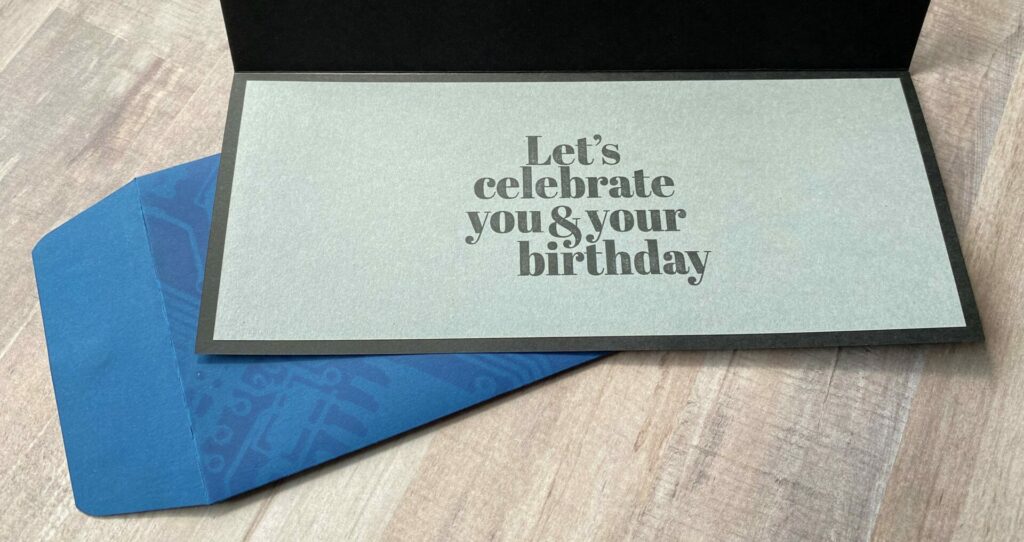
Inside Of The Card
After that, I stamped it with the “Let’s celebrate you & your birthday” sentiment from the Special Day Sentiment Duos stamp set by Simon Says Stamp in black soot archival ink. Then, I adhered it to the inside of the circuit birthday slimline card.
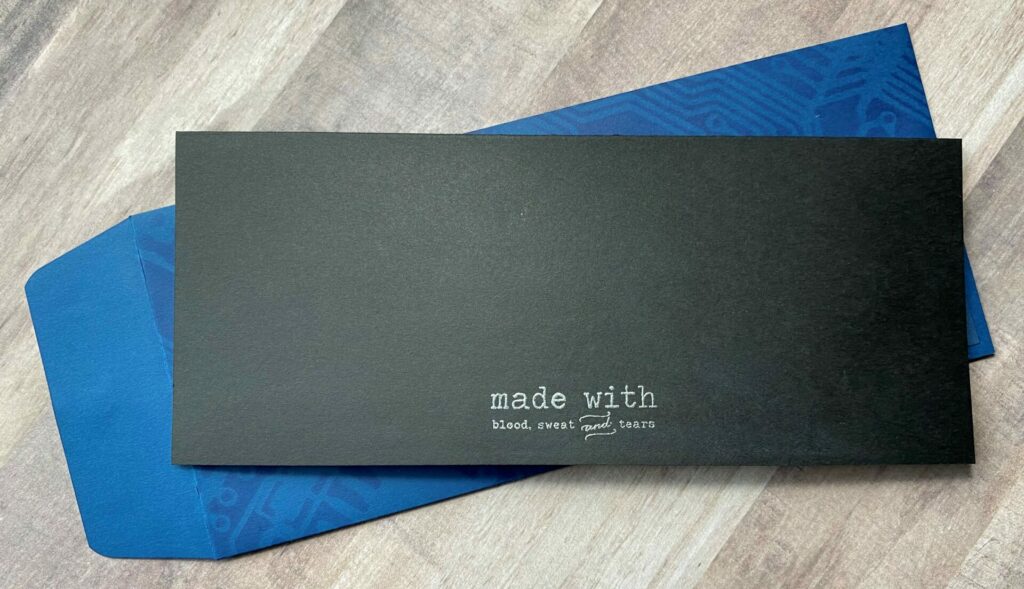
Back Of The Card
For the back of my cards, I always like to add a “made with…” sentiment. Feel free to skip this step if you want. Here I used the “made with blood, sweat, and tears” sentiment from Hampton Arts #SC0763. I like to use this sentiment on all my more masculine cards.
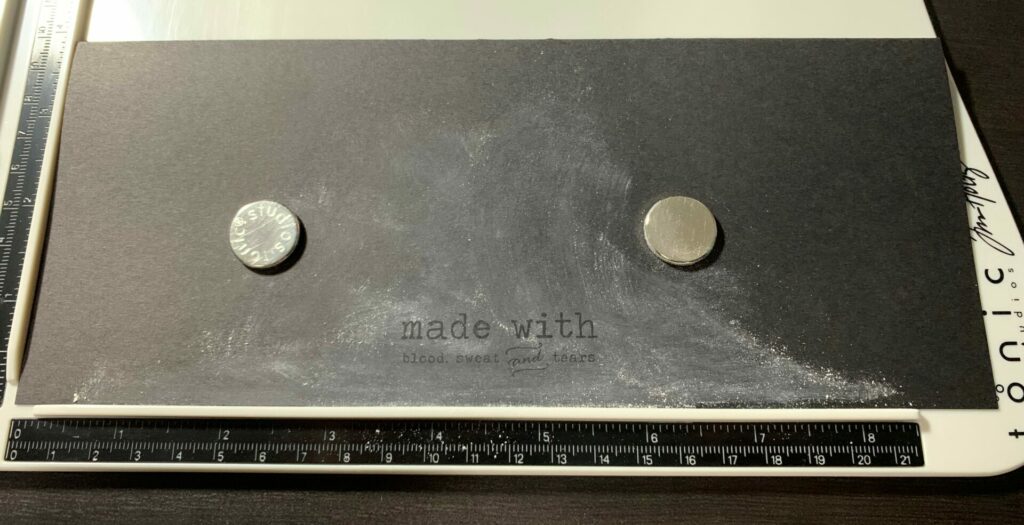
This was heat embossed with silver ultra fine embossing powder from Simon Says Stamp. You could also use pigment ink if you didn’t want to heat emboss.
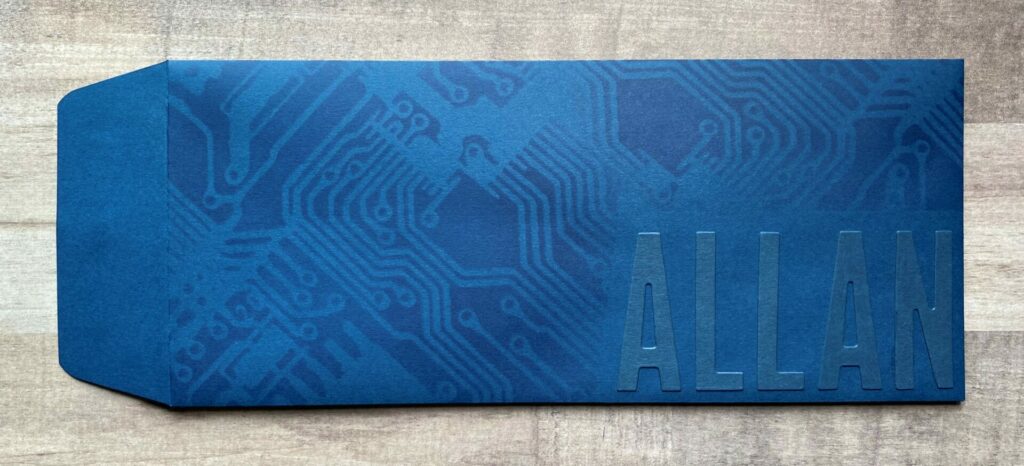
Circuit Slimline Envelope
Lastly, if you want to make the matching envelope, this is how I made it. For this, you’ll need navy slimline envelope, circuit stencil, chipped sapphire distress ink, blending brush, and washi tape. If you want to personalize it with a name you’ll also need alphanumeric bulletin dies, die cutting machine, glue, a frame die, and craft pick. I did the stenciling last on mine. But, if I were to make this again I would do the stenciling first.
- Use the circuit stencil to stencil the front of the envelope. Similar to how the card front was stenciled.
- Using a blending brush, apply the chipped sapphire distress ink over the envelope and stencil.
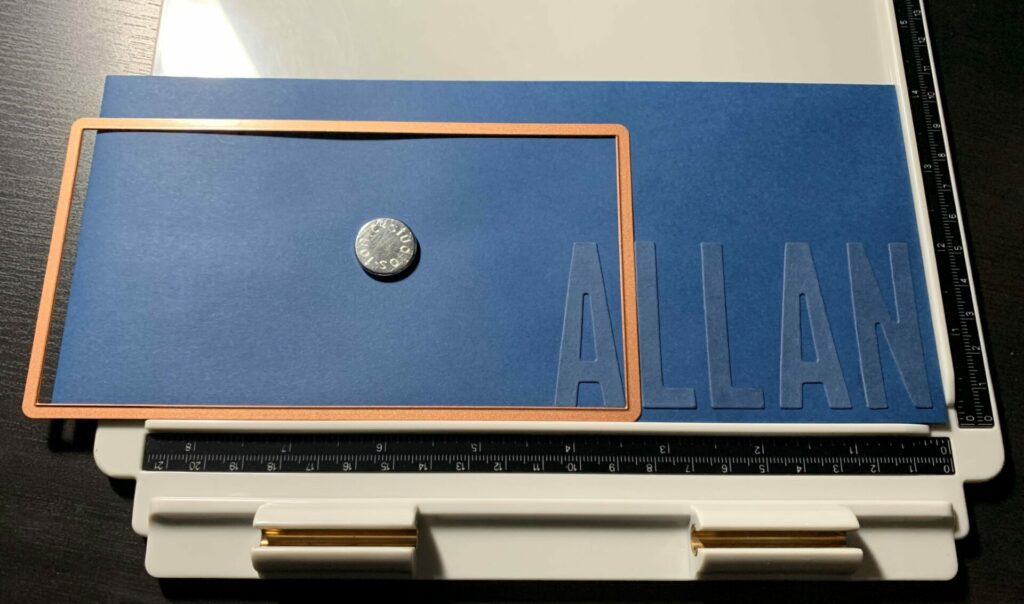
- Die cut letters from navy cardstock.
- Use a frame die for consistent spacing between letters.
- Glue letters to the envelope.
Circuit Birthday Slimline Card Complete!
Congratulations! You have now completed your circuit birthday slimline card! I hope you enjoyed this tutorial and have as much fun making it as I did. If you do make this card, please use the #grovecrafted and tag me (@grovecrafted) on Instagram. I’d love to see what you’ve created! Thanks for stopping by and I hope you found some new inspiration to create.
If you enjoyed making this circuit birthday slimline card, you might want to check out another one of my masculine card tutorials. It’s called Quilted Leather Card and it can be a birthday or Father’s Day card.


Love this Circuit birthday card – thanks for sharing.
Thanks Kim! I’m so glad you enjoyed the tutorial.