
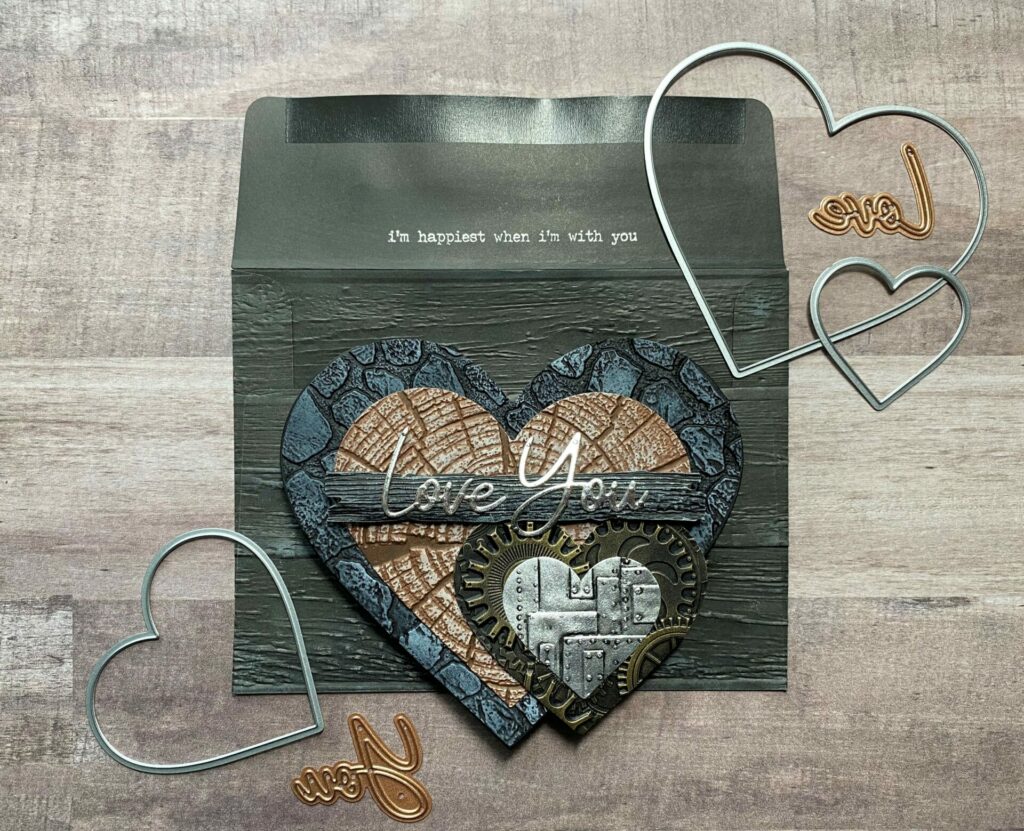
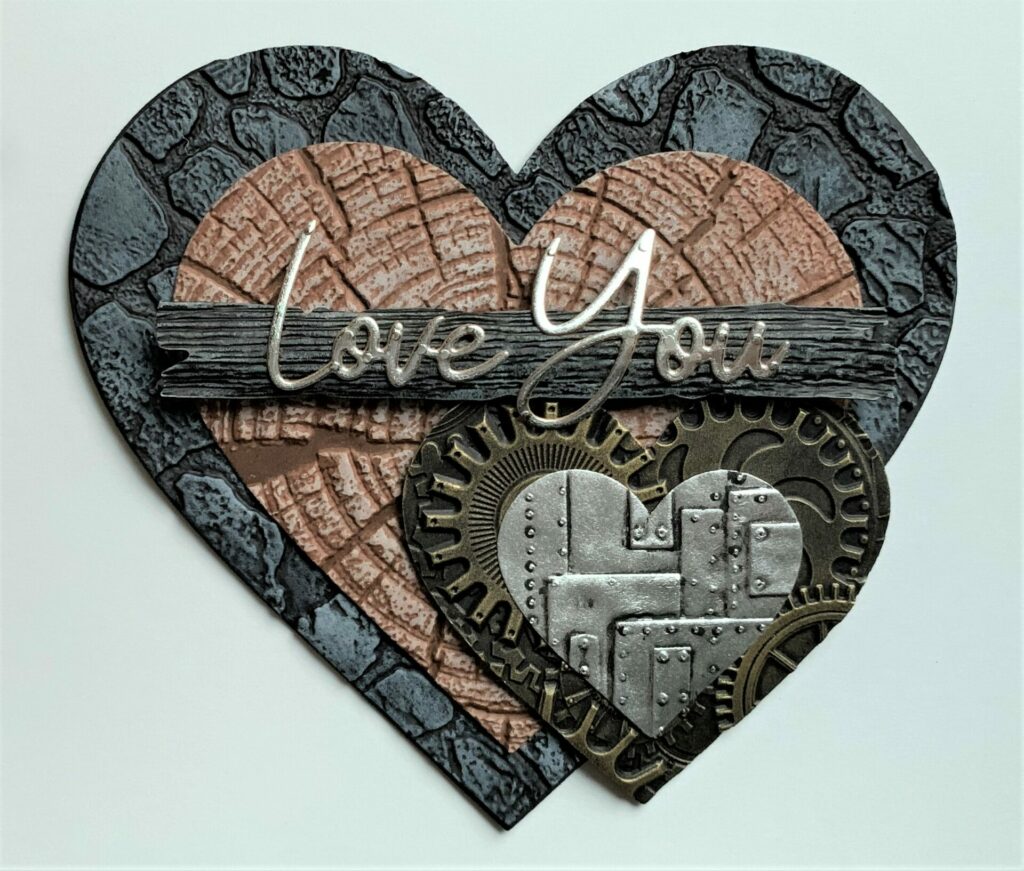
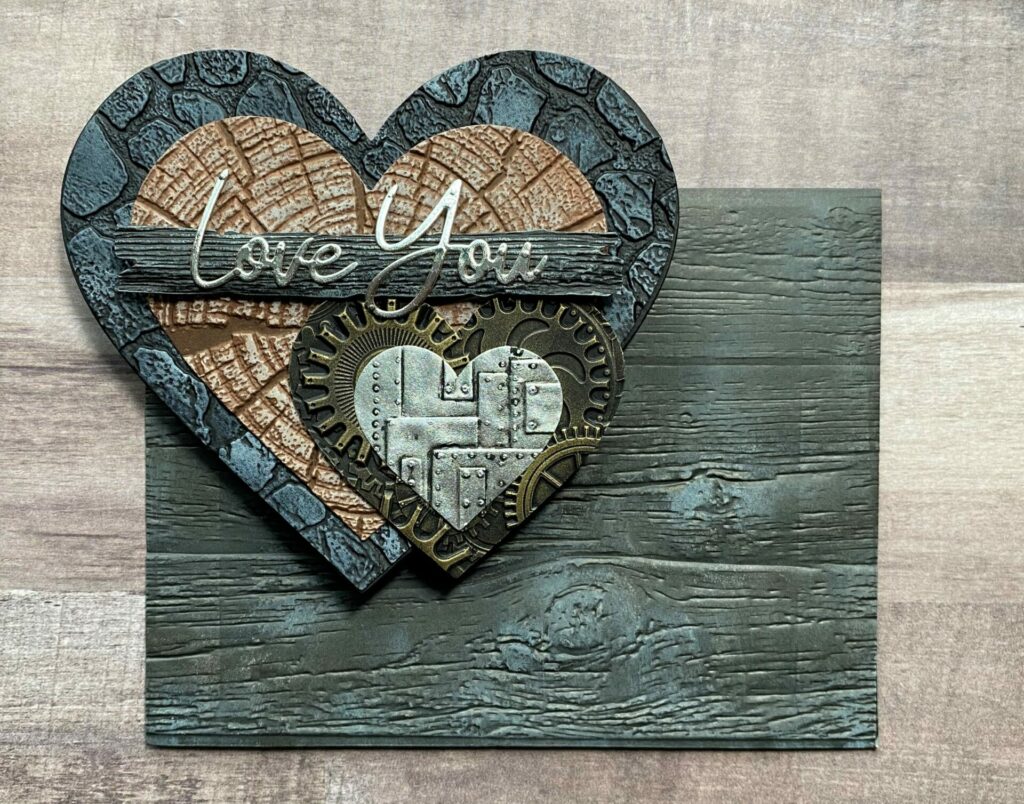
Layered Hearts Valentine
Hello crafty card makers, and happy belated new year! With Valentine’s Day being just around the corner, I’m betting you’re in need of a valentine for your significant other. So today I’m sharing how I made this layered hearts valentine. It features layers of 3D embossed textures, along with multiple metallic finishes. I made this one a more masculine valentine, but the colors and embossing folders could easily be changed to make it more feminine or to fit your specific need. The beauty of this valentine is that it is fully customizable. Just by changing up the colors, embossing folders, and paper finishes, it could have a completely different look and feel. Perfect for your boyfriend/husband, girlfriend/wife, and even your kids. This layered hearts valentine could also work great as an anniversary card, just by switching out the inside sentiment.
Link Abbreviations
- AMZ – Amazon*
- SB – Spellbinders*
- Sb.com – Scrapbook.com*
- SIZ – Sizzix*
- SSS – Simon Says Stamp
- HA – Hero Arts*
- RI – Ranger Ink*
Full Disclosure: This post contains affiliate links which are indicated with an (*). If you click on an affiliate link and later make a purchase, I may receive a small commission. Clicking on an affiliate link which earns a commission does NOT result in additional charges to you or cost you anything extra. Money earned via affiliate links helps pay the fees to keep this blog up and running. Thank you so much for shopping through my links to show your support for the brands that we love and the products that I share!
Supplies Used / Substitutions:
- Hero Arts Nesting Infinity Dies – Hearts #DI334 | HA | AMZ | Sb.com / Any nested heart dies
- Spellbinders Dies – Simply Perfect Mix & Match Sentiments SKU: S5-443 | Sb.com | AMZ / Any sentiment die
- Sizzix Tim Holtz Bigz Die- Planks #662705 / Optional
- Sizzix Tim Holtz 3D Embossing Folder – Lumber #662718 | Sb.com | SIZ | AMZ / Any embossing folder
- Tim Holtz Sizzix 3D Embossing Folder – Cobblestone #665375 | SIZ | AMZ | SSS / Any embossing folder
- Tim Holtz Sizzix 3D Embossing Folder – Tree Rings #666049 | Sb.com / Any embossing folder
- Sizzix Tim Holtz 3D Mini Embossing Folder – Mechanics #665633 | Sb.com | AMZ / Any embossing folder
- Sizzix Tim Holtz 3D Mini Embossing Folder – Foundry #665634 | Sb.com | SIZ | AMZ | SSS / Any embossing folder
- Heffy Doodle Stamps – Special Day Sentiment Duos | SSS / Optional or any sentiment stamp
- Black Cardstock | SSS / Any color cardstock
- Brown Cardstock | SSS / Any color cardstock
- Sizzix Surfacez Texture Roll – Silver #664913 | Sb.com | AMZ / Any metallic silver cardstock
- Sizzix Luster Wax – Gold | Sb.com | SIZ | AMZ |
- Archival Ink Distress – Ground Espresso | SSS |
- Distress Crayon – Black Soot | SSS / Distress paint
- Distress Oxide Ink / Any color pigment inks
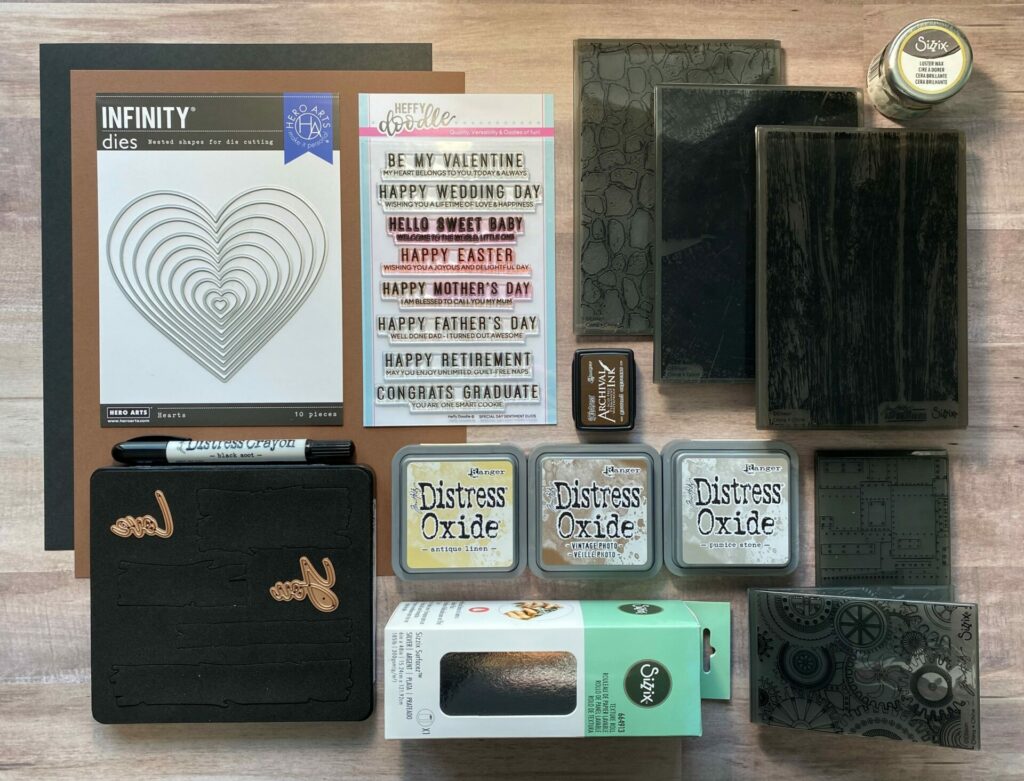
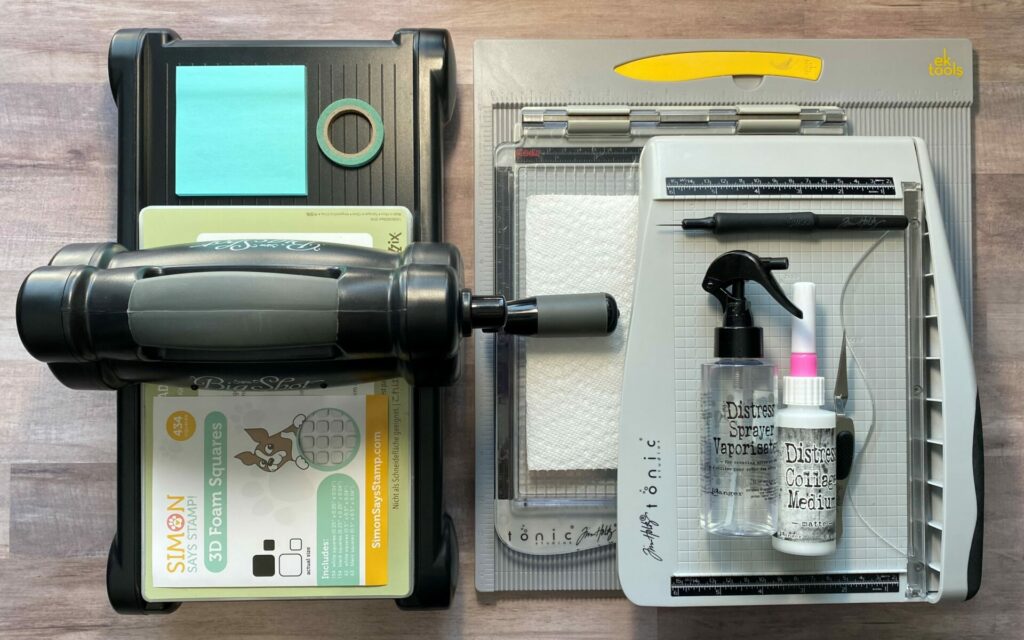
Tools Used / Substitutions:
- Sizzix Big Shot | SIZ / Spellbinders Platinum Six | Sb.com | SB / Any die cutting machine
- Tim Holtz Comfort Paper Trimmer | Sb.com | AMZ | RI / Any paper trimmer
- Tonic Tim Holtz Stamp Platform / Any stamping tool or clear acrylic block
- EK Scoring Board | AMZ | SSS / Any scoring board
- Distress Collage Medium – Matte | Sb.com | RI / Any liquid adhesive
- Spray Bottle with water | Sb.com | SB | AMZ / Any spray bottle with water
- Tim Holtz Retractable Craft Pick | Sb.com | SSS | AMZ / Toothpick
- Tim Holtz Reverse Action Tweezers #665304 | Sb.com | SIZ | SSS / Any reverse action tweezers
- Foam Squares – Black | SSS / Optional
- Paper Towel
- Post-It / Scrap piece of paper
- Washi Tape / Any low tack tape
Die Cutting The Hearts
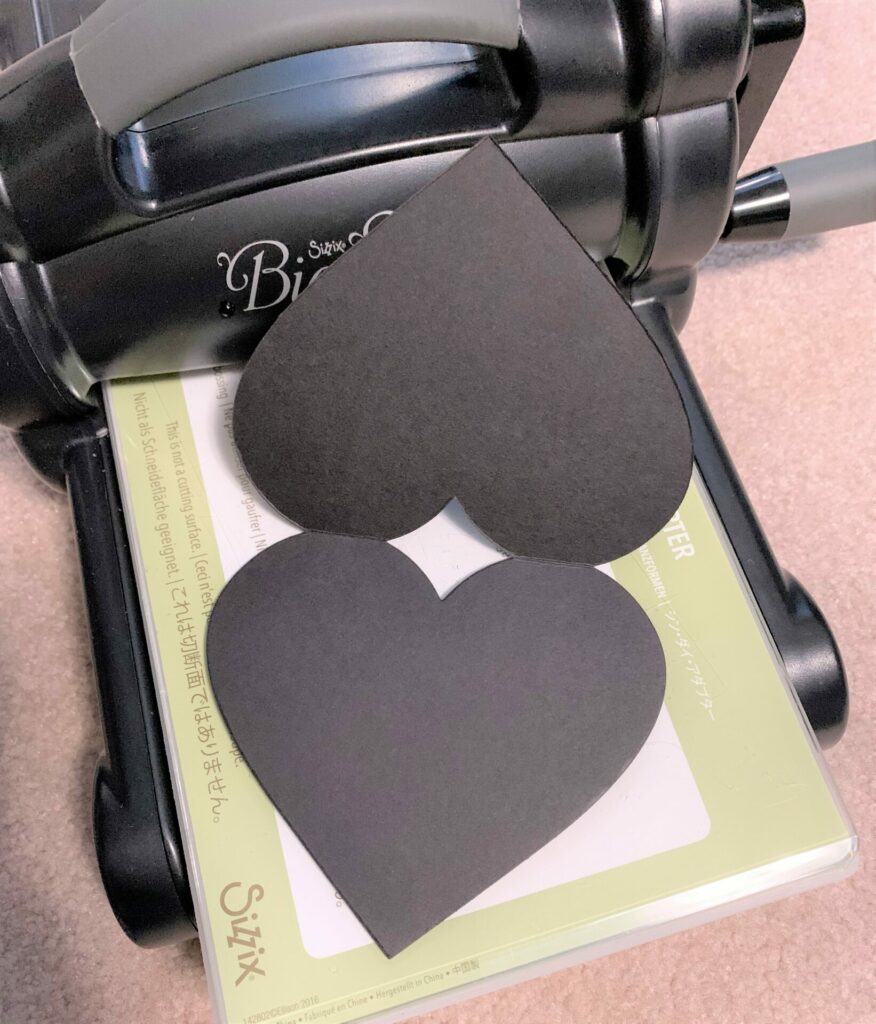
To begin with, I die cut four hearts. For this you’ll need black and brown cardstock, silver texture roll, paper trimmer/scissors, heart dies, washi tape, and die cutting machine. I used the Nesting Hearts Infinity Dies from Hero Arts, but you can used any brand of nesting heart dies you like. I used the largest heart die and every other smaller die down from that. The four hearts highlighted in red are the ones I used. (See below)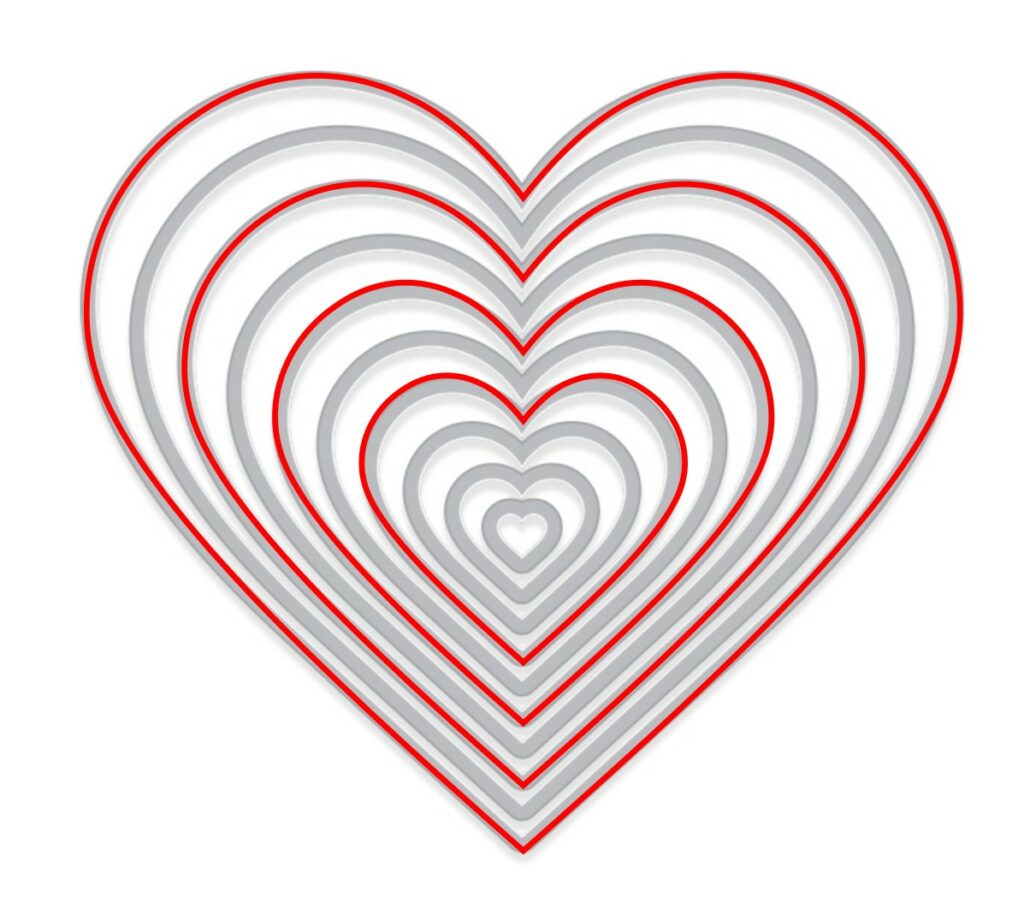 Large Heart – Die cut with black cardstock.
Medium Heart – Die cut with brown cardstock.
Small Heart – Die cut with black cardstock.
Extra Small Heart – Die cut with silver texture roll cardstock.
Making The Heart Card Base
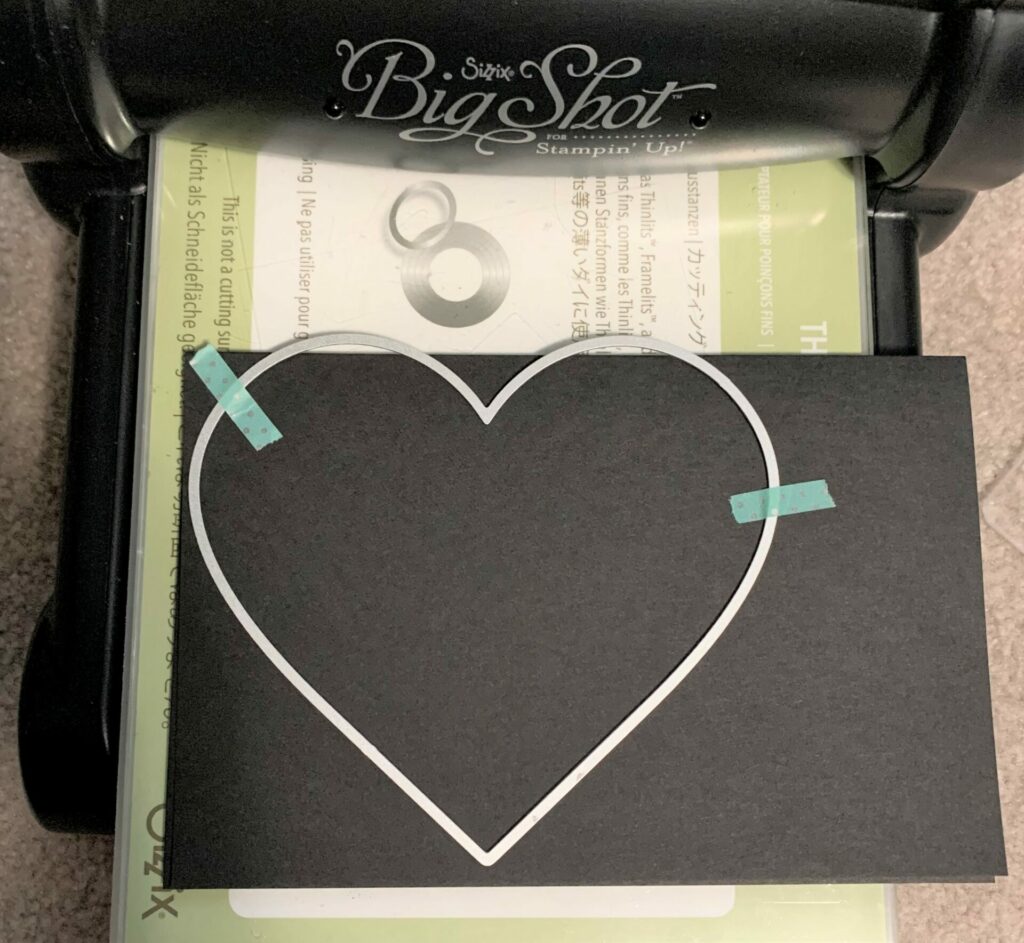
Firstly, I started by making the card base. For this you’ll need black cardstock, paper trimmer/scissors, scoring board, large heart die, washi tape, and die cutting machine.
- Trim the black cardstock down to a size of 5in x 8½in with the paper trimmer or scissors.
- Using the scoring board, score the cardstock at the 4¼in line and fold it in half. Your folded card base should now be 5in x 4¼in.
- Take the large heart die and position it on the card base as shown above. Make sure the fold is at the top, and that the top of the heart die hangs off the edge a bit. This creates the folded hinge of the card base.
- Secure the die down with some washi tape, and run it through your die cutting machine.
3D Embossing Tips
Before we emboss, here are some tips for getting the best 3D embossing. You’ll want to spritz the front and back of the paper with water before putting it into the 3D embossing folder. If your paper is inked with distress inks you’ll only want to spray the back of the paper because the distress inks are water reactive. This means the water will remove some of the ink and ruin the inking that was done previously. The water helps to soften the fibers of the paper so it doesn’t crack. For more examples of why I recommend using the water spritz, check out my side-by-side photo comparisons in my Elegant & Simple Card tutorial.
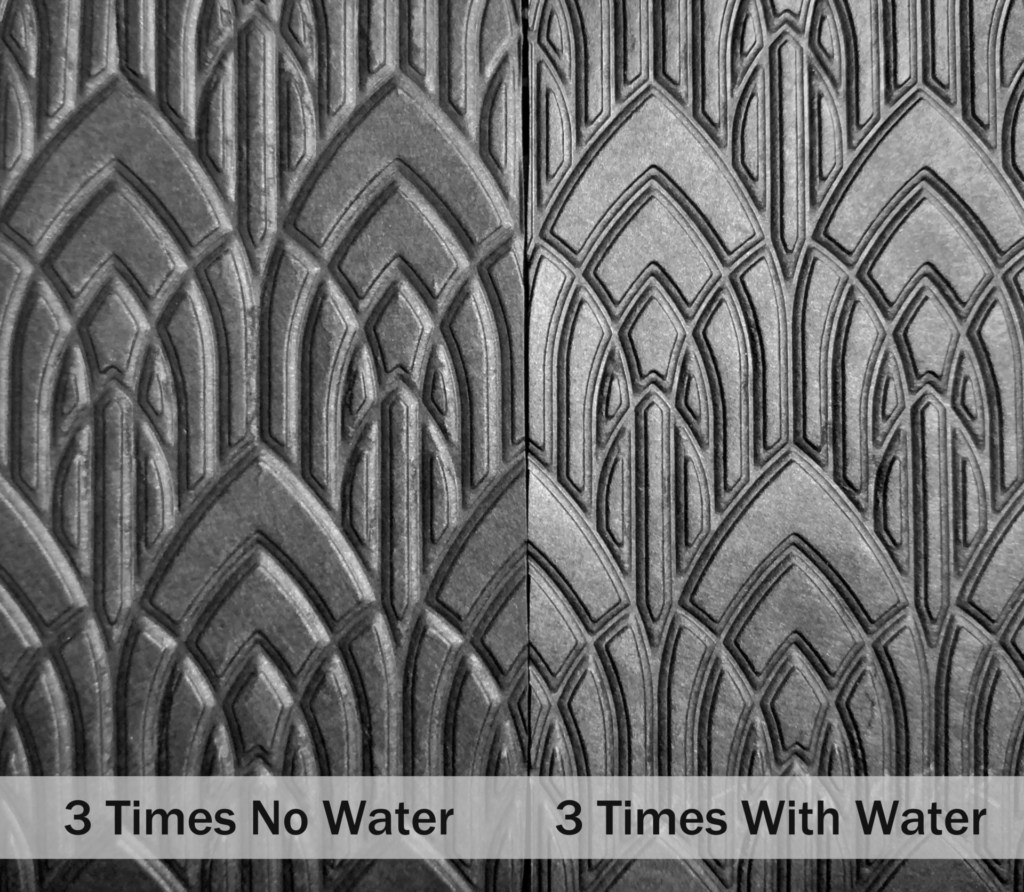
Then, you’ll put the misted paper into the 3D embossing folder and run it through the Sizzix Big Shot/any die cutting machine three times. Remember, 3D = 3 times (it makes for a deeper and crisper impression.) See photo above for a side-by-side comparison. However, each machine applies a different amount of pressure. For instance, the Sizzix big shot foldaway machine applies a lot of pressure, and would only need one pass for a 3D embossing folder. The weight of your paper is also a contributing factor. The thinner the paper the less number of passes you’ll need to run it through. The heavier weight paper may need an extra pass through the machine. I recommend doing some small test swatches to see how many passes is ideal for your machine with the different weights of paper that you will be using.
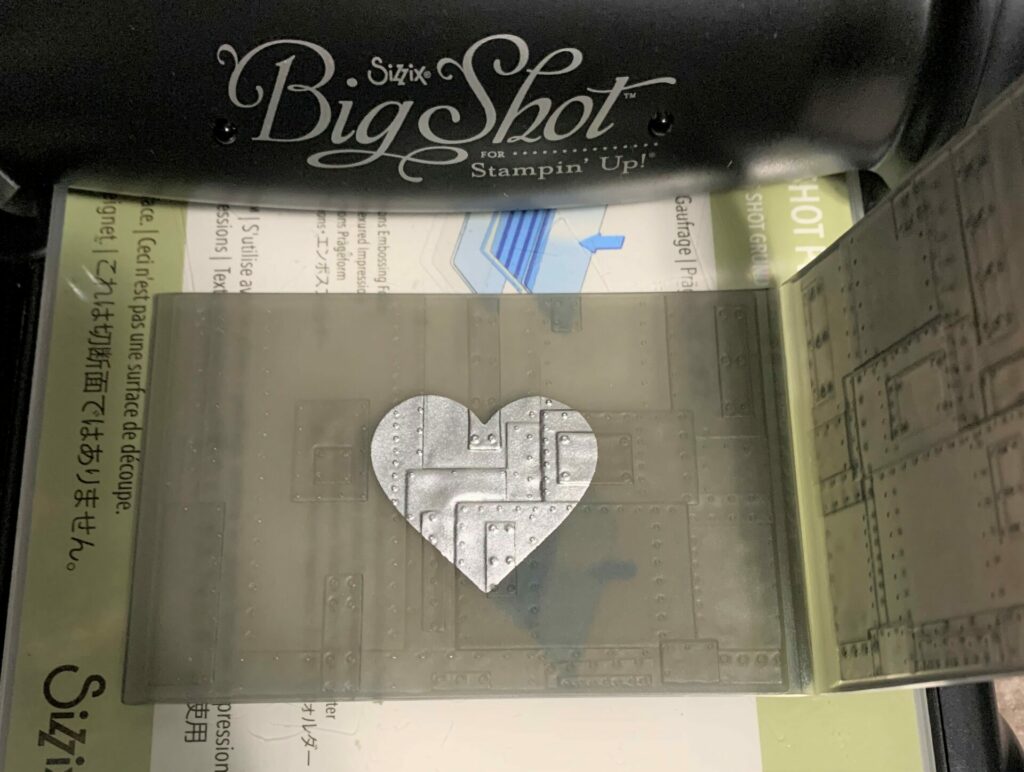
Embossing The Hearts
Next, I embossed the four hearts I die cut earlier. For this part, you’ll need your four die cut hearts, 3D embossing folders in Cobblestone and Tree Rings, 3D mini embossing folders in Mechanics and Foundry, spray bottle with water, distress archival ink in the shade ground espresso, and a die cutting machine. Keep in mind you can customize this however you like by using any embossing folders.
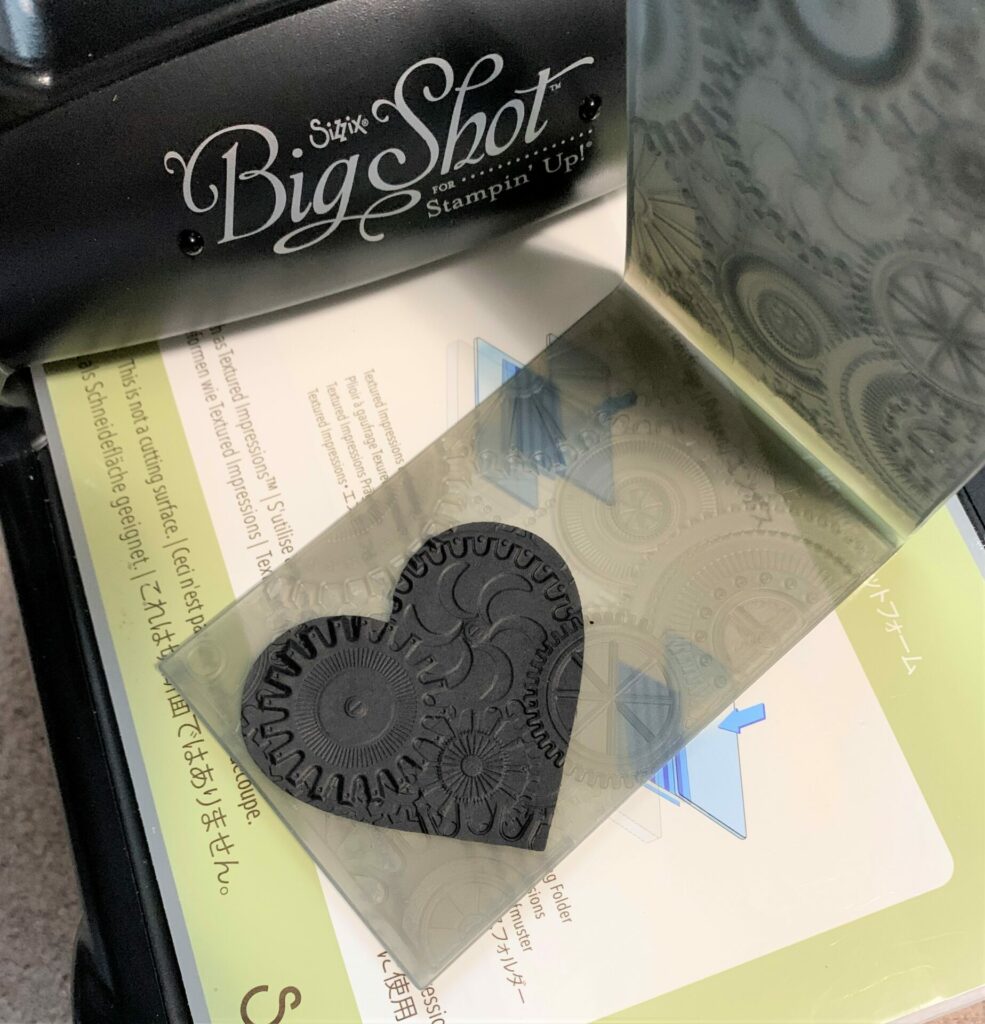
Large Cobblestone Heart
- Mist both sides of the large black heart with water.
- Place it in the cobblestone 3D embossing folder.
- Run it through your die cutting machine. I did two passes for mine.
- Remove the embossed heart from the folder and let it dry under a flat cutting pad.

Medium Tree Rings Heart
- Gently rub distress archival ink in the shade ground espresso on the top inside of the embossing folder. Where the red arrow is. (Do this only in the area where the heart will be embossed. You don’t have to cover the whole folder.)
- Mist the back side of the medium brown heart with water.
- Place the heart in the tree rings 3D embossing folder
- Run it through your die cutting machine. I did two passes for mine.
- Remove the embossed heart from the folder and let it dry under a flat cutting pad.
- Clean off any excess ink from the embossing folder.
![]()
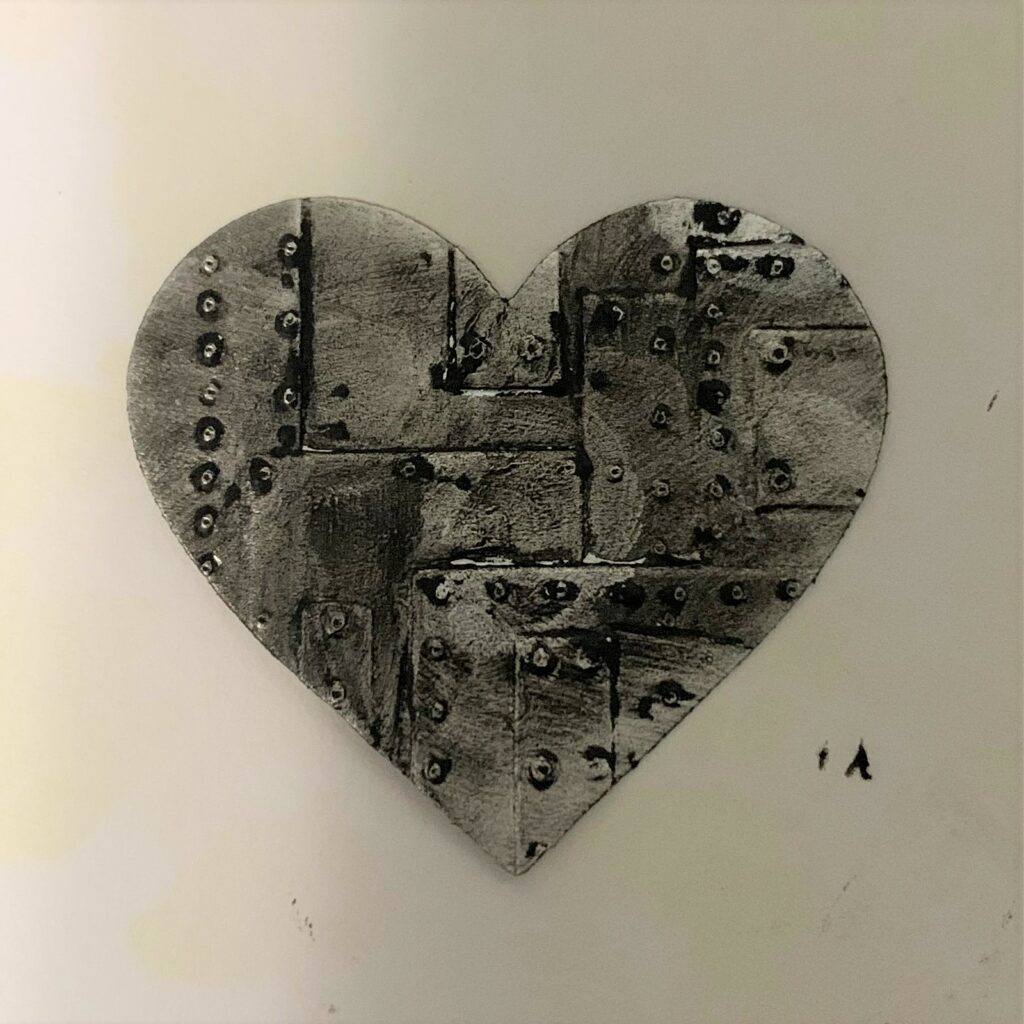
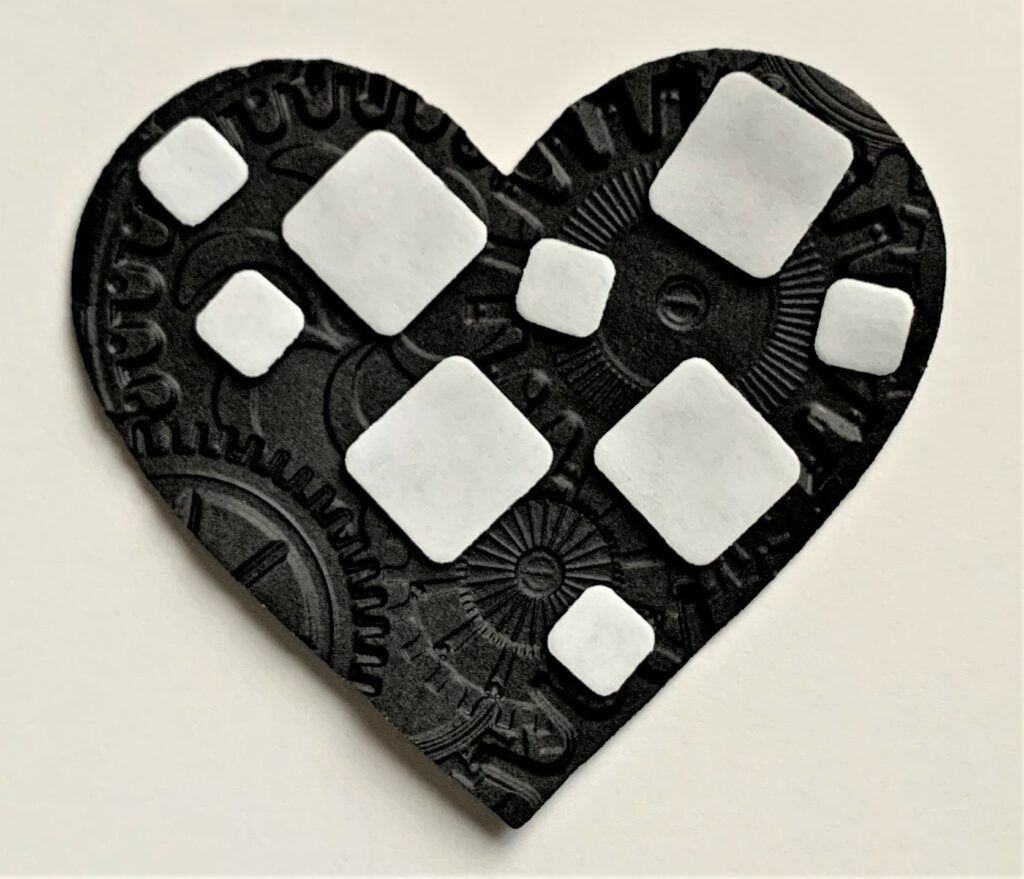
Small Mechanics Heart
- Mist both sides of the small black heart with water.
- Place it in the mechanics mini 3D embossing folder.
- Run it through your die cutting machine. I did two passes for mine.
- Remove the embossed heart from the folder and let it dry under a flat cutting pad.
Extra Small Foundry Heart
- Place the extra small silver heart in the foundry mini 3D embossing folder
- Run it through your die cutting machine. I did two passes for mine.
- Remove the embossed heart from the folder.
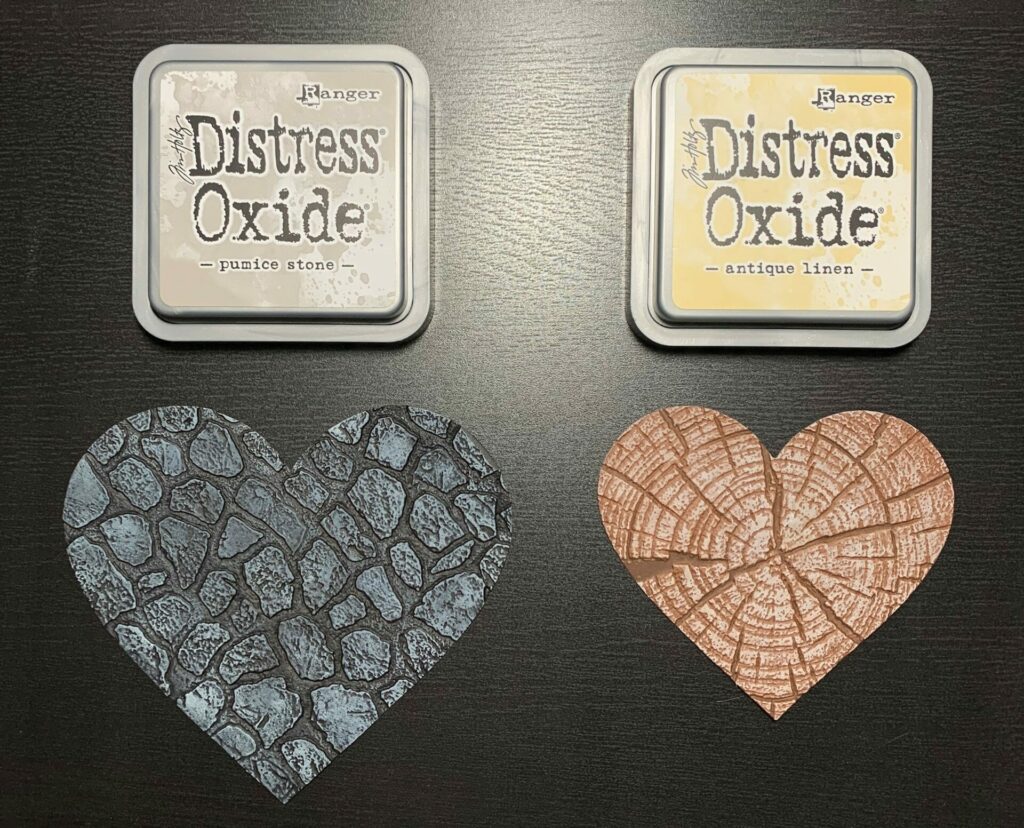
Applying The Oxide Ink
After the hearts were all embossed, I added distress oxide ink to the two bigger hearts. I used pumice stone on the large black cobblestone heart and antique linen on the medium brown tree rings heart. To do this I simply rubbed the ink onto the high points of the embossing using my finger. Do this using a light hand.
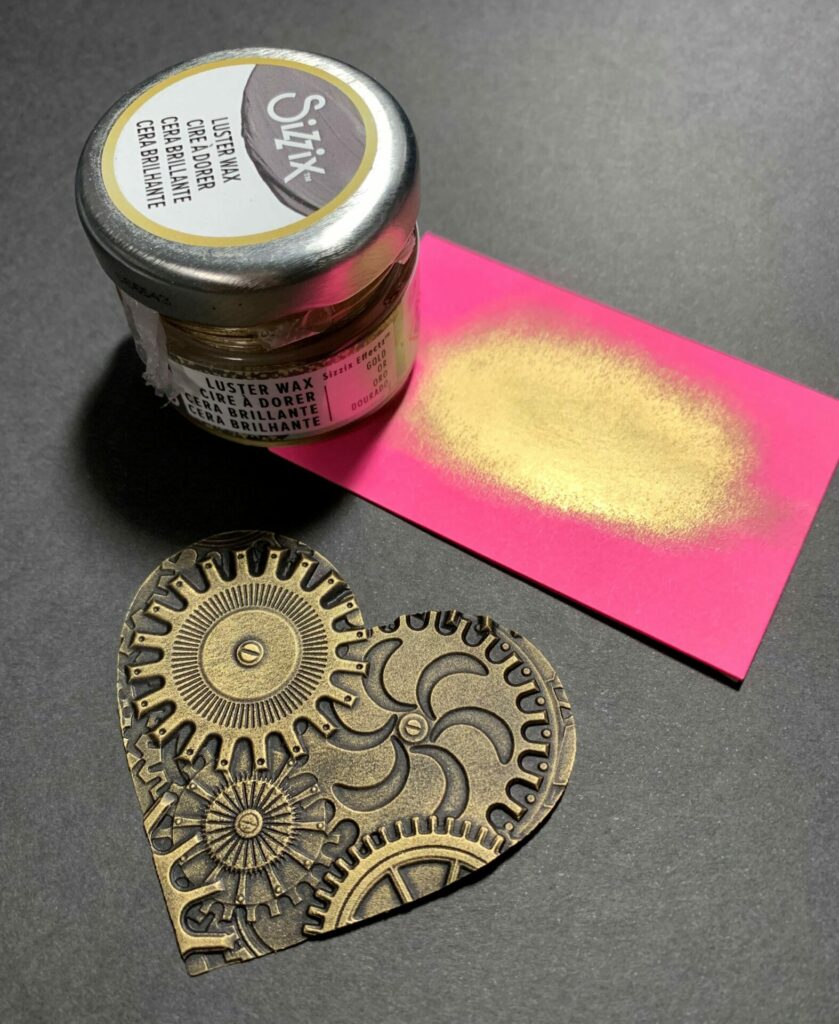
Applying The Luster Wax
Then, I added the gold luster wax to the small black mechanics heart. For this, you’ll need your small embossed black heart, Sizzix luster wax in gold, a post-it, and scrap piece of paper to work on. Firstly, take a little bit of luster wax out of the jar with your finger tip and rub it onto the post-it note or scrap piece of paper. This removes some of the excess wax globs and will save you from ruining your project with hot spots of wax all in one area. It also makes for an even application of the luster wax. Then, rub the wax onto the high points of the embossed gears. Here you’ll want to use a light touch and take your time. Continue this process until all the gears are covered in gold. Lastly, I washed the luster wax off my hands with soap and water.
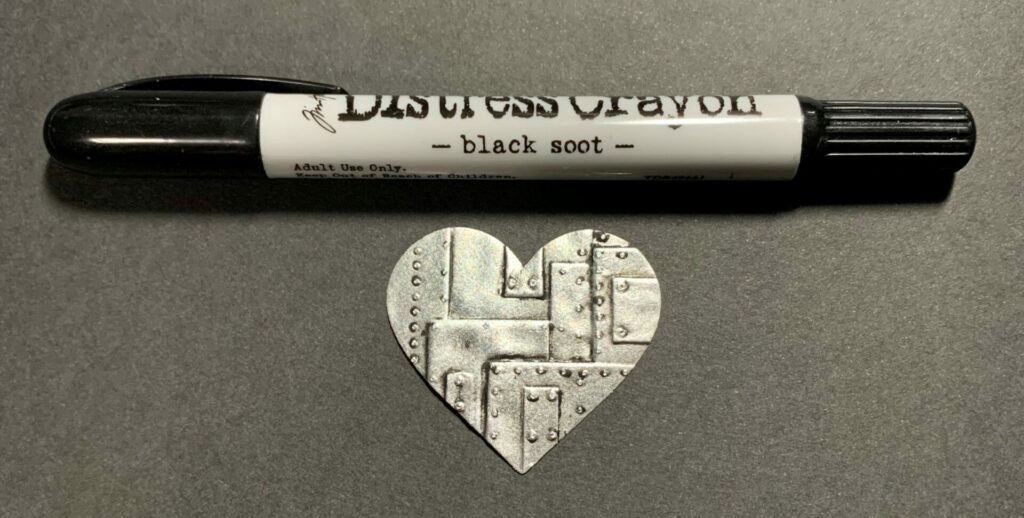
Adding The Distress Crayon
Lastly, for the embossed hearts, I added distress crayon to the extra small silver heart. For this you’ll need your silver embossed heart, distress crayon in black soot, a damp paper towel, and a scrap piece of paper to work on.
- Scribble the crayon along the rivet lines.

- Rub it in with your finger. You’ll want to work the crayon into all the lines and crevices.
- Take a wet paper towel (wring out most of the water) and gently rubbed it over the heart.
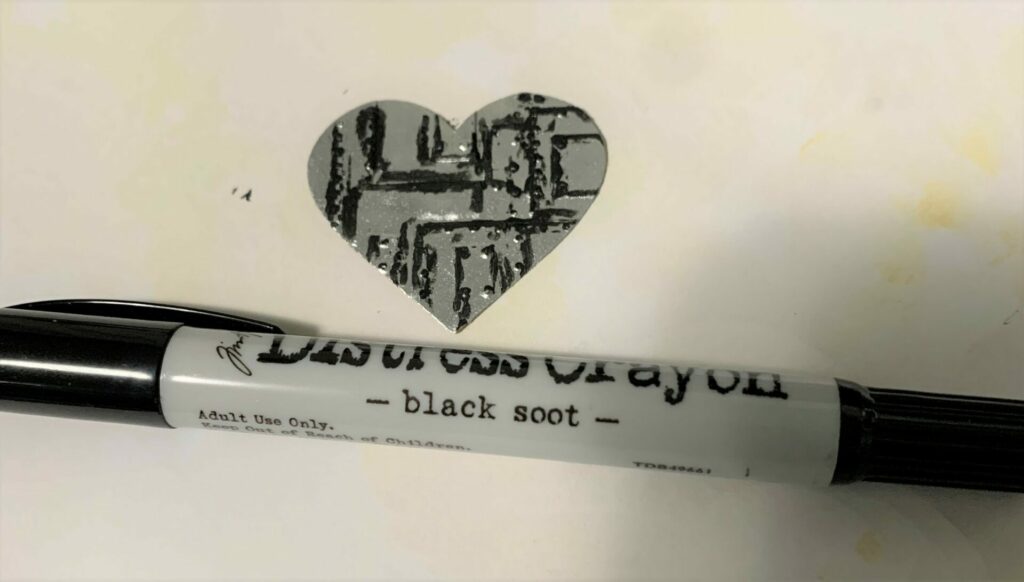
This is to remove the crayon from all the high points of the paper. This gets a little messy and your fingers will get black, but don’t worry because it wipes right off with water. You’ll also want to move to a clean part of the paper towel once it becomes to black. If you end up rubbing off too much crayon, no big deal. Just add more crayon to that area and repeat the process. Once I was happy with how it looked, I set it aside to dry.
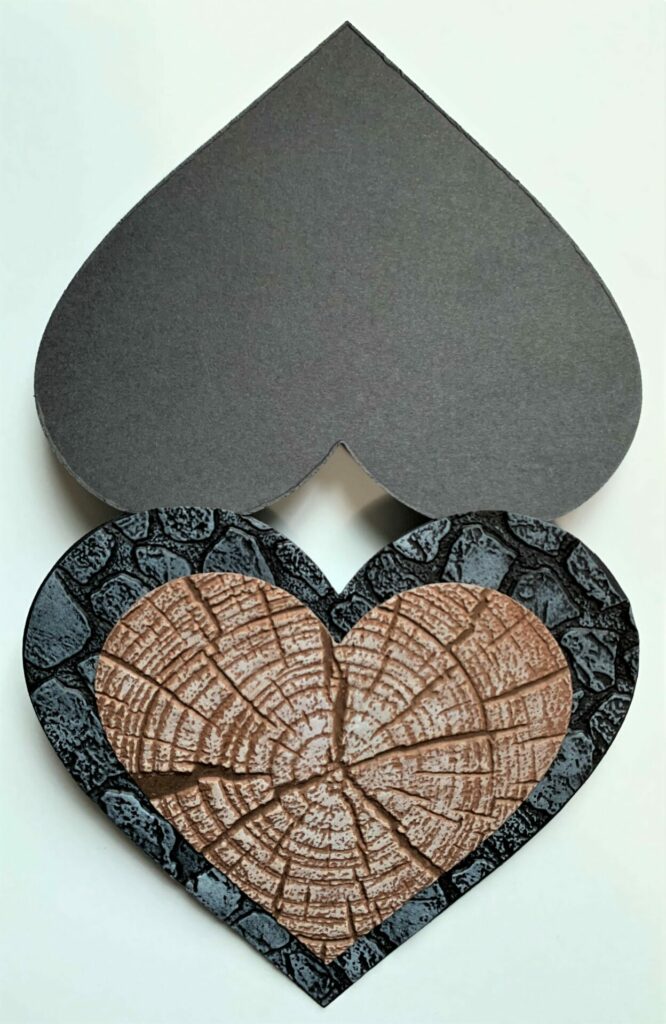
Gluing The Hearts Together
Then, using distress collage medium, glue the two larger hearts together and the two smaller together. See reference below. Set something heavy on top of the hearts while the glue dries. I like to use my Big Shot platform for this.

Next, glue the large heart duo to the front of the card base and set the Big Shot platform on top of it while it dries.
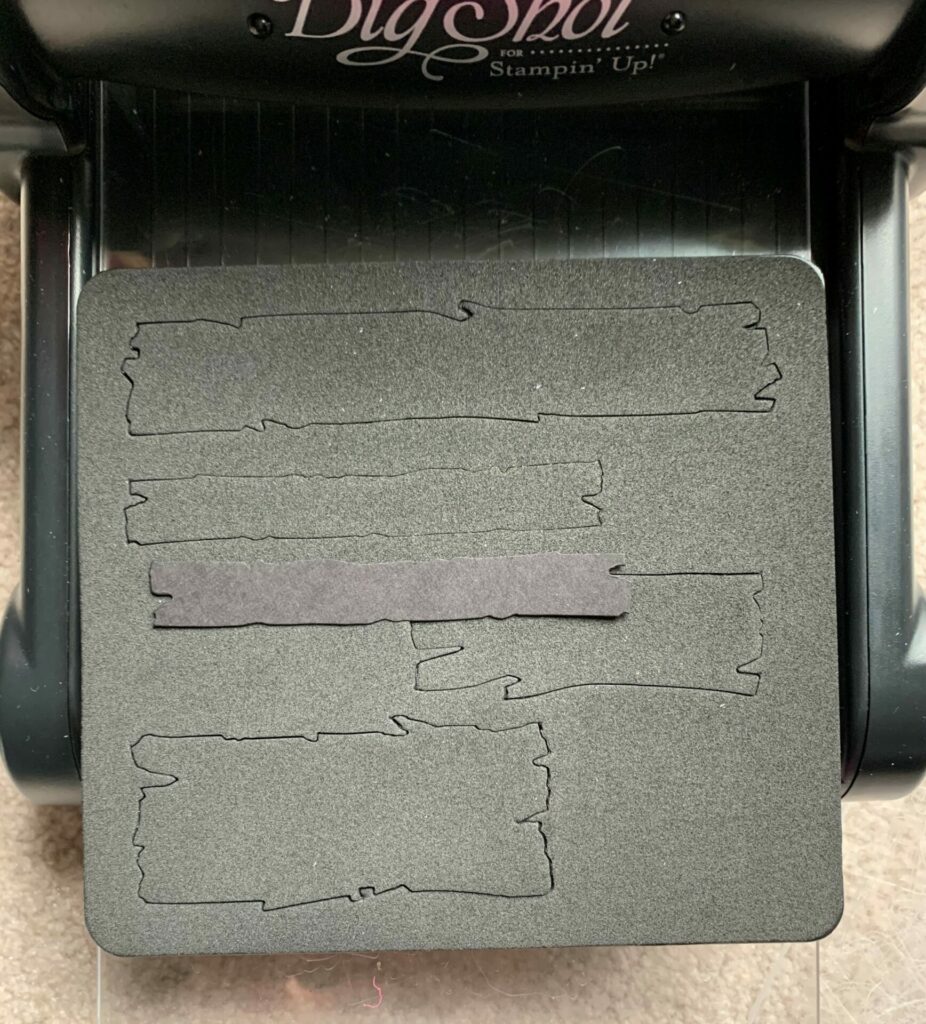
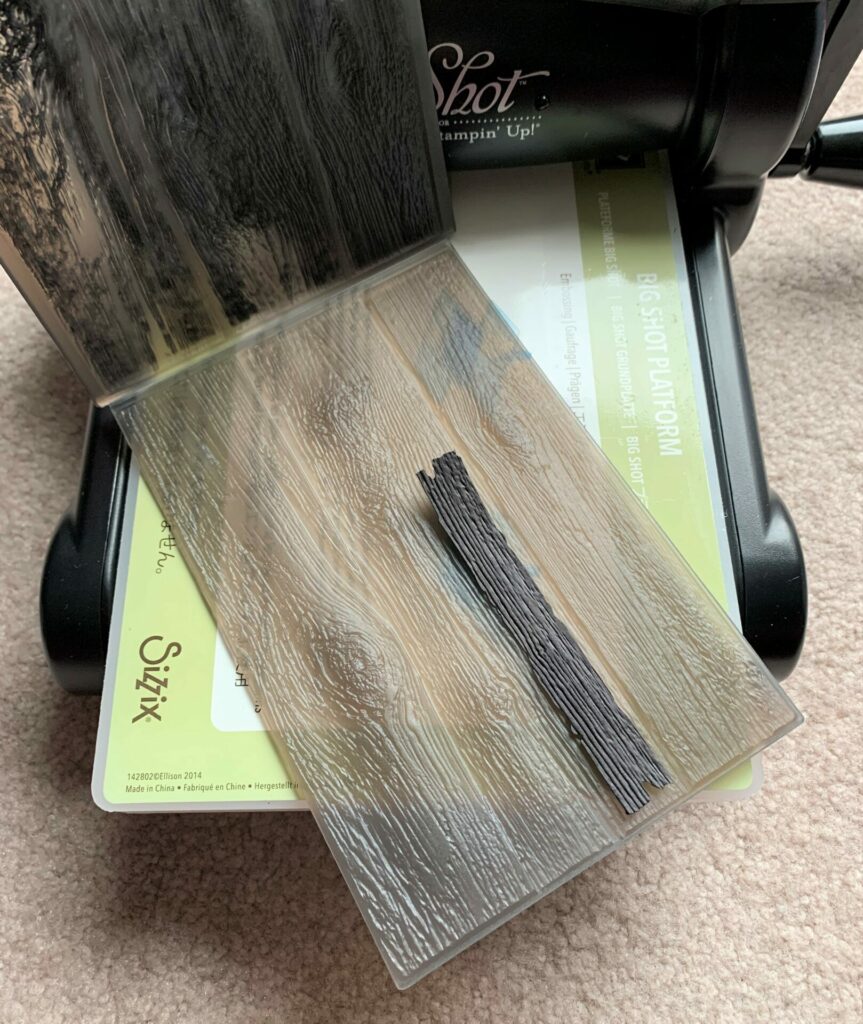
Making The Wood Plank
After that, it’s time to make the wood plank. This is the foundation the sentiment die cut will be attached to. For this part, you will need black cardstock, Sizzix Planks bigz die, Lumber 3D embossing folder, spray bottle with water, distress crayon, and a die cutting machine. Now I know that the Sizzix Planks bigz die is discontinued, so if you don’t have it, you could cut a strip of black cardstock to a size of 3¾in x ½in. Then, with scissors, you could cut out some notches and curves to make it look like a wood plank.
- Die cut the long thin plank from black cardstock.
- Mist the plank die cut with water and place it vertically in the lumber 3D embossing folder.
- Run it through the die cutting machine two times.
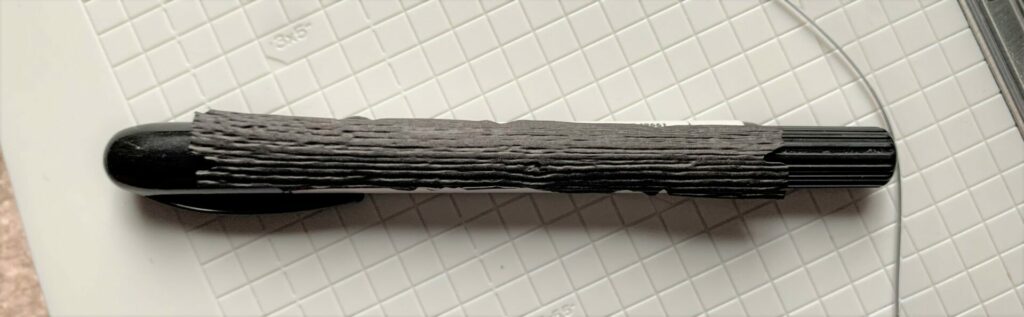
- Remove the plank from the folder and while it’s still damp mold it around the crayon and let it dry.
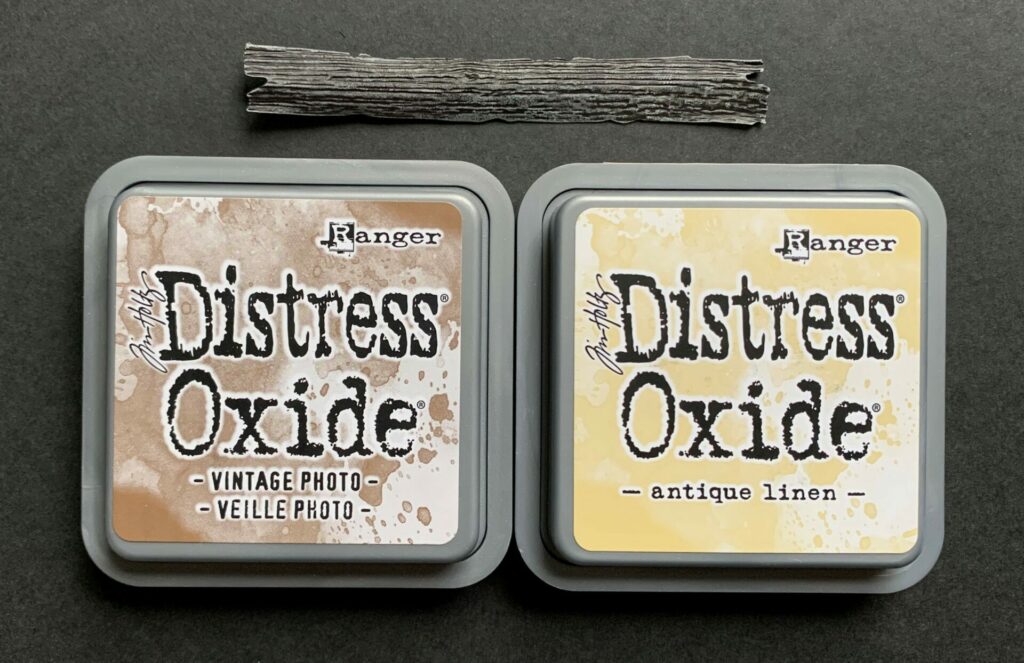
- Rub distress oxide ink in the shade vintage photo onto the high points of the plank using your finger. Do this using a light hand.
- Then, rub a layer of distress oxide ink in the shade antique linen onto some the high points of the plank. Concentrate mostly around the edges.
Making The Sentiment
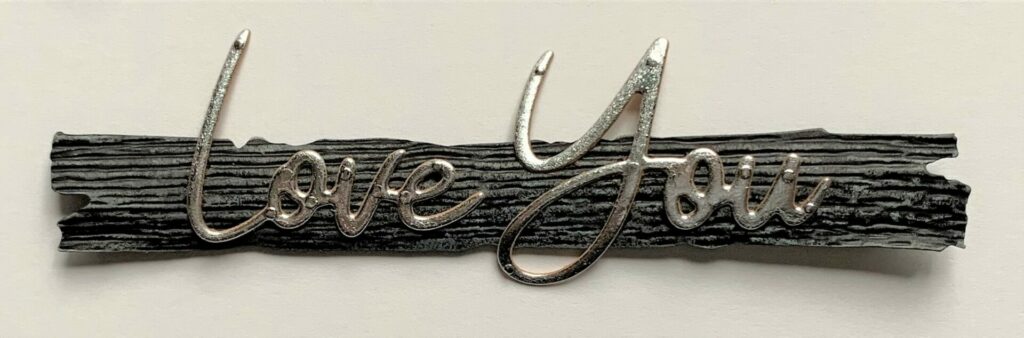
Following that, I die cut the sentiment “Love You” from the Sizzix silver texture roll. I used the Simply Perfect Mix & Match Sentiments die set from Spellbinders.
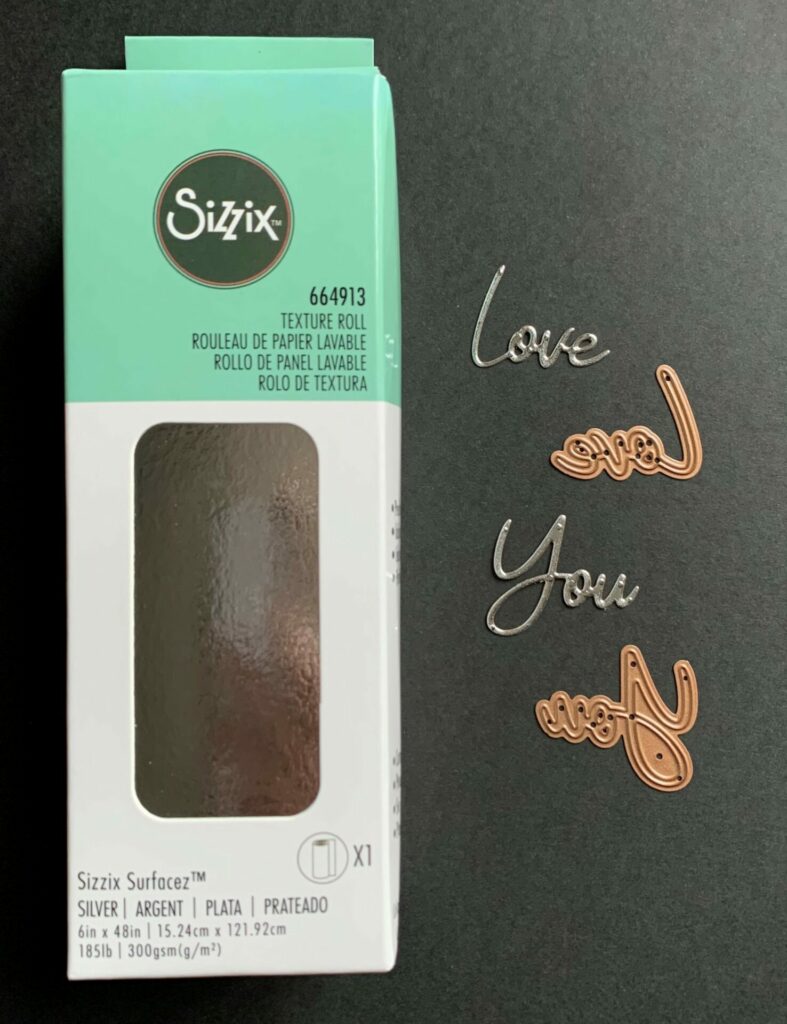
- Position the dies face down on the silver texture roll and secured them with some washi tape.
- Run it through your die cutting machine.
- Weed out the excess pieces of paper and poke out the die cuts from the dies with a craft pick.
- Apply distress collage medium to the back of the “Love You” die cuts and adhere them to the center of the wood plank.
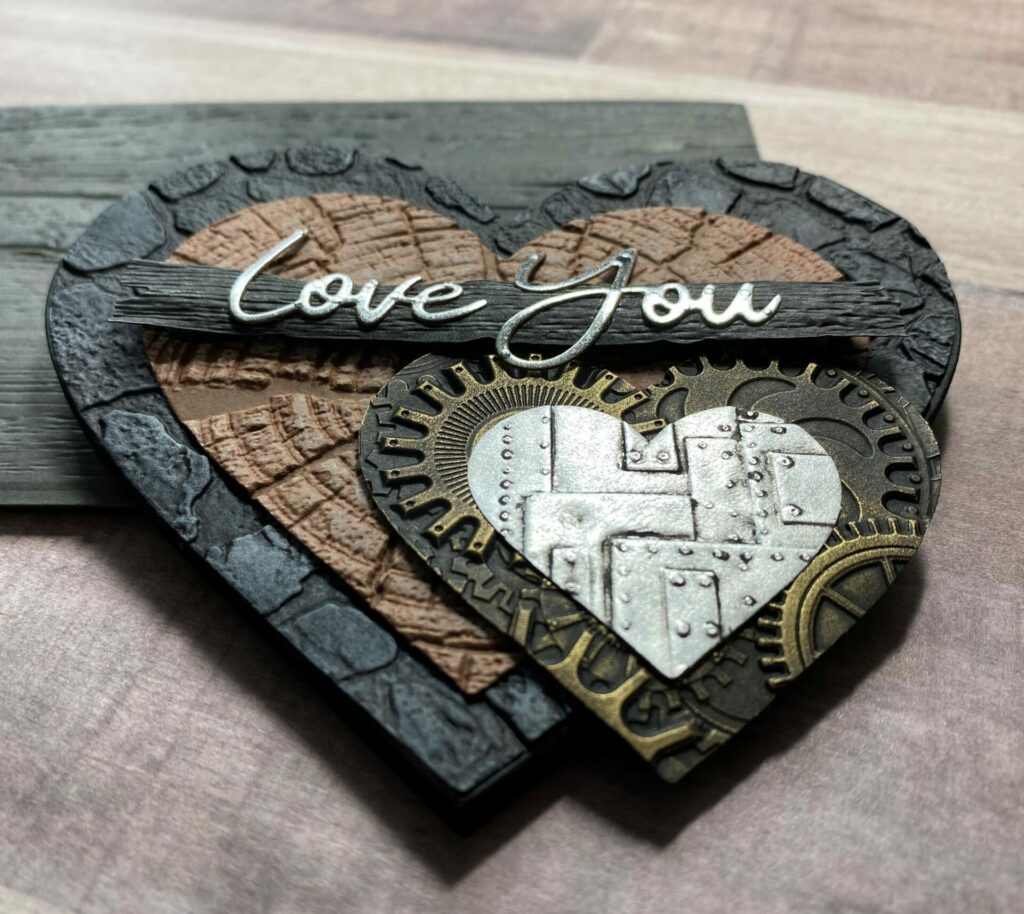
Putting It All Together
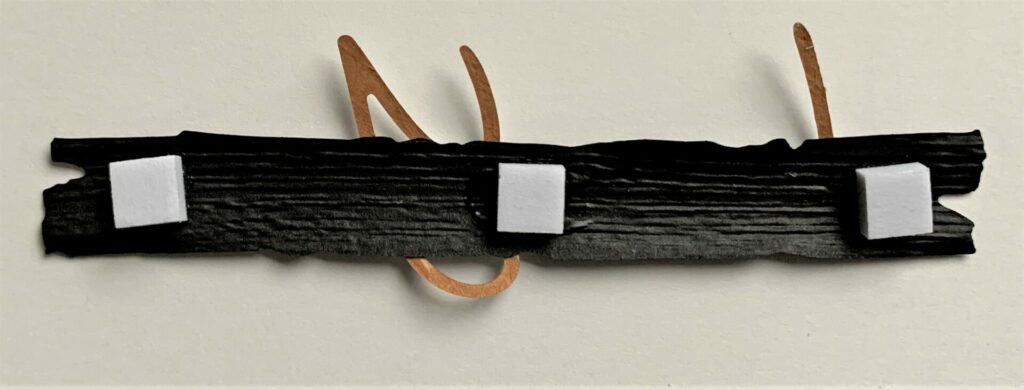
Finally, it’s time to put the layered hearts valentine all together. Firstly, put some foam squares on the back of the small heart duo. See foam square placement pictured below. I intentionally left the left side blank because it’s going to be hanging off the edge of the card.
Remove all the adhesive backings from the squares and adhere it to the front bottom right of the heart card base. See below for placement reference.

Then, stack a double layer of foam squares on the back of the sentiment plank. Doing this creates more depth on the card.
Lastly, adhere the “Love You” sentiment plank to the front center of the layered hearts valentine.
Finishing The Inside & Back Of The Valentine
To finish off this card, I die cut two hearts using the second largest heart die from black cardstock. One is for the inside sentiment and the other is for the back of the card. These extra heart layers helps to provide stability and structure to the card. Otherwise the back of the card is too flimsy without these additional heart layers.
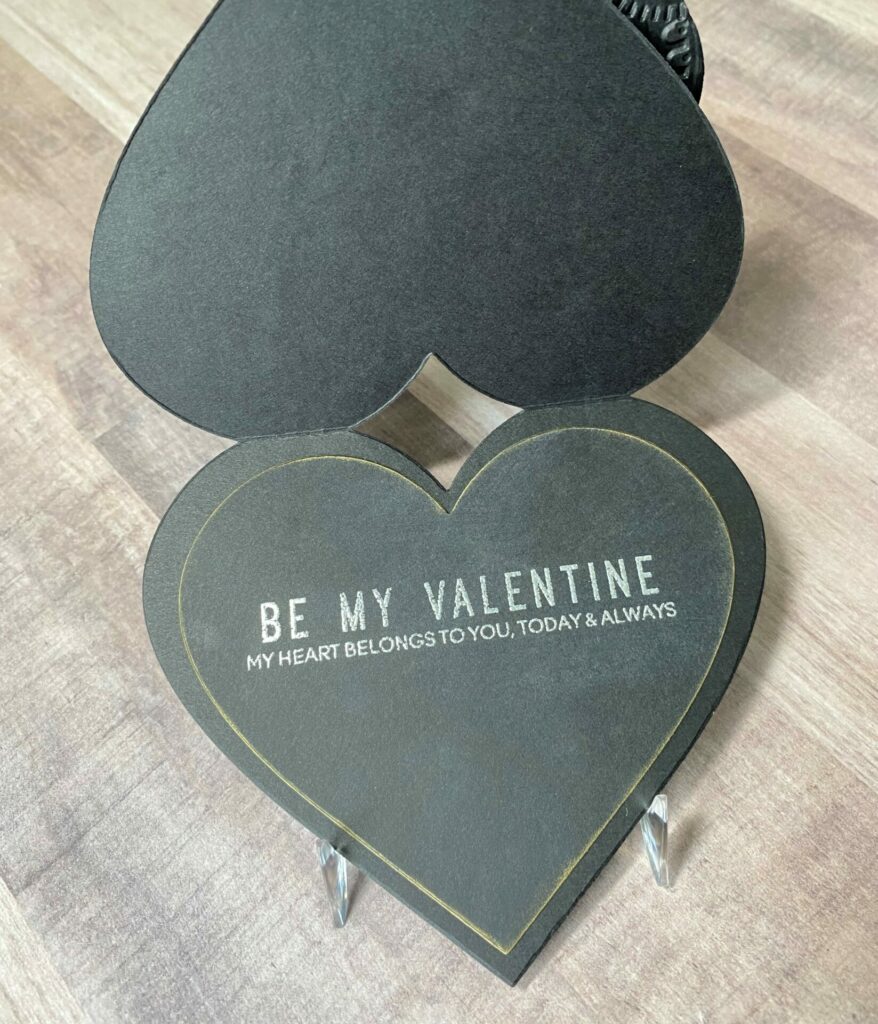
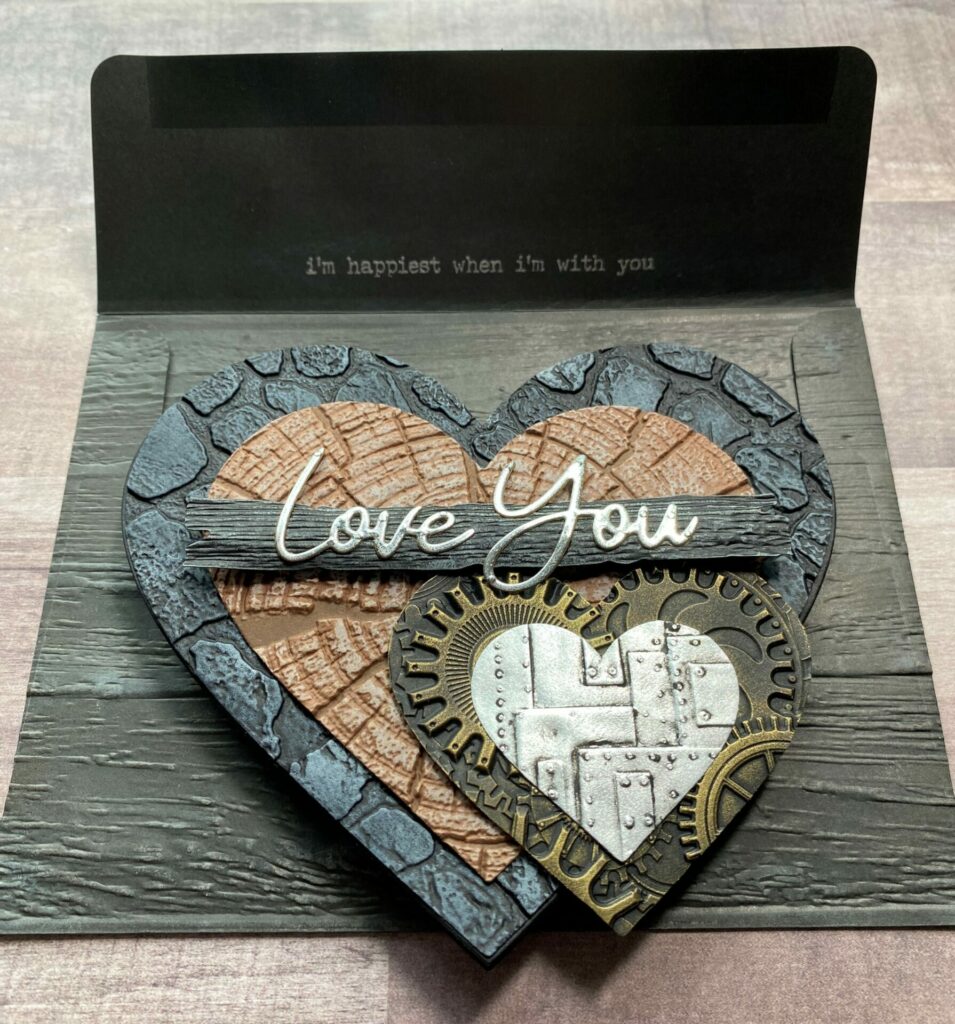
Inside Of The Card
On the inside of the card, I heat embossed the “Be My Valentine” sentiment from the Special Day Sentiment Duos stamp set by Heffy Doodle in silver. If you don’t have heat embossing supplies or quite simply don’t want to, you could instead just stamp the sentiment with distress oxide ink in the shade pumice stone. I also added a little bit of gold luster wax to the edges of the heart with my finger. Then, I adhered the heart to the inside of the card.
Back Of The Card
For the back of my cards, I always like to add a “made with…” sentiment. Feel free to skip this step if you want. Here I used the “made with blood, sweat, and tears” sentiment from Hampton Arts #SC0763. I like to use this sentiment on all my more masculine cards.
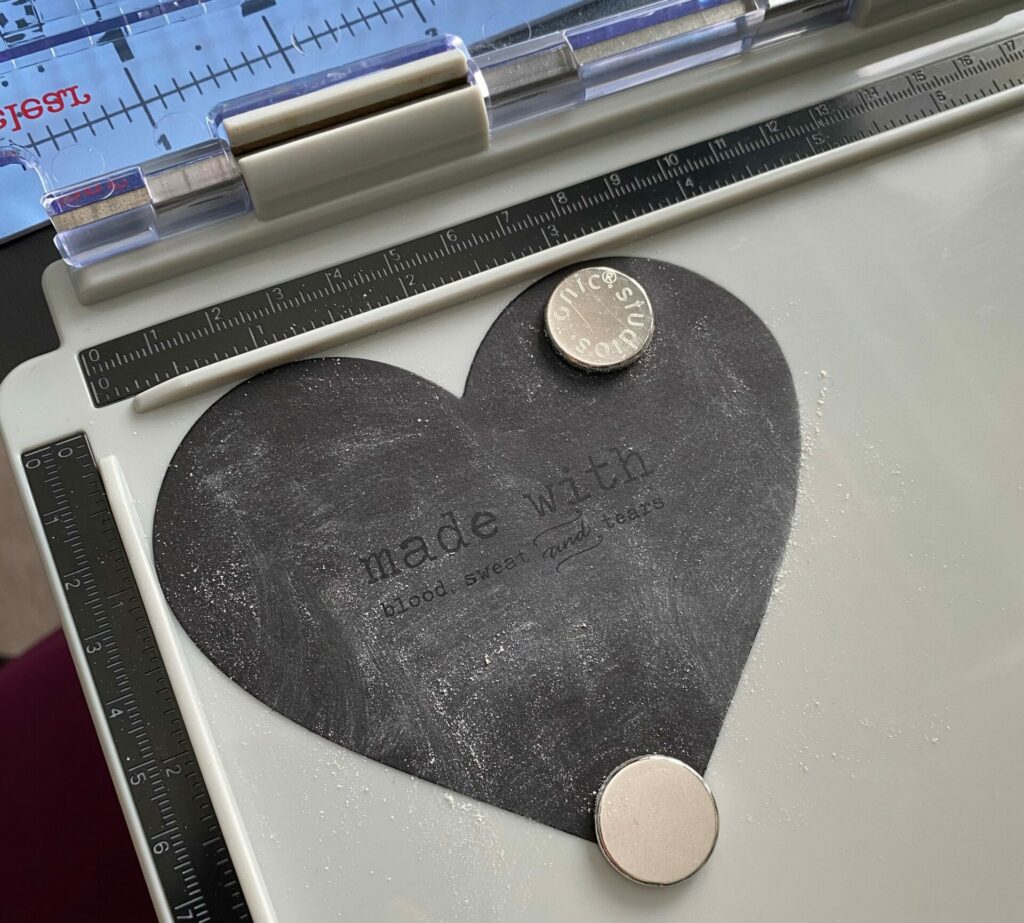
I heat embossed it in silver on the heart that was die cut earlier. But, like I said above, instead of using embossing powder you could use pumice stone distress oxide ink if you wanted. Then, I adhered the heart to the back of the card.
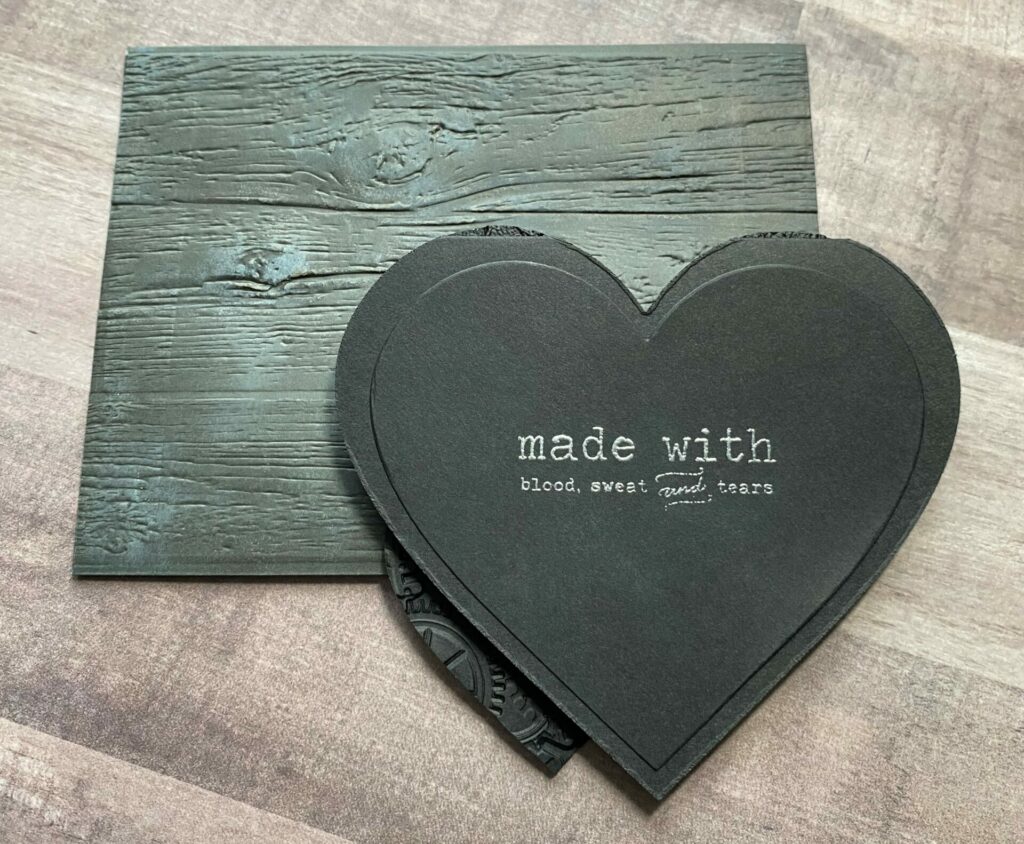
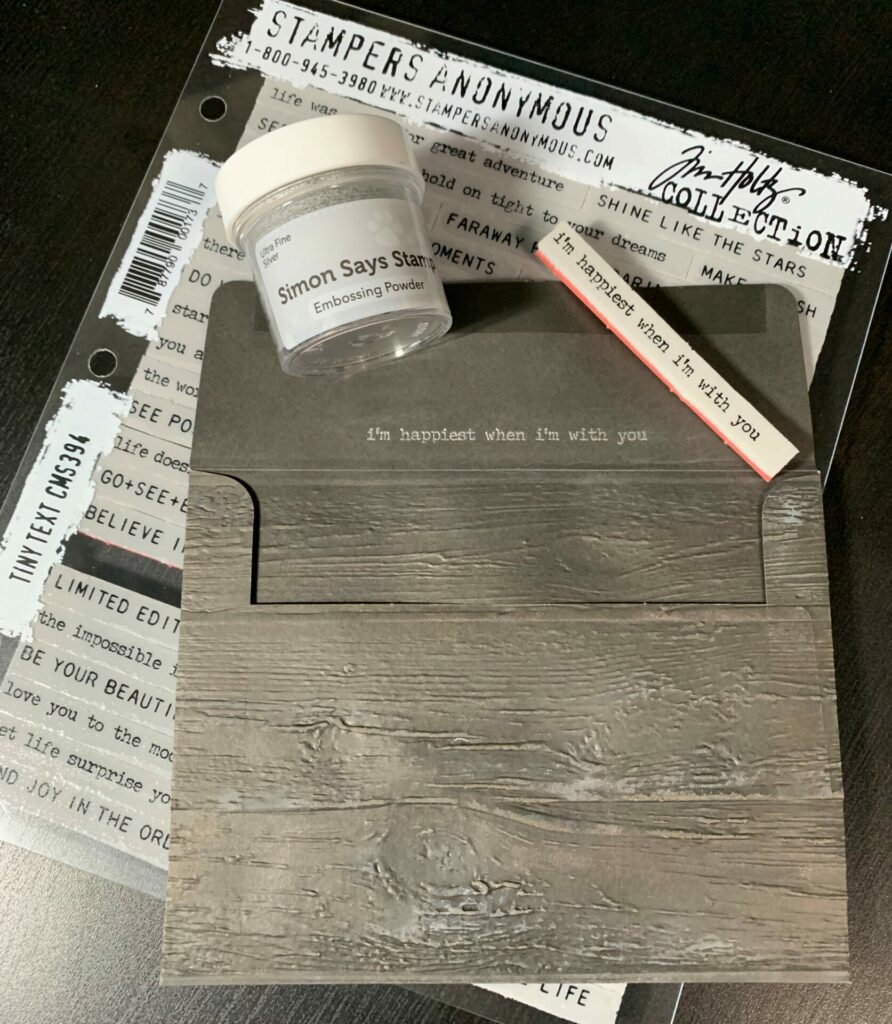
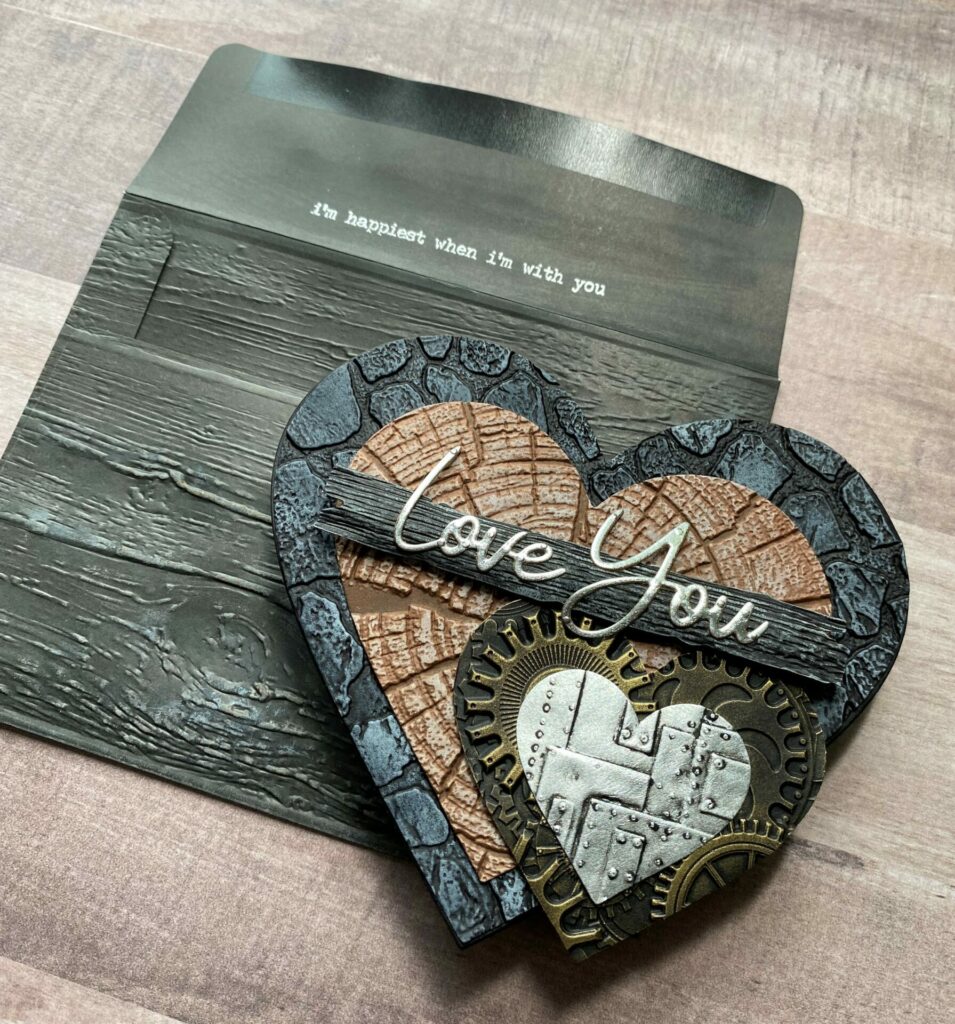
Envelope For The Layered Hearts Valentine
Lastly, to make the envelope you’ll need a black A2 envelope, lumber 3D embossing folder, Big Shot, brayer, distress oxide ink in the shade vintage photo and antique linen, stamping tool/acrylic block, anti-static tool, sentiment stamp, embossing ink, silver fine detail embossing powder, sheet of copy paper, and embossing gun. But if you don’t want to go through the fuss of using embossing powder, you could instead just stamp the sentiment with distress oxide ink in the shade pumice stone.
Making The Envelope
- Firstly, place envelope in the center of the lumber 3D embossing folder. Do NOT mist with water.
- Run it through the die cutting machine once.
- Using a brayer, roll distress oxide ink in the shade vintage photo over the high points of the front and back of the envelope. (Mask off the inside of the envelope with a piece of scrap paper.)
- Then, rub distress oxide ink in the shade antique linen over the wood knots using your finger.
- Dry the ink with a heat tool or let it dry overnight.
- Put envelope in the stamp platform with the back side facing up.
- Rub the anti-static pouch on the inside of the envelope flap.
- Position the sentiment stamp on the inside flap of the envelope and close your stamping tool. I used the “I’m happiest when I’m with you” Stampers Anonymous stamp from the Tiny Text CMS394 set by Tim Holtz. Feel free to use any sentiment stamp you want.
- Ink the stamp with embossing ink and close the stamping tool to stamp the sentiment.
- Remove the envelope from the stamping tool and pour silver fine detail embossing powder over the stamped sentiment. Tap off the powder over a sheet of copy paper and pour the extra powder back into the jar.
- Brush away any stray embossing powder with a small brush.
- Lastly, emboss the powder with a embossing gun. Hold the envelope in the air and heat the sentiment from the back side of the paper. This prevents over embossing and scorching of the shiny metallic finish. Pro tip: keep the heat gun moving!

Layered Hearts Valentine Complete!
Congratulations! You have now completed your layered hearts valentine card! I hope you enjoyed this tutorial and have as much fun making it as I did. If you do make this card, please use the #grovecrafted and tag me on Instagram. I’d love to see what you’ve created! Thanks for stopping by and I hope you found some new inspiration to create.

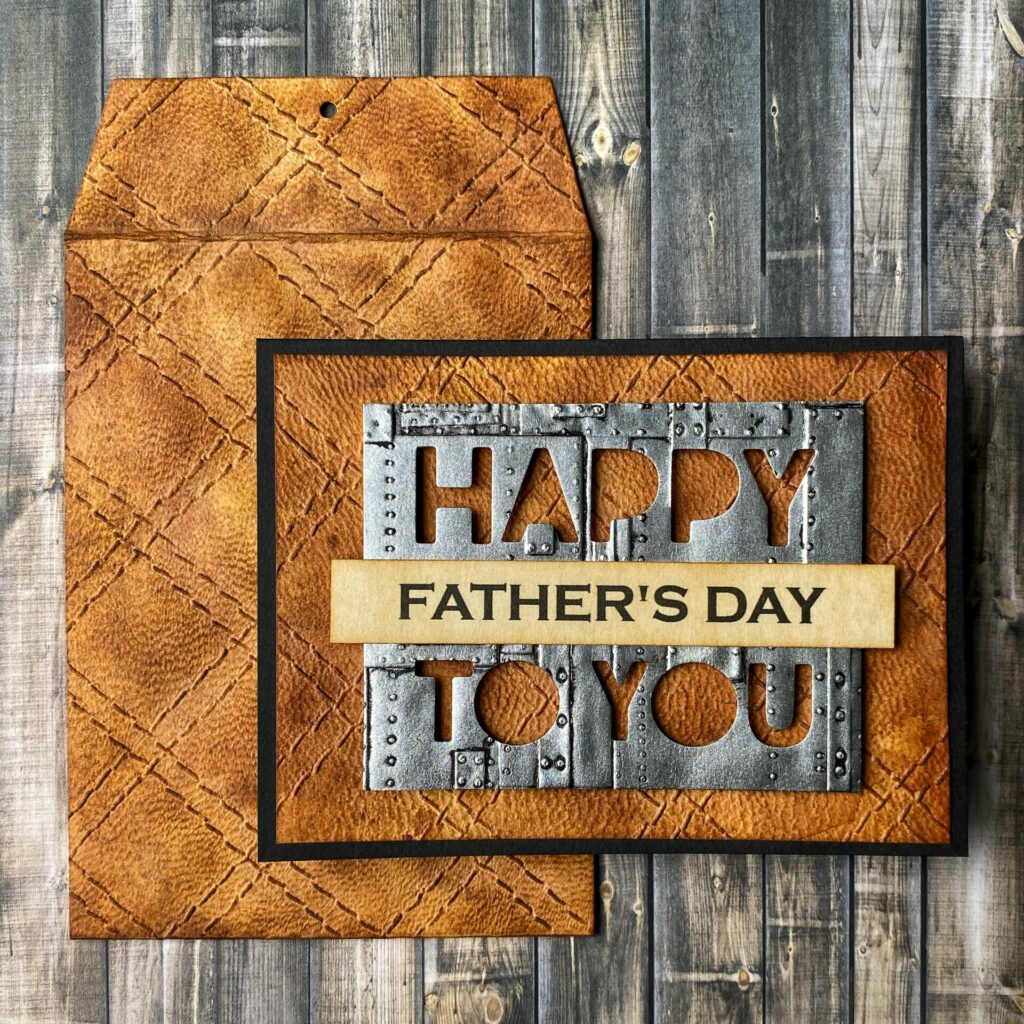
If you enjoyed making this manly layered hearts valentine, you might want to check out another one of my masculine card tutorials. It’s called Quilted Leather Card and it can be a birthday card or a Father’s Day card.


What a great project! Love your tutorial style.
Thanks so much Karen! I’m glad your enjoying the tutorials.